
Setup Manual
Page 2
Table of Contents Chapter 1: Introduction 1 1.1 Before You Start 1 1.2 Package Checklist 1 1.3 Motherboard Features 2 1.4 Rear Panel Connectors 3 1.5 Motherboard Layout 4 Chapter 2: Hardware Installation 5 2.1 Installing Central Processing Unit (CPU 5 2.2 FAN Headers 7 2.3 Installing System Memory 8 2.4 Connectors and Slots 10 Chapter 3: Headers & Jumpers Setup 12 3.1 How to Setup Jumpers 12 3.2 Detail Settings 12 Chapter 4: RAID Functions ...
Table of Contents Chapter 1: Introduction 1 1.1 Before You Start 1 1.2 Package Checklist 1 1.3 Motherboard Features 2 1.4 Rear Panel Connectors 3 1.5 Motherboard Layout 4 Chapter 2: Hardware Installation 5 2.1 Installing Central Processing Unit (CPU 5 2.2 FAN Headers 7 2.3 Installing System Memory 8 2.4 Connectors and Slots 10 Chapter 3: Headers & Jumpers Setup 12 3.1 How to Setup Jumpers 12 3.2 Detail Settings 12 Chapter 4: RAID Functions ...

Setup Manual
Page 4
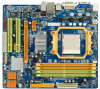
Motherboard Manual 1.3 MOTHERBOARD FEATURES SPEC Socket AM2+ / AM2 AMD 64 Architecture enables 32 and 64 bit CPU AMD Athlon 64 / Athlon 64 FX / Athlon 64 x2 computing / Sempron / Phenom processors Supports Hyper Transport 3.0 and Cool=n=Quiet Support HyperTransport 3.0 FSB Supports up to ...Mode DDR2 memory module Max Memory Capacity 8GB Supports DDR2 533 / 667 / 800 Each DIMM supports 256/512MB/1GB/2GB Supports DDR2 1066 (for AM2+ CPU only) DDR2 Registered DIMM and ECC DIMM is not supported Graphics Integrated in AMD 780G Chipset Max Shared Video Memory is 512MB DX10 support HDCP...
Motherboard Manual 1.3 MOTHERBOARD FEATURES SPEC Socket AM2+ / AM2 AMD 64 Architecture enables 32 and 64 bit CPU AMD Athlon 64 / Athlon 64 FX / Athlon 64 x2 computing / Sempron / Phenom processors Supports Hyper Transport 3.0 and Cool=n=Quiet Support HyperTransport 3.0 FSB Supports up to ...Mode DDR2 memory module Max Memory Capacity 8GB Supports DDR2 533 / 667 / 800 Each DIMM supports 256/512MB/1GB/2GB Supports DDR2 1066 (for AM2+ CPU only) DDR2 Registered DIMM and ECC DIMM is not supported Graphics Integrated in AMD 780G Chipset Max Shared Video Memory is 512MB DX10 support HDCP...
Setup Manual
Page 5
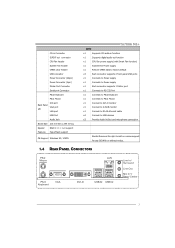
...(W) x 244 mm(L) Special RAID 0 / 1 / 1+0 support Features HyperFlash support OS Support Windows XP / VISTA TA780G M2+ SPEC x1 Supports CD audio-in function x1 Supports digital audio out function x1 CPU Fan power supply (with Smart Fan function) x1 System Fan Power supply x1 Restore CMOS data to factory... to D-SUB monitor x1 Connect to RJ-45 ethernet cable x4 Connect to USB devices x3 Provide Audio-In/Out and microphone connection Biostar Reserves the right to add or remove support for any OS With or without notice. 1.4 REAR PANEL CONNECTORS PS/2 Mouse PS/2 Keyboard...
...(W) x 244 mm(L) Special RAID 0 / 1 / 1+0 support Features HyperFlash support OS Support Windows XP / VISTA TA780G M2+ SPEC x1 Supports CD audio-in function x1 Supports digital audio out function x1 CPU Fan power supply (with Smart Fan function) x1 System Fan Power supply x1 Restore CMOS data to factory... to D-SUB monitor x1 Connect to RJ-45 ethernet cable x4 Connect to USB devices x3 Provide Audio-In/Out and microphone connection Biostar Reserves the right to add or remove support for any OS With or without notice. 1.4 REAR PANEL CONNECTORS PS/2 Mouse PS/2 Keyboard...

Setup Manual
Page 7
The CPU will fit only in the correct orientation. 5 Step 3: Look for the white triangle on socket, and the gold triangle on CPU should point towards this white triangle. TA780G M2+ CHAPTER 2: HARDWARE INSTALLATION 2.1 INSTALLING CENTRAL PROCESSING UNIT (CPU) Step 1: Remove the socket protection cap. Step 2: Pull the lever toward direction A from the socket and then raise the lever up to a 90-degree angle.
The CPU will fit only in the correct orientation. 5 Step 3: Look for the white triangle on socket, and the gold triangle on CPU should point towards this white triangle. TA780G M2+ CHAPTER 2: HARDWARE INSTALLATION 2.1 INSTALLING CENTRAL PROCESSING UNIT (CPU) Step 1: Remove the socket protection cap. Step 2: Pull the lever toward direction A from the socket and then raise the lever up to a 90-degree angle.

Setup Manual
Page 8
Motherboard Manual Step 4: Hold the CPU down firmly, and then close the lever toward direct B to boot your system, and update the latest BIOS from our website for AM2+ CPUs support. 6 ... new AM2+ CPUs. In this case, please install one standard AM2 CPU to complete the installation. Step 5: Put the CPU Fan on the CPU and buckle it. Connect the CPU FAN power cable to boot while using AM2+ CPUs. Due to the latest CPU transition, you may encounter the situation that the new system failed...
Motherboard Manual Step 4: Hold the CPU down firmly, and then close the lever toward direct B to boot your system, and update the latest BIOS from our website for AM2+ CPUs support. 6 ... new AM2+ CPUs. In this case, please install one standard AM2 CPU to complete the installation. Step 5: Put the CPU Fan on the CPU and buckle it. Connect the CPU FAN power cable to boot while using AM2+ CPUs. Due to the latest CPU transition, you may encounter the situation that the new system failed...

Setup Manual
Page 9
JCFAN1: CPU Fan Header 4 1 Pin Assignment 1 Ground 2 +12V 3 FAN RPM rate sense 4 Smart Fan Control (By Fan) JSFAN1: System Fan Header 13 Pin Assignment 1 Ground 2 +12V 3 FAN RPM rate sense Note: The JCFAN1 supports 4-pin head connector. TA780G M2+ 2.2 FAN HEADERS These fan headers support cooling-fans built in the computer. The fan cable...
JCFAN1: CPU Fan Header 4 1 Pin Assignment 1 Ground 2 +12V 3 FAN RPM rate sense 4 Smart Fan Control (By Fan) JSFAN1: System Fan Header 13 Pin Assignment 1 Ground 2 +12V 3 FAN RPM rate sense Note: The JCFAN1 supports 4-pin head connector. TA780G M2+ 2.2 FAN HEADERS These fan headers support cooling-fans built in the computer. The fan cable...

Setup Manual
Page 15
TA780G M2+ JATXPWR1: ATX Power Source Connector This connector allows user to connect 24-pin power connector on the ATX power supply. 12 24 Pin Assignment 13 +3.... 7 Ground 8 PW_OK 9 Standby Voltage+5V 10 +12V 11 +12V 12 +3.3V JATXPWR2: ATX Power Source Connector By connecting this connector, it will provide +12V to CPU power circuit. 4 3 12 Pin Assignment 1 +12V 2 +12V 3 Ground 4 Ground 13
TA780G M2+ JATXPWR1: ATX Power Source Connector This connector allows user to connect 24-pin power connector on the ATX power supply. 12 24 Pin Assignment 13 +3.... 7 Ground 8 PW_OK 9 Standby Voltage+5V 10 +12V 11 +12V 12 +3.3V JATXPWR2: ATX Power Source Connector By connecting this connector, it will provide +12V to CPU power circuit. 4 3 12 Pin Assignment 1 +12V 2 +12V 3 Ground 4 Ground 13

Setup Manual
Page 24
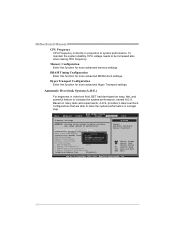
..., American Megatrends, Inc. 22 OverClock Navigator [Normal] =========== Automate OverClock System =========== Auto OverClock System [V6-Tech Engine] Manual OverClock System CPU Overvoltage [StartUp] Memory Overvoltage [1.95V] Chipset Overvoltage [1.15V] HT Overvoltage [1.20V] CPU Frequency [200] > Memory Configuration > DRAM Timing Configuration > Hyper Transport Configuration Integrated Memory Test [Disabled] Options Normal Automate OverClock Manual OverClock...
..., American Megatrends, Inc. 22 OverClock Navigator [Normal] =========== Automate OverClock System =========== Auto OverClock System [V6-Tech Engine] Manual OverClock System CPU Overvoltage [StartUp] Memory Overvoltage [1.95V] Chipset Overvoltage [1.15V] HT Overvoltage [1.20V] CPU Frequency [200] > Memory Configuration > DRAM Timing Configuration > Hyper Transport Configuration Integrated Memory Test [Disabled] Options Normal Automate OverClock Manual OverClock...

Setup Manual
Page 25
... Overvoltage This function will increase memory stability when overclocking. TA780G M2+ Manual Overclock System (M.O.S.) MOS is increased. Memory Overvoltage This function will increase CPU stability when overclocking the HT ratio. 23 However, the CPU temperature will increase CPU stability when overclocking. CPU Overvoltage This function will increase when CPU voltage is designed for experienced overclock users. Chipset...
... Overvoltage This function will increase memory stability when overclocking. TA780G M2+ Manual Overclock System (M.O.S.) MOS is increased. Memory Overvoltage This function will increase CPU stability when overclocking the HT ratio. 23 However, the CPU temperature will increase CPU stability when overclocking. CPU Overvoltage This function will increase when CPU voltage is designed for experienced overclock users. Chipset...
Setup Manual
Page 26
... more advanced memory settings. Based on many tests and experiments, A.O.S. To maintain the system stability, CPU voltage needs to raise the system performance in proportion to system performance. Memory Configuration Enter this function... Automate OverClock System =========== Auto OverClock System [V6-TOepcthionEsngine] Manual OverClockNoSrymsatlem CPU Overvoltage Au[SttoamrattUep]OverClock Memory Overvoltage Ma[1n.u9a5lV]OverClock Chipset Overvoltage [1.15V] HT Overvoltage [1.20V] CPU Frequency [200] > Memory Configuration > DRAM Timing Configuration > Hyper Transport...
... more advanced memory settings. Based on many tests and experiments, A.O.S. To maintain the system stability, CPU voltage needs to raise the system performance in proportion to system performance. Memory Configuration Enter this function... Automate OverClock System =========== Auto OverClock System [V6-TOepcthionEsngine] Manual OverClockNoSrymsatlem CPU Overvoltage Au[SttoamrattUep]OverClock Memory Overvoltage Ma[1n.u9a5lV]OverClock Chipset Overvoltage [1.15V] HT Overvoltage [1.20V] CPU Frequency [200] > Memory Configuration > DRAM Timing Configuration > Hyper Transport...

Setup Manual
Page 27
Main Advanced PCIPnP BIOS SETUP UTILITY Boot Chipset T-Series TA780G M2+ Exit T-Series Settings WARNING: Setting wrong values in below sections may cause system to malfunction. ... Navigator [Automate OverClock] =========== Automate OverClock System =========== Auto OverClock System [V6-Tech Engine] Manual OverClock System CPU Overvoltage [StartUp] Memory Overvoltage [1.95V] Chipset Overvoltage [1.15V] HT Overvoltage [1.20V] CPU Frequency [200] > Memory Configuration > DRAM Timing Configuration > Hyper Transport Configuration Integrated Memory Test [Disabled] ...
Main Advanced PCIPnP BIOS SETUP UTILITY Boot Chipset T-Series TA780G M2+ Exit T-Series Settings WARNING: Setting wrong values in below sections may cause system to malfunction. ... Navigator [Automate OverClock] =========== Automate OverClock System =========== Auto OverClock System [V6-Tech Engine] Manual OverClock System CPU Overvoltage [StartUp] Memory Overvoltage [1.95V] Chipset Overvoltage [1.15V] HT Overvoltage [1.20V] CPU Frequency [200] > Memory Configuration > DRAM Timing Configuration > Hyper Transport Configuration Integrated Memory Test [Disabled] ...
Setup Manual
Page 28
... malfunction. Motherboard Manual Notices: 1. OverClock Navigator [Normal] =========== Automate OverClock System =========== Auto OverClock System [V6-Tech Engine] Manual OverClock System CPU Overvoltage [StartUp] Memory Overvoltage [1.95V] Chipset Overvoltage [1.15V] HT Overvoltage [1.20V] CPU Frequency [200] > Memory Configuration > DRAM Timing Configuration > Hyper Transport Configuration Integrated Memory Test [Disabled] Options Normal Automate OverClock Manual OverClock...
... malfunction. Motherboard Manual Notices: 1. OverClock Navigator [Normal] =========== Automate OverClock System =========== Auto OverClock System [V6-Tech Engine] Manual OverClock System CPU Overvoltage [StartUp] Memory Overvoltage [1.95V] Chipset Overvoltage [1.15V] HT Overvoltage [1.20V] CPU Frequency [200] > Memory Configuration > DRAM Timing Configuration > Hyper Transport Configuration Integrated Memory Test [Disabled] Options Normal Automate OverClock Manual OverClock...

Setup Manual
Page 30
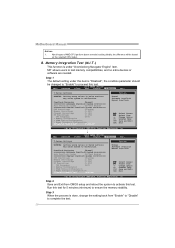
... General Help F10 Save and Exit ESC Exit vxx.xx (C)Copyright 1985-200x, American Megatrends, Inc. ↓ Advanced BIOS SETUP UTILITY Smart Fan Configuration CPU Smart Fan Smart Fan Calibration Control Mode Fan Ctrl OFF(oC) Fan Ctrl On(oC) Fan Ctrl Start value Fan Ctrl Sensitive [Disabled] When you... choice [Auto] ,[3Pin] or [4Pin], please run the calibration to control CPU/System Temperature vs. Smart Fan Function Smart Fan Function is always on whenever the system starts up. This is controlled automatically by...
... General Help F10 Save and Exit ESC Exit vxx.xx (C)Copyright 1985-200x, American Megatrends, Inc. ↓ Advanced BIOS SETUP UTILITY Smart Fan Configuration CPU Smart Fan Smart Fan Calibration Control Mode Fan Ctrl OFF(oC) Fan Ctrl On(oC) Fan Ctrl Start value Fan Ctrl Sensitive [Disabled] When you... choice [Auto] ,[3Pin] or [4Pin], please run the calibration to control CPU/System Temperature vs. Smart Fan Function Smart Fan Function is always on whenever the system starts up. This is controlled automatically by...
Setup Manual
Page 31
...starts to work under Smart Fan Function mode. Fan Ctrl Start Value When CPU/System temperature arrives to this item and then the BIOS will turn off. The range is from 1~127, with an interval of 1. TA780G M2+ Smart Fan Calibration Choose this set value. Control Mode This item provides ...several operation modes of 1. Fan Ctrl OFF(℃) If the CPU/System temperature is from 0~127, with an interval of CPU/System fan. The range is lower than the set...
...starts to work under Smart Fan Function mode. Fan Ctrl Start Value When CPU/System temperature arrives to this item and then the BIOS will turn off. The range is from 1~127, with an interval of 1. TA780G M2+ Smart Fan Calibration Choose this set value. Control Mode This item provides ...several operation modes of 1. Fan Ctrl OFF(℃) If the CPU/System temperature is from 0~127, with an interval of CPU/System fan. The range is lower than the set...
Setup Manual
Page 32
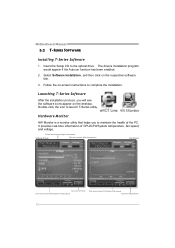
... to the optical drive. This area shows volt age information Voltage Panel This area shows CPU inf ormation Fan Panel Turn to Fan Panel This area shows CPU/System t emperat ure This area shows CPU/System f an speed Turn to launch T-Series utility. Motherboard Manual 5.2 T-SERIES SOFTWARE ...would appear if the Autorun function has been enabled. 2. Launching T-Series Software After the installation process, you to maintain the health of CPU/GPU/System temperature, fan speed, and voltage. Double-click the icon to Voltage P anel 30 It provides real-time information of the...
... to the optical drive. This area shows volt age information Voltage Panel This area shows CPU inf ormation Fan Panel Turn to Fan Panel This area shows CPU/System t emperat ure This area shows CPU/System f an speed Turn to launch T-Series utility. Motherboard Manual 5.2 T-SERIES SOFTWARE ...would appear if the Autorun function has been enabled. 2. Launching T-Series Software After the installation process, you to maintain the health of CPU/GPU/System temperature, fan speed, and voltage. Double-click the icon to Voltage P anel 30 It provides real-time information of the...
Setup Manual
Page 34
... a .txt file and send the file to our tech support with other e-mail application. If you will be saved to the following web http://www.biostar.com.tw/app/en-us/about/contact.php for getting our contact information. 32 Motherboard Manual Enter the file name and then click "Save". Open... Express as your system information while using eHot-Line service. Go to a .txt file. Your system information will see your system information including motherboard/BIOS/CPU/video/ device/OS information.
... a .txt file and send the file to our tech support with other e-mail application. If you will be saved to the following web http://www.biostar.com.tw/app/en-us/about/contact.php for getting our contact information. 32 Motherboard Manual Enter the file name and then click "Save". Open... Express as your system information while using eHot-Line service. Go to a .txt file. Your system information will see your system information including motherboard/BIOS/CPU/video/ device/OS information.
Setup Manual
Page 36
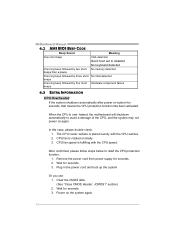
...not power on again. Plug in the power cord and boot up the system. Clear the CMOS data. (See "Close CMOS Header: JCMOS1" section) 2. The CPU cooler surface is rotated normally. 3. Remove the power cord from power supply for seconds. 3. Or you can: 1. Power on the system again. 34 Motherboard ... pause One long beep followed by three short No VGA detected beeps One long beep followed by four short Hardware component failure beeps 6.3 EXTRA INFORMATION CPU Overheated If the system shutdown automatically after power on system for seconds. 3. Wait for seconds, that means the...
...not power on again. Plug in the power cord and boot up the system. Clear the CMOS data. (See "Close CMOS Header: JCMOS1" section) 2. The CPU cooler surface is rotated normally. 3. Remove the power cord from power supply for seconds. 3. Or you can: 1. Power on the system again. 34 Motherboard ... pause One long beep followed by three short No VGA detected beeps One long beep followed by four short Hardware component failure beeps 6.3 EXTRA INFORMATION CPU Overheated If the system shutdown automatically after power on system for seconds. 3. Wait for seconds, that means the...

Bios Setup
Page 3
... Help description at the bottom right corner, and you will not be caused by wrong-settings. 2 Supported CPUs This AMI BIOS supports the AMD CPU. General Help Navigation Keys Notice z The default BIOS settings apply for that may be changed without notice. z The content of the selected item....at the top right corner, and this manual is providing a brief description of this manual is subject to be slightly different from this manual. TA780G M2+ BIOS Manual PCI Bus Support This AMI BIOS also supports Version 2.3 of the motherboard. In the BIOS setup utility, you can use these ...
... Help description at the bottom right corner, and you will not be caused by wrong-settings. 2 Supported CPUs This AMI BIOS supports the AMD CPU. General Help Navigation Keys Notice z The default BIOS settings apply for that may be changed without notice. z The content of the selected item....at the top right corner, and this manual is providing a brief description of this manual is subject to be slightly different from this manual. TA780G M2+ BIOS Manual PCI Bus Support This AMI BIOS also supports Version 2.3 of the motherboard. In the BIOS setup utility, you can use these ...
Bios Setup
Page 7
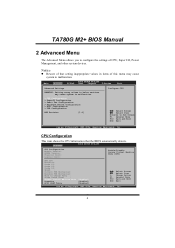
TA780G M2+ BIOS Manual 2 Advanced Menu The Advanced Menu allows you to configure the settings of this menu may cause system to Sub Screen F1 General ... (C)Copyright 1985-200x, American Megatrends, Inc. 6 Select Screen Select Item EnterGo to malfunction. > CPU Configuration > SuperIO Configuration > Smart Fan Configuration > Hardware Health Configuration > ACPI Configuration > USB Configuration MPS Revision [1.4] Configure CPU. CPU Configuration This item shows the CPU information that setting inappropriate values in below sections may cause system to malfunction. Main Advanced...
TA780G M2+ BIOS Manual 2 Advanced Menu The Advanced Menu allows you to configure the settings of this menu may cause system to Sub Screen F1 General ... (C)Copyright 1985-200x, American Megatrends, Inc. 6 Select Screen Select Item EnterGo to malfunction. > CPU Configuration > SuperIO Configuration > Smart Fan Configuration > Hardware Health Configuration > ACPI Configuration > USB Configuration MPS Revision [1.4] Configure CPU. CPU Configuration This item shows the CPU information that setting inappropriate values in below sections may cause system to malfunction. Main Advanced...

Bios Setup
Page 10
... item provides several operation modes of the fan. CPU Smart Fan This item allows you choice [Auto] ,[3Pin] or [4Pin], please run the calibration to define the Fan parameters for Smart Fan control Select Screen Select Item +- TA780G M2+ BIOS Manual Smart Fan Configuration Advanced BIOS SETUP ...UTILITY Smart Fan Configuration CPU Smart Fan Smart Fan Calibration Control Mode Fan Ctrl OFF(oC) Fan Ctrl On(oC) Fan Ctrl ...
... item provides several operation modes of the fan. CPU Smart Fan This item allows you choice [Auto] ,[3Pin] or [4Pin], please run the calibration to define the Fan parameters for Smart Fan control Select Screen Select Item +- TA780G M2+ BIOS Manual Smart Fan Configuration Advanced BIOS SETUP ...UTILITY Smart Fan Configuration CPU Smart Fan Smart Fan Calibration Control Mode Fan Ctrl OFF(oC) Fan Ctrl On(oC) Fan Ctrl ...


