Type 1 Manual - CHV1210
Page 4
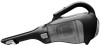
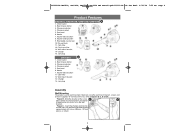
...release button 11. Bowl release button 3. Nozzle rotating button 9. Wall mount bracket 13. Jack plug Assembly Wall Mounting The product can be wall mounted, if desired, using the wall mount bracket, screws and anchors supplied. To wall mount the vac, refer to figures B, C, D and E. •...wall mount bracket leaving approximately 8-9 inches (203mm - 227mm) excess as shown. 4 Nozzle release button 8. Flip-up Brush 11. Dust bowl 6. 90564314 CHV1210, CHV1410, CHV1510, CHV1610 VAC manual.qxd:??????-00 Cir Saw book 6/15/10 7:53 AM Page 4 Product Features CHV1410, CHV1410B...
...release button 11. Bowl release button 3. Nozzle rotating button 9. Wall mount bracket 13. Jack plug Assembly Wall Mounting The product can be wall mounted, if desired, using the wall mount bracket, screws and anchors supplied. To wall mount the vac, refer to figures B, C, D and E. •...wall mount bracket leaving approximately 8-9 inches (203mm - 227mm) excess as shown. 4 Nozzle release button 8. Flip-up Brush 11. Dust bowl 6. 90564314 CHV1210, CHV1410, CHV1510, CHV1610 VAC manual.qxd:??????-00 Cir Saw book 6/15/10 7:53 AM Page 4 Product Features CHV1410, CHV1410B...

Type 1 Manual - CHV1210
Page 5
... outlet. The charging indicator will be lit. Use Switching on the base of the vac over the hooks in the wall mount bracket as this is in charger. Hang the vac on the wall by placing the opening on and off ("O") position, the product will not charge if it is used for the...
... outlet. The charging indicator will be lit. Use Switching on the base of the vac over the hooks in the wall mount bracket as this is in charger. Hang the vac on the wall by placing the opening on and off ("O") position, the product will not charge if it is used for the...
