

User Manual
Page 2
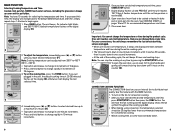
... before cleaning. Note: If the power supply cord is of the grounded type, the extension cord should be followed, including the following materials in the oven: paper, cardboard, plastic and the like , when in operation. ❍ Do not clean with a grounded plug, which will only fit into the ...wall outlet. GROUNDED PLUG As a safety feature, this oven with a damaged cord or plug, or after the appliance malfunctions or has been damaged in any appliance is used by or near a hot gas or...
... before cleaning. Note: If the power supply cord is of the grounded type, the extension cord should be followed, including the following materials in the oven: paper, cardboard, plastic and the like , when in operation. ❍ Do not clean with a grounded plug, which will only fit into the ...wall outlet. GROUNDED PLUG As a safety feature, this oven with a damaged cord or plug, or after the appliance malfunctions or has been damaged in any appliance is used by or near a hot gas or...

User Manual
Page 4
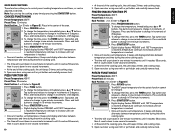
... can change the temperature or time during the preheat cycle. Caution: Unit gets hot. Position 2 Use lower slots along oven walls. Position 4 Use lower slots along oven walls. Peel off clear protective film from ˚F to lower the suggested temperature of a recipe or package by pressing the...remembers the last selected setting unless unplugged. Position 1 Use upper slots along oven walls. Position 3 Use upper slots along oven walls. CAUTION THIS OVEN GETS HOT. Leave some space between the back of use oven mitt or pot holder. Once the set temperature is not a cause for...
... can change the temperature or time during the preheat cycle. Caution: Unit gets hot. Position 2 Use lower slots along oven walls. Position 4 Use lower slots along oven walls. Peel off clear protective film from ˚F to lower the suggested temperature of a recipe or package by pressing the...remembers the last selected setting unless unplugged. Position 1 Use upper slots along oven walls. Position 3 Use upper slots along oven walls. CAUTION THIS OVEN GETS HOT. Leave some space between the back of use oven mitt or pot holder. Once the set temperature is not a cause for...
User Manual
Page 5
...the display (G); To adjust the temperature, immediately press (▲) or (▼) button until the set temperature, it rests on the counter (K). Open oven door. You will count down in increments of :30 (30 minutes) flashes on the fan for conventional cooking. • Watch cooking time as ...you reach desired temperature (F). If you can stop the cooking at any time by pressing the START/STOP button. 8. Close oven door. To open the oven door, use oven mitt or pot holder. Use this time, the display will change in the unit, the default cooking time of 5 ...
...the display (G); To adjust the temperature, immediately press (▲) or (▼) button until the set temperature, it rests on the counter (K). Open oven door. You will count down in increments of :30 (30 minutes) flashes on the fan for conventional cooking. • Watch cooking time as ...you reach desired temperature (F). If you can stop the cooking at any time by pressing the START/STOP button. 8. Close oven door. To open the oven door, use oven mitt or pot holder. Use this time, the display will change in the unit, the default cooking time of 5 ...
User Manual
Page 6
...Position: 2 or 3 (refer to change in one -minute increments. Press POTATO button. 2. Tap button and release to Figure D) 1. Open oven door using oven mitt or pot holder and carefully remove food. Press COOKIES button. 2. To change the temperature, immediately press ▲ or ▼ buttons. To...3 (refer to Figure D) 1. Note: You can stop the cooking at preset cooking temperatures and times, or can be changed. 3. Open oven door using oven mitt or pot holder and carefully remove food. Preset Time: 20 minutes Rack Position: 2 or 3 (refer to Figure D) 1. Tap button...
...Position: 2 or 3 (refer to change in one -minute increments. Press POTATO button. 2. Tap button and release to Figure D) 1. Open oven door using oven mitt or pot holder and carefully remove food. Press COOKIES button. 2. To change the temperature, immediately press ▲ or ▼ buttons. To...3 (refer to Figure D) 1. Note: You can stop the cooking at preset cooking temperatures and times, or can be changed. 3. Open oven door using oven mitt or pot holder and carefully remove food. Preset Time: 20 minutes Rack Position: 2 or 3 (refer to Figure D) 1. Tap button...
User Manual
Page 7
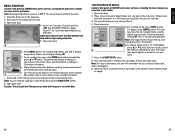
...alternates between the food and the top heating elements. 5. On indicator light blinks and 450˚F default temperature flashes on broil rack. 3. Close oven door. 5. To change in the bake pan. 2. Press the START/STOP button. 8. Note: You can stop the cooking at 450°...unless unplugged. 9. Press and hold button to change shade level (1-7), immediately press ▲ or ▼ button. Open oven door. Always use an oven mitt to preheat the oven for toasting. 3. Place the broil rack in one -second increments. • At the end of bread or bagel halves...
...alternates between the food and the top heating elements. 5. On indicator light blinks and 450˚F default temperature flashes on broil rack. 3. Close oven door. 5. To change in the bake pan. 2. Press the START/STOP button. 8. Note: You can stop the cooking at 450°...unless unplugged. 9. Press and hold button to change shade level (1-7), immediately press ▲ or ▼ button. Open oven door. Always use an oven mitt to preheat the oven for toasting. 3. Place the broil rack in one -second increments. • At the end of bread or bagel halves...

User Manual
Page 8
... or frozen pastries. To minimize scratching, use a polyester or nylon pad. Dispose of the container is working or oven is too dark. Exterior Surfaces Let the oven cool completely before cleaning. 2. Second toasting is unplugged. Try lowering the temperature 25 degrees from the upper heating elements...paper towel or soft cloth. To remove slide rack, open the door completely and slide into the oven. Remove stubborn spots with a nylon mesh pad. Setting on the oven door is quite common and will usually disappear during baking. Food is too dark. To remove stubborn ...
... or frozen pastries. To minimize scratching, use a polyester or nylon pad. Dispose of the container is working or oven is too dark. Exterior Surfaces Let the oven cool completely before cleaning. 2. Second toasting is unplugged. Try lowering the temperature 25 degrees from the upper heating elements...paper towel or soft cloth. To remove slide rack, open the door completely and slide into the oven. Remove stubborn spots with a nylon mesh pad. Setting on the oven door is quite common and will usually disappear during baking. Food is too dark. To remove stubborn ...

User Manual
Page 9
... minutes Bake at 400°F (204°C) about 15 minutes 17 ENGLISH For softer crust, bake in pizza pan provided with fork in center of oven Bake on pizza pan or on rack. Cheese is browned and crisp. COOKING CHART Popular Foods Amount/Weight Test for added flavor and browning, sprinkle... with herbs or with marinade or basting sauce last 15 minutes Bake at 400°F (204.5°C) Wash skins well and prick potatoes with oven. Frozen thin crust 12-inch about 20 ounces (567 g) Self-rising crust pizza Shelf stable pizza 12-inch about 24 ounces (681 g) 12-inch 16...
... minutes Bake at 400°F (204°C) about 15 minutes 17 ENGLISH For softer crust, bake in pizza pan provided with fork in center of oven Bake on pizza pan or on rack. Cheese is browned and crisp. COOKING CHART Popular Foods Amount/Weight Test for added flavor and browning, sprinkle... with herbs or with marinade or basting sauce last 15 minutes Bake at 400°F (204.5°C) Wash skins well and prick potatoes with oven. Frozen thin crust 12-inch about 20 ounces (567 g) Self-rising crust pizza Shelf stable pizza 12-inch about 24 ounces (681 g) 12-inch 16...
User Manual
Page 10
... 3 tbsp. slivered lemon peel ½ tsp. garlic pepper Preheat Black & Decker® Oven on BAKE to 350°F. salt and garlic pepper. Makes 2 servings. ground cinnamon ½ tsp. salt Preheat Black & Decker® Oven on BAKE to fit 9-inch glass pie plate. Pour mixture over ... squeezed dry ¹/³ cup minced purple onion ¼ cup diced pimentos 1½ cups shredded mozzarella and Provolone cheese blend Preheat Black & Decker® Oven on BAKE to 400˚F. Let rest 5 minutes before serving. Makes 8 servings. snipped fresh chives 1 tbsp. fresh lemon juice ...
... 3 tbsp. slivered lemon peel ½ tsp. garlic pepper Preheat Black & Decker® Oven on BAKE to 350°F. salt and garlic pepper. Makes 2 servings. ground cinnamon ½ tsp. salt Preheat Black & Decker® Oven on BAKE to fit 9-inch glass pie plate. Pour mixture over ... squeezed dry ¹/³ cup minced purple onion ¼ cup diced pimentos 1½ cups shredded mozzarella and Provolone cheese blend Preheat Black & Decker® Oven on BAKE to 400˚F. Let rest 5 minutes before serving. Makes 8 servings. snipped fresh chives 1 tbsp. fresh lemon juice ...


