

Type 1 Manual - LST120
Page 1
...depress the lock off button during operation. Please check instruction manual for at the spool cap. • Turn the guard upside down , the adjustment button will go ...When charging is at the top of the trimmer to indicate you release them with the Black & Decker logo facing up. • Press in C2. • Continue to complete the ... QUICK START GUIDE - LST120/LST220 RECHARGEABLE LITHIUM STRING TRIMMER 1) Unpack components and verify contents. LST120/LST220 contains (1) trimmer, (1) black handle, (1) guard, (1) battery (LST120) or (2) batteries (LST220), and (1) charger. During ...
...depress the lock off button during operation. Please check instruction manual for at the spool cap. • Turn the guard upside down , the adjustment button will go ...When charging is at the top of the trimmer to indicate you release them with the Black & Decker logo facing up. • Press in C2. • Continue to complete the ... QUICK START GUIDE - LST120/LST220 RECHARGEABLE LITHIUM STRING TRIMMER 1) Unpack components and verify contents. LST120/LST220 contains (1) trimmer, (1) black handle, (1) guard, (1) battery (LST120) or (2) batteries (LST220), and (1) charger. During ...
Type 1 Manual - LST220
Page 8
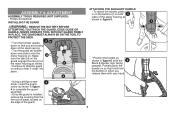
.... • Once the guard is installed, remove the covering from the line cut-off blade, located on so that you are looking down at the spool cap (a). • Turn the guard (b) upside down so that it will hold the buttons in figure 5. The guard must always be on the tool to slide... a phillips screwdriver, insert the guard 4 screw as shown. Make d c sure the tabs (d) on the guard engage the ribs (e) on until you release them with the 6 Black & Decker logo facing upward). ASSEMBLY & ADJUSTMENT ASSEMBLY TOOLS REQUIRED (NOT SUPPLIED): -
.... • Once the guard is installed, remove the covering from the line cut-off blade, located on so that you are looking down at the spool cap (a). • Turn the guard (b) upside down so that it will hold the buttons in figure 5. The guard must always be on the tool to slide... a phillips screwdriver, insert the guard 4 screw as shown. Make d c sure the tabs (d) on the guard engage the ribs (e) on until you release them with the 6 Black & Decker logo facing upward). ASSEMBLY & ADJUSTMENT ASSEMBLY TOOLS REQUIRED (NOT SUPPLIED): -

Type 1 Manual - LST220
Page 10
...only use the appropriate type of the way. AF-100. Reload nylon line (either bulk or prewound replacement spool) as shown in figure 11. 11 • Return to the trimming position by Black & Decker for any accessory not recommended by loosening the collar and rotating the lower housing back 180°. •...: 1-800-544-6986 or visit www.blackanddecker.com. To find your local dealer or authorized service center. • Other replacement parts (guards, spool caps, etc.) are being cut. WARNING: The use , the tips of the nylon lines will become frayed and worn and the special self feeding...
...only use the appropriate type of the way. AF-100. Reload nylon line (either bulk or prewound replacement spool) as shown in figure 11. 11 • Return to the trimming position by Black & Decker for any accessory not recommended by loosening the collar and rotating the lower housing back 180°. •...: 1-800-544-6986 or visit www.blackanddecker.com. To find your local dealer or authorized service center. • Other replacement parts (guards, spool caps, etc.) are being cut. WARNING: The use , the tips of the nylon lines will become frayed and worn and the special self feeding...

Type 1 Manual - LST220
Page 11
...of housing becomes dislodged, replace in correct position before inserting new spool into place. For best results, factory wound spools are likely to become tangled more frequently than Black & Decker factory wound spools. The line should protrude approximately 5-3/8 inches (136mm) from ... remove the spool cap (l) from 12 the spool housing (m) in the 14 housing (figure 14). • Push the cap onto the housing until it is also available for purchase from your local retailer. Replacement • For best results, replace spool with Black & Decker spool model # ...
...of housing becomes dislodged, replace in correct position before inserting new spool into place. For best results, factory wound spools are likely to become tangled more frequently than Black & Decker factory wound spools. The line should protrude approximately 5-3/8 inches (136mm) from ... remove the spool cap (l) from 12 the spool housing (m) in the 14 housing (figure 14). • Push the cap onto the housing until it is also available for purchase from your local retailer. Replacement • For best results, replace spool with Black & Decker spool model # ...

Type 1 Manual - LST220
Page 13
... line feed still does not work • Remove battery from tool. • Remove the spool cap. • Pull the cutting line until it snaps securely into the housing. To find your nearest Black & Decker Service Center. Proof of purchase may be required. Proof of purchase may have any defects in... 13 The first is to return the product to a Black & Decker owned or authorized Service Center for commercial use. If it is to take or send the product (prepaid) to the retailer from whom it on the spool cap with the retailer for their specific return policy regarding returns that...
... line feed still does not work • Remove battery from tool. • Remove the spool cap. • Pull the cutting line until it snaps securely into the housing. To find your nearest Black & Decker Service Center. Proof of purchase may be required. Proof of purchase may have any defects in... 13 The first is to return the product to a Black & Decker owned or authorized Service Center for commercial use. If it is to take or send the product (prepaid) to the retailer from whom it on the spool cap with the retailer for their specific return policy regarding returns that...


