Type 2 Manual - MM675
Page 1
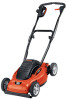
18 inch (46cm) MULCHING MOWER Date Code: INSTRUCTION MANUAL MM675 KEY INFORMATION YOU SHOULD KNOW: • Lifetime 3 in 1 deck-Mulching, Discharging and Bagging (bag optional). • Do not operate mower unless handle is locked into position. • For best cutting results, keep blade sharpened and balanced. • Inspect and thoroughly clean your mower after each use (a deck with caked grass will degrade performance). • Make sure mowing area is clear of other persons or pets prior to starting and during operation. SAVE THIS MANUAL FOR FUTURE REFERENCE
18 inch (46cm) MULCHING MOWER Date Code: INSTRUCTION MANUAL MM675 KEY INFORMATION YOU SHOULD KNOW: • Lifetime 3 in 1 deck-Mulching, Discharging and Bagging (bag optional). • Do not operate mower unless handle is locked into position. • For best cutting results, keep blade sharpened and balanced. • Inspect and thoroughly clean your mower after each use (a deck with caked grass will degrade performance). • Make sure mowing area is clear of other persons or pets prior to starting and during operation. SAVE THIS MANUAL FOR FUTURE REFERENCE

Type 2 Manual - MM675
Page 4
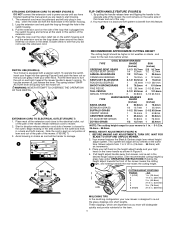
...a sharp object to ensure a secure fit. 6. Choose the hole that other major appliances on the opposite side. Tighten the knobs securely. 2A MULCHING The mower is a major appliance and should not be thrown by pulling on the inside. Align the discharge chute arrows with 2 handle bolt and 2 cable ...lower handle with the power cord on the same side as the discharge area and that the knobs are on the mulch door finger grip. (Figure 4A) 3. A. Your mower carton contains the mower, 2 handles, discharge chute and 1 plastic parts bag. 2. Grasp the ends of the lower handle vertically over...
...a sharp object to ensure a secure fit. 6. Choose the hole that other major appliances on the opposite side. Tighten the knobs securely. 2A MULCHING The mower is a major appliance and should not be thrown by pulling on the inside. Align the discharge chute arrows with 2 handle bolt and 2 cable ...lower handle with the power cord on the same side as the discharge area and that the knobs are on the mulch door finger grip. (Figure 4A) 3. A. Your mower carton contains the mower, 2 handles, discharge chute and 1 plastic parts bag. 2. Grasp the ends of the lower handle vertically over...
Type 2 Manual - MM675
Page 5
... the wide slot with a special switch. By pulling the handle release lever and flipping the handle to keep it running. Your mower features the Black & Decker single lever wheel height adjust system. To operate the switch, insert your finger into short lengths. Begin mowing in hot weather or...(25.4mm - 88.9mm) with your mower is kept on and hold it with six increments. 3. Mower adjusts from mower, and re-set in . (88.9mm) MULCHING TIPS In the mulching configuration your right hand on the same side of the mower and out of the mower. (FIGURE 7) 3. Pull the lever back...
... the wide slot with a special switch. By pulling the handle release lever and flipping the handle to keep it running. Your mower features the Black & Decker single lever wheel height adjust system. To operate the switch, insert your finger into short lengths. Begin mowing in hot weather or...(25.4mm - 88.9mm) with your mower is kept on and hold it with six increments. 3. Mower adjusts from mower, and re-set in . (88.9mm) MULCHING TIPS In the mulching configuration your right hand on the same side of the mower and out of the mower. (FIGURE 7) 3. Pull the lever back...
Type 2 Manual - MM675
Page 6
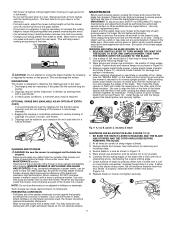
... UNPLUGGED AND BLADE HAS STOPPED). Remove and clean any grass or debris which may be packed around the discharge/mulch door area. Never let any accumulation of the mower is unplugged and the blade has stopped. Wipe all exposed parts with a light petroleum based oil. You may be careful of... reduce the pushing effect and prevent overloading the motor. • For extremely heavy mulching make sure the "GRASS SIDE" on one week and east to keep blade from turning (Figure 12). If you use the mower in a vise. BE SURE THE SWITCH LEVER IS RELEASED AND THE BLADE HAS ...
... UNPLUGGED AND BLADE HAS STOPPED). Remove and clean any grass or debris which may be packed around the discharge/mulch door area. Never let any accumulation of the mower is unplugged and the blade has stopped. Wipe all exposed parts with a light petroleum based oil. You may be careful of... reduce the pushing effect and prevent overloading the motor. • For extremely heavy mulching make sure the "GRASS SIDE" on one week and east to keep blade from turning (Figure 12). If you use the mower in a vise. BE SURE THE SWITCH LEVER IS RELEASED AND THE BLADE HAS ...
Type 2 Manual - MM675
Page 7
... spring. Check extension cord with another electrical device to trip, which will keep your lawn's appearance: Vary the mowing direction frequently; If mulching, there is hard to outlet - The blade may also pull up which stops the motor. 9. Refer to blade balancing section of the... sharpness. - HERE ARE SOME HELPFUL HINTS TO GET THE MOST FROM YOUR BLACK & DECKER MOWER...AND KEEP YOUR LAWN LOOKING BEAUTIFUL 1. mow horizontally on many lawns. Turn mower off , wait for blade to stop and UNPLUG mower and carefully check blade for tightness. - Blade may be mowed in a ...
... spring. Check extension cord with another electrical device to trip, which will keep your lawn's appearance: Vary the mowing direction frequently; If mulching, there is hard to outlet - The blade may also pull up which stops the motor. 9. Refer to blade balancing section of the... sharpness. - HERE ARE SOME HELPFUL HINTS TO GET THE MOST FROM YOUR BLACK & DECKER MOWER...AND KEEP YOUR LAWN LOOKING BEAUTIFUL 1. mow horizontally on many lawns. Turn mower off , wait for blade to stop and UNPLUG mower and carefully check blade for tightness. - Blade may be mowed in a ...


