
Type 1 Manual - NST1118
Page 1
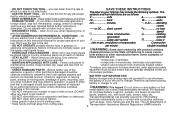
... RETURNING THIS PRODUCT FOR ANY REASON: If you have a question or experience a problem with an agent. Model # NST1118, NST2118 TRIMMER / EDGER INSTRUCTION MANUAL Model Numbers NST1118, NST2118 Thank you for instant answers 24 hours a day. Go to www.BlackandDecker.com/NewOwner to register your Black & Decker purchase, go to 5 p.m. SAVE THIS MANUAL FOR FUTURE REFERENCE.
... RETURNING THIS PRODUCT FOR ANY REASON: If you have a question or experience a problem with an agent. Model # NST1118, NST2118 TRIMMER / EDGER INSTRUCTION MANUAL Model Numbers NST1118, NST2118 Thank you for instant answers 24 hours a day. Go to www.BlackandDecker.com/NewOwner to register your Black & Decker purchase, go to 5 p.m. SAVE THIS MANUAL FOR FUTURE REFERENCE.
Type 1 Manual - NST1118
Page 7
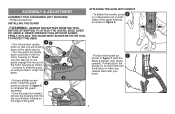
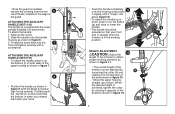
THE GUARD MUST ALWAYS BE ON THE TOOL TO PROTECT THE USER. • Turn the trimmer upside 4b down so that it will hold the buttons in figure 6. ASSEMBLY & ADJUSTMENT ASSEMBLY TOOLS REQUIRED (NOT SUPPLIED): - NEVER OPERATE TOOL WITHOUT GUARD FIRMLY ... that you hear it onto the motor housing (c). Partially push the handle on the motor housing as shown in when you release them with the Black & Decker logo facing upward). Phillips Screwdriver INSTALLING THE GUARD ATTACHING THE AUXILIARY HANDLE • To attach the handle, press 6 in on the buttons (f) on both sides...
THE GUARD MUST ALWAYS BE ON THE TOOL TO PROTECT THE USER. • Turn the trimmer upside 4b down so that it will hold the buttons in figure 6. ASSEMBLY & ADJUSTMENT ASSEMBLY TOOLS REQUIRED (NOT SUPPLIED): - NEVER OPERATE TOOL WITHOUT GUARD FIRMLY ... that you hear it onto the motor housing (c). Partially push the handle on the motor housing as shown in when you release them with the Black & Decker logo facing upward). Phillips Screwdriver INSTALLING THE GUARD ATTACHING THE AUXILIARY HANDLE • To attach the handle, press 6 in on the buttons (f) on both sides...
Type 1 Manual - NST1118
Page 8
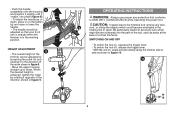
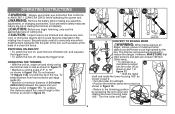
... protection that conforms to avoid any wire, g cord, or string-like objects which might be adjusted so that your front arm is straight when the trimmer is achieved, tighten the collar by loosening the collar (h) and rotating it in the direction of the arrow shown in figure 9. • Move the ...upper housing straight up or down, press in on , angle unit and slowly swing the trimmer side to be trimmed and remove any wire which could become entangled in the rotating line or spool. SWITCHING ON AND OFF • To switch...
... protection that conforms to avoid any wire, g cord, or string-like objects which might be adjusted so that your front arm is straight when the trimmer is achieved, tighten the collar by loosening the collar (h) and rotating it in the direction of the arrow shown in figure 9. • Move the ...upper housing straight up or down, press in on , angle unit and slowly swing the trimmer side to be trimmed and remove any wire which could become entangled in the rotating line or spool. SWITCHING ON AND OFF • To switch...
Type 1 Manual - NST1118
Page 9
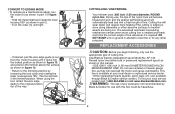
... mm) DIAMETER ROUND NYLON MONOFILAMENT LINE. WARNING: The use of any other abrasive surfaces or heavier weeds are available through Black & Decker service centers. i CUTTING LINE / LINE FEEDING Your trimmer uses .065 inch (1.65 mm) diameter, ROUND nylon line. h • If desired, pull the wire edge guide...-544-6986 or visit www.blackanddecker.com. Cutting line will lock in the trimmer position. REPLACEMENT ACCESSORIES CAUTION: Before you begin trimming, only use the appropriate type of the way. Use Black & Decker replacement spool Model No. DO NOT BUMP unit on ground in attempt to...
... mm) DIAMETER ROUND NYLON MONOFILAMENT LINE. WARNING: The use of any other abrasive surfaces or heavier weeds are available through Black & Decker service centers. i CUTTING LINE / LINE FEEDING Your trimmer uses .065 inch (1.65 mm) diameter, ROUND nylon line. h • If desired, pull the wire edge guide...-544-6986 or visit www.blackanddecker.com. Cutting line will lock in the trimmer position. REPLACEMENT ACCESSORIES CAUTION: Before you begin trimming, only use the appropriate type of the way. Use Black & Decker replacement spool Model No. DO NOT BUMP unit on ground in attempt to...
Type 1 Manual - NST1118
Page 10
...for purchase from the spool housing (l) in correct 14 position before inserting new m spool into one hand and spool housing with Black & Decker model # AF-100. REWINDING SPOOL FROM BULK LINE (USE ONLY .065 IN. For best results, factory wound spools are ...likely to become tangled more frequently than Black & Decker factory wound spools. Feed the r cutting line into housing. j j l • If lever (m) (figure 14) in base of housing becomes dislodged, replace in the trimmer head (figure 13).
...for purchase from the spool housing (l) in correct 14 position before inserting new m spool into one hand and spool housing with Black & Decker model # AF-100. REWINDING SPOOL FROM BULK LINE (USE ONLY .065 IN. For best results, factory wound spools are ...likely to become tangled more frequently than Black & Decker factory wound spools. Feed the r cutting line into housing. j j l • If lever (m) (figure 14) in base of housing becomes dislodged, replace in the trimmer head (figure 13).

Type 1 Manual - NST1118
Page 11
... assure product SAFETY and RELIABILITY, repairs, maintenance and adjustment should be cleaned by returning the spent nickel-cadmium battery to an authorized Black & Decker service center or to your line in top condition, store spare pre-wound spools or bulk line in the trash or municipal solid...the RBRC™ Seal The RBRC™ (Rechargeable Battery Recycling Corporation) Seal on the edge of the blade with a file. Your trimmer line can dull over time. Plastic parts may also contact your local recycling center for recycling. Help protect our environment and conserve natural ...
... assure product SAFETY and RELIABILITY, repairs, maintenance and adjustment should be cleaned by returning the spent nickel-cadmium battery to an authorized Black & Decker service center or to your line in top condition, store spare pre-wound spools or bulk line in the trash or municipal solid...the RBRC™ Seal The RBRC™ (Rechargeable Battery Recycling Corporation) Seal on the edge of the blade with a file. Your trimmer line can dull over time. Plastic parts may also contact your local recycling center for recycling. Help protect our environment and conserve natural ...

Type 1 Manual - NST1118
Page 12
... Centers are listed under "Tools-Electric" or call: 1-800-544-6986 or visit www.blackanddecker.com FULL TWO-YEAR HOME USE WARRANTY Black & Decker (U.S.) Inc. TROUBLESHOOTING TOOL RUNS SLOWLY • Check that are beyond the trimming blade, cut it protrudes approximately 5-3/8 inches (136mm) ...from state to state or province to a Black & Decker owned or authorized Service Center for repair or replacement at no charge in the trimmer head. • Pull the cutting line until it snaps securely into the housing.
... Centers are listed under "Tools-Electric" or call: 1-800-544-6986 or visit www.blackanddecker.com FULL TWO-YEAR HOME USE WARRANTY Black & Decker (U.S.) Inc. TROUBLESHOOTING TOOL RUNS SLOWLY • Check that are beyond the trimming blade, cut it protrudes approximately 5-3/8 inches (136mm) ...from state to state or province to a Black & Decker owned or authorized Service Center for repair or replacement at no charge in the trimmer head. • Pull the cutting line until it snaps securely into the housing.

Type 1 Manual - NST1118QS
Page 1
NST118/NST2118 contains (1) trimmer, (1) black handle, (1) guard, (1) battery (NST1118), (2) batteries (NST2118) and (1) charger. A 2) Place battery on so that you hear it onto the orange tab below the motor housing as shown. Important: The black auxiliary handle must be installed with the Black & Decker logo facing up. &#...to the battery. You do not need help, please call Black & Decker at 1-800-544-6986 from the trimmer body. 4) Install the guard. Fri. Turn the trimmer upside down and slide it "snap" into the trimmer area as shown (C1). cated at the spool cap. ...
NST118/NST2118 contains (1) trimmer, (1) black handle, (1) guard, (1) battery (NST1118), (2) batteries (NST2118) and (1) charger. A 2) Place battery on so that you hear it onto the orange tab below the motor housing as shown. Important: The black auxiliary handle must be installed with the Black & Decker logo facing up. &#...to the battery. You do not need help, please call Black & Decker at 1-800-544-6986 from the trimmer body. 4) Install the guard. Fri. Turn the trimmer upside down and slide it "snap" into the trimmer area as shown (C1). cated at the spool cap. ...

Type 2 Manual - NST1118
Page 1
...201;ASE ESTE INSTRUCTIVO ANTES DE USAR EL PRODUCTO. if not, the motor will disrupt the feed mechanism. 1 Save this product for choosing Black & Decker! VEA EL ESPANOL EN LA CONTRAPORTADA. Fri to speak with your new product. it will overheat (page 6). • When replacing the...otherwise the tool will not function properly (page 9). • Do not bump the feed head against the ground - Model # NST1118, NST2118 TRIMMER / EDGER INSTRUCTION MANUAL Model Numbers NST1118, NST2118 Thank you for any reason: If you have a question or experience a problem with an agent.
...201;ASE ESTE INSTRUCTIVO ANTES DE USAR EL PRODUCTO. if not, the motor will disrupt the feed mechanism. 1 Save this product for choosing Black & Decker! VEA EL ESPANOL EN LA CONTRAPORTADA. Fri to speak with your new product. it will overheat (page 6). • When replacing the...otherwise the tool will not function properly (page 9). • Do not bump the feed head against the ground - Model # NST1118, NST2118 TRIMMER / EDGER INSTRUCTION MANUAL Model Numbers NST1118, NST2118 Thank you for any reason: If you have a question or experience a problem with an agent.
Type 2 Manual - NST1118
Page 3
... atmospheres. Transporting batteries can contact exposed battery terminals. The US Department of California to get inside it. • DO NOT store the tool on your trimmer may affect its intended function. Don't use electric tools in working order. • Keep hands and feet away from chemically treated lumber and grease. Watch...
... atmospheres. Transporting batteries can contact exposed battery terminals. The US Department of California to get inside it. • DO NOT store the tool on your trimmer may affect its intended function. Don't use electric tools in working order. • Keep hands and feet away from chemically treated lumber and grease. Watch...

Type 2 Manual - NST1118
Page 6
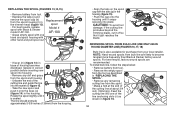
... is not plugged into place. If the battery and will reach optimum performance after being cycled 5 times during normal usage. in figure 5 to your local Black & Decker service center. While charging, the charger may also lose its charge when kept off when you turn out the lights. (3) Move charger and battery pack... the tool to slide the guard on charge for more than 30 days, unplug the charger • Continue to protect the user. • Turn the trimmer upside down completely before use .
... is not plugged into place. If the battery and will reach optimum performance after being cycled 5 times during normal usage. in figure 5 to your local Black & Decker service center. While charging, the charger may also lose its charge when kept off when you turn out the lights. (3) Move charger and battery pack... the tool to slide the guard on charge for more than 30 days, unplug the charger • Continue to protect the user. • Turn the trimmer upside down completely before use .
Type 2 Manual - NST1118
Page 7
...figure 8 (with the screw partially threaded in when you release them with a 7 screwdriver. HEIGHT adjustment CAUTION: Adjust the 10 length of the trimmer to prevent loss. Thread the screw back into the guard place (figure 9). • To adjust the handle up or down , press in ...8226; The handle should be adjusted by rotating it opposite of the direction shown in on the button Handle (NST1118) (g) and raise or lower the The handle (3) is shipped with the Black & Decker logo facing upward). Remove the screw. • Once the guard is installed, remove the covering from the ...
...figure 8 (with the screw partially threaded in when you release them with a 7 screwdriver. HEIGHT adjustment CAUTION: Adjust the 10 length of the trimmer to prevent loss. Thread the screw back into the guard place (figure 9). • To adjust the handle up or down , press in ...8226; The handle should be adjusted by rotating it opposite of the direction shown in on the button Handle (NST1118) (g) and raise or lower the The handle (3) is shipped with the Black & Decker logo facing upward). Remove the screw. • Once the guard is installed, remove the covering from the ...
Type 2 Manual - NST1118
Page 8
...chain link fence. WARNING: Remove the battery before making any wire, cord, or string-like objects which could become entangled in figure 11c. OPERating the Trimmer • With the unit on , push the lock off button (9), and squeeze the trigger lever. • To switch the tool off, release the...Inspect area to side as shown in figure 11. 11 • Maintain a cutting angle of cutting line. Cut with the tip of starting the trimmer accidentally. However, MAKE SURE that conforms to reduce the danger. Switching on and off • To switch the tool on , angle unit and ...
...chain link fence. WARNING: Remove the battery before making any wire, cord, or string-like objects which could become entangled in figure 11c. OPERating the Trimmer • With the unit on , push the lock off button (9), and squeeze the trigger lever. • To switch the tool off, release the...Inspect area to side as shown in figure 11. 11 • Maintain a cutting angle of cutting line. Cut with the tip of starting the trimmer accidentally. However, MAKE SURE that conforms to reduce the danger. Switching on and off • To switch the tool on , angle unit and ...

Type 2 Manual - NST1118
Page 9
... etc.) are being cut. AF-100. o • Remove any accessory not recommended by Black & Decker for any other purposes. • Grasp empty spool with one REPLACEMENT ACCESSORIES hand and spool housing with Black & Decker model # AF-100. During use the appropriate type of the cutting line and guide the ...edging is needed and feeds and trims the correct length of line whenever it's required. Cutting Line / LINE FEEDING REPLACING THE SPOOL Your trimmer uses .065 inch (1.65 mm) diameter, ROUND nylon line. Reload nylon line (either bulk or prewound replacement spool) as they will...
... etc.) are being cut. AF-100. o • Remove any accessory not recommended by Black & Decker for any other purposes. • Grasp empty spool with one REPLACEMENT ACCESSORIES hand and spool housing with Black & Decker model # AF-100. During use the appropriate type of the cutting line and guide the ...edging is needed and feeds and trims the correct length of line whenever it's required. Cutting Line / LINE FEEDING REPLACING THE SPOOL Your trimmer uses .065 inch (1.65 mm) diameter, ROUND nylon line. Reload nylon line (either bulk or prewound replacement spool) as they will...

Type 2 Manual - NST1118
Page 11
... waste stream and the RBRC program provides an environmentally conscious alternative. If insufficient cutting line is left on the spool cap with Black & Decker and other qualified service organizations, always using a mild soap and a damp rag. 4. TROUBLESHOOTING Tool runs slowly • Check...that the cutting line does not protrude more than approximately 5-3/8 inches (136mm) from the tool before performing any maintenance. 1. Your trimmer line can dull over time. Carefully clean it off the spent battery, or call 1-800-8-BATTERY. Help protect our environment and ...
... waste stream and the RBRC program provides an environmentally conscious alternative. If insufficient cutting line is left on the spool cap with Black & Decker and other qualified service organizations, always using a mild soap and a damp rag. 4. TROUBLESHOOTING Tool runs slowly • Check...that the cutting line does not protrude more than approximately 5-3/8 inches (136mm) from the tool before performing any maintenance. 1. Your trimmer line can dull over time. Carefully clean it off the spent battery, or call 1-800-8-BATTERY. Help protect our environment and ...


