

Type 1 Manual - PF260
Page 3
... and only operate when hand held. • Use clamps or another practical way to secure and support the work by insulated gripping surfaces, because the belt may contact its own cord. Use of control. Holding the work piece to control. Some examples of parts and any adjusting key or wrench before...
... and only operate when hand held. • Use clamps or another practical way to secure and support the work by insulated gripping surfaces, because the belt may contact its own cord. Use of control. Holding the work piece to control. Some examples of parts and any adjusting key or wrench before...
Type 1 Manual - PF260
Page 5
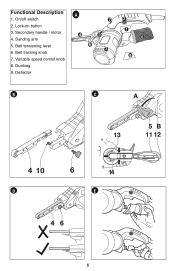
Belt tensioning lever 6. Belt tracking knob 7. Variable speed control knob 8. On/off switch 2. Sanding arm 5. Functional Description 1. Deflector A 7 4 5 6 3 2 1 8 9 B C D E 5 Lock-on button 3. Dustbag 9. Secondary handle / motor 4.
Belt tensioning lever 6. Belt tracking knob 7. Variable speed control knob 8. On/off switch 2. Sanding arm 5. Functional Description 1. Deflector A 7 4 5 6 3 2 1 8 9 B C D E 5 Lock-on button 3. Dustbag 9. Secondary handle / motor 4.
Type 1 Manual - PF260
Page 7
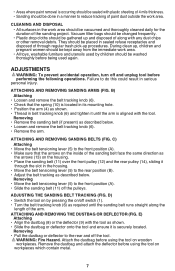
...paint dust outside the work area. • All toys, washable furniture and utensils used again. Removing • Move the belt tensioning lever (5) to the front position (A). • Slide the sanding belt (11) off the tool. Attaching and removing the dustbag or deflector (fig. E) Attaching • Align the dustbag ... and off the pulleys. During clean up and disposed of along the length of the arm. ATTaching and removing sanding belts (fig. They should be placed in serious personal injury. Adjustments WARNING: To prevent accidental operation, turn off switch (1). • Turn the...
...paint dust outside the work area. • All toys, washable furniture and utensils used again. Removing • Move the belt tensioning lever (5) to the front position (A). • Slide the sanding belt (11) off the tool. Attaching and removing the dustbag or deflector (fig. E) Attaching • Align the dustbag ... and off the pulleys. During clean up and disposed of along the length of the arm. ATTaching and removing sanding belts (fig. They should be placed in serious personal injury. Adjustments WARNING: To prevent accidental operation, turn off switch (1). • Turn the...
Type 1 Manual - PF260
Page 8
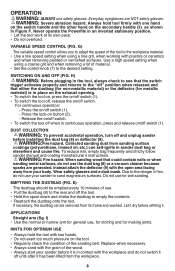
... (fig. Collected sanding dust from its own pace. • Do not overload. Do not use . • Pull the dustbag (8) to the danger of the sanding belt. OPERATION WARNING: ALWAYS use , for slotting and for wet sanding. Variable speed control (fig. applications Straight arm (fig. G) The variable speed control allows you to...
... (fig. Collected sanding dust from its own pace. • Do not overload. Do not use . • Pull the dustbag (8) to the danger of the sanding belt. OPERATION WARNING: ALWAYS use , for slotting and for wet sanding. Variable speed control (fig. applications Straight arm (fig. G) The variable speed control allows you to...
Type 1 Manual - PF260
Page 9
... recommended for use with efficient and reliable power tool service. Full Two-Year Home Use Warranty Black & Decker (U.S.) Inc. Returns should be required. Proof of belt grits to 90 days after the sale). The following operations. Service Information Black & Decker offers a full network of company-owned and authorized service locations throughout North America. To clean...
... recommended for use with efficient and reliable power tool service. Full Two-Year Home Use Warranty Black & Decker (U.S.) Inc. Returns should be required. Proof of belt grits to 90 days after the sale). The following operations. Service Information Black & Decker offers a full network of company-owned and authorized service locations throughout North America. To clean...
