

Type 1 Manual - PF260
Page 3
... cannot be controlled with sharp cutting edges are less likely to operate the power tool. Power tools are caused by insulated gripping surfaces, because the belt may result in the hands of the power tool may contact its own cord. Many accidents are dangerous in personal injury. To reduce your body...
... cannot be controlled with sharp cutting edges are less likely to operate the power tool. Power tools are caused by insulated gripping surfaces, because the belt may result in the hands of the power tool may contact its own cord. Many accidents are dangerous in personal injury. To reduce your body...
Type 1 Manual - PF260
Page 5
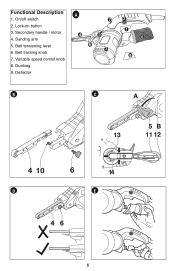
Belt tracking knob 7. Deflector A 7 4 5 6 3 2 1 8 9 B C D E 5 Functional Description 1. Belt tensioning lever 6. Sanding arm 5. Dustbag 9. Lock-on button 3. Variable speed control knob 8. Secondary handle / motor 4. On/off switch 2.
Belt tracking knob 7. Deflector A 7 4 5 6 3 2 1 8 9 B C D E 5 Functional Description 1. Belt tensioning lever 6. Sanding arm 5. Dustbag 9. Lock-on button 3. Variable speed control knob 8. Secondary handle / motor 4. On/off switch 2.
Type 1 Manual - PF260
Page 7
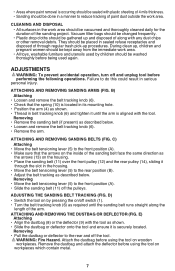
...area should be placed in the work area. • All toys, washable furniture and utensils used again. C) Attaching • Move the belt tensioning lever (5) to reduce tracking of through the slot in serious personal injury. WARNING: Fire Hazard. Remove the dustbag and attach the ...dustbag (8) or the deflector (9) with the tool. Removing • Pull the dustbag or deflector to the rear position (B). • Adjust the belt tracking as described below . D) • Switch the tool on by children should be vacuumed and thoroughly cleaned daily for the duration of the sanding...
...area should be placed in the work area. • All toys, washable furniture and utensils used again. C) Attaching • Move the belt tensioning lever (5) to reduce tracking of through the slot in serious personal injury. WARNING: Fire Hazard. Remove the dustbag and attach the ...dustbag (8) or the deflector (9) with the tool. Removing • Pull the dustbag or deflector to the rear position (B). • Adjust the belt tracking as described below . D) • Switch the tool on by children should be vacuumed and thoroughly cleaned daily for the duration of the sanding...
Type 1 Manual - PF260
Page 8
... down and shake the dustbag to the workpiece material. • Use a low speed setting when using a coarse grit and when removing a lot of the sanding belt. Release the on/off switch. • To switch the tool off when in continuous operation, press and release on /off switch (1). WARNING:Fire hazard. Collected...
... down and shake the dustbag to the workpiece material. • Use a low speed setting when using a coarse grit and when removing a lot of the sanding belt. Release the on/off switch. • To switch the tool off when in continuous operation, press and release on /off switch (1). WARNING:Fire hazard. Collected...
Type 1 Manual - PF260
Page 9
...participating retailer). Accessories Use only 1/2in. x 18in. (13mm x 457mm) sanding belts. CAUTION:: The use of any defects in the yellow pages of the phone directory. Service Information Black & Decker offers a full network of two ways. Please check with efficient and reliable power ...tool service. MATERIAL BELT GRIT Solid Wood 80 Veneer 150 Chipboard 60/80 Plastics 100 Steel...
...participating retailer). Accessories Use only 1/2in. x 18in. (13mm x 457mm) sanding belts. CAUTION:: The use of any defects in the yellow pages of the phone directory. Service Information Black & Decker offers a full network of two ways. Please check with efficient and reliable power ...tool service. MATERIAL BELT GRIT Solid Wood 80 Veneer 150 Chipboard 60/80 Plastics 100 Steel...
