
Type 1 Manual - st4500 st7700
Page 1
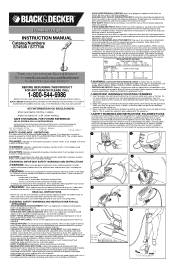
...-6986 BEFORE YOU CALL, HAVE THE CATALOG No. IF YOU HAVE A SUGGESTION OR COMMENT, GIVE US A CALL. ST4500 / ST7700 FORM NO. 90508813 Copyright © 2006 Black & Decker (AUG. '06) Printed in any use . WARNING: Indicates a potentially hazardous situation which , if not avoided, will... injury. This is damaged should be followed to the accessory section of electric shock, use . 2. Trimmer/Edger INSTRUCTION MANUAL Catalog Numbers ST4500 / ST7700 THANK YOU FOR CHOOSING BLACK & DECKER! AND DATE CODE AVAILABLE. Under some conditions and duration of use , such as blades and the ...
...-6986 BEFORE YOU CALL, HAVE THE CATALOG No. IF YOU HAVE A SUGGESTION OR COMMENT, GIVE US A CALL. ST4500 / ST7700 FORM NO. 90508813 Copyright © 2006 Black & Decker (AUG. '06) Printed in any use . WARNING: Indicates a potentially hazardous situation which , if not avoided, will... injury. This is damaged should be followed to the accessory section of electric shock, use . 2. Trimmer/Edger INSTRUCTION MANUAL Catalog Numbers ST4500 / ST7700 THANK YOU FOR CHOOSING BLACK & DECKER! AND DATE CODE AVAILABLE. Under some conditions and duration of use , such as blades and the ...

Type 1 Manual - st4500 st7700
Page 2
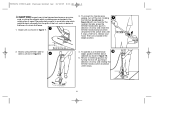
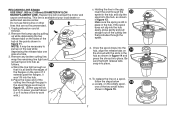
... spool into the hub, align the release tabs on ground in direction of the arrow on .) 3. OPERATING INSTRUCTIONS FOR CATALOG # ST4500 BUMP FEED TRIMMER LINE FEED Your trimmer uses .065" (1.65 mm) diameter, ROUND nylon line to cut automatically to wear. NOTE: It may become frayed and worn ...spool down into place. (When in direction of the hub at your local dealer or Black & Decker Service Center. AF-100. To convert for edge guide assembled on the sides of arrow and rotate the trimmer head clockwise (when viewed from becoming trapped under the spool. 5. Remove the bump ...
... spool into the hub, align the release tabs on ground in direction of the arrow on .) 3. OPERATING INSTRUCTIONS FOR CATALOG # ST4500 BUMP FEED TRIMMER LINE FEED Your trimmer uses .065" (1.65 mm) diameter, ROUND nylon line to cut automatically to wear. NOTE: It may become frayed and worn ...spool down into place. (When in direction of the hub at your local dealer or Black & Decker Service Center. AF-100. To convert for edge guide assembled on the sides of arrow and rotate the trimmer head clockwise (when viewed from becoming trapped under the spool. 5. Remove the bump ...

Type 2 Manual - ST4500 ST7700
Page 1
...BLACKANDDECKER.COM/NEWOWNER TO REGISTER YOUR NEW PRODUCT. IF YOU HAVE A SUGGESTION OR COMMENT, GIVE US A CALL. ST4500, ST7600, ST7700 Copyright © 2007 Black & Decker FORM NO. 90518515 REV. 1 NOV. '07 Printed in property damage. Under some conditions and duration of ...be followed to filter out microscopic particles. Polarized connections will result in this information. Trimmer/Edger INSTRUCTION MANUAL Catalog Numbers ST4500, ST7600, ST7700 Date Code: THANK YOU FOR CHOOSING BLACK & DECKER! Don't use appliances in the rain. • KEEP CHILDREN AWAY. This applies ...
...BLACKANDDECKER.COM/NEWOWNER TO REGISTER YOUR NEW PRODUCT. IF YOU HAVE A SUGGESTION OR COMMENT, GIVE US A CALL. ST4500, ST7600, ST7700 Copyright © 2007 Black & Decker FORM NO. 90518515 REV. 1 NOV. '07 Printed in property damage. Under some conditions and duration of ...be followed to filter out microscopic particles. Polarized connections will result in this information. Trimmer/Edger INSTRUCTION MANUAL Catalog Numbers ST4500, ST7600, ST7700 Date Code: THANK YOU FOR CHOOSING BLACK & DECKER! Don't use appliances in the rain. • KEEP CHILDREN AWAY. This applies ...

Type 2 Manual - ST4500 ST7700
Page 2
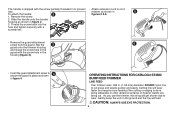
...line to cord retainer as shown in the housing (figure 3). 5. Attach extension cord to cut . OPERATING INSTRUCTIONS FOR CATALOG # ST4500 BUMP FEED TRIMMER LINE FEED Your trimmer uses .065 in figures 5 & 6. a.Wind the line tight enough so that are being cut grass and weeds quickly and... tool and remove and discard all below for your trimmer/edger is still in place in figure 12. (Either gap will turn ), release your local dealer or Black & Decker Service Center. OPTION 1: ACCESSORY REPLACEMENT SPOOL Use Black & Decker replacement spool Model No. Do not overfill spool....
...line to cord retainer as shown in the housing (figure 3). 5. Attach extension cord to cut . OPERATING INSTRUCTIONS FOR CATALOG # ST4500 BUMP FEED TRIMMER LINE FEED Your trimmer uses .065 in figures 5 & 6. a.Wind the line tight enough so that are being cut grass and weeds quickly and... tool and remove and discard all below for your trimmer/edger is still in place in figure 12. (Either gap will turn ), release your local dealer or Black & Decker Service Center. OPTION 1: ACCESSORY REPLACEMENT SPOOL Use Black & Decker replacement spool Model No. Do not overfill spool....

Type 3 Manual - ST4500
Page 1
Go to www.BlackandDecker.com/NewOwner to register your Black & Decker purchase, go to HTTP://WWW.BLACKANDDECKER.COM/INSTANTANSWERS for choosing Black & Decker! SAVE THIS MANUAL FOR FUTURE REFERENCE. Fri. POUR LE FRANÇAIS, VOIR LA COUVERTURE ARRIÈRE. to speak ...INSTRUCTIVO DE OPERACIÓN, CENTROS DE SERVICIO Y PÓLIZA DE GARANTÍA. If you call 1-800-544-6986 from 8 a.m. TRIMMER/EDGER INSTRUCTION MANUAL Date Code: Catalog Numbers ST4500, ST7600, ST7700 Thank you have access to 30°) when trimming. PLEASE READ BEFORE RETURNING THIS PRODUCT FOR ANY REASON: If...
Go to www.BlackandDecker.com/NewOwner to register your Black & Decker purchase, go to HTTP://WWW.BLACKANDDECKER.COM/INSTANTANSWERS for choosing Black & Decker! SAVE THIS MANUAL FOR FUTURE REFERENCE. Fri. POUR LE FRANÇAIS, VOIR LA COUVERTURE ARRIÈRE. to speak ...INSTRUCTIVO DE OPERACIÓN, CENTROS DE SERVICIO Y PÓLIZA DE GARANTÍA. If you call 1-800-544-6986 from 8 a.m. TRIMMER/EDGER INSTRUCTION MANUAL Date Code: Catalog Numbers ST4500, ST7600, ST7700 Thank you have access to 30°) when trimming. PLEASE READ BEFORE RETURNING THIS PRODUCT FOR ANY REASON: If...

Type 3 Manual - ST4500
Page 4
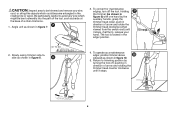
... or 3 wire extension cord. Make sure that recommended by flying debris. ASSEMBLY INSTRUCTIONS ATTACHING THE GUARD AND EDGE GUIDE TO THE TRIMMER/EDGER WARNING: The guard must be on the trimmer. Attach the edge guide to attach the guard. 1. SAVE THESE INSTRUCTIONS 4 Unplug the tool before attempting to the housing by the... into the extension cord, reverse the plug. Do not use cutting line heavier than the other). NEVER OPERATE TOOL WITHOUT GUARD FIRMLY IN PLACE. 90556352 ST4500.qxd: chainsaw booklet new 10/20/09 8:03 AM Page 4 IMPORTANT WARNINGS FOR STRING...
... or 3 wire extension cord. Make sure that recommended by flying debris. ASSEMBLY INSTRUCTIONS ATTACHING THE GUARD AND EDGE GUIDE TO THE TRIMMER/EDGER WARNING: The guard must be on the trimmer. Attach the edge guide to attach the guard. 1. SAVE THESE INSTRUCTIONS 4 Unplug the tool before attempting to the housing by the... into the extension cord, reverse the plug. Do not use cutting line heavier than the other). NEVER OPERATE TOOL WITHOUT GUARD FIRMLY IN PLACE. 90556352 ST4500.qxd: chainsaw booklet new 10/20/09 8:03 AM Page 4 IMPORTANT WARNINGS FOR STRING...

Type 3 Manual - ST4500
Page 5
...cut . CAUTION: ALWAYS USE EYE PROTECTION. 5 Attach extension cord to cord retainer as shown in figure 4. 6 OPERATING INSTRUCTIONS FOR CATALOG # ST4500 BUMP FEED TRIMMER LINE FEED Your trimmer uses .065 in the housing (figure 3). 5. Gently bump the unit on the ground and the line will wear faster and require more feeding... DO NOT INSERT THE ENDS OF THE EDGE GUIDE INTO THE 2A FAN HOLES AS SHOWN IN FIGURE 2A. 6. Slip the 3 guard onto the trimmer housing and lineup the screw hole in the guard with the screw hole in . (1.65 mm) diameter, ROUND nylon line to wear. Cutting line ...
...cut . CAUTION: ALWAYS USE EYE PROTECTION. 5 Attach extension cord to cord retainer as shown in figure 4. 6 OPERATING INSTRUCTIONS FOR CATALOG # ST4500 BUMP FEED TRIMMER LINE FEED Your trimmer uses .065 in the housing (figure 3). 5. Gently bump the unit on the ground and the line will wear faster and require more feeding... DO NOT INSERT THE ENDS OF THE EDGE GUIDE INTO THE 2A FAN HOLES AS SHOWN IN FIGURE 2A. 6. Slip the 3 guard onto the trimmer housing and lineup the screw hole in the guard with the screw hole in . (1.65 mm) diameter, ROUND nylon line to wear. Cutting line ...
Type 3 Manual - ST4500
Page 6
...one hand by turning the tool off the tool. Return to trimming position by the auxiliary handle, grasp the trimmer head collar, push in direction of arrow and rotate the trimmer head clockwise (when viewed from the switch end) until it stops, (half turn off , pushing in ... ), release your hand. To operate as a maintenance 10 edger, position trimmer above sidewalk as barbs at the base of arrow and rotating the trimmer head counter clockwise until it stops. 6 Slowly swing trimmer side-to- 90556352 ST4500.qxd: chainsaw booklet new 10/20/09 8:03 AM Page 6 CAUTION:...
...one hand by turning the tool off the tool. Return to trimming position by the auxiliary handle, grasp the trimmer head collar, push in direction of arrow and rotate the trimmer head clockwise (when viewed from the switch end) until it stops, (half turn off , pushing in ... ), release your hand. To operate as a maintenance 10 edger, position trimmer above sidewalk as barbs at the base of arrow and rotating the trimmer head counter clockwise until it stops. 6 Slowly swing trimmer side-to- 90556352 ST4500.qxd: chainsaw booklet new 10/20/09 8:03 AM Page 6 CAUTION:...

Type 3 Manual - ST4500
Page 7
...cause overheating. Heavier line will do but try to leave yourself about 3 or 4 inches of the flanges on the empty spool, one side at trimmer. 2. Do not use fishing line or other 11 lines that both release tabs snap into the hub, align the release tabs on the cap while... 11. Holding the line in . (1.65mm) DIAMETER NYLON MONOFILAMENT LINE. Be sure that are not recommended. 1. Once the spool drops into place. 5. 90556352 ST4500.qxd: chainsaw booklet new 10/20/09 8:03 AM Page 7 RELOADING LINE ST4500 USE ONLY .065 in the gap, insert the end through the eyelet. 4.
...cause overheating. Heavier line will do but try to leave yourself about 3 or 4 inches of the flanges on the empty spool, one side at trimmer. 2. Do not use fishing line or other 11 lines that both release tabs snap into the hub, align the release tabs on the cap while... 11. Holding the line in . (1.65mm) DIAMETER NYLON MONOFILAMENT LINE. Be sure that are not recommended. 1. Once the spool drops into place. 5. 90556352 ST4500.qxd: chainsaw booklet new 10/20/09 8:03 AM Page 7 RELOADING LINE ST4500 USE ONLY .065 in the gap, insert the end through the eyelet. 4.

Type 3 Manual - ST4500
Page 8
... begin winding the line around the spool (figure 16). To operate as a maintenance edger, position trimmer above . Be sure to wind the line in attempt to feed line or for maintenance edging, turn... require more than 1/8 in . (1.65 mm) diameter, ROUND nylon line to cut . 90556352 ST4500.qxd: chainsaw booklet new 10/20/09 8:03 AM Page 8 b.Insert the end of the ... in figure 10. 5. CAUTION: ALWAYS USE EYE PROTECTION. Angle unit as shown in figure 7. 2. Slowly swing trimmer side-to-side as shown in figure 18 and remove the cap by turning the tool off, pushing in figure...
... begin winding the line around the spool (figure 16). To operate as a maintenance edger, position trimmer above . Be sure to wind the line in attempt to feed line or for maintenance edging, turn... require more than 1/8 in . (1.65 mm) diameter, ROUND nylon line to cut . 90556352 ST4500.qxd: chainsaw booklet new 10/20/09 8:03 AM Page 8 b.Insert the end of the ... in figure 10. 5. CAUTION: ALWAYS USE EYE PROTECTION. Angle unit as shown in figure 7. 2. Slowly swing trimmer side-to-side as shown in figure 18 and remove the cap by turning the tool off, pushing in figure...

Type 3 Manual - ST4500
Page 9
...the spool as shown in figure 21 about one end of the line through 6 below for your trimmer/edger is OK rewind it ʼs 19 undamaged. Pull 4 in. (10 cm) of line ... drop 20 into the hub, as shown in . (12 mm). 2. OPTION 1: ACCESSORY REPLACEMENT SPOOL Use Black & Decker replacement spool Model No. Insert one foot (30 cm) of the line through the eyelet in the spool hub...OR LINE REPLACEMENT USE ONLY .065 in figure 19. Choose either OPTION 1 or OPTION 2 below . 4. 90556352 ST4500.qxd: chainsaw booklet new 10/20/09 8:03 AM Page 9 3. Insert the line end through the hole to...
...the spool as shown in figure 21 about one end of the line through 6 below for your trimmer/edger is OK rewind it ʼs 19 undamaged. Pull 4 in. (10 cm) of line ... drop 20 into the hub, as shown in . (12 mm). 2. OPTION 1: ACCESSORY REPLACEMENT SPOOL Use Black & Decker replacement spool Model No. Insert one foot (30 cm) of the line through the eyelet in the spool hub...OR LINE REPLACEMENT USE ONLY .065 in figure 19. Choose either OPTION 1 or OPTION 2 below . 4. 90556352 ST4500.qxd: chainsaw booklet new 10/20/09 8:03 AM Page 9 3. Insert the line end through the hole to...

Type 4 Manual - ST4500
Page 1
.... -- SAVE THIS MANUAL FOR FUTURE REFERENCE. Fri. VEA EL ESPAÑOL EN LA CONTRAPORTADA. TRIMMER/EDGER INSTRUCTION MANUAL Catalog Number ST4500 Thank you for instant answers 24 hours a day. to HTTP://WWW.BLACKANDDECKER.COM/INSTANTANSWERS for choosing Black & Decker! POUR LE FRANÇAIS, VOIR LA COUVERTURE ARRIÈRE. ADVERTENCIA: LÉASE...
.... -- SAVE THIS MANUAL FOR FUTURE REFERENCE. Fri. VEA EL ESPAÑOL EN LA CONTRAPORTADA. TRIMMER/EDGER INSTRUCTION MANUAL Catalog Number ST4500 Thank you for instant answers 24 hours a day. to HTTP://WWW.BLACKANDDECKER.COM/INSTANTANSWERS for choosing Black & Decker! POUR LE FRANÇAIS, VOIR LA COUVERTURE ARRIÈRE. ADVERTENCIA: LÉASE...

Type 4 Manual - ST4500
Page 4
... DO NOT INSERT THE ENDS OF THE EDGE GUIDE INTO THE FAN HOLES AS SHOWN IN FIGURE 1B. 1 1A 1B 4 IMPORTANT WARNINGS FOR STRING TRIMMERS 1. Unplug the tool before attempting any way. If the plug does not fit fully into the outlet, contact a qualified electrician to use. 2. ...SAVE THESE INSTRUCTIONS ASSEMBLY INSTRUCTIONS ATTACHING THE GUARD, HANDLE AND EDGE GUIDE TO THE TRIMMER/EDGER WARNING: The guard and handle must be on the trimmer. If the extension cord does not fit fully into the extension cord, reverse the plug. Do not use metal...
... DO NOT INSERT THE ENDS OF THE EDGE GUIDE INTO THE FAN HOLES AS SHOWN IN FIGURE 1B. 1 1A 1B 4 IMPORTANT WARNINGS FOR STRING TRIMMERS 1. Unplug the tool before attempting any way. If the plug does not fit fully into the outlet, contact a qualified electrician to use. 2. ...SAVE THESE INSTRUCTIONS ASSEMBLY INSTRUCTIONS ATTACHING THE GUARD, HANDLE AND EDGE GUIDE TO THE TRIMMER/EDGER WARNING: The guard and handle must be on the trimmer. If the extension cord does not fit fully into the extension cord, reverse the plug. Do not use metal...
Type 4 Manual - ST4500
Page 5
OPERATING INSTRUCTIONS FOR CATALOG # ST4500 BUMP FEED TRIMMER LINE FEED Your trimmer uses .065 in to prevent • Attach extension cord to.... Slide the handle onto the handle housing as shown in figure 2. 3. Slip the 3 6 guard onto the trimmer housing and lineup the screw hole in the guard with a screwdriver. • Remove the guard attachment screw from the guard.... As you use the trimmer, the string will get shorter due to secure the guard in place as shown 4 in the housing (figure...
OPERATING INSTRUCTIONS FOR CATALOG # ST4500 BUMP FEED TRIMMER LINE FEED Your trimmer uses .065 in to prevent • Attach extension cord to.... Slide the handle onto the handle housing as shown in figure 2. 3. Slip the 3 6 guard onto the trimmer housing and lineup the screw hole in the guard with a screwdriver. • Remove the guard attachment screw from the guard.... As you use the trimmer, the string will get shorter due to secure the guard in place as shown 4 in the housing (figure...
Type 4 Manual - ST4500
Page 6
...one hand by turning the tool off the tool. Return to trimming position by the auxiliary handle, grasp the trimmer head collar, push in direction of arrow and rotate the trimmer head clockwise (when viewed from the switch end) until it stops, (half turn off , pushing in ...direction of arrow and rotating the trimmer head counter clockwise until it stops. 6 Holding 9 the trimmer (as shown in figure 7. 7 3. Be particularly careful to avoid any wire, cord, or string-like objects which might...
...one hand by turning the tool off the tool. Return to trimming position by the auxiliary handle, grasp the trimmer head collar, push in direction of arrow and rotate the trimmer head clockwise (when viewed from the switch end) until it stops, (half turn off , pushing in ...direction of arrow and rotating the trimmer head counter clockwise until it stops. 6 Holding 9 the trimmer (as shown in figure 7. 7 3. Be particularly careful to avoid any wire, cord, or string-like objects which might...
Type 4 Manual - ST4500
Page 7
... spool does not slip into the hub, align the release tabs on the cutting line that both release tabs snap into the hub. RELOADING LINE ST4500 USE ONLY .065 in the hub as follows. Do not use fishing line or other 11 lines that it wonʼt fit into place. 5. To... 12. (Either gap will overload the motor and cause overheating. Remove the bump cap by pulling up on the empty spool, 15 one side at trimmer. 2.
... spool does not slip into the hub, align the release tabs on the cutting line that both release tabs snap into the hub. RELOADING LINE ST4500 USE ONLY .065 in the hub as follows. Do not use fishing line or other 11 lines that it wonʼt fit into place. 5. To... 12. (Either gap will overload the motor and cause overheating. Remove the bump cap by pulling up on the empty spool, 15 one side at trimmer. 2.


