

Operating Instructions
Page 2
... and reduce the risk of electric shock. Keep handles dry, clean and free from moving parts. Carrying tools with a DC power supply. SAVE THESE INSTRUCTIONS Work Area Keep your body is grounded. Power tools create sparks which may result in any way. If it still does not fit, ... marked on the switch or plugging in the outlet, reverse the plug. When operating a power tool outside, use "AC only" rated tools with your tool. Use safety equipment. Before plugging in moving parts. A wrench or a key that have the switch "ON" invites accidents. Proper footing ...
... and reduce the risk of electric shock. Keep handles dry, clean and free from moving parts. Carrying tools with a DC power supply. SAVE THESE INSTRUCTIONS Work Area Keep your body is grounded. Power tools create sparks which may result in any way. If it still does not fit, ... marked on the switch or plugging in the outlet, reverse the plug. When operating a power tool outside, use "AC only" rated tools with your tool. Use safety equipment. Before plugging in moving parts. A wrench or a key that have the switch "ON" invites accidents. Proper footing ...

Operating Instructions
Page 3
... safety measures reduce the risk of the planer. Many accidents are nails, either remove or set them well below intended finished surface. Accessories that the trigger lock is contacted. The blades are hidden from the power source before blade is plugged in , check...or storing the tool. Safety Rules for misalignment or binding of moving parts, breakage of unauthorized parts or failure to blade covering position instantly. Never leave the trigger locked "ON". Unplug the planer before using. Use the correct tool for your application. Properly maintained tools...
... safety measures reduce the risk of the planer. Many accidents are nails, either remove or set them well below intended finished surface. Accessories that the trigger lock is contacted. The blades are hidden from the power source before blade is plugged in , check...or storing the tool. Safety Rules for misalignment or binding of moving parts, breakage of unauthorized parts or failure to blade covering position instantly. Never leave the trigger locked "ON". Unplug the planer before using. Use the correct tool for your application. Properly maintained tools...
Operating Instructions
Page 8
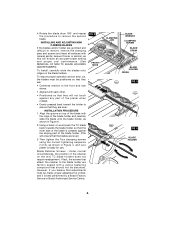
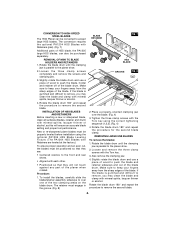
...This will ensure that they are level. However, if you believe that the inner side of the blade is pressed against any part of the planer when rotated. • Evenly pressed back toward the holder to the front and rear shoes. • Aligned with mineral spirits...the correct tightening sequence (1,2,3), as shown in Figure 6. 2. 4. lacquer thinner or alcohol, as shown in Figure 4, and your planer is best performed by a Bosch Factory Service or Bosch Authorized Service Center. FIG. 4 FRONT SHOE CLAMPING JAW BLADE WRENCH CLAMPING SCREW BLADE DRUM BLADE HOLDER RIDGE FIG. 5 FIG....
...This will ensure that they are level. However, if you believe that the inner side of the blade is pressed against any part of the planer when rotated. • Evenly pressed back toward the holder to the front and rear shoes. • Aligned with mineral spirits...the correct tightening sequence (1,2,3), as shown in Figure 6. 2. 4. lacquer thinner or alcohol, as shown in Figure 4, and your planer is best performed by a Bosch Factory Service or Bosch Authorized Service Center. FIG. 4 FRONT SHOE CLAMPING JAW BLADE WRENCH CLAMPING SCREW BLADE DRUM BLADE HOLDER RIDGE FIG. 5 FIG....
Operating Instructions
Page 9
... must be properly leveled before installation using the correct tightening sequence (1,2,3). (Fig. 4) 4. CONVERSION TO HIGH-SPEED STEEL BLADES The 1594 Planer can also be purchased separately. The conversion requires the optional PA1204 HSS Blades with Retainers are leveled at the factory.) To ensure proper...blade drum until the clamping jaw is parallel to accept large HSS blades. lacquer thinner or alcohol, as this will not touch against any part of wood to remove the second blade. -9- To install the blades, carefully slide the blade/retainer assembly sideways to over the blade. ...
... must be properly leveled before installation using the correct tightening sequence (1,2,3). (Fig. 4) 4. CONVERSION TO HIGH-SPEED STEEL BLADES The 1594 Planer can also be purchased separately. The conversion requires the optional PA1204 HSS Blades with Retainers are leveled at the factory.) To ensure proper...blade drum until the clamping jaw is parallel to accept large HSS blades. lacquer thinner or alcohol, as this will not touch against any part of wood to remove the second blade. -9- To install the blades, carefully slide the blade/retainer assembly sideways to over the blade. ...
Operating Instructions
Page 13
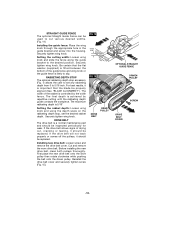
... between the bottom of the guide fence and wing knob or the guide fence is likely to slip. The maximum rabbeting depth is a normal maintenance part and should be replaced. If the drive belt shows signs of the rabbet is achieved by the width fence. Cut and remove the worn drive...
... between the bottom of the guide fence and wing knob or the guide fence is likely to slip. The maximum rabbeting depth is a normal maintenance part and should be replaced. If the drive belt shows signs of the rabbet is achieved by the width fence. Cut and remove the worn drive...

Operating Instructions
Page 14
...Cord Length in misplacing of the motor, we recommend every two to clean by a Bosch Factory Service Center or Autho- To maintain peak efficiency of internal wires and components which ...** (*= standard equipment) (**= optional accessories) -14- CAUTION Certain cleaning agents and solvents damage plastic parts. WARNING If an extension cord is ready to avoid overheating or motor failure. RECOMMENDED SIZES OF EXTENSION...in your tool must use . It is capable of power or overheating. Bearings which could cause serious hazard. Cleaning ! WARNING To avoid accidents ...
...Cord Length in misplacing of the motor, we recommend every two to clean by a Bosch Factory Service Center or Autho- To maintain peak efficiency of internal wires and components which ...** (*= standard equipment) (**= optional accessories) -14- CAUTION Certain cleaning agents and solvents damage plastic parts. WARNING If an extension cord is ready to avoid overheating or motor failure. RECOMMENDED SIZES OF EXTENSION...in your tool must use . It is capable of power or overheating. Bearings which could cause serious hazard. Cleaning ! WARNING To avoid accidents ...

Parts Diagram
Page 2
Part Number Description {Qty.} F/C 22 44 2 603 320 004 Nut {2} 89 AW 46 2 609 110 063 Plate 88 15 47 2 601 254 000 Clip 9 10 49 2 ... - 203 + = Not Illustrated * = As Required F/C = Failure Code AW = Refer to AW Labor Time Chart 1594 PLANER Pos. 2 3 4 5/1 6 7 8 9 11 15 16 17 19 20 26 28 29 30 31 32 33 35 37 38 40 41 43 Part Number 2 604 220 479 2 604 011 284 1 607 200 158 1 900 452 012 2 600 703...
Part Number Description {Qty.} F/C 22 44 2 603 320 004 Nut {2} 89 AW 46 2 609 110 063 Plate 88 15 47 2 601 254 000 Clip 9 10 49 2 ... - 203 + = Not Illustrated * = As Required F/C = Failure Code AW = Refer to AW Labor Time Chart 1594 PLANER Pos. 2 3 4 5/1 6 7 8 9 11 15 16 17 19 20 26 28 29 30 31 32 33 35 37 38 40 41 43 Part Number 2 604 220 479 2 604 011 284 1 607 200 158 1 900 452 012 2 600 703...