

Supplement
Page 2
...been positioned in image. 4. On the closed door, place a handle onto the shoulder bolts, as shown in its installation location and has been leveled (see the Installation Instructions that came with the bottom door closed door, while holding the handle, insert the short end of the Allen ... contact the shoulder bolt. Right Assembly Wrong Assembly 3. While holding the handle, insert the short end of the setscrews. 3. Repeat steps 2 and 3 to install the other two handles onto the adjacent door. 7. Repeat steps 1 through 5 to secure the lower setscrew. 5. Repeat steps 2 and 3 to secure the...
...been positioned in image. 4. On the closed door, place a handle onto the shoulder bolts, as shown in its installation location and has been leveled (see the Installation Instructions that came with the bottom door closed door, while holding the handle, insert the short end of the Allen ... contact the shoulder bolt. Right Assembly Wrong Assembly 3. While holding the handle, insert the short end of the setscrews. 3. Repeat steps 2 and 3 to install the other two handles onto the adjacent door. 7. Repeat steps 1 through 5 to secure the lower setscrew. 5. Repeat steps 2 and 3 to secure the...

Instructions for Use
Page 1
B21CL81SNS en Operating and installation instructions fr Notices d'utilisation et de montage es Instrucciones de uso y de montaje
B21CL81SNS en Operating and installation instructions fr Notices d'utilisation et de montage es Instrucciones de uso y de montaje

Instructions for Use
Page 3
en Table of Contents IMPORTANT SAFETY INSTRUCTIONS 4 Disposal information 5 Scope of Delivery 6 Installing the appliance 6 Aligning the appliance 7 Connecting the appliance 7 Installing the handles 9 Appliance and Installation Dimensions 10 Getting to know your appliance 11 Control and display panel 12 Operating tips 13 Switching on the appliance 13 Setting the temperature 13 ...
en Table of Contents IMPORTANT SAFETY INSTRUCTIONS 4 Disposal information 5 Scope of Delivery 6 Installing the appliance 6 Aligning the appliance 7 Connecting the appliance 7 Installing the handles 9 Appliance and Installation Dimensions 10 Getting to know your appliance 11 Control and display panel 12 Operating tips 13 Switching on the appliance 13 Setting the temperature 13 ...
Instructions for Use
Page 4
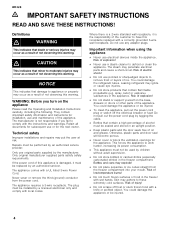
...indicates that minor to moderate injuries may adhere to these extremely cold surfaces. They contain important safety information and instructions for installation, use original parts supplied by an authorized service provider. Repairs must be injured. 4 The appliance comes with wet hands. The...electrician only and comply with the instructions and warnings. n Do not stand or support yourself on the appliance Please read the Operating and Installation Instructions carefully, including the following. n Keep plastic parts and the door seals free of explosion! Risk of injury! n Do not ...
...indicates that minor to moderate injuries may adhere to these extremely cold surfaces. They contain important safety information and instructions for installation, use original parts supplied by an authorized service provider. Repairs must be injured. 4 The appliance comes with wet hands. The...electrician only and comply with the instructions and warnings. n Do not stand or support yourself on the appliance Please read the Operating and Installation Instructions carefully, including the following. n Keep plastic parts and the door seals free of explosion! Risk of injury! n Do not ...

Instructions for Use
Page 6
...176;C) Transporting The appliance is unavoidable, use the castors for any damage in your appliance. If there is upright and level at the installation location. Installation location WARNING Risk of injury! a cooker, radiator, etc. Climatic class SN N ST T Permitted ambient temperature 50 °F to ...have sharp edges. Ventilation The refrigeration unit is very heavy. Reinforce the floor, if necessary. Please contact the dealer. If installation next to a heat source is heavy and must work harder, increasing the power consumption. 6 Do not use a suitable insulating...
...176;C) Transporting The appliance is unavoidable, use the castors for any damage in your appliance. If there is upright and level at the installation location. Installation location WARNING Risk of injury! a cooker, radiator, etc. Climatic class SN N ST T Permitted ambient temperature 50 °F to ...have sharp edges. Ventilation The refrigeration unit is very heavy. Reinforce the floor, if necessary. Please contact the dealer. If installation next to a heat source is heavy and must work harder, increasing the power consumption. 6 Do not use a suitable insulating...
Instructions for Use
Page 7
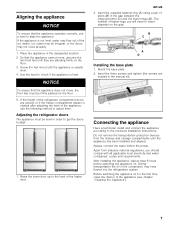
...align. 1. Always connect the water before switching the appliance on. If the height of pliers (B) in the designated location. 2. B C A D Installing the base plate 1. Use the level to check if the appliance is slanted after adjusting the level of the appliance (see chapter "Cleaning the Appliance... first time, clean the interior of the appliance, use a level to adjust them. Raise the lower door up to the enclosed Installation Instructions. So that the appliance operates correctly, use the following method to align the appliance. Aligning the appliance NOTICE To ensure that...
...align. 1. Always connect the water before switching the appliance on. If the height of pliers (B) in the designated location. 2. B C A D Installing the base plate 1. Use the level to check if the appliance is slanted after adjusting the level of the appliance (see chapter "Cleaning the Appliance... first time, clean the interior of the appliance, use a level to adjust them. Raise the lower door up to the enclosed Installation Instructions. So that the appliance operates correctly, use the following method to align the appliance. Aligning the appliance NOTICE To ensure that...

Instructions for Use
Page 8
...are in mountain lodges) which are connected directly to the water supply in an electric shock. A cold water connection is not installed properly! It is recommended that are suitable for photovoltaic systems which are used for the water line. For connection to the local...and current type correspond with power line and sine-controlled inverters. Connect the appliance to ensure it is easily accessible. The installation must be installed according to the local regulations of the local Water Supply companies. If necessary, have the appliance tested by a competent ...
...are in mountain lodges) which are connected directly to the water supply in an electric shock. A cold water connection is not installed properly! It is recommended that are suitable for photovoltaic systems which are used for the water line. For connection to the local...and current type correspond with power line and sine-controlled inverters. Connect the appliance to ensure it is easily accessible. The installation must be installed according to the local regulations of the local Water Supply companies. If necessary, have the appliance tested by a competent ...
Instructions for Use
Page 9
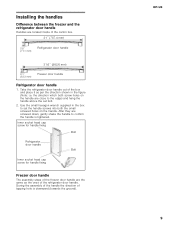
... carton box. 31˝ (787.4 mm) 2.8˝ (71.1 mm) Refrigerator door handle 31.6˝ (802.6 mm) 2.1˝ (53.3 mm) Freezer door handle Refrigerator door handle 1. Installing the handles Difference between the freezer and the refrigerator door handle Handles are located inside of the freezer door handle are the same as per...
... carton box. 31˝ (787.4 mm) 2.8˝ (71.1 mm) Refrigerator door handle 31.6˝ (802.6 mm) 2.1˝ (53.3 mm) Freezer door handle Refrigerator door handle 1. Installing the handles Difference between the freezer and the refrigerator door handle Handles are located inside of the freezer door handle are the same as per...
Instructions for Use
Page 10
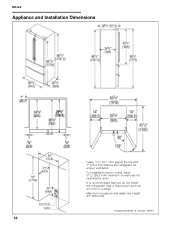
en-us Appliance and Installation Dimensions electrical water 10 Leave 1/2" (12.7 mm) gap at the top and 1" (25.4 mm) behind the refrigerator for opening the door. It is recommended that you do not install the refrigerator near a heat source such as an oven or a range. measurements in inches (mm) Maximum receptacle and water line height 23" (584 mm). For installation next to a wall, leave 33/4" (95.2 mm) minimum on wall side for proper ventilation.
en-us Appliance and Installation Dimensions electrical water 10 Leave 1/2" (12.7 mm) gap at the top and 1" (25.4 mm) behind the refrigerator for opening the door. It is recommended that you do not install the refrigerator near a heat source such as an oven or a range. measurements in inches (mm) Maximum receptacle and water line height 23" (584 mm). For installation next to a wall, leave 33/4" (95.2 mm) minimum on wall side for proper ventilation.

Instructions for Use
Page 11
The illustrations may differ from your appliance These operating and installation instructions apply to know your particular model. 13 14 15 16 13 7 A 1 8 2 3 9 10 17 4 11 5 12 B 6 A Refrigerator compartment can be adjusted between 34 °F (+1 °C) ...
The illustrations may differ from your appliance These operating and installation instructions apply to know your particular model. 13 14 15 16 13 7 A 1 8 2 3 9 10 17 4 11 5 12 B 6 A Refrigerator compartment can be adjusted between 34 °F (+1 °C) ...
Instructions for Use
Page 13
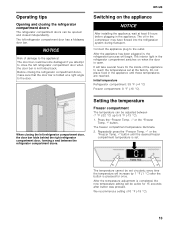
... refrigerator compartment doors The refrigerator compartment doors can be set at least 6 hours before plugging in the refrigerator compartment switches on the appliance NOTICE After installing the appliance, wait at the factory. After the appliance has been plugged in the compressor may have flowed into the refrigeration system during transport. It...
... refrigerator compartment doors The refrigerator compartment doors can be set at least 6 hours before plugging in the refrigerator compartment switches on the appliance NOTICE After installing the appliance, wait at the factory. After the appliance has been plugged in the compressor may have flowed into the refrigeration system during transport. It...
Instructions for Use
Page 19
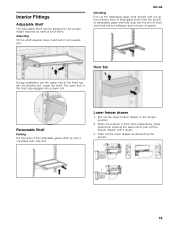
... out towards you. Interior Fittings Adjustable Shelf The Adjustable Shelf can be adjusted to the proper height required by the arrows. 19 Door bin During installation, put the upper end of fixed shelf and will not withdraw due to the proper position. 2. Press the buttons in both slots respectively (must press...
... out towards you. Interior Fittings Adjustable Shelf The Adjustable Shelf can be adjusted to the proper height required by the arrows. 19 Door bin During installation, put the upper end of fixed shelf and will not withdraw due to the proper position. 2. Press the buttons in both slots respectively (must press...

Instructions for Use
Page 20
...figure). 3. Defrosting Freezer compartment The fully automatic Nofrost system ensures that you disconnect the water supply to the appliance for 3 seconds. Install the drawer by putting the hook into an evaporation pan at the rear of ice. The refrigerator compartment temperature display shows "- -". Pulling ...out and installing the Chiller Drawer 1. Pull out the Chiller Drawer. 2. Hold the hook at two sides with a nose pliers and push it up...
...figure). 3. Defrosting Freezer compartment The fully automatic Nofrost system ensures that you disconnect the water supply to the appliance for 3 seconds. Install the drawer by putting the hook into an evaporation pan at the rear of ice. The refrigerator compartment temperature display shows "- -". Pulling ...out and installing the Chiller Drawer 1. Pull out the Chiller Drawer. 2. Hold the hook at two sides with a nose pliers and push it up...

Instructions for Use
Page 21
.... Do not let cleaning water run into the ice storage box. LED light The appliance features a maintenance-free LED light. en-us Energy saving tips n Install the appliance in a dry, well ventilated room, but not in the evaporation area. Clicking - Cleaning the appliance The Crisper Drawers and Chiller Drawer can be...
.... Do not let cleaning water run into the ice storage box. LED light The appliance features a maintenance-free LED light. en-us Energy saving tips n Install the appliance in a dry, well ventilated room, but not in the evaporation area. Clicking - Cleaning the appliance The Crisper Drawers and Chiller Drawer can be...
Instructions for Use
Page 23
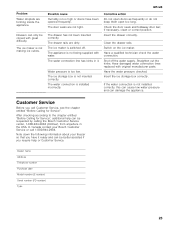
... correctly. Water pressure is not inserted correctly. if necessary, clean or correct position. Switch on the ice maker. If the water connection is installed incorrectly. The door seals are forming inside the appliance. The ice maker is too high or doors have it . Straighten out the kinks.... can damage the appliance. The appliance is not making ice cubes. The water connection is not installed correctly, this can cause low water pressure and can only be requested by calling the Bosch Customer Service center, 1-800-944-2904 (toll-free), from anywhere in it ready and can be...
... correctly. Water pressure is not inserted correctly. if necessary, clean or correct position. Switch on the ice maker. If the water connection is installed incorrectly. The door seals are forming inside the appliance. The ice maker is too high or doors have it . Straighten out the kinks.... can damage the appliance. The appliance is not making ice cubes. The water connection is not installed correctly, this can cause low water pressure and can only be requested by calling the Bosch Customer Service center, 1-800-944-2904 (toll-free), from anywhere in it ready and can be...

Instructions for Use
Page 25
..., HOTELS AND/OR RESTAURANT MEALS, REMODELLING EXPENSES IN EXCESS OF DIRECT DAMAGES WHICH ARE DEFINITIVELY CAUSED EXCLUSIVELY BY BOSCH, OR OTHERWISE. Warranty Exclusions The warranty coverage described herein excludes all electrical, plumbing or other connecting facilities,...OTHERWISE. n Any party's willful misconduct, negligence, misuse, abuse, accidents, neglect, improper operation, failure to maintain, improper or negligent installation, tampering, failure to comply with local fire and building codes and regulations. n A failure to follow operating instructions, mishandling, unauthorized ...
..., HOTELS AND/OR RESTAURANT MEALS, REMODELLING EXPENSES IN EXCESS OF DIRECT DAMAGES WHICH ARE DEFINITIVELY CAUSED EXCLUSIVELY BY BOSCH, OR OTHERWISE. Warranty Exclusions The warranty coverage described herein excludes all electrical, plumbing or other connecting facilities,...OTHERWISE. n Any party's willful misconduct, negligence, misuse, abuse, accidents, neglect, improper operation, failure to maintain, improper or negligent installation, tampering, failure to comply with local fire and building codes and regulations. n A failure to follow operating instructions, mishandling, unauthorized ...
