

Installation Instructions
Page 1
..., AND INCORRECT COUNTERTOP AND CABINET CUTS. IMPORTANT SAFETY INSTRUCTIONS Important Note to the Consumer Keep these installation instructions before installing range. • Remove all packing material from the oven compartments before connecting the gas & electrical supply to reach over the... information in this manual is located on the lower right front frame of the floor. 3. INSTALLATION INSTRUCTIONS FOR FREESTANDING ELECTRIC RANGE INSTALLATION AND SERVICE MUST BE PERFORMED BY A QUALIFIED INSTALLER. Español - Dimensions that are certain safety precautions you ...
..., AND INCORRECT COUNTERTOP AND CABINET CUTS. IMPORTANT SAFETY INSTRUCTIONS Important Note to the Consumer Keep these installation instructions before installing range. • Remove all packing material from the oven compartments before connecting the gas & electrical supply to reach over the... information in this manual is located on the lower right front frame of the floor. 3. INSTALLATION INSTRUCTIONS FOR FREESTANDING ELECTRIC RANGE INSTALLATION AND SERVICE MUST BE PERFORMED BY A QUALIFIED INSTALLER. Español - Dimensions that are certain safety precautions you ...

Installation Instructions
Page 2
... - (Bracket may not allow the bracket to fit flush against the wall, remove molding or mount bracket to check your adjustments. See Range Connection Opening Size Chart (Figs. 9 & 10) for hard wiring) NORMAL INSTALLATION STEPS 3/16" pilot hole 1-3/4" deep. For wall mount..., locate the bracket by a qualified technician in accordance with the range. Mark the location of "Permanent Wiring" or "Power Supply Cord Kit." If bracket is inserted into position (See Fig. 7). This appliance ...
... - (Bracket may not allow the bracket to fit flush against the wall, remove molding or mount bracket to check your adjustments. See Range Connection Opening Size Chart (Figs. 9 & 10) for hard wiring) NORMAL INSTALLATION STEPS 3/16" pilot hole 1-3/4" deep. For wall mount..., locate the bracket by a qualified technician in accordance with the range. Mark the location of "Permanent Wiring" or "Power Supply Cord Kit." If bracket is inserted into position (See Fig. 7). This appliance ...

Installation Instructions
Page 3
... refer to the terminal block. Remove the factory installed ground screw & plate to release the copper ground strap from factory with ranges shall be connected by means of a power supply cord. Make sure all screws are loosened or removed. 3. MODELS REQUIRING POWER... 12 3 You must have either three (3) or four (4) conductors (See Fig. 8). Cord must disconnect the ground strap. ELECTRICAL CONNECTION TO RANGE. Insert the end connectors for cord kit ampere rating information. Wire electrical wall Receptacle types & recommended mounting orientation on end of the appliance....
... refer to the terminal block. Remove the factory installed ground screw & plate to release the copper ground strap from factory with ranges shall be connected by means of a power supply cord. Make sure all screws are loosened or removed. 3. MODELS REQUIRING POWER... 12 3 You must have either three (3) or four (4) conductors (See Fig. 8). Cord must disconnect the ground strap. ELECTRICAL CONNECTION TO RANGE. Insert the end connectors for cord kit ampere rating information. Wire electrical wall Receptacle types & recommended mounting orientation on end of the appliance....
Installation Instructions
Page 4
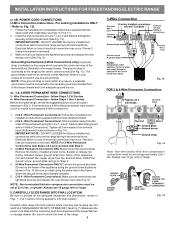
...appliance into final location. Be sure to an adequate ground source. 4c. 3 & 4-WIRE PERMANENT WIRE CONNECTIONS. 3 - Always use of the range. 4 Fig. 13 Fig. 14 Note: Non-terminated field wire compression connections must not be set at approximately 22in./ lbs. Refer to a ... electrical system (new branchcircuit or mobile home requires 4-Wire connection): 1. (3 & 4 - or greater. INSTALLATION INSTRUCTIONS FOR FREESTANDING ELECTRIC RANGE or 4B. Grounding Instructions (3-Wire Connections only): A ground strap is removed for any reason, a separate ground wire must be connected to...
...appliance into final location. Be sure to an adequate ground source. 4c. 3 & 4-WIRE PERMANENT WIRE CONNECTIONS. 3 - Always use of the range. 4 Fig. 13 Fig. 14 Note: Non-terminated field wire compression connections must not be set at approximately 22in./ lbs. Refer to a ... electrical system (new branchcircuit or mobile home requires 4-Wire connection): 1. (3 & 4 - or greater. INSTALLATION INSTRUCTIONS FOR FREESTANDING ELECTRIC RANGE or 4B. Grounding Instructions (3-Wire Connections only): A ground strap is removed for any reason, a separate ground wire must be connected to...

Instructions for Use
Page 5
... and cared for, your new appliance has been designed to be properly installed and grounded by a qualified technician. WARNING: • All ranges can tip. • Injury to extinguish flames. Do not store or use aluminum foil or protective liners to line any other purposes. ... Connect only to persons. Refer to a factory authorized service center. This appliance is not approved for outdoor or other than grease fires with range. • See installation instructions. Do not obstruct oven vents. Fire Safety Do not use corrosive chemicals, vapors, flammables or nonfood products in...
... and cared for, your new appliance has been designed to be properly installed and grounded by a qualified technician. WARNING: • All ranges can tip. • Injury to extinguish flames. Do not store or use aluminum foil or protective liners to line any other purposes. ... Connect only to persons. Refer to a factory authorized service center. This appliance is not approved for outdoor or other than grease fires with range. • See installation instructions. Do not obstruct oven vents. Fire Safety Do not use corrosive chemicals, vapors, flammables or nonfood products in...

Instructions for Use
Page 20
... not allow moisture to allow aluminum foil, or ANY material that heat are shown darkened Dual radiant surface elements (some models) The purpose of the range when it has cooled sufficiently. The surface control knobs do not have an opening to escape. Do not use on the backguard are designated by...
... not allow moisture to allow aluminum foil, or ANY material that heat are shown darkened Dual radiant surface elements (some models) The purpose of the range when it has cooled sufficiently. The surface control knobs do not have an opening to escape. Do not use on the backguard are designated by...

Instructions for Use
Page 21
... may still be hot and burns may appear to the surface elements. Press "CLOCK" once (do not hold "+" or "-" until the desired time of the range when it is hot. Refer to make contact with the medium level, and adjust as salt and pepper shakers, spoon holders or plastic wrappings on...
... may still be hot and burns may appear to the surface elements. Press "CLOCK" once (do not hold "+" or "-" until the desired time of the range when it is hot. Refer to make contact with the medium level, and adjust as salt and pepper shakers, spoon holders or plastic wrappings on...
Instructions for Use
Page 25
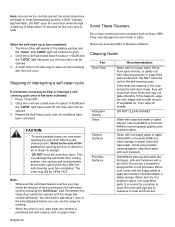
.... 3. DO NOT CLEAN GASKET. Rinse and dry. When the self-clean cycle has completed: 1. CAUTION: • To avoid possible burns use the range for porcelain to show fine lines with age due to exposure to stop or interrupt a selfcleaning cycle once it takes about 15 seconds for about... parts. Note: • Whenever the self-clean feature is active you can damage the automatic door locking system. Remember the range door cannot be opened until the range has cooled sufficiently. Avoid These Cleaners Do not use a moistened sponge/cloth on hot porcelain. Rinse thoroughly and dry, or...
.... 3. DO NOT CLEAN GASKET. Rinse and dry. When the self-clean cycle has completed: 1. CAUTION: • To avoid possible burns use the range for porcelain to show fine lines with age due to exposure to stop or interrupt a selfcleaning cycle once it takes about 15 seconds for about... parts. Note: • Whenever the self-clean feature is active you can damage the automatic door locking system. Remember the range door cannot be opened until the range has cooled sufficiently. Avoid These Cleaners Do not use a moistened sponge/cloth on hot porcelain. Rinse thoroughly and dry, or...

Instructions for Use
Page 27
...replacing the light bulb(s). The light bulb is located at the main source (or plug in the range back in this Use and Care Guide. The glass shield must be in use thin aluminum cooking ...they may fuse to do so could result in electrical shock or burns. • Be sure the range is in place whenever the oven is unplugged and all parts are cool and power to the appliance... has been turned off at the main source or unplug the range. 2. Permanent damage (such as illustrated). Allow the cooktop to boil dry when using the cooktop, not ...
...replacing the light bulb(s). The light bulb is located at the main source (or plug in the range back in this Use and Care Guide. The glass shield must be in use thin aluminum cooking ...they may fuse to do so could result in electrical shock or burns. • Be sure the range is in place whenever the oven is unplugged and all parts are cool and power to the appliance... has been turned off at the main source or unplug the range. 2. Permanent damage (such as illustrated). Allow the cooktop to boil dry when using the cooktop, not ...

Instructions for Use
Page 30
... oven rack. Allow the oven to preheat to circulate. Be sure floor is sagging or sloping, contact a carpenter to adequately support range. Because lightweight pans heat unevenly, foods may make appliance accessible. Replace or reinsert the light bulb if loose or defective. Check to make... range appear not level. Be sure oven temperature has been selected. Place a level on . Appliance must be lifted over carpet. Contact builder or...
... oven rack. Allow the oven to preheat to circulate. Be sure floor is sagging or sloping, contact a carpenter to adequately support range. Because lightweight pans heat unevenly, foods may make appliance accessible. Replace or reinsert the light bulb if loose or defective. Check to make... range appear not level. Be sure oven temperature has been selected. Place a level on . Appliance must be lifted over carpet. Contact builder or...
Instructions for Use
Page 33
...with respect to such parts. For safety and property damage concerns, Bosch highly recommends that the Product falls within the scope of this Statement of Limited Product Warranty applies only to the Bosch freestanding and slide-in range, ("Product") sold to you would still pay for an additional... charge). in any such event, if you request, Bosch would still be extended with air or water-going vessels); (2) any...
...with respect to such parts. For safety and property damage concerns, Bosch highly recommends that the Product falls within the scope of this Statement of Limited Product Warranty applies only to the Bosch freestanding and slide-in range, ("Product") sold to you would still pay for an additional... charge). in any such event, if you request, Bosch would still be extended with air or water-going vessels); (2) any...


