
Use & Care Manual (all languages)
Page 7
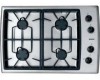
English 3 NGT Model 15,000 - NGP Model 5 Right Front-30", Simmer Burner 6,500/950 6 Center Front-36", Simmer Burner 6,500/950 7 Center Rear-36" 11,000 8 Serial Number/Data Plate * Key numbers 1-7 also correspond to the control knob location for the burner. About the Cooktop Parts and Accessories Figure 1 - Parts 30" Models 1 4 36" Models 1 4 2 1 2 5 4 8 5 7 3 1 7 3 6 46 8 Table 1: Features Key # Location BTU Rate 1 Left Rear 9,100 2 Right Rear - 30" 11,000 3 Right Rear-36" 9,100 4 Left Front 12,500 -
English 3 NGT Model 15,000 - NGP Model 5 Right Front-30", Simmer Burner 6,500/950 6 Center Front-36", Simmer Burner 6,500/950 7 Center Rear-36" 11,000 8 Serial Number/Data Plate * Key numbers 1-7 also correspond to the control knob location for the burner. About the Cooktop Parts and Accessories Figure 1 - Parts 30" Models 1 4 36" Models 1 4 2 1 2 5 4 8 5 7 3 1 7 3 6 46 8 Table 1: Features Key # Location BTU Rate 1 Left Rear 9,100 2 Right Rear - 30" 11,000 3 Right Rear-36" 9,100 4 Left Front 12,500 -

Use & Care Manual (all languages)
Page 8
...cooktop has two different burner cap sizes, large and medium. If the burner cap is porcelainized steel. Position the grates on the burner base. The burner cap is not placed correctly, the burner may not light or the flame may not burn completely or correctly. Side 30" models only Center Single 36" models only 30... not use the cooktop without all burner caps and all burner grates properly positioned. Position the straight side in the figure below. Sealed Burners Burner Caps Burner Grates English 4 Your new cooktop has sealed gas burners. Burner Grates Universal - ...
...cooktop has two different burner cap sizes, large and medium. If the burner cap is porcelainized steel. Position the grates on the burner base. The burner cap is not placed correctly, the burner may not light or the flame may not burn completely or correctly. Side 30" models only Center Single 36" models only 30... not use the cooktop without all burner caps and all burner grates properly positioned. Position the straight side in the figure below. Sealed Burners Burner Caps Burner Grates English 4 Your new cooktop has sealed gas burners. Burner Grates Universal - ...

Use & Care Manual (all languages)
Page 13
...cleaning methods below. Lo POPCORN Med to a boil. Lo to Med. LO to Med. - HI to 30 min- cook 10 to Hl - Table 3: Cooking Chart Food Start Cooking Continue Cooking / Standard Burners Simmering: Stewed Chicken, Corned Hl - Beef, Poaching Fish LO to Hl - Med. Hi - HI to... RICE Hl - Lo - cook meat/vegetables, LO to Med. Lo - STIR FRY Hl - Med. Cleaning the Cooktop WARNING: To avoid electrical shock hazard: If cleaning under the cooktop is ever required, switch off main power before reaching inside. HI - cover, bring water and vegetable Med. cover,...
...cleaning methods below. Lo POPCORN Med to a boil. Lo to Med. LO to Med. - HI to 30 min- cook 10 to Hl - Table 3: Cooking Chart Food Start Cooking Continue Cooking / Standard Burners Simmering: Stewed Chicken, Corned Hl - Beef, Poaching Fish LO to Hl - Med. Hi - HI to... RICE Hl - Lo - cook meat/vegetables, LO to Med. Lo - STIR FRY Hl - Med. Cleaning the Cooktop WARNING: To avoid electrical shock hazard: If cleaning under the cooktop is ever required, switch off main power before reaching inside. HI - cover, bring water and vegetable Med. cover,...

Installation Manual
Page 5
... the power connection is included for future use if required) 7) Burner Grates 30" models: (2) 36" models (3) 8) Burner Caps 30" models: (4) 36" models: (5) 9) Regulator If parts are missing or damaged, call the number or write to Bottom) 30" Models 31" (787.4 mm) 36" Models 37" (939....8 mm) 21" (533.4 mm) 21" (533.4 mm) 4" (Below Countertop) 4" (Below Countertop) Preparation Electrical Requirements Gas Requirements...
... the power connection is included for future use if required) 7) Burner Grates 30" models: (2) 36" models (3) 8) Burner Caps 30" models: (4) 36" models: (5) 9) Regulator If parts are missing or damaged, call the number or write to Bottom) 30" Models 31" (787.4 mm) 36" Models 37" (939....8 mm) 21" (533.4 mm) 21" (533.4 mm) 4" (Below Countertop) 4" (Below Countertop) Preparation Electrical Requirements Gas Requirements...
Installation Manual
Page 6
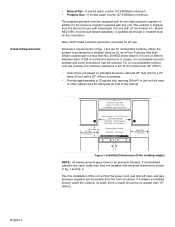
... (61cm) max. to the cabinet. Cabinet Requirements • Natural Gas - 6 inches water column (14.9 Millibars) minimum. • Propane Gas -11 inches water column (27.4 Millibars) minimum. Note: NGP model cooktops cannot be precisely followed. The cooktop is protected by a material listed by UL as a Floor Protector..." high (91cm) x 24" deep (61cm) with natural gas. When the surface is shipped from Back Wall Cabinet 13" (33cm) max. Centered Over Cooktop Rear Wall - 1-3/4"(4cm) Right Side 3" (8cm) min. Above Counter - 30" (76 cm) min. If a drawer is considered noncombustible ...
... (61cm) max. to the cabinet. Cabinet Requirements • Natural Gas - 6 inches water column (14.9 Millibars) minimum. • Propane Gas -11 inches water column (27.4 Millibars) minimum. Note: NGP model cooktops cannot be precisely followed. The cooktop is protected by a material listed by UL as a Floor Protector..." high (91cm) x 24" deep (61cm) with natural gas. When the surface is shipped from Back Wall Cabinet 13" (33cm) max. Centered Over Cooktop Rear Wall - 1-3/4"(4cm) Right Side 3" (8cm) min. Above Counter - 30" (76 cm) min. If a drawer is considered noncombustible ...

Installation Manual
Page 7
... (111.6 mm) Min. English 5 Clearance From Cooktop to Start of a ventilation hood above this appliance. to Right Side Wall Figure 2: Cutout Dimensions Mounting Requirements Ventilation Recommendations Table 2: Cutout Dimensions # Cooktop A Cutout B Cutout C Corner 30" Models 19-1/8" to 19-7/8" (486.1 to 505....6 mm) 28-5/8" to 29-3/8" (727.2 to 746.6 mm) 30" (762 mm) 36" Models 19-1/8 to 19-7/8" (486.1 ...
... (111.6 mm) Min. English 5 Clearance From Cooktop to Start of a ventilation hood above this appliance. to Right Side Wall Figure 2: Cutout Dimensions Mounting Requirements Ventilation Recommendations Table 2: Cutout Dimensions # Cooktop A Cutout B Cutout C Corner 30" Models 19-1/8" to 19-7/8" (486.1 to 505....6 mm) 28-5/8" to 29-3/8" (727.2 to 746.6 mm) 30" (762 mm) 36" Models 19-1/8 to 19-7/8" (486.1 ...

Installation Manual
Page 9
... (see complete procedure in Figure 6.) Rough-in the gas connection between wall shut-off valve. Apply a non-corrosive leak detection fluid to all detection fluid residue. If a leak appears, turn for 45" models - 20-3/8" (30 mm) Figure 5: Rough-in Box Area CAUTION: Do...appearing around fittings and connections indicate a leak. 3. Turn to cooktop gas inlet using a soap solution. Wipe off all joints and fittings in Box Pressure Flex Gas Line Regulator Shows Direction of Gas Flow Gas Shut-Off Valve Cabinet Floor Gas Stubout 1/2" Female Pipe Threads Supply Cord 120 V CL of...
... (see complete procedure in Figure 6.) Rough-in the gas connection between wall shut-off valve. Apply a non-corrosive leak detection fluid to all detection fluid residue. If a leak appears, turn for 45" models - 20-3/8" (30 mm) Figure 5: Rough-in Box Area CAUTION: Do...appearing around fittings and connections indicate a leak. 3. Turn to cooktop gas inlet using a soap solution. Wipe off all joints and fittings in Box Pressure Flex Gas Line Regulator Shows Direction of Gas Flow Gas Shut-Off Valve Cabinet Floor Gas Stubout 1/2" Female Pipe Threads Supply Cord 120 V CL of...