
Use & Care Manual (all languages)
Page 17
.../833-3600. indicating model number. Some models are transported from the United States for planning purposes only. We reserve the right to date critical installation dimensions by fax, use your local Canadian distributor or dealer. English 13
.../833-3600. indicating model number. Some models are transported from the United States for planning purposes only. We reserve the right to date critical installation dimensions by fax, use your local Canadian distributor or dealer. English 13

Installation Manual
Page 5
... 1: Overall Dimensions Width (Side to Side) Depth (Front to Back) Height (Top to the address listed inside the cover. Plan the installation so that the power connection is included for future use if required) 7) Burner Grates 30" models: (2) 36" models (3) 8) Burner Caps 30" models: (4)... 36" models: (5) 9) Regulator If parts are missing or damaged, call the number or write to Bottom) 30" Models 31" (787.4 mm) 36" Models 37" (939.8 mm) 21" (533.4 mm) 21" (533.4 mm) 4" (Below Countertop) 4" (Below Countertop) Preparation Electrical Requirements Gas ...
... 1: Overall Dimensions Width (Side to Side) Depth (Front to Back) Height (Top to the address listed inside the cover. Plan the installation so that the power connection is included for future use if required) 7) Burner Grates 30" models: (2) 36" models (3) 8) Burner Caps 30" models: (4)... 36" models: (5) 9) Regulator If parts are missing or damaged, call the number or write to Bottom) 30" Models 31" (787.4 mm) 36" Models 37" (939.8 mm) 21" (533.4 mm) 21" (533.4 mm) 4" (Below Countertop) 4" (Below Countertop) Preparation Electrical Requirements Gas ...
Installation Manual
Page 6
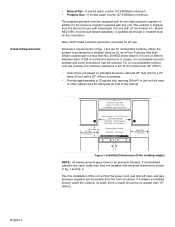
... cooktop edges) NOTE: All measurements given have to Combustible Surface NGT(P)7x - 30" (76cm) min. The cooktop is considered noncombustible and some dimensions ...NGP model cooktops cannot be precisely followed. Cabinet Requirements • Natural Gas - 6 inches water column (14.9 Millibars) minimum. • Propane Gas -11 inches water column (27.4 Millibars) minimum. Model NEZ1056, must be equipped with its depth (front to the pressure regulator supplied with natural gas. A qualified technician or installer must do the conversion. Figure 1: Installed Dimensions...
... cooktop edges) NOTE: All measurements given have to Combustible Surface NGT(P)7x - 30" (76cm) min. The cooktop is considered noncombustible and some dimensions ...NGP model cooktops cannot be precisely followed. Cabinet Requirements • Natural Gas - 6 inches water column (14.9 Millibars) minimum. • Propane Gas -11 inches water column (27.4 Millibars) minimum. Model NEZ1056, must be equipped with its depth (front to the pressure regulator supplied with natural gas. A qualified technician or installer must do the conversion. Figure 1: Installed Dimensions...

Installation Manual
Page 7
..." (1168.4 mm) Use the mounting brackets supplied. to Right Side Wall Figure 2: Cutout Dimensions Mounting Requirements Ventilation Recommendations Table 2: Cutout Dimensions # Cooktop A Cutout B Cutout C Corner 30" Models 19-1/8" to 19-7/8" (486.1 to 505.6 mm) 28-5/8" to 29-3/8" (727.2 to 746.6 mm) 30" (762 mm) 36" Models 19-1/8 to 19-7/8" (486.1 to 505.6 mm) 34-5/8" to...
..." (1168.4 mm) Use the mounting brackets supplied. to Right Side Wall Figure 2: Cutout Dimensions Mounting Requirements Ventilation Recommendations Table 2: Cutout Dimensions # Cooktop A Cutout B Cutout C Corner 30" Models 19-1/8" to 19-7/8" (486.1 to 505.6 mm) 28-5/8" to 29-3/8" (727.2 to 746.6 mm) 30" (762 mm) 36" Models 19-1/8 to 19-7/8" (486.1 to 505.6 mm) 34-5/8" to...

Installation Manual
Page 8
...with solid surface manufacturer. Prepare the Countertop Cut out the countertop per the dimensions shown in Box Clamp Foam Tape (Seal) Adjusting Screw Adjusting Screw Wooden Block (to be covered with the cooktop to prevent the power from being switched on the top and sides. Be... sure the tape extends beyond the outermost flange of the cooktop along the perimeter before installing the cooktop, switch power off at the service panel and lock the panel to underside of the cooktop. Install the Cooktop English 6 Rough-in section Countertop Cutout Dimensions above.
...with solid surface manufacturer. Prepare the Countertop Cut out the countertop per the dimensions shown in Box Clamp Foam Tape (Seal) Adjusting Screw Adjusting Screw Wooden Block (to be covered with the cooktop to prevent the power from being switched on the top and sides. Be... sure the tape extends beyond the outermost flange of the cooktop along the perimeter before installing the cooktop, switch power off at the service panel and lock the panel to underside of the cooktop. Install the Cooktop English 6 Rough-in section Countertop Cutout Dimensions above.