
Use & Care Manual (all languages)
Page 3
Table of Contents Important Safety Instructions 1 About the Cooktop 3 Parts and Accessories 3 Sealed Burners 4 Burner Caps 4 Burner Grates 4 Burner Control Knobs 5 Using the Cooktop 5 Before Using the Cooktop for the First Time 5 Operation 6 Normal Operation (Electronic Ignition/Reignition 6 In the Event of a Power Failure 6 Typical Flame Characteristics 6 Getting the Most Out Of Your Cooktop 7 Cooking Techniques (For Best Results 7 Proper...
Table of Contents Important Safety Instructions 1 About the Cooktop 3 Parts and Accessories 3 Sealed Burners 4 Burner Caps 4 Burner Grates 4 Burner Control Knobs 5 Using the Cooktop 5 Before Using the Cooktop for the First Time 5 Operation 6 Normal Operation (Electronic Ignition/Reignition 6 In the Event of a Power Failure 6 Typical Flame Characteristics 6 Getting the Most Out Of Your Cooktop 7 Cooking Techniques (For Best Results 7 Proper...

Use & Care Manual (all languages)
Page 5
... worn while cooking. • Use only certain types of glass, heatproof glass, ceramic, earthenware, or other metal tray, then turn off the gas burner. They should never be left alone or unattended in use . • Leave the hood ventilator on when flambéing food. •...replace any questions, contact the manufacturer. • Always have any part of the cooktop. • Wear proper apparel. Loose fitting garments or hanging sleeves should never be allowed to sit or stand on or near the burners; Boilovers cause smoking, and greasy spillovers may be certain that ...
... worn while cooking. • Use only certain types of glass, heatproof glass, ceramic, earthenware, or other metal tray, then turn off the gas burner. They should never be left alone or unattended in use . • Leave the hood ventilator on when flambéing food. •...replace any questions, contact the manufacturer. • Always have any part of the cooktop. • Wear proper apparel. Loose fitting garments or hanging sleeves should never be allowed to sit or stand on or near the burners; Boilovers cause smoking, and greasy spillovers may be certain that ...

Use & Care Manual (all languages)
Page 7
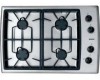
NGP Model 5 Right Front-30", Simmer Burner 6,500/950 6 Center Front-36", Simmer Burner 6,500/950 7 Center Rear-36" 11,000 8 Serial Number/Data Plate * Key numbers 1-7 also correspond to the control knob location for the burner. Parts 30" Models 1 4 36" Models 1 4 2 1 2 5 4 8 5 7 3 1 7 3 6 46 8 Table 1: Features Key # Location BTU Rate 1 Left Rear 9,100 2 Right Rear - 30" 11,000 3 Right Rear-36" 9,100 4 Left Front 12,500 - English 3 About the Cooktop Parts and Accessories Figure 1 - NGT Model 15,000 -
NGP Model 5 Right Front-30", Simmer Burner 6,500/950 6 Center Front-36", Simmer Burner 6,500/950 7 Center Rear-36" 11,000 8 Serial Number/Data Plate * Key numbers 1-7 also correspond to the control knob location for the burner. Parts 30" Models 1 4 36" Models 1 4 2 1 2 5 4 8 5 7 3 1 7 3 6 46 8 Table 1: Features Key # Location BTU Rate 1 Left Rear 9,100 2 Right Rear - 30" 11,000 3 Right Rear-36" 9,100 4 Left Front 12,500 - English 3 About the Cooktop Parts and Accessories Figure 1 - NGT Model 15,000 -

Use & Care Manual (all languages)
Page 8
... the center. Position the grates on the burner base. Burner Cap Porcelain Enamel Cap BURNER CAP Ports Locator Igniter BURNER BASE Notch WARNING: To prevent flare-ups do not use the cooktop without all burner caps and all burner grates properly positioned. Figure 3 - They are no burner parts under the cooktop to the size burner. Match the pan to clean, disassemble...
... the center. Position the grates on the burner base. Burner Cap Porcelain Enamel Cap BURNER CAP Ports Locator Igniter BURNER BASE Notch WARNING: To prevent flare-ups do not use the cooktop without all burner caps and all burner grates properly positioned. Figure 3 - They are no burner parts under the cooktop to the size burner. Match the pan to clean, disassemble...

Use & Care Manual (all languages)
Page 14
...;. Do not soak grommets. Rub lightly in the direction of polish lines. Table 4: Cooktop Cleaning Chart Cooktop Part / Material Suggested Cleaners Important Reminders Burner Base and • Burner Cap, underside • / Aluminum Alloy • Burner Cap and exterior • finish / Porcelain Enamel • • • &#... or chlorine compounds in their proper positions before using cooktop. English 10 Use all parts in some cleaners are corrosive to avoid water marks. • Before cleaning, be certain the burners are turned off . Make sure the cap is ...
...;. Do not soak grommets. Rub lightly in the direction of polish lines. Table 4: Cooktop Cleaning Chart Cooktop Part / Material Suggested Cleaners Important Reminders Burner Base and • Burner Cap, underside • / Aluminum Alloy • Burner Cap and exterior • finish / Porcelain Enamel • • • &#... or chlorine compounds in their proper positions before using cooktop. English 10 Use all parts in some cleaners are corrosive to avoid water marks. • Before cleaning, be certain the burners are turned off . Make sure the cap is ...

Use & Care Manual (all languages)
Page 15
...gas supply to service by an unauthorized agency or the use care when lift- A damp igniter will prevent burner...gas shut off with the Model Number, Serial Number and Date of occupancy for a new, previously unoccupied dwelling, any remaining lint after an outage, the igniters may spark once or twice even though all burner...For authorized service or parts information, call ,... English 11 Table 4: Cooktop Cleaning Chart Cooktop Part / Material Suggested Cleaners ... • Remove any part which fails in the ... the burner caps are properly positioned and the burner ports ...address Parts listed ...
...gas supply to service by an unauthorized agency or the use care when lift- A damp igniter will prevent burner...gas shut off with the Model Number, Serial Number and Date of occupancy for a new, previously unoccupied dwelling, any remaining lint after an outage, the igniters may spark once or twice even though all burner...For authorized service or parts information, call ,... English 11 Table 4: Cooktop Cleaning Chart Cooktop Part / Material Suggested Cleaners ... • Remove any part which fails in the ... the burner caps are properly positioned and the burner ports ...address Parts listed ...

Installation Manual
Page 5
...the power connection is included for future use if required) 7) Burner Grates 30" models: (2) 36" models (3) 8) Burner Caps 30" models: (4) 36" models: (5) 9) Regulator If parts are missing or damaged, call the number or write to Bottom) 30" Models 31" (787.4 mm) 36" Models 37" (939....8 mm) 21" (533.4 mm) 21" (533.4 mm) 4" (Below Countertop) 4" (Below Countertop) Preparation Electrical Requirements Gas Requirements...
...the power connection is included for future use if required) 7) Burner Grates 30" models: (2) 36" models (3) 8) Burner Caps 30" models: (4) 36" models: (5) 9) Regulator If parts are missing or damaged, call the number or write to Bottom) 30" Models 31" (787.4 mm) 36" Models 37" (939....8 mm) 21" (533.4 mm) 21" (533.4 mm) 4" (Below Countertop) 4" (Below Countertop) Preparation Electrical Requirements Gas Requirements...

