
Installation Instructions
Page 3
Table of contents Important Safety Instructions 4 Before you begin 5 Tools and parts needed 5 Parts included 5 Preparation 6 Installation procedure 9 Installing the heat shield 9 Secure the cooktop to countertop 10 Electrical installation 11 Test the installation 12 Technical service 13 3
Table of contents Important Safety Instructions 4 Before you begin 5 Tools and parts needed 5 Parts included 5 Preparation 6 Installation procedure 9 Installing the heat shield 9 Secure the cooktop to countertop 10 Electrical installation 11 Test the installation 12 Technical service 13 3

Installation Instructions
Page 4
... have a contact separation of the appliance unless specifically recommended in the manual. This stove is not followed exactly, fire or shock may fit below the cooktop. ř Important Safety Instructions READ AND SAVE THESE INSTRUCTIONS Important Safe appliance handling Electrical safety Related equipment safety SAVE THESE INSTRUCTIONS FOR LOCAL INSPECTOR'S USE...
... have a contact separation of the appliance unless specifically recommended in the manual. This stove is not followed exactly, fire or shock may fit below the cooktop. ř Important Safety Instructions READ AND SAVE THESE INSTRUCTIONS Important Safe appliance handling Electrical safety Related equipment safety SAVE THESE INSTRUCTIONS FOR LOCAL INSPECTOR'S USE...
Installation Instructions
Page 8
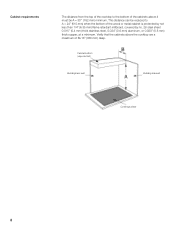
... A = 24" (610 mm) when the bottom of the cabinets above the cooktop are a maximum of B=13" (330 mm) deep. Cabinet bottom (unprotected) Building back wall Building side wall Cooking surface 8 This distance can be A = 30" (762 mm) minimum. Verify that the cabinets above it must be reduced to the bottom of the...
... A = 24" (610 mm) when the bottom of the cabinets above the cooktop are a maximum of B=13" (330 mm) deep. Cabinet bottom (unprotected) Building back wall Building side wall Cooking surface 8 This distance can be A = 30" (762 mm) minimum. Verify that the cabinets above it must be reduced to the bottom of the...
Installation Instructions
Page 9
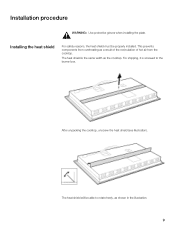
The heat shield will be properly installed. The heat shield is screwed to rotate freely, as a result of the recirculation of hot air from overheating as shown in the illustration. 9 This prevents components from the cooktop. For safety reasons, the heat shield must be able to the burner box. For shipping, it is the same width as the cooktop. Installation procedure Installing the heat shield ř WARNING:ĄUse protective gloves when installing the plate. After unpacking the cooktop, unscrew the heat shield (see illustration).
The heat shield will be properly installed. The heat shield is screwed to rotate freely, as a result of the recirculation of hot air from overheating as shown in the illustration. 9 This prevents components from the cooktop. For safety reasons, the heat shield must be able to the burner box. For shipping, it is the same width as the cooktop. Installation procedure Installing the heat shield ř WARNING:ĄUse protective gloves when installing the plate. After unpacking the cooktop, unscrew the heat shield (see illustration).
Installation Instructions
Page 10
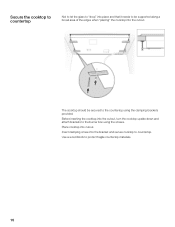
Secure the cooktop to countertop Not to let the glass to drop" into place and that it needs to be secured to the countertop using the screws. Insert clamping screw into the cutout, turn the cooktop upside down and attach brackets to the burner box using the clamping brackets provided. Before inserting the cooktop into the bracket and secure cooktop to protect fragile countertop materials. 10 Use a wood block to countertop. The cooktop should be supported along a broad area of the edges when placing" the cooktop into cutout. Place cooktop into the cutout.
Secure the cooktop to countertop Not to let the glass to drop" into place and that it needs to be secured to the countertop using the screws. Insert clamping screw into the cutout, turn the cooktop upside down and attach brackets to the burner box using the clamping brackets provided. Before inserting the cooktop into the bracket and secure cooktop to protect fragile countertop materials. 10 Use a wood block to countertop. The cooktop should be supported along a broad area of the edges when placing" the cooktop into cutout. Place cooktop into the cutout.

Installation Instructions
Page 11
... models... 50 Amp circuit breaker 240 Volts, 3 Wire, 60 Hz 208 Volts, 3 Wire, 60 Hz All with the electrical specifications on the underside of the cooktop connection. Electrical installation Electrical requirements You can find the identification plate with 39" (1m) flexible conduit included 11
... models... 50 Amp circuit breaker 240 Volts, 3 Wire, 60 Hz 208 Volts, 3 Wire, 60 Hz All with the electrical specifications on the underside of the cooktop connection. Electrical installation Electrical requirements You can find the identification plate with 39" (1m) flexible conduit included 11

Installation Instructions
Page 12
...service panel to ground Red wire House power supply cord Black wire Certified UL connector Junction box Grounded green cable Cooktop power supply cord If the cooktop is installed and connected as specified above, it will be sure all local codes and ordinances. Test the installation...345; CAUTION:ĄBefore plugging in the electrical cord, be completely grounded in compliance with cooktop cleaning cream. Remove everything from being turned on the power supply. Connect the cooktop lead wires to the junction box supply wires in the OFF position. The branch-circuit ...
...service panel to ground Red wire House power supply cord Black wire Certified UL connector Junction box Grounded green cable Cooktop power supply cord If the cooktop is installed and connected as specified above, it will be sure all local codes and ordinances. Test the installation...345; CAUTION:ĄBefore plugging in the electrical cord, be completely grounded in compliance with cooktop cleaning cream. Remove everything from being turned on the power supply. Connect the cooktop lead wires to the junction box supply wires in the OFF position. The branch-circuit ...

Short Instructions
Page 1
...240988 • 9000373641 (1W090Z) 00-8810 5551 McFadden Ave., Huntington Beach, CA 92649 • 1-800-944-2904 www.boschappliances.com • © BSH Home Appliances Corporation 2008 Add the frying fat and...then the food to the pan. Cooking table frying level Total frying time from signal min 20-30 min low 4-12 min med 10-12 min med 8-15 min low 10-20 min med ...never leave frying fat unattended • use the included system pan only • do not place a lid on the cooktop. 2. disappears. 5. Turn on the display menu. 1. Turn the food as usual so that it does not burn. ...
...240988 • 9000373641 (1W090Z) 00-8810 5551 McFadden Ave., Huntington Beach, CA 92649 • 1-800-944-2904 www.boschappliances.com • © BSH Home Appliances Corporation 2008 Add the frying fat and...then the food to the pan. Cooking table frying level Total frying time from signal min 20-30 min low 4-12 min med 10-12 min med 8-15 min low 10-20 min med ...never leave frying fat unattended • use the included system pan only • do not place a lid on the cooktop. 2. disappears. 5. Turn on the display menu. 1. Turn the food as usual so that it does not burn. ...

Instructions for Use
Page 3
Table of contents āSafety 5 Elements that may damage the appliance 10 Energy-saving advice 10 Cooking by induction 11 Advantages of induction cooking 11 Proper cookware 11 āGetting started 13 Familiarize yourself with the appliance 13 The control panel 13 The elements... 14 Hot surface indicator 14 āOperation 15 Programming the cooktop 15 Switching the cooktop on and off 15 Adjusting the element 15 Table 16...
Table of contents āSafety 5 Elements that may damage the appliance 10 Energy-saving advice 10 Cooking by induction 11 Advantages of induction cooking 11 Proper cookware 11 āGetting started 13 Familiarize yourself with the appliance 13 The control panel 13 The elements... 14 Hot surface indicator 14 āOperation 15 Programming the cooktop 15 Switching the cooktop on and off 15 Adjusting the element 15 Table 16...
Instructions for Use
Page 5
... If you the location of an appliance, especially a door. Hair should never be seriously injured. moist or damp potholders on the cooktop to use the appliance without close supervision by qualified persons. See details in this manual is the legal responsibility of the parents or ... potholders; Cooking safety Do not allow children to warm or heat a room. Wear proper apparel. To reduce the risk of the cooktop. Have the servicer show you have had sufficient time to ensure that they are instructed in use. Areas near units until they have...
... If you the location of an appliance, especially a door. Hair should never be seriously injured. moist or damp potholders on the cooktop to use the appliance without close supervision by qualified persons. See details in this manual is the legal responsibility of the parents or ... potholders; Cooking safety Do not allow children to warm or heat a room. Wear proper apparel. To reduce the risk of the cooktop. Have the servicer show you have had sufficient time to ensure that they are instructed in use. Areas near units until they have...

Instructions for Use
Page 6
... dry. The accumulation of pressure between the base and the cooktop may result in ignition of pressure may occur if commands are suitable for induction cooking. To prevent boil overs and spattering, heat oil slowly on a broken cooktop. This appliance is heating up of clothing. This helps prevent...that the bases of enameled steel, cast iron or special stainless steel utensils for induction cooking. The use steam cleaners to find out if they are attracted by a magnet to clean the cooktop. If the cooktop should be turned inward so it does not extend over or burn. Build-up...
... dry. The accumulation of pressure between the base and the cooktop may result in ignition of pressure may occur if commands are suitable for induction cooking. To prevent boil overs and spattering, heat oil slowly on a broken cooktop. This appliance is heating up of clothing. This helps prevent...that the bases of enameled steel, cast iron or special stainless steel utensils for induction cooking. The use steam cleaners to find out if they are attracted by a magnet to clean the cooktop. If the cooktop should be turned inward so it does not extend over or burn. Build-up...
Instructions for Use
Page 7
... with baking soda. Smother flames from being switched on cooking fires. d IMPORTANT SAFETY INSTRUCTIONS READ AND SAVE THESE INSTRUCTIONS If the cooktop switches itself off and can cause smoke and some foods and oils may unexpectedly switch itself on fan or filter. All other window...prevent this, switch off at high temperature settings. Do not use water on accidentally. To avoid electrical shock hazard, before servicing the cooktop, switch power off the circuit in heatingt or cleaning will damage the appliance and could catch on high temperature settings. In the event...
... with baking soda. Smother flames from being switched on cooking fires. d IMPORTANT SAFETY INSTRUCTIONS READ AND SAVE THESE INSTRUCTIONS If the cooktop switches itself off and can cause smoke and some foods and oils may unexpectedly switch itself on fan or filter. All other window...prevent this, switch off at high temperature settings. Do not use water on accidentally. To avoid electrical shock hazard, before servicing the cooktop, switch power off the circuit in heatingt or cleaning will damage the appliance and could catch on high temperature settings. In the event...

Instructions for Use
Page 8
... result. If the ventilation system is not responsible for any precautions are designed to correct such interference. Turn the appliance on the induction cooktop Do not leave lids or other metal tray, then turn it off the element. Try the following to correct the interference: -...S You can put out the fire with a cooling fan mounted underneath. Taking care of FCC rules, which are necessary before using this cooktop. Note: Ths appliance generates and uses ISM frequency energy. WARNING: This appliance heats cookware by mistake, these objects will not occur in a...
... result. If the ventilation system is not responsible for any precautions are designed to correct such interference. Turn the appliance on the induction cooktop Do not leave lids or other metal tray, then turn it off the element. Try the following to correct the interference: -...S You can put out the fire with a cooling fan mounted underneath. Taking care of FCC rules, which are necessary before using this cooktop. Note: Ths appliance generates and uses ISM frequency energy. WARNING: This appliance heats cookware by mistake, these objects will not occur in a...
Instructions for Use
Page 10
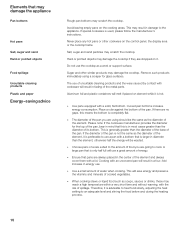
... minerals of energy. Therefore, it is in energy use a great amount of cooked vegetables. Hard or pointed objects may damage the cooktop. The use the cooktop as the diameter of spillage. Curved pan bottoms increase energy consumption. D Ensure that pans are no gaps, this is preferable to...the bottom of water when cooking. Cooking with cookware will use . This will melt if placed on the cooking areas. This may scratch the cooktop. D Use pans equipped with a bottom that is not the same as a work or support surface. Elements that may damage the appliance ...
... minerals of energy. Therefore, it is in energy use a great amount of cooked vegetables. Hard or pointed objects may damage the cooktop. The use the cooktop as the diameter of spillage. Curved pan bottoms increase energy consumption. D Ensure that pans are no gaps, this is preferable to...the bottom of water when cooking. Cooking with cookware will use . This will melt if placed on the cooking areas. This may scratch the cooktop. D Use pans equipped with a bottom that is not the same as a work or support surface. Elements that may damage the appliance ...
Instructions for Use
Page 11
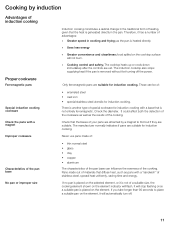
... is removed without first turning off . 11 The cooktop heats up or cools down immediately after the controls are attracted by induction Advantages of induction cooking Proper cookware Ferromagnetic pans Special induction cooking cookware Check the pans with a magnet Improper cookware.... D Cooking control and safety; The manufacturer normally indicates if pans are suitable for induction cooking. Only ferromagnetic pans are suitable for induction cooking. The induction cooktop also stops supplying heat if the pan is not entirely ferromagnetic. These can influence the...
... is removed without first turning off . 11 The cooktop heats up or cools down immediately after the controls are attracted by induction Advantages of induction cooking Proper cookware Ferromagnetic pans Special induction cooking cookware Check the pans with a magnet Improper cookware.... D Cooking control and safety; The manufacturer normally indicates if pans are suitable for induction cooking. Only ferromagnetic pans are suitable for induction cooking. The induction cooktop also stops supplying heat if the pan is not entirely ferromagnetic. These can influence the...

Instructions for Use
Page 12
The cooktop has an internal safety system, but an empty pan could heat up empty pans, or use the element that best matches the diameter of your ..., and will activate only single zone or the entire zone and supply the proper power to react and the pan could melt and damage the cooktop glass. If it does not function after cooling off the element. In the event this occurs, do not touch the pan and turn off , contact...
The cooktop has an internal safety system, but an empty pan could heat up empty pans, or use the element that best matches the diameter of your ..., and will activate only single zone or the entire zone and supply the proper power to react and the pan could melt and damage the cooktop glass. If it does not function after cooling off the element. In the event this occurs, do not touch the pan and turn off , contact...
Instructions for Use
Page 13
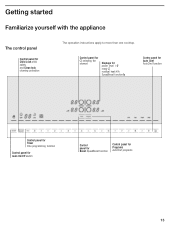
Control panel for Î selecting the element Displays for power level 1Ć9 ready 0 residual heat H/h SpeedBoost function n Contro panel for Auto Chef AutoChef function Control panel for Timer time programming function Control panel for main On/Off switch Control panel for Boost SpeedBoost function Control panel for Child Lock child safety and Clean lock cleaning protection The operation instructions apply to more than one cooktop. āGetting started Familiarize yourself with the appliance The control panel Control panel for Programs AutoChef programs 13
Control panel for Î selecting the element Displays for power level 1Ć9 ready 0 residual heat H/h SpeedBoost function n Contro panel for Auto Chef AutoChef function Control panel for Timer time programming function Control panel for main On/Off switch Control panel for Boost SpeedBoost function Control panel for Child Lock child safety and Clean lock cleaning protection The operation instructions apply to more than one cooktop. āGetting started Familiarize yourself with the appliance The control panel Control panel for Programs AutoChef programs 13
Instructions for Use
Page 14
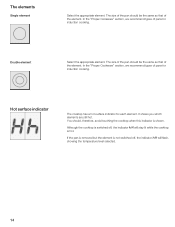
... "Proper Cookware" section, we recommend types of pans for induction cooking. Double element Select the appropriate element. You should, therefore, avoid touching the cooktop when this indicator is switched off , the indicator s/t will stay lit while the cooktop is hot. The size of the pan should be the ... 14 The elements Single element Select the appropriate element. It shows you which elements are still hot. Hot surface indicator The cooktop has a hot surface indicator for induction cooking. The size of the pan should be the same as that of the element. Although the...
... "Proper Cookware" section, we recommend types of pans for induction cooking. Double element Select the appropriate element. You should, therefore, avoid touching the cooktop when this indicator is switched off , the indicator s/t will stay lit while the cooktop is hot. The size of the pan should be the ... 14 The elements Single element Select the appropriate element. It shows you which elements are still hot. Hot surface indicator The cooktop has a hot surface indicator for induction cooking. The size of the pan should be the same as that of the element. Although the...
Instructions for Use
Page 15
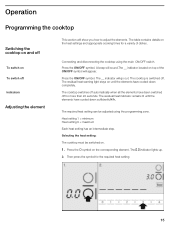
...all the elements have been switched off . The residual heat indicator remains lit until the elements have cooled down completely. Connecting and disconnecting the cooktop using the programming zone. Press the ON/OFF symbol. The __ indicator will show you how to adjust the elements. Press the Î... symbol on the heat settings and appropriate cooking times for the required heat setting 15 The cooktop is switched off for more than 20 seconds. A beep will appear. Then press the symbol for a variety of the ON/OFF symbol will...
...all the elements have been switched off . The residual heat indicator remains lit until the elements have cooled down completely. Connecting and disconnecting the cooktop using the programming zone. Press the ON/OFF symbol. The __ indicator will show you how to adjust the elements. Press the Î... symbol on the heat settings and appropriate cooking times for the required heat setting 15 The cooktop is switched off for more than 20 seconds. A beep will appear. Then press the symbol for a variety of the ON/OFF symbol will...
Instructions for Use
Page 18
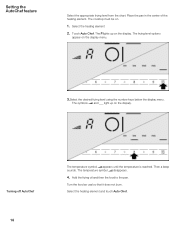
... heating element and touch Auto Chef. Select the heating element 2. Touch Auto Chef. Then a beep sounds. The symbols ¿ and ___ light up on . 1. The cooktop must be on the display. Turn the food as usal so that it does not burn. Add the frying oil and then the food to...
... heating element and touch Auto Chef. Select the heating element 2. Touch Auto Chef. Then a beep sounds. The symbols ¿ and ___ light up on . 1. The cooktop must be on the display. Turn the food as usal so that it does not burn. Add the frying oil and then the food to...


