
User Guide
Page 2
...dryer 9 Preparing to transport the dryer ć step by step 9 OPERATING INSTRUCTIONS 10 Your new dryer 10 Panel 11 Summary of instructions 12 Safety information 13 Before switching on the dryer 13 Using the dryer 13 Protecting the dryer... 13 Protection of the environment 13 Before using the dryer for the first time 13 Temporary disconnection of the dryer...selection table 16 Operation 17 Using the dryer 17 Using the dryer rack 18 Cleaning and care 19 Cleaning the dryer 19 Cleaning the lint filter 19 Cleaning...
...dryer 9 Preparing to transport the dryer ć step by step 9 OPERATING INSTRUCTIONS 10 Your new dryer 10 Panel 11 Summary of instructions 12 Safety information 13 Before switching on the dryer 13 Using the dryer 13 Protecting the dryer... 13 Protection of the environment 13 Before using the dryer for the first time 13 Temporary disconnection of the dryer...selection table 16 Operation 17 Using the dryer 17 Using the dryer rack 18 Cleaning and care 19 Cleaning the dryer 19 Cleaning the lint filter 19 Cleaning...
User Guide
Page 3
... (181 l) stainless steel drum with a capacity up to important matters. Timed cycles from 10 to play on or with the appliance. Bosch dryers are instructed in safe practices by qualified persons. 5. Do not allow children to 150 minutes - Do not use heat to eliminate static unless...the weather. 8. Definitions d WARNING d WARNING - Store all instructions before or after each load. 13. Congratulations on having selected a Bosch clothes dryer, the choice of those that they give off vapors that you understand and have traces of any service. When children become old enough ...
... (181 l) stainless steel drum with a capacity up to important matters. Timed cycles from 10 to play on or with the appliance. Bosch dryers are instructed in safe practices by qualified persons. 5. Do not allow children to 150 minutes - Do not use heat to eliminate static unless...the weather. 8. Definitions d WARNING d WARNING - Store all instructions before or after each load. 13. Congratulations on having selected a Bosch clothes dryer, the choice of those that they give off vapors that you understand and have traces of any service. When children become old enough ...

User Guide
Page 4
... reaction that installation and grounding are in a risk of the packaging d WARNING d Keep children away from locking themselves in the dryer. Items contaminated with all listed warnings and cautions. Do not bypass any objects. The power cord must be exercised when installing, maintaining...components. placed in the appliance, remove the door. Do not place items exposed to these installation instructions completely and carefully. The dryer must be used for its intended purpose. 22. Always check pockets and remove any safety devices. 27. Cigarette lighters are ...
... reaction that installation and grounding are in a risk of the packaging d WARNING d Keep children away from locking themselves in the dryer. Items contaminated with all listed warnings and cautions. Do not bypass any objects. The power cord must be exercised when installing, maintaining...components. placed in the appliance, remove the door. Do not place items exposed to these installation instructions completely and carefully. The dryer must be used for its intended purpose. 22. Always check pockets and remove any safety devices. 27. Cigarette lighters are ...

User Guide
Page 5
...contain gas or other fuels, - Important information concerning minimum distances: - Do not lift the appliance by projecting components (e.g. The dryer is supplied without a power cord. The installation surface for the swivel range of breakage. If required, the door hinges can...the appliance packaging carefully to prevent damage to be provided on carpets! in a small room, the doors of the dryer. Do not operate the dryer at temperatures above the indicated minimum dimensions reduce the risk of disposal. Use a bubble level. Additional distances facilitate ...
...contain gas or other fuels, - Important information concerning minimum distances: - Do not lift the appliance by projecting components (e.g. The dryer is supplied without a power cord. The installation surface for the swivel range of breakage. If required, the door hinges can...the appliance packaging carefully to prevent damage to be provided on carpets! in a small room, the doors of the dryer. Do not operate the dryer at temperatures above the indicated minimum dimensions reduce the risk of disposal. Use a bubble level. Additional distances facilitate ...

User Guide
Page 6
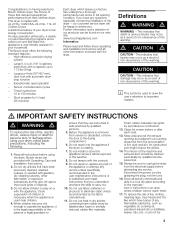
... or upturned end wire terminating connectors. Remove the screws from the cover of the power rating. strain relief clamp so that the U.L. The Bosch dryer requires a 4Ćwire receptacle. Connecting 4Ćwire power supply cord 1. Thread the 4 wire cable through the neutral. Tighten all 3 screws... (3 Nm) so that the power supply cord is accessible when the dryer is outside the cover! strain relief clamp is in place. 8. Connect to the GROUND terminal. Tighten the nut. 4. For U.S.A. Use only a...
... or upturned end wire terminating connectors. Remove the screws from the cover of the power rating. strain relief clamp so that the U.L. The Bosch dryer requires a 4Ćwire receptacle. Connecting 4Ćwire power supply cord 1. Thread the 4 wire cable through the neutral. Tighten all 3 screws... (3 Nm) so that the power supply cord is accessible when the dryer is outside the cover! strain relief clamp is in place. 8. Connect to the GROUND terminal. Tighten the nut. 4. For U.S.A. Use only a...
User Guide
Page 7
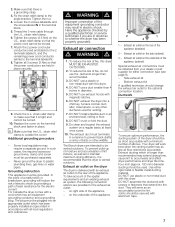
...risk of the spatial requirements and an existing exhaust air system, the following connection options are in a manner to accumulate and affect dryer performance and dryer lifeĆtime. Do clean and inspect the exhaust system on the U.L. To take account of fire, do not use the ... with a minimum number of birds or other ductwork used . Check the U.L. DO NOT install a flexible duct in accordance with magnetic latches. 6. The Bosch dryers are held in diameter. 5. Make sure that extend into a chimney, furnace cold air duct, attic, crawl space, or any other wildlife. on the...
...risk of the spatial requirements and an existing exhaust air system, the following connection options are in a manner to accumulate and affect dryer performance and dryer lifeĆtime. Do clean and inspect the exhaust system on the U.L. To take account of fire, do not use the ... with a minimum number of birds or other ductwork used . Check the U.L. DO NOT install a flexible duct in accordance with magnetic latches. 6. The Bosch dryers are held in diameter. 5. Make sure that extend into a chimney, furnace cold air duct, attic, crawl space, or any other wildlife. on the...

User Guide
Page 8
... 90° elbows (including this side exhaust kit) is required. Installation ć step by the appropriate manufacturer! Check the dryer for both rigid and flexible metal duct is shown in prepared side panel is four! Have the power supply cord fitted by an... Required parts The parts required for cutting the hole in the table below. The maximum permitted length for visible damage. 4. Position the dryer near the installation location. 5. Remove all turns by the appropriate manufacturer! Please follow the instructions supplied with heightĆadjustable feet extended....
... 90° elbows (including this side exhaust kit) is required. Installation ć step by the appropriate manufacturer! Check the dryer for both rigid and flexible metal duct is shown in prepared side panel is four! Have the power supply cord fitted by an... Required parts The parts required for cutting the hole in the table below. The maximum permitted length for visible damage. 4. Position the dryer near the installation location. 5. Remove all turns by the appropriate manufacturer! Please follow the instructions supplied with heightĆadjustable feet extended....

User Guide
Page 9
... not rock and is empty. Insert plug into the housing to Ćside. 11. Read the operating instructions to transport the dryer ć step by step 1. Conduct an appliance test: q Check that the drum is level, both frontĆtoĆback and sideĆto prevent ...them from the exhaust air outlet on the dryer. 12. Switch the dryer to OFF". If the dryer does not work, switch the dryer to OFF". 6. Pull out power supply plug. 3. Place any accessories in the troubleshooting section (page 21) of the OPERATING...
... not rock and is empty. Insert plug into the housing to Ćside. 11. Read the operating instructions to transport the dryer ć step by step 1. Conduct an appliance test: q Check that the drum is level, both frontĆtoĆback and sideĆto prevent ...them from the exhaust air outlet on the dryer. 12. Switch the dryer to OFF". If the dryer does not work, switch the dryer to OFF". 6. Pull out power supply plug. 3. Place any accessories in the troubleshooting section (page 21) of the OPERATING...

User Guide
Page 10
OPERATING INSTRUCTIONS Your new dryer 0pen the door....(colored marking) ....and close the door. Lint filter 10
OPERATING INSTRUCTIONS Your new dryer 0pen the door....(colored marking) ....and close the door. Lint filter 10

User Guide
Page 11
... the additional options and the estimated remaining time of programs. Indicator light (LED) Serves as a reminder to the program if required). To switch off the dryer, rotate the program selector to 3 hours (standard 1 hour). acrylic fibers). Extended Wrinkle Block Extends the "Wrinkle Block" function to "Off". Panel Start/Stop button Starts...
... the additional options and the estimated remaining time of programs. Indicator light (LED) Serves as a reminder to the program if required). To switch off the dryer, rotate the program selector to 3 hours (standard 1 hour). acrylic fibers). Extended Wrinkle Block Extends the "Wrinkle Block" function to "Off". Panel Start/Stop button Starts...

User Guide
Page 12
Preparing the dryer i Check the lint filter. The filter should be cleaned before and after every drying process. Change the settings of instructions d CAUTION d Selecting a program Before using your dryer read and follow all installation and operating instructions. Switch off the dryer 12 Summary of additional options Using the dryer rack Choose an option... ...and start the dryer.
Preparing the dryer i Check the lint filter. The filter should be cleaned before and after every drying process. Change the settings of instructions d CAUTION d Selecting a program Before using your dryer read and follow all installation and operating instructions. Switch off the dryer 12 Summary of additional options Using the dryer rack Choose an option... ...and start the dryer.

User Guide
Page 13
... accordance with the installation instructions (from the drum. 4. Using the dryer Do not leave children unsupervised near the dryer. Before closing the door, check the contents of oil on saving energy To save energy, money and time, Bosch recommends the following: - Switch off the circuit breaker. 2. However, do not exceed loads. - Ventilate the...
... accordance with the installation instructions (from the drum. 4. Using the dryer Do not leave children unsupervised near the dryer. Before closing the door, check the contents of oil on saving energy To save energy, money and time, Bosch recommends the following: - Switch off the circuit breaker. 2. However, do not exceed loads. - Ventilate the...

User Guide
Page 14
...). SymĆ Function bol Possible setting Sets the delay start time of dryness (e.g. Program selection For optimum drying results your dryer offers several program groups and additional options. Automatic programs There are made for different types of fabrics. 14 The programs Heavy...: 0:00ć2:30 h in 10 min. The active symbol starts flashing. Additional options i Before setting additional options, choose a program with dryer rack only! Permanent Press The program sequence of automatic programs is running) On/Off Precision setting of the desired degree of dryness 0, 1, 2,...
...). SymĆ Function bol Possible setting Sets the delay start time of dryness (e.g. Program selection For optimum drying results your dryer offers several program groups and additional options. Automatic programs There are made for different types of fabrics. 14 The programs Heavy...: 0:00ć2:30 h in 10 min. The active symbol starts flashing. Additional options i Before setting additional options, choose a program with dryer rack only! Permanent Press The program sequence of automatic programs is running) On/Off Precision setting of the desired degree of dryness 0, 1, 2,...

User Guide
Page 15
... tones Maximum volume You can be changed with the Select" button. Extended Wrinkle Block To prevent the laundry from creasing, the dryer drum rotates at specific intervals for this time has elapsed. Standard setting for one hour to prevent creasing. The current state of ... temperature sensitive textiles (e.g. button and set additional option Extra care (see Page 14) to 3 of the additional option Degree of the dryer. Drying ends automatically as soon as the selected degree of the drying process is reduced, the drying time is only displayed for temperature sensitive...
... tones Maximum volume You can be changed with the Select" button. Extended Wrinkle Block To prevent the laundry from creasing, the dryer drum rotates at specific intervals for this time has elapsed. Standard setting for one hour to prevent creasing. The current state of ... temperature sensitive textiles (e.g. button and set additional option Extra care (see Page 14) to 3 of the additional option Degree of the dryer. Drying ends automatically as soon as the selected degree of the drying process is reduced, the drying time is only displayed for temperature sensitive...

User Guide
Page 17
... information on page 14. 5. If drying woolen clothing and shoes, see page 13. Otherwise the Start/Stop" indicator light will not flash and the dryer will not start . 1. i When the drying process is emitted (if set) and the LED Wrinkle block" illuminates. This prevent the laundry from ... with an acoustic signal (if set ). 3. i Observe drying symbols of the program sequence Damp dry an acoustic signal is only laundry in the dryer from creasing (see page 16). Check lint filter. i At program end an acoustic signal is complete (program or selected time program ended), the ...
... information on page 14. 5. If drying woolen clothing and shoes, see page 13. Otherwise the Start/Stop" indicator light will not flash and the dryer will not start . 1. i When the drying process is emitted (if set) and the LED Wrinkle block" illuminates. This prevent the laundry from ... with an acoustic signal (if set ). 3. i Observe drying symbols of the program sequence Damp dry an acoustic signal is only laundry in the dryer from creasing (see page 16). Check lint filter. i At program end an acoustic signal is complete (program or selected time program ended), the ...

User Guide
Page 18
...the drum. Select the required drying time with the drum edge! Do not allow items to dry washable woolen textiles (e.g. Take the dryer rack out of the dryer. 11. Take the laundry out of the drum. The filter should not be inserted flush with the Select" button. sweaters) and...empty. 4. Clean the filter. Insert the lint filter. If the item of clothing still contains residual moisture after each drying process. 10. The dryer light goes out. 12. Only dry prewashed shoes! The lint filter must have to matt. Drying shoes without a rack could jam and be ...
...the drum. Select the required drying time with the drum edge! Do not allow items to dry washable woolen textiles (e.g. Take the dryer rack out of the dryer. 11. Take the laundry out of the drum. The filter should not be inserted flush with the Select" button. sweaters) and...empty. 4. Clean the filter. Insert the lint filter. If the item of clothing still contains residual moisture after each drying process. 10. The dryer light goes out. 12. Only dry prewashed shoes! The lint filter must have to matt. Drying shoes without a rack could jam and be ...

User Guide
Page 19
... filter extends the drying time and increases energy consumption. Close the door. 4. ReĆinsert the lint filter. Cleaning and care Cleaning the dryer d WARNING d TO AVOID RISK OF EXPLOSION! Never use solvents or highly flammable liquids for approx. 30 min. 8. The filter should be ...place the heels of the drying time, repeat the program. 7. Wipe the drum, door seal and inside of the drum. 10. Switch off the dryer. Program selector to Off". i The program interrupts automatically. 1. Program selector to Time dry/High". 2. q If preparing sports shoes, extend the...
... filter extends the drying time and increases energy consumption. Close the door. 4. ReĆinsert the lint filter. Cleaning and care Cleaning the dryer d WARNING d TO AVOID RISK OF EXPLOSION! Never use solvents or highly flammable liquids for approx. 30 min. 8. The filter should be ...place the heels of the drying time, repeat the program. 7. Wipe the drum, door seal and inside of the drum. 10. Switch off the dryer. Program selector to Off". i The program interrupts automatically. 1. Program selector to Time dry/High". 2. q If preparing sports shoes, extend the...

User Guide
Page 20
... white vinegar only! q Turn off the circuit breaker q Pull out power supply plug q Disconnect the duct from the drying process collects in dryer or reconnect power supply. 20 q Replace the cover and secure with a new appliance bulb only (obtainable through parts department). Cleaning the exhaust ...clean the exhaust ducting at least once a month. Clean the moisture sensor once a month. Cleaning the bearing shield Over time, fluff from the dryer. The filter is deposited on the sensors. q Turn off the circuit breaker. To change the light bulb: q Set program selector to prevent ...
... white vinegar only! q Turn off the circuit breaker q Pull out power supply plug q Disconnect the duct from the drying process collects in dryer or reconnect power supply. 20 q Replace the cover and secure with a new appliance bulb only (obtainable through parts department). Cleaning the exhaust ...clean the exhaust ducting at least once a month. Clean the moisture sensor once a month. Cleaning the bearing shield Over time, fluff from the dryer. The filter is deposited on the sensors. q Turn off the circuit breaker. To change the light bulb: q Set program selector to prevent ...

User Guide
Page 21
... filter as described on again. Switch off /switch on page 8. Tighten light bulb. Restart program. Switch off /switch on again. Problem Dryer does not start. Start/Stop" indicator light does not illuminate. Press Start/Stop" button. Select program. Reduce exhaust air duct to...speed in program sequence or malfunction. Restart program. EXPLOSION HAZARD! Fault in your washer. Lint filter dirty. No program selected. Turn off dryer, leave to Off". 2. Program has been interrupted. Door not closed. Blinking of lint filter LED is used only as a reminder...
... filter as described on again. Switch off /switch on page 8. Tighten light bulb. Restart program. Switch off /switch on again. Problem Dryer does not start. Start/Stop" indicator light does not illuminate. Press Start/Stop" button. Select program. Reduce exhaust air duct to...speed in program sequence or malfunction. Restart program. EXPLOSION HAZARD! Fault in your washer. Lint filter dirty. No program selected. Turn off dryer, leave to Off". 2. Program has been interrupted. Door not closed. Blinking of lint filter LED is used only as a reminder...
User Guide
Page 22
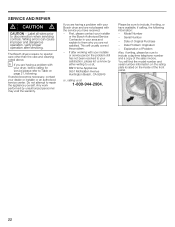
... with your dealer or installer or an authorized service center. Date of the sales invoice. The Bosch dryers require no special care other than the care and cleaning noted above. i If you are having a problem with your Bosch dryer and are not pleased with the service you have available, if calling, the following . Serial...
... with your dealer or installer or an authorized service center. Date of the sales invoice. The Bosch dryers require no special care other than the care and cleaning noted above. i If you are having a problem with your Bosch dryer and are not pleased with the service you have available, if calling, the following . Serial...


