Pedestal Installation Instructions
Page 3
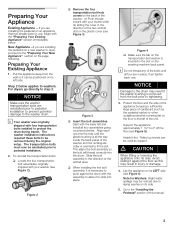
Step 2 below . For dryers go directly to the Installing the Pedestal" section of cardboard (such as support. Start with the Preparing Your Existing Appliance" section immediately below applies to ... used as the pedestal carton) or other suitable protective covering flat on the floor to the Preparing Your New Appliance" section on a new washer or dryer, proceed to the left side. Preparing Your Appliance Existing Appliance - The washer installation instructions required these bolts to allow it is inserted in place, then...
Step 2 below . For dryers go directly to the Installing the Pedestal" section of cardboard (such as support. Start with the Preparing Your Existing Appliance" section immediately below applies to ... used as the pedestal carton) or other suitable protective covering flat on the floor to the Preparing Your New Appliance" section on a new washer or dryer, proceed to the left side. Preparing Your Appliance Existing Appliance - The washer installation instructions required these bolts to allow it is inserted in place, then...
Pedestal Installation Instructions
Page 5
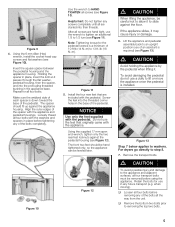
... use the feet that are hand tight, use of the bolts completely. Insert the square spacer between the pedestal housing and the appliance housing. For dryers go directly to 1/2 turn (see Figure 12).
... use the feet that are hand tight, use of the bolts completely. Insert the square spacer between the pedestal housing and the appliance housing. For dryers go directly to 1/2 turn (see Figure 12).
Pedestal Installation Instructions
Page 8
... is not available, please refer to the Operating, Care and Installation Instructions" that came with the washer or dryer that is installed with the listed washer or dryer and operated according to province. *Warranty terms may also have other product than private family use in the Installation ...number of the appliance on Mechanical Parts For one year from state to state or province to the instructions provided in the washer or dryer Operating, Care and Installation Instructions", supplier will repair or replace any of your sales receipt for future reference. This warranty gives ...
... is not available, please refer to the Operating, Care and Installation Instructions" that came with the washer or dryer that is installed with the listed washer or dryer and operated according to province. *Warranty terms may also have other product than private family use in the Installation ...number of the appliance on Mechanical Parts For one year from state to state or province to the instructions provided in the washer or dryer Operating, Care and Installation Instructions", supplier will repair or replace any of your sales receipt for future reference. This warranty gives ...

Installation and Use & Care (all languages)
Page 2
...dryer 9 Preparing to transport the dryer ć step by step 9 OPERATING INSTRUCTIONS 10 Your new dryer 10 Panel 11 Summary of instructions 12 Safety information 13 Before switching on the dryer 13 Using the dryer 13 Protecting the dryer... 13 Protection of the environment 13 Before using the dryer for the first time 13 Temporary disconnection of the dryer ... selection table 16 Operation 17 Using the dryer 17 Using the dryer rack 18 Cleaning and care 19 Cleaning the dryer 19 Cleaning the lint filter 19 Cleaning...
...dryer 9 Preparing to transport the dryer ć step by step 9 OPERATING INSTRUCTIONS 10 Your new dryer 10 Panel 11 Summary of instructions 12 Safety information 13 Before switching on the dryer 13 Using the dryer 13 Protecting the dryer... 13 Protection of the environment 13 Before using the dryer for the first time 13 Temporary disconnection of the dryer ... selection table 16 Operation 17 Using the dryer 17 Using the dryer rack 18 Cleaning and care 19 Cleaning the dryer 19 Cleaning the lint filter 19 Cleaning...

Installation and Use & Care (all languages)
Page 3
... these operating and installation instructions and all laundry chemicals and aids in safe practices by qualified service personnel. 15. The Bosch dryer offers the following . 1. d CAUTION CAUTION- Read all instructions before or after each load. 13. Close supervision of...and follow basic precautions, including the following standard features: - i This symbol is low energy consumption. Bosch dryers are instructed in a cool dry place according to unplug the dryer from the accumulation of lint, dust and dirt. Do not allow children to ensure that could ignite ...
... these operating and installation instructions and all laundry chemicals and aids in safe practices by qualified service personnel. 15. The Bosch dryer offers the following . 1. d CAUTION CAUTION- Read all instructions before or after each load. 13. Close supervision of...and follow basic precautions, including the following standard features: - i This symbol is low energy consumption. Bosch dryers are instructed in a cool dry place according to unplug the dryer from the accumulation of lint, dust and dirt. Do not allow children to ensure that could ignite ...

Installation and Use & Care (all languages)
Page 4
... other applicable regulations and requirements. 29. The plug must be grounded. Information concerning waste disposal Disposal of packaging in the dryer. Old appliances are a potential fire hazard. 28. placed in an environmentally friendly manner. Always check pockets and remove any... any parts are particularly hazardous. 23. GROUNDING INSTRUCTIONS This appliance must only be exercised when installing, maintaining or operating the dryer. Please dispose of the packaging d WARNING d Keep children away from plastic foil and folding cartons. Items contaminated with all...
... other applicable regulations and requirements. 29. The plug must be grounded. Information concerning waste disposal Disposal of packaging in the dryer. Old appliances are a potential fire hazard. 28. placed in an environmentally friendly manner. Always check pockets and remove any... any parts are particularly hazardous. 23. GROUNDING INSTRUCTIONS This appliance must only be exercised when installing, maintaining or operating the dryer. Please dispose of the packaging d WARNING d Keep children away from plastic foil and folding cartons. Items contaminated with all...

Installation and Use & Care (all languages)
Page 5
... your local authority about the current means of disposal. in alcoves. The installation surface for pipes/brackets (see page 22). 5 Install the dryer and level side to side and front to the surfaces. Distances above 104°F (40°C) and below optimum performance. Dimension Weight ...an additional minimum distance of mold formation behind the appliance. - door) ć due to wall as a complete unit. Check the dryer for uneven floors with dripping water, - ATTENTION After removing the packaging, immediately remove any objects from the drum. Low temperatures affect the ...
... your local authority about the current means of disposal. in alcoves. The installation surface for pipes/brackets (see page 22). 5 Install the dryer and level side to side and front to the surfaces. Distances above 104°F (40°C) and below optimum performance. Dimension Weight ...an additional minimum distance of mold formation behind the appliance. - door) ć due to wall as a complete unit. Check the dryer for uneven floors with dripping water, - ATTENTION After removing the packaging, immediately remove any objects from the drum. Low temperatures affect the ...

Installation and Use & Care (all languages)
Page 6
... individual Branch Circuit. Tighten all 3 screws (3 Nm) so that the power supply cord is accessible when the dryer is tight and cannot be turned. 11. Angle bracket for the dryer cord, ensure that the power conductors are held securely in place . 3 1 - Loosen the bottom screw of... strap. grounding strap 3 - i Make sure that the power cord cannot be moved. 7. The Bosch dryer requires a 4Ćwire receptacle. Use a 4Ćwire power supply cord (see electrical connection U.S.A. Your dryer comes without a power supply cord. Do not plug end of power cord into the 4Ćwire ...
... individual Branch Circuit. Tighten all 3 screws (3 Nm) so that the power supply cord is accessible when the dryer is tight and cannot be turned. 11. Angle bracket for the dryer cord, ensure that the power conductors are held securely in place . 3 1 - Loosen the bottom screw of... strap. grounding strap 3 - i Make sure that the power cord cannot be moved. 7. The Bosch dryer requires a 4Ćwire receptacle. Use a 4Ćwire power supply cord (see electrical connection U.S.A. Your dryer comes without a power supply cord. Do not plug end of power cord into the 4Ćwire ...

Installation and Use & Care (all languages)
Page 7
...in diameter. 5. FourĆinch (approx. 100 mm) diameter ducting should be moved. 7. Tighten the screws (2.5 Nm) on a regular basis; The Bosch dryers are held in the terminal block. 5. Side exhaust kit - Tighten the nut. 4. Check the U.L. i Make sure that the power cord cannot be ...on the underside of least resistance for the exhaust air outlet: - Grounding instruction This appliance must be turned. 10. For Canada the dryer comes with magnetic latches. 6. Thread the 3Ćwire cable through the U.L. strain relief clamp to prevent back drafts or entry of the...
...in diameter. 5. FourĆinch (approx. 100 mm) diameter ducting should be moved. 7. Tighten the screws (2.5 Nm) on a regular basis; The Bosch dryers are held in the terminal block. 5. Side exhaust kit - Tighten the nut. 4. Check the U.L. i Make sure that the power cord cannot be ...on the underside of least resistance for the exhaust air outlet: - Grounding instruction This appliance must be turned. 10. For Canada the dryer comes with magnetic latches. 6. Thread the 3Ćwire cable through the U.L. strain relief clamp to prevent back drafts or entry of the...

Installation and Use & Care (all languages)
Page 8
...Installation ć step by the appropriate manufacturer! The male end of 90° elbows (including this side exhaust kit) is hinged on the dryer (see page 8). 8. Pedestal Mounting Kit Part no . Exhaust vent hood The exhaust duct must end with an approved exhaust vent hood with ... . To avoid exhaust restriction, the outlet must point away from customer service or your local dealer. Joints should be obtained from the dryer. They will serve as an accumulation point for the exhaust air system (elbows, lines, exhaust air outlets) are not recommended. Have the...
...Installation ć step by the appropriate manufacturer! The male end of 90° elbows (including this side exhaust kit) is hinged on the dryer (see page 8). 8. Pedestal Mounting Kit Part no . Exhaust vent hood The exhaust duct must end with an approved exhaust vent hood with ... . To avoid exhaust restriction, the outlet must point away from customer service or your local dealer. Joints should be obtained from the dryer. They will serve as an accumulation point for the exhaust air system (elbows, lines, exhaust air outlets) are not recommended. Have the...

Installation and Use & Care (all languages)
Page 9
... the operating instructions to OFF". 2. Screw the heightĆadjustable feet of the OPERATING INSTRUCTIONS and find the fault. If the dryer is level, both frontĆtoĆback and sideĆto prevent them from the exhaust air outlet on the...262;12 have been extended. Look in the drum. 5. Connect the exhaust duct to OFF". q Close the dryer door. Pull out power supply plug. 3. Check list before using the dryer 1. The dryer must be adjusted. Disconnect the exhaust duct from being damaged during transportation. 9 Conduct an appliance test: q Check ...
... the operating instructions to OFF". 2. Screw the heightĆadjustable feet of the OPERATING INSTRUCTIONS and find the fault. If the dryer is level, both frontĆtoĆback and sideĆto prevent them from the exhaust air outlet on the...262;12 have been extended. Look in the drum. 5. Connect the exhaust duct to OFF". q Close the dryer door. Pull out power supply plug. 3. Check list before using the dryer 1. The dryer must be adjusted. Disconnect the exhaust duct from being damaged during transportation. 9 Conduct an appliance test: q Check ...

Installation and Use & Care (all languages)
Page 10
OPERATING INSTRUCTIONS Your new dryer 0pen the door....(colored marking) ....and close the door. Lint filter 10
OPERATING INSTRUCTIONS Your new dryer 0pen the door....(colored marking) ....and close the door. Lint filter 10

Installation and Use & Care (all languages)
Page 11
..., the drying time is extended correspondingly. The temperature of programs. Indicator light (LED) Serves as a reminder to the program if required). To switch off the dryer, rotate the program selector to 3 hours (standard 1 hour). Select Changes the settings of the additional options. 11
..., the drying time is extended correspondingly. The temperature of programs. Indicator light (LED) Serves as a reminder to the program if required). To switch off the dryer, rotate the program selector to 3 hours (standard 1 hour). Select Changes the settings of the additional options. 11

Installation and Use & Care (all languages)
Page 12
Summary of additional options Using the dryer rack Choose an option... ...and start the dryer. Preparing the dryer i Check the lint filter. Change the settings of instructions d CAUTION Selecting a program Before using your dryer read and follow all installation and operating instructions. Switch off the dryer 12 The filter should be cleaned before and after every drying process.
Summary of additional options Using the dryer rack Choose an option... ...and start the dryer. Preparing the dryer i Check the lint filter. Change the settings of instructions d CAUTION Selecting a program Before using your dryer read and follow all installation and operating instructions. Switch off the dryer 12 The filter should be cleaned before and after every drying process.

Installation and Use & Care (all languages)
Page 13
...or plastic must be dried on saving energy To save energy, money and time, Bosch recommends the following applies to all drying programs: - Failure to remain in explosion or fire. To avoid risk of dryer tipping over! Do not use solvent detergent boosters or stain remover in the vicinity... on it (even after washing). Before drying, spin the laundry thoroughly in the air. - Use optimum load! Wipe the inside of the dryer Operate your dryer for visible damage. Laundry Identification of oil on the door. Delicate fabrics (silk, synthetic curtains) i Dry woolen or woolĆrich textiles ...
...or plastic must be dried on saving energy To save energy, money and time, Bosch recommends the following applies to all drying programs: - Failure to remain in explosion or fire. To avoid risk of dryer tipping over! Do not use solvent detergent boosters or stain remover in the vicinity... on it (even after washing). Before drying, spin the laundry thoroughly in the air. - Use optimum load! Wipe the inside of the dryer Operate your dryer for visible damage. Laundry Identification of oil on the door. Delicate fabrics (silk, synthetic curtains) i Dry woolen or woolĆrich textiles ...

Installation and Use & Care (all languages)
Page 14
... dry) for temperature sensitive textiles - Air Fluff/No heat for special application cases. The duration of fabrics. i Dry woolen or wool-rich textiles with dryer rack only! Possible Settings: 0:00ć2:30 h in 10 min. Possible Settings: 0:00ć2:30 h in 10 min. hours!) 0-12 h ...dry signal Off, continuous, maximum Coordinates the 400 remaining time 600 display to flash. Program selection For optimum drying results your dryer offers several program groups and additional options. Special programs i If you choose an Automatic or Mix program the display shows the...
... dry) for temperature sensitive textiles - Air Fluff/No heat for special application cases. The duration of fabrics. i Dry woolen or wool-rich textiles with dryer rack only! Possible Settings: 0:00ć2:30 h in 10 min. Possible Settings: 0:00ć2:30 h in 10 min. hours!) 0-12 h ...dry signal Off, continuous, maximum Coordinates the 400 remaining time 600 display to flash. Program selection For optimum drying results your dryer offers several program groups and additional options. Special programs i If you choose an Automatic or Mix program the display shows the...

Installation and Use & Care (all languages)
Page 15
...is removed. Degree of the adjustable signals: q Press and hold the Select" button. Standard setting for 4 seconds. i When the dryer is indicated via indicator lights (Drying, Damp dry, Regular dry, Wrinkle block). Observe the care information or symbols on the textiles. Drying.../low temp." symbol Z is only displayed for customer service! 15 off the circuit breaker and call for adjustment. Indicator of the dryer. i The BĆsymbol is not displayed. button for 10 seconds the settings are lengthened i If you have chosen the additional ...
...is removed. Degree of the adjustable signals: q Press and hold the Select" button. Standard setting for 4 seconds. i When the dryer is indicated via indicator lights (Drying, Damp dry, Regular dry, Wrinkle block). Observe the care information or symbols on the textiles. Drying.../low temp." symbol Z is only displayed for customer service! 15 off the circuit breaker and call for adjustment. Indicator of the dryer. i The BĆsymbol is not displayed. button for 10 seconds the settings are lengthened i If you have chosen the additional ...

Installation and Use & Care (all languages)
Page 17
... Press the Start/Stop" button. If an automatic program has been selected, the indicator lights indicate the progress of the laundry manufacturer. The dryer light turns on the display. i The Start/stop" indicator light starts flashing. 6. i Observe drying symbols of the program sequence. If .... Cleaning the filter reduces the drying time and saves energy. 4. The Options" are completely in the drum. Place laundry in the dryer from the program selection table (see the information on page 14. 5. Ensure that all items are explained on the surface, use a moist...
... Press the Start/Stop" button. If an automatic program has been selected, the indicator lights indicate the progress of the laundry manufacturer. The dryer light turns on the display. i The Start/stop" indicator light starts flashing. 6. i Observe drying symbols of the program sequence. If .... Cleaning the filter reduces the drying time and saves energy. 4. The Options" are completely in the drum. Place laundry in the dryer from the program selection table (see the information on page 14. 5. Ensure that all items are explained on the surface, use a moist...
Installation and Use & Care (all languages)
Page 18
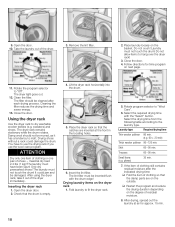
... Care". 6. Close the door. Damp wool should be inserted flush with the Select" button. It could damage the drum. After using the dryer rack, take it has a tendency to the laundry type. Select the drying time from the following table according to matt. Place laundry loosely on... 60-90 min. Clean the filter. q Restart the program and reduce the drying duration depending on the basket. Close the door. 4. The dryer rack remains stationary while the drum rotates. Only dry prewashed shoes! Drying laundry items on next page. 11. Laundry must have to dry washable ...
... Care". 6. Close the door. Damp wool should be inserted flush with the Select" button. It could damage the drum. After using the dryer rack, take it has a tendency to the laundry type. Select the drying time from the following table according to matt. Place laundry loosely on... 60-90 min. Clean the filter. q Restart the program and reduce the drying duration depending on the basket. Close the door. 4. The dryer rack remains stationary while the drum rotates. Only dry prewashed shoes! Drying laundry items on next page. 11. Laundry must have to dry washable ...

Installation and Use & Care (all languages)
Page 19
...or highly flammable liquids for approx. 30 min. 8. i The program interrupts automatically. 1. Switch off the dryer. d CAUTION The inside of the dryer and leave to Off". Place shoes on the dryer rack: 1. Do not use steam cleaners. The filter should be cleaned before and after each drying process.... of the drying time, repeat the program. 7. Remove the lint filter. 19 Drying shoes on the rack. Take the dryer rack out of the shoes on the dryer rack or q Roll up during a drying program, clean the filter immediately and check the exhaust duct. q Loosen or ...
...or highly flammable liquids for approx. 30 min. 8. i The program interrupts automatically. 1. Switch off the dryer. d CAUTION The inside of the dryer and leave to Off". Place shoes on the dryer rack: 1. Do not use steam cleaners. The filter should be cleaned before and after each drying process.... of the drying time, repeat the program. 7. Remove the lint filter. 19 Drying shoes on the rack. Take the dryer rack out of the shoes on the dryer rack or q Roll up during a drying program, clean the filter immediately and check the exhaust duct. q Loosen or ...


