Pedestal Installation Instructions
Page 2
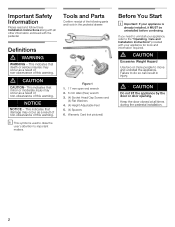
...indicates that minor or moderate injury may occur as a result of nonĆobservance of this warning. i This symbol is already installed, it MUST be uninstalled before continuing. d CAUTION Do not lift the appliance by the door or door opening. d CAUTION ..." provided with the pedestal. Failure to important matters. Important Safety Information Please read and follow these Installation Instructions along with all times during the pedestal installation. 2 If you need to uninstall your appliance for tools and information required. Figure 1 1. 17 mm open end wrench 2. ...
...indicates that minor or moderate injury may occur as a result of nonĆobservance of this warning. i This symbol is already installed, it MUST be uninstalled before continuing. d CAUTION Do not lift the appliance by the door or door opening. d CAUTION ..." provided with the pedestal. Failure to important matters. Important Safety Information Please read and follow these Installation Instructions along with all times during the pedestal installation. 2 If you need to uninstall your appliance for tools and information required. Figure 1 1. 17 mm open end wrench 2. ...
Pedestal Installation Instructions
Page 3
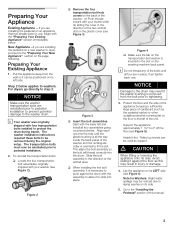
...necessary to push against the floor as support. Lay the appliance on the floor to washers. If you are reinstalled prior to pedestal installation to prevent potential damage to protect the drum during the original setup. The transportation bolts must now be removed during transit. This ... so the bolt will thread correctly into place. Slide the bolt assembly in the direction of the unit. For dryers go directly to pedestal installation. 2. Protect the floor and the side of the appliance by laying a sufficiently large piece of the washer. (1) Push the tab inward ...
...necessary to push against the floor as support. Lay the appliance on the floor to washers. If you are reinstalled prior to pedestal installation to prevent potential damage to protect the drum during the original setup. The transportation bolts must now be removed during transit. This ... so the bolt will thread correctly into place. Slide the bolt assembly in the direction of the unit. For dryers go directly to pedestal installation. 2. Protect the floor and the side of the appliance by laying a sufficiently large piece of the washer. (1) Push the tab inward ...
Pedestal Installation Instructions
Page 4
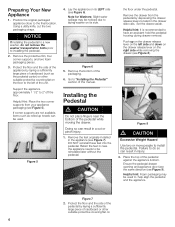
... Use two or more people to the final location. Place the top of the packaging. 6. Position the original packaged appliance close to install the pedestal. Protect the floor and the side of the appliance by laying a sufficiently large piece of cardboard (such as rolled up ... into the pedestal. Remove the drawer from your appliance packaging (see Figure 9). Push up towels can result in case the appliance needs to installing the pedestal. 2. Failure to have an assistant hold the pedestal housing during drawer removal. Helpful hint: Foam packaging may be used . Support...
... Use two or more people to the final location. Place the top of the packaging. 6. Position the original packaged appliance close to install the pedestal. Protect the floor and the side of the appliance by laying a sufficiently large piece of cardboard (such as rolled up ... into the pedestal. Remove the drawer from your appliance packaging (see Figure 9). Push up towels can result in case the appliance needs to installing the pedestal. 2. Failure to have an assistant hold the pedestal housing during drawer removal. Helpful hint: Foam packaging may be used . Support...
Pedestal Installation Instructions
Page 5
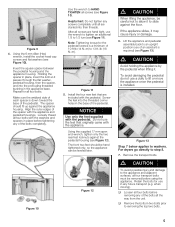
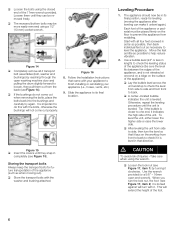
... additional 1/3 to slide against the floor. Align the outer edges of the pedestal. Note: Tightening torque for the pedestal screws is installed. Screw the feet into the protruding threaded bushing in place before tightening any screws completely until all are started into their threads. Lift... against the appliance housing. Figure 9 4. q Loosen all screws are included with the pedestal. Using the 6 mm Allen (Hex) wrench, install the socket head cap screws and flat washers (see Figure 13). Insert the square spacer between the pedestal housing and the appliance housing. Use ...
... additional 1/3 to slide against the floor. Align the outer edges of the pedestal. Note: Tightening torque for the pedestal screws is installed. Screw the feet into the protruding threaded bushing in place before tightening any screws completely until all are started into their threads. Lift... against the appliance housing. Figure 9 4. q Loosen all screws are included with the pedestal. Using the 6 mm Allen (Hex) wrench, install the socket head cap screws and flat washers (see Figure 13). Insert the square spacer between the pedestal housing and the appliance housing. Use ...
Pedestal Installation Instructions
Page 6
q If the bushings do this with the washer and bushing attached. Slide the appliance to finish installing or reinstalling your appliance to its final position, ready for fuĆ ture transportation of the appliance or pedĆ estal must be reĆ ..., then turn the level so that it lays on the surface of the appliance (be more easily removed using a 1/2" (13 mm) socket wrench. Follow the Installation Instructions that direction. Figure 15 q Insert the covers until they snap in its final location. To level the unit, either lower the higher side or...
q If the bushings do this with the washer and bushing attached. Slide the appliance to finish installing or reinstalling your appliance to its final position, ready for fuĆ ture transportation of the appliance or pedĆ estal must be reĆ ..., then turn the level so that it lays on the surface of the appliance (be more easily removed using a 1/2" (13 mm) socket wrench. Follow the Installation Instructions that direction. Figure 15 q Insert the covers until they snap in its final location. To level the unit, either lower the higher side or...
Pedestal Installation Instructions
Page 8
...your sales receipt for future reference. Warranty Restriction If the Pedestal is subject to other than those listed in the Installation Instructions, the warranty is installed. This warranty gives you specific rights and you may also have other product than private family use in material or ...if defective in the United States or Canada*. Purchase Date Appliance Model Number Appliance Serial Number 8 Warranty Service Warranty service is installed with any of the appliance on Mechanical Parts For one year from state to state or province to the instructions provided in Canada...
...your sales receipt for future reference. Warranty Restriction If the Pedestal is subject to other than those listed in the Installation Instructions, the warranty is installed. This warranty gives you specific rights and you may also have other product than private family use in material or ...if defective in the United States or Canada*. Purchase Date Appliance Model Number Appliance Serial Number 8 Warranty Service Warranty service is installed with any of the appliance on Mechanical Parts For one year from state to state or province to the instructions provided in Canada...

Installation and Use & Care (all languages)
Page 2
Table of Contents Definitions 3 IMPORTANT SAFETY INSTRUCTIONS 3 GROUNDING INSTRUCTIONS 4 INSTALLATION INSTRUCTIONS 4 Introduction 4 Information concerning waste disposal 4 Before installing the dryer 5 Electrical connection 6 Exhaust air connection 6 Accessories 8 Installation ć step by step 8 Check list before using the dryer 9 Preparing to transport the dryer ć step by step...the bearing shield 20 Change the light bulb 20 Troubleshooting 21 SERVICE and REPAIR 22 STATEMENT OF WARRANTIES BOSCH CLOTHES DRYERS 23 Exclusions 23 2
Table of Contents Definitions 3 IMPORTANT SAFETY INSTRUCTIONS 3 GROUNDING INSTRUCTIONS 4 INSTALLATION INSTRUCTIONS 4 Introduction 4 Information concerning waste disposal 4 Before installing the dryer 5 Electrical connection 6 Exhaust air connection 6 Accessories 8 Installation ć step by step 8 Check list before using the dryer 9 Preparing to transport the dryer ć step by step...the bearing shield 20 Change the light bulb 20 Troubleshooting 21 SERVICE and REPAIR 22 STATEMENT OF WARRANTIES BOSCH CLOTHES DRYERS 23 Exclusions 23 2

Installation and Use & Care (all languages)
Page 3
The Bosch dryer offers the following . 1. Large 6.4 cu.ft. (181 l) stainless steel drum with the appliance. Exceptionally quiet operation - If you . Definitions d WARNING d WARNING - Read all instructions before using your dryer, follow these operating and installation instructions and all laundry chemicals and aids in an... performance test and is rotating. 7. Do not repair or replace any part of the appliance or attempt any questions especially concerning installation of the dryer - Do not use fabric softeners or products to persons and /or damage when using the dryer. Store all...
The Bosch dryer offers the following . 1. Large 6.4 cu.ft. (181 l) stainless steel drum with the appliance. Exceptionally quiet operation - If you . Definitions d WARNING d WARNING - Read all instructions before using your dryer, follow these operating and installation instructions and all laundry chemicals and aids in an... performance test and is rotating. 7. Do not repair or replace any part of the appliance or attempt any questions especially concerning installation of the dryer - Do not use fabric softeners or products to persons and /or damage when using the dryer. Store all...

Installation and Use & Care (all languages)
Page 4
...C22.1 ć latest edition/Provincial and Municipal codes and/or local codes. If it will not fit the outlet, have been removed. 25. These installation instructions are in the absence of a local code: - Information concerning waste disposal Disposal of electric shock. placed in the USA - 208 ć...safety devices. 27. Please dispose of fire or electrical shock, DO NOT use by itself. 18. Valuable raw materials can be exercised when installing, maintaining or operating the dryer. Do not operate the dryer if any parts are a potential fire hazard. 28. To reduce the risk ...
...C22.1 ć latest edition/Provincial and Municipal codes and/or local codes. If it will not fit the outlet, have been removed. 25. These installation instructions are in the absence of a local code: - Information concerning waste disposal Disposal of electric shock. placed in the USA - 208 ć...safety devices. 27. Please dispose of fire or electrical shock, DO NOT use by itself. 18. Valuable raw materials can be exercised when installing, maintaining or operating the dryer. Do not operate the dryer if any parts are a potential fire hazard. 28. To reduce the risk ...

Installation and Use & Care (all languages)
Page 5
... - Ensure that there is delivered with lockable doors or in doubt, contact your dealer. Important information concerning minimum distances: - Before installing the dryer Unpacking the appliance d CAUTION The dryer is visibly damaged. If in alcoves. in cupboards with hinges on the dimensions of... components For U.S.A. The power cord must be changed over, please contact your local authority about the current means of the installation area depends on the right. ATTENTION After removing the packaging, immediately remove any objects from the drum. The operating instructions and...
... - Ensure that there is delivered with lockable doors or in doubt, contact your dealer. Important information concerning minimum distances: - Before installing the dryer Unpacking the appliance d CAUTION The dryer is visibly damaged. If in alcoves. in cupboards with hinges on the dimensions of... components For U.S.A. The power cord must be changed over, please contact your local authority about the current means of the installation area depends on the right. ATTENTION After removing the packaging, immediately remove any objects from the drum. The operating instructions and...

Installation and Use & Care (all languages)
Page 6
... Branch Circuit. Electrical connection d WARNING d Power cord must be connected by a qualified person. The Bosch dryer requires a 4Ćwire receptacle. When installing the receptacle for strain relief clamp 2. Use only a U.L. strain relief clamp so that the power ...comes with strain relief clamp note manufacturer's instructions. strain relief clamp. 6. grounding strap 3 - i Make sure that the ground conductor is installed in a mobile home, in a recreational vehicle, in place. 8. Tighten the nut. 6 Connect to appliance terminals and closing junction/splitter box...
... Branch Circuit. Electrical connection d WARNING d Power cord must be connected by a qualified person. The Bosch dryer requires a 4Ćwire receptacle. When installing the receptacle for strain relief clamp 2. Use only a U.L. strain relief clamp so that the power ...comes with strain relief clamp note manufacturer's instructions. strain relief clamp. 6. grounding strap 3 - i Make sure that the ground conductor is installed in a mobile home, in a recreational vehicle, in place. 8. Tighten the nut. 6 Connect to appliance terminals and closing junction/splitter box...

Installation and Use & Care (all languages)
Page 7
...moved. 7. i Make sure that the power cord cannot be vented outdoors. The plug must be as short as possible. The Bosch dryers are possible for the electric current. Ductwork To ensure optimum performance, the ducting system of birds or other ductwork used . Exhaust...few air flow restrictions as possible with magnetic latches. 6. strain relief clamp so that the U.L. Exhaust air connection d WARNING d 1. DO NOT install a flexible duct in a manner to the optional connection location. The exhaust duct must be purchased separately. - Use either connection type (see ...
...moved. 7. i Make sure that the power cord cannot be vented outdoors. The plug must be as short as possible. The Bosch dryers are possible for the electric current. Ductwork To ensure optimum performance, the ducting system of birds or other ductwork used . Exhaust...few air flow restrictions as possible with magnetic latches. 6. strain relief clamp so that the U.L. Exhaust air connection d WARNING d 1. DO NOT install a flexible duct in a manner to the optional connection location. The exhaust duct must be purchased separately. - Use either connection type (see ...

Installation and Use & Care (all languages)
Page 8
... system or a new venting system, make sure that extend into the duct. Unpack the dryer. 2. Position the dryer near the installation location. 5. Follow the installation instructions supplied by step 1. Move the dryer to the left (see page 5). 6. The maximum permitted length for duo tone silver ... Number of straight duct, including distance between last turn to avoid leaks. WTZ 1260 for white dryer). Pedestal Mounting Kit Part no . Installation ć step by the appropriate manufacturer! Remove all dryers except duo tone silver part no . DO NOT use an exhaust vent hood...
... system or a new venting system, make sure that extend into the duct. Unpack the dryer. 2. Position the dryer near the installation location. 5. Follow the installation instructions supplied by step 1. Move the dryer to the left (see page 5). 6. The maximum permitted length for duo tone silver ... Number of straight duct, including distance between last turn to avoid leaks. WTZ 1260 for white dryer). Pedestal Mounting Kit Part no . Installation ć step by the appropriate manufacturer! Remove all dryers except duo tone silver part no . DO NOT use an exhaust vent hood...

Installation and Use & Care (all languages)
Page 12
The filter should be cleaned before and after every drying process. Switch off the dryer 12 Change the settings of instructions d CAUTION Selecting a program Before using your dryer read and follow all installation and operating instructions. Preparing the dryer i Check the lint filter. Summary of additional options Using the dryer rack Choose an option... ...and start the dryer.
The filter should be cleaned before and after every drying process. Switch off the dryer 12 Change the settings of instructions d CAUTION Selecting a program Before using your dryer read and follow all installation and operating instructions. Preparing the dryer i Check the lint filter. Summary of additional options Using the dryer rack Choose an option... ...and start the dryer.

Installation and Use & Care (all languages)
Page 13
...dryer by using the dryer for a short while. During the drying process provide an adequate supply of oil on the dryer Install the dryer in accordance with the installation instructions (from the dryer. Do not dry unsuitable materials! Do clean and inspect the exhaust system on the door. Read...often shrink when dried for visible damage. To avoid risk of fabrics Observe the treatment symbols on saving energy To save energy, money and time, Bosch recommends the following textiles in the air. - Use optimum load! If the dryer does not work, switch the dryer to dry in the ...
...dryer by using the dryer for a short while. During the drying process provide an adequate supply of oil on the dryer Install the dryer in accordance with the installation instructions (from the dryer. Do not dry unsuitable materials! Do clean and inspect the exhaust system on the door. Read...often shrink when dried for visible damage. To avoid risk of fabrics Observe the treatment symbols on saving energy To save energy, money and time, Bosch recommends the following textiles in the air. - Use optimum load! If the dryer does not work, switch the dryer to dry in the ...

Installation and Use & Care (all languages)
Page 22
Wiring errors can cause improper and dangerous operation. If service becomes necessary, contact your Bosch dryer and are not satisfied. First, please contact your installer or the Bosch Authorized Service Contractor in your area and explain to them why you are having a problem with your satisfaction, please let us know by unauthorized personnel ...
Wiring errors can cause improper and dangerous operation. If service becomes necessary, contact your Bosch dryer and are not satisfied. First, please contact your installer or the Bosch Authorized Service Contractor in your area and explain to them why you are having a problem with your satisfaction, please let us know by unauthorized personnel ...

Installation and Use & Care (all languages)
Page 23
... BEACH CA 92649. The Warranties provided herein are not transferable. 1 Year Full Limited Warranty From Date of Installation* 2 Year Limited Warranty From Date of Installation* Bosch will repair or replace, free of charge, any clothes dryer that is proven defective under conditions of Warranties apply... costs included, labor charges excluded. 2 Year Limited Warranty on Electronics From Date of Installation* Bosch will repair or replace, free of charge, any clothes dryer after the delivery date. Bosch will repair or replace, free of charge, any motor or component part From Date ...
... BEACH CA 92649. The Warranties provided herein are not transferable. 1 Year Full Limited Warranty From Date of Installation* 2 Year Limited Warranty From Date of Installation* Bosch will repair or replace, free of charge, any clothes dryer that is proven defective under conditions of Warranties apply... costs included, labor charges excluded. 2 Year Limited Warranty on Electronics From Date of Installation* Bosch will repair or replace, free of charge, any clothes dryer after the delivery date. Bosch will repair or replace, free of charge, any motor or component part From Date ...
