User Guide
Page 4
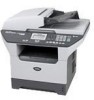
...the system to receive faxed instructions and an Index of the Brother accessories and supplies that are available at most Brother retailers. This system is available 24 hours a day, 7 days a week. Brother fax back system (USA only) Brother has installed an easy-to-use fax back system, so ... are available for purchase.) In USA: 1-888-879-3232 (voice) 1-800-947-1445 (fax) http://www.brothermall.com In Canada: 1-877-BROTHER (voice) Description Toner Cartridge Drum Unit IEEE-1284 Bi-directional Cable Paper Tray #2 (Option) User's Guide Quick Setup Guide Item TN-550 (Standard, Prints approx. ...
...the system to receive faxed instructions and an Index of the Brother accessories and supplies that are available at most Brother retailers. This system is available 24 hours a day, 7 days a week. Brother fax back system (USA only) Brother has installed an easy-to-use fax back system, so ... are available for purchase.) In USA: 1-888-879-3232 (voice) 1-800-947-1445 (fax) http://www.brothermall.com In Canada: 1-877-BROTHER (voice) Description Toner Cartridge Drum Unit IEEE-1284 Bi-directional Cable Paper Tray #2 (Option) User's Guide Quick Setup Guide Item TN-550 (Standard, Prints approx. ...
User Guide
Page 6
... send the Product properly packaged, freight prepaid, to the Authorized Service Center together with a rated life; iv Brother® Three-Year Limited Warranty and Exchange Service For DCP-8060 and DCP-8065DN (USA only) Who is covered: „ This limited warranty ("warranty") is given only to the original ...include but used (including but not limited to floor models or refurbished product), prior to toner, drums, print heads and ink cartridges. „ Except as Paper Feeding Kit, Fuser and Laser Units. You are not limited to your purchase you are not the Original Purchaser and ...
... send the Product properly packaged, freight prepaid, to the Authorized Service Center together with a rated life; iv Brother® Three-Year Limited Warranty and Exchange Service For DCP-8060 and DCP-8065DN (USA only) Who is covered: „ This limited warranty ("warranty") is given only to the original ...include but used (including but not limited to floor models or refurbished product), prior to toner, drums, print heads and ink cartridges. „ Except as Paper Feeding Kit, Fuser and Laser Units. You are not limited to your purchase you are not the Original Purchaser and ...
User Guide
Page 9
... warranty. For laser products: Failure to remove the Toner Cartridge (and Toner Drum Unit on applicable models) during shipping. This Limited Warranty gives you specific legal rights and you . Internet support: support@brother.ca or browse Brother's Web Site: www.brother.com Brother International Corporation (Canada)...only) Pursuant to this limited warranty of 1 year from the date of purchase for labour and parts, Brother International Corporation (Canada) Ltd. ("Brother"), or its Authorized Service Centers, Distributors, Dealers, Agents or employees, shall create another warranty or modify...
... warranty. For laser products: Failure to remove the Toner Cartridge (and Toner Drum Unit on applicable models) during shipping. This Limited Warranty gives you specific legal rights and you . Internet support: support@brother.ca or browse Brother's Web Site: www.brother.com Brother International Corporation (Canada)...only) Pursuant to this limited warranty of 1 year from the date of purchase for labour and parts, Brother International Corporation (Canada) Ltd. ("Brother"), or its Authorized Service Centers, Distributors, Dealers, Agents or employees, shall create another warranty or modify...

User Guide
Page 10
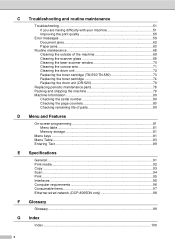
...General 1 General information Using the documentation 2 Symbols and conventions used in the documentation 2 Accessing the complete User's Guide 3 Viewing documentation 3 Accessing Brother Support (For Windows 5 Control panel overview 6 Status LED indications 8 2 Loading documents and paper Loading documents 10 Using the ADF 10 Using the......17 Tray use in Copy mode 18 Tray use in Print mode 18 Volume Settings 19 Beeper volume 19 Ecology features 19 Toner save...19 Sleep time...19 Turning off the scanner lamp 20 LCD Contrast ...20 User Settings List 20 4 Security features Security...
...General 1 General information Using the documentation 2 Symbols and conventions used in the documentation 2 Accessing the complete User's Guide 3 Viewing documentation 3 Accessing Brother Support (For Windows 5 Control panel overview 6 Status LED indications 8 2 Loading documents and paper Loading documents 10 Using the ADF 10 Using the......17 Tray use in Copy mode 18 Tray use in Print mode 18 Volume Settings 19 Beeper volume 19 Ecology features 19 Toner save...19 Sleep time...19 Turning off the scanner lamp 20 LCD Contrast ...20 User Settings List 20 4 Security features Security...
User Guide
Page 12
... Cleaning the outside of the machine 68 Cleaning the scanner glass 69 Cleaning the laser scanner window 70 Cleaning the corona wire 71 Cleaning the drum unit 72 Replacing the toner cartridge (TN-550/TN-580 73 Replacing the toner cartridge 74 Replacing the drum unit (DR-520 76 Replacing periodic maintenance parts... Text ...89 E Specifications General ...91 Print media...92 Copy ...93 Scan...94 Print ...95 Interfaces ...95 Computer requirements 96 Consumable items 97 Ethernet wired network (DCP-8065DN only 98 F Glossary Glossary...99 G Index Index ...100 x
... Cleaning the outside of the machine 68 Cleaning the scanner glass 69 Cleaning the laser scanner window 70 Cleaning the corona wire 71 Cleaning the drum unit 72 Replacing the toner cartridge (TN-550/TN-580 73 Replacing the toner cartridge 74 Replacing the drum unit (DR-520 76 Replacing periodic maintenance parts... Text ...89 E Specifications General ...91 Print media...92 Copy ...93 Scan...94 Print ...95 Interfaces ...95 Computer requirements 96 Consumable items 97 Ethernet wired network (DCP-8065DN only 98 F Glossary Glossary...99 G Index Index ...100 x

User Guide
Page 21
... same service call indication after turning the machine back on, please call Brother Customer Service. (See Brother numbers on and try to print again. Replace the toner cartridge with a new one. Put paper in Sleep mode, the LED is open Toner Life End Red Paper error Scan lock Others Out of memory Follow the...
... same service call indication after turning the machine back on, please call Brother Customer Service. (See Brother numbers on and try to print again. Replace the toner cartridge with a new one. Put paper in Sleep mode, the LED is open Toner Life End Red Paper error Scan lock Others Out of memory Follow the...
User Guide
Page 31
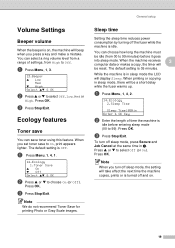
...3 computer data or makes a copy, the timer will display Sleep. While the machine is in sleep mode, there will beep when you set toner save toner using this feature. Note When you turn off the fuser while the machine is idle before it goes into sleep mode. General setup Volume Settings...while the fuser warms up. You can choose how long the machine must be reset. The default setting is 05 minutes. a Press Menu, 1, 4, 1. 14.Ecology 1.Toner Save a On b Off Select ab & OK b Press a or b to 99 minutes) before entering sleep mode (00 to 99). Press OK. Note We do ...
...3 computer data or makes a copy, the timer will display Sleep. While the machine is in sleep mode, there will beep when you set toner save toner using this feature. Note When you turn off the fuser while the machine is idle before it goes into sleep mode. General setup Volume Settings...while the fuser warms up. You can choose how long the machine must be reset. The default setting is 05 minutes. a Press Menu, 1, 4, 1. 14.Ecology 1.Toner Save a On b Off Select ab & OK b Press a or b to 99 minutes) before entering sleep mode (00 to 99). Press OK. Note We do ...
User Guide
Page 52
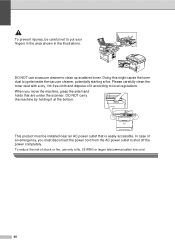
Please carefully clean the toner dust with a dry, lint-free cloth and dispose of it at the bottom. When you must be careful not to put your fingers in the ... AC power outlet to ignite inside the vacuum cleaner, potentially starting a fire. DO NOT carry the machine by holding it according to clean up scattered toner. Doing this might cause the toner dust to shut off the power completely.
Please carefully clean the toner dust with a dry, lint-free cloth and dispose of it at the bottom. When you must be careful not to put your fingers in the ... AC power outlet to ignite inside the vacuum cleaner, potentially starting a fire. DO NOT carry the machine by holding it according to clean up scattered toner. Doing this might cause the toner dust to shut off the power completely.

User Guide
Page 63
...wire on page 71.) Printing Difficulties Difficulties Poor print quality Vertical black lines on page 59.) „ The machine is online. Right-click 'Brother DCP-XXXX (where XXXX is probably not your computer. (See the Quick Setup Guide.) „ Check that the correct printer driver has been ...need additional help , you must be dirty. Your machine's primary corona wire for printing is turned on. „ Check that the toner cartridge and drum unit are having difficulty with the way your PC, click Start, then Settings, and then Printers and Faxes. Calls must ...
...wire on page 71.) Printing Difficulties Difficulties Poor print quality Vertical black lines on page 59.) „ The machine is online. Right-click 'Brother DCP-XXXX (where XXXX is probably not your computer. (See the Quick Setup Guide.) „ Check that the correct printer driver has been ...need additional help , you must be dirty. Your machine's primary corona wire for printing is turned on. „ Check that the toner cartridge and drum unit are having difficulty with the way your PC, click Start, then Settings, and then Printers and Faxes. Calls must ...

User Guide
Page 66
...number (54295 for more information. Suggestions „ If this problem occurs when making copies turn Toner Save mode to off in the Advanced tab in the printer driver. (See Advanced tab in... the Software User's Guide on the CD-ROM.) Network Difficulties (DCP-8065DN only) Difficulties Suggestions Cannot print over a wired Network. „ Make sure your PC may be...the 'Exceptions' tab and 'Add port' button. 3. For Windows® XP SP1, please visit the Brother Solutions Center. For details, see the Network User's Guide on the 'Basic' tab is checked, and then...
...number (54295 for more information. Suggestions „ If this problem occurs when making copies turn Toner Save mode to off in the Advanced tab in the printer driver. (See Advanced tab in... the Software User's Guide on the CD-ROM.) Network Difficulties (DCP-8065DN only) Difficulties Suggestions Cannot print over a wired Network. „ Make sure your PC may be...the 'Exceptions' tab and 'Add port' button. 3. For Windows® XP SP1, please visit the Brother Solutions Center. For details, see the Network User's Guide on the 'Basic' tab is checked, and then...

User Guide
Page 67
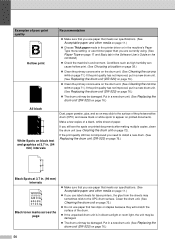
... meets our specifications. Turn off Toner Save mode in the machine's menu settings or in the printer Properties of the drum unit. (See Cleaning the laser scanner window on page 70 and... Cleaning the corona wire on page 71.) If the print quality has not improved, put in a new toner cartridge. (See Replacing the toner cartridge (TN550... 01234 Faint ABCDEFGH abcdefghijk ABCD abcde 01234 Gray background Ghost ABCDEFGH abcdefghijk ABCD abcde 01234 Toner specks Recommendation „ Check the machine's environment. Rough-surfaced paper may be on page...
... meets our specifications. Turn off Toner Save mode in the machine's menu settings or in the printer Properties of the drum unit. (See Cleaning the laser scanner window on page 70 and... Cleaning the corona wire on page 71.) If the print quality has not improved, put in a new toner cartridge. (See Replacing the toner cartridge (TN550... 01234 Faint ABCDEFGH abcdefghijk ABCD abcde 01234 Gray background Ghost ABCDEFGH abcdefghijk ABCD abcde 01234 Toner specks Recommendation „ Check the machine's environment. Rough-surfaced paper may be on page...
User Guide
Page 68
... other media on page 11.) „ Choose Thick paper mode in the printer driver or in . (94 mm) intervals ABCDEFGH abcdefghijk ABCD abcde 01234 Black toner marks across the page „ Make sure that has clips or staples because they will scratch the surface of paper. If you still see the...; If the unpacked drum unit is in the Software User's Guide on page 72.) „ Do not use paper that you use label sheets for laser printers, the glue from the sheets may stick to the OPC drum surface. Conditions such as high humidity can cause hollow print. (See Choosing a location...
... other media on page 11.) „ Choose Thick paper mode in the printer driver or in . (94 mm) intervals ABCDEFGH abcdefghijk ABCD abcde 01234 Black toner marks across the page „ Make sure that has clips or staples because they will scratch the surface of paper. If you still see the...; If the unpacked drum unit is in the Software User's Guide on page 72.) „ Do not use paper that you use label sheets for laser printers, the glue from the sheets may stick to the OPC drum surface. Conditions such as high humidity can cause hollow print. (See Choosing a location...

User Guide
Page 69
...this problem, especially if the machine has not been used for a long time. „ Clean the scanner window with a soft cloth. (See Cleaning the laser scanner window on page 70.) „ The drum unit may be too full. „ Check the paper type and quality. (See Acceptable paper and other... media on page 11.) 57 Put in a new drum unit. (See Replacing the drum unit (DR-520) on page 70.) „ The toner cartridge may be damaged. Call Brother Customer Service at the home position (a). „ The drum unit may be damaged. ABCDEFGH abcdefghijk ABCD abcde 01234 „ Clean the...
...this problem, especially if the machine has not been used for a long time. „ Clean the scanner window with a soft cloth. (See Cleaning the laser scanner window on page 70.) „ The drum unit may be too full. „ Check the paper type and quality. (See Acceptable paper and other... media on page 11.) 57 Put in a new drum unit. (See Replacing the drum unit (DR-520) on page 70.) „ The toner cartridge may be damaged. Call Brother Customer Service at the home position (a). „ The drum unit may be damaged. ABCDEFGH abcdefghijk ABCD abcde 01234 „ Clean the...

User Guide
Page 71
... is Open The front cover is not closed completely. The fuser cover is not closed completely. Close the front cover of the drum unit or toner cartridge is not closed completely. See Document jams on page 62 or Using the ADF on again. Error Message Check Paper Size Cause Paper is...
... is Open The front cover is not closed completely. The fuser cover is not closed completely. Close the front cover of the drum unit or toner cartridge is not closed completely. See Document jams on page 62 or Using the ADF on again. Error Message Check Paper Size Cause Paper is...

User Guide
Page 73
... unit assembly is not installed properly, or the toner cartridge is used up and printing is time to replace the paper feeding kit for Tray 2. Call Brother Customer Service to replace the laser unit. See Scan on page 63.) Call Brother Customer Service to print, copy or scan again.... out. Troubleshooting and routine maintenance Error Message Paper Jam Tray1 Paper Jam Tray2 Replace Fuser Replace Laser Replace PF Kit1 Replace PF Kit2 Replace PF KitMP Scanner Locked Toner Error Toner Life End Toner Low Too Many Trays Unable to Init. (Initialize) Unable to Print Unable to Scan Cause...
... unit assembly is not installed properly, or the toner cartridge is used up and printing is time to replace the paper feeding kit for Tray 2. Call Brother Customer Service to replace the laser unit. See Scan on page 63.) Call Brother Customer Service to print, copy or scan again.... out. Troubleshooting and routine maintenance Error Message Paper Jam Tray1 Paper Jam Tray2 Replace Fuser Replace Laser Replace PF Kit1 Replace PF Kit2 Replace PF KitMP Scanner Locked Toner Error Toner Life End Toner Low Too Many Trays Unable to Init. (Initialize) Unable to Print Unable to Scan Cause...
User Guide
Page 76
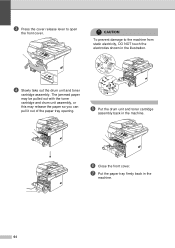
f Close the front cover. The jammed paper may be pulled out with the toner cartridge and drum unit assembly, or this may release the paper so you can pull it out of the paper tray opening. e Put the drum unit and toner cartridge assembly back in the machine. 64 g Put the paper tray firmly back in the machine. c Press the cover release lever to the machine from static electricity, DO NOT touch the electrodes shown in the illustration. d Slowly take out the drum unit and toner cartridge assembly. CAUTION To prevent damage to open the front cover.
f Close the front cover. The jammed paper may be pulled out with the toner cartridge and drum unit assembly, or this may release the paper so you can pull it out of the paper tray opening. e Put the drum unit and toner cartridge assembly back in the machine. 64 g Put the paper tray firmly back in the machine. c Press the cover release lever to the machine from static electricity, DO NOT touch the electrodes shown in the illustration. d Slowly take out the drum unit and toner cartridge assembly. CAUTION To prevent damage to open the front cover.
User Guide
Page 77
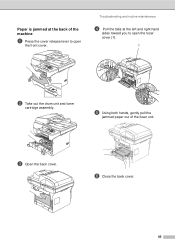
f Close the back cover. 65 e Using both hands, gently pull the jammed paper out of the machine C a Press the cover release lever to open the front cover. c Open the back cover. Paper is jammed at the left and right hand sides toward you to open the fuser cover (1). 1 b Take out the drum unit and toner cartridge assembly. Troubleshooting and routine maintenance d Pull the tabs at the back of the fuser unit.
f Close the back cover. 65 e Using both hands, gently pull the jammed paper out of the machine C a Press the cover release lever to open the front cover. c Open the back cover. Paper is jammed at the left and right hand sides toward you to open the fuser cover (1). 1 b Take out the drum unit and toner cartridge assembly. Troubleshooting and routine maintenance d Pull the tabs at the back of the fuser unit.
User Guide
Page 78
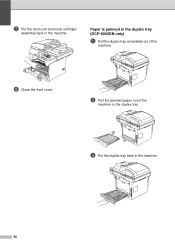
b Pull the jammed paper out of the machine. Paper is jammed in the machine. 66 c Put the duplex tray back in the duplex tray (DCP-8065DN only) C a Pull the duplex tray completely out of the machine or the duplex tray. h Close the front cover. g Put the drum unit and toner cartridge assembly back in the machine.
b Pull the jammed paper out of the machine. Paper is jammed in the machine. 66 c Put the duplex tray back in the duplex tray (DCP-8065DN only) C a Pull the duplex tray completely out of the machine or the duplex tray. h Close the front cover. g Put the drum unit and toner cartridge assembly back in the machine.
User Guide
Page 79
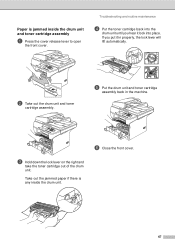
...open the front cover. e Put the drum unit and toner cartridge assembly back in properly, the lock lever will lift automatically. Take out the jammed paper if there is jammed inside the drum unit. b Take out the drum unit and toner cartridge assembly. c Hold down the lock lever on the... right and take the toner cartridge out of the drum unit. f Close the front cover. 67 Troubleshooting and routine maintenance d Put the...
...open the front cover. e Put the drum unit and toner cartridge assembly back in properly, the lock lever will lift automatically. Take out the jammed paper if there is jammed inside the drum unit. b Take out the drum unit and toner cartridge assembly. c Hold down the lock lever on the... right and take the toner cartridge out of the drum unit. f Close the front cover. 67 Troubleshooting and routine maintenance d Put the...
User Guide
Page 80
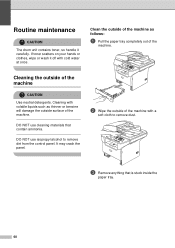
If toner scatters on your hands or clothes, wipe or wash it carefully. Clean the outside of the machine. DO NOT use cleaning materials that is stuck ... completely out of the machine with cold water at once. DO NOT use isopropyl alcohol to remove dust. Routine maintenance C CAUTION The drum unit contains toner, so handle it off with a soft cloth to remove dirt from the control panel.
If toner scatters on your hands or clothes, wipe or wash it carefully. Clean the outside of the machine. DO NOT use cleaning materials that is stuck ... completely out of the machine with cold water at once. DO NOT use isopropyl alcohol to remove dust. Routine maintenance C CAUTION The drum unit contains toner, so handle it off with a soft cloth to remove dirt from the control panel.

