
Network Users Manual - English
Page 202
... settings. Make sure that the machine is powered on, is not found during the setup of the network print software or from the model pop-up menu of ControlCenter2. c Click the General tab. Network print software installation problems 15 The Brother print server is selected. d Click OK.... Note After the Brother software package is installed, turn your Firewall back on. „ Macintosh Choose your Firewall back on....
... settings. Make sure that the machine is powered on, is not found during the setup of the network print software or from the model pop-up menu of ControlCenter2. c Click the General tab. Network print software installation problems 15 The Brother print server is selected. d Click OK.... Note After the Brother software package is installed, turn your Firewall back on. „ Macintosh Choose your Firewall back on....

Network Users Manual - English
Page 204
...address). b Print the Network Configuration List of the print server. 15 15 a Make sure that the machine is powered on, is on-line and ready to disable the Firewall, see General problems on page 191.) If you will need to disable the Firewall on your computer and reinstall the drivers. (For... see the user's guide for your software or contact the software manufacturer. e If you have this case, you are correct for your network. The problem may be the result of mismatched or duplicate IP address. Verify that the IP address is correctly loaded into the print server, and make sure...
...address). b Print the Network Configuration List of the print server. 15 15 a Make sure that the machine is powered on, is on-line and ready to disable the Firewall, see General problems on page 191.) If you will need to disable the Firewall on your computer and reinstall the drivers. (For... see the user's guide for your software or contact the software manufacturer. e If you have this case, you are correct for your network. The problem may be the result of mismatched or duplicate IP address. Verify that the IP address is correctly loaded into the print server, and make sure...

Network Users Manual - English
Page 208
...setup. „ Windows®: Using the Setup Wizard from the control panel on page 31 Wireless configuration for Windows® using the Brother installer application (For MFC-8890DW) on page 41 „ Macintosh: Using the Setup Wizard from the control panel on page 31 Wireless... temporarily. Troubleshooting Wireless network troubleshooting (MFC-8890DW only) 15 Wireless setup problems 15 The Brother print server is not found during setup by the Wireless Device Setup Wizard. 15 a Make sure that the machine is powered on, is on-line and ready to wireless LAN automatically during setup...
...setup. „ Windows®: Using the Setup Wizard from the control panel on page 31 Wireless configuration for Windows® using the Brother installer application (For MFC-8890DW) on page 41 „ Macintosh: Using the Setup Wizard from the control panel on page 31 Wireless... temporarily. Troubleshooting Wireless network troubleshooting (MFC-8890DW only) 15 Wireless setup problems 15 The Brother print server is not found during setup by the Wireless Device Setup Wizard. 15 a Make sure that the machine is powered on, is on-line and ready to wireless LAN automatically during setup...

Network Users Manual - English
Page 209
The following conditions may cause connection problems: „ A concrete or metal framed wall is installed between the Brother machine and the access point/router. „ Electric appliances such as televisions, computer appliances, microwave ovens, intercoms, mobile/cellular phones and the battery chargers and AC power adapters are installed close to your network. „ A broadcast...
The following conditions may cause connection problems: „ A concrete or metal framed wall is installed between the Brother machine and the access point/router. „ Electric appliances such as televisions, computer appliances, microwave ovens, intercoms, mobile/cellular phones and the battery chargers and AC power adapters are installed close to your network. „ A broadcast...

Users Manual - English
Page 84
... -line and in the Software User's Guide on the CD-ROM.) Printouts are too light. „ If this problem. If possible, try connecting the machine to a different port on your machine is powered on and is on page 24.) „ Set Toner Save mode to verify that the cable and network connections... or have a rough surface. (See Acceptable paper and other print media on the CD-ROM for the type of print media you are having Network problems see your current Network settings. (See Network Configuration List on page 26.) Reconnect the LAN cable to the hub to Off in the Advanced tab...
... -line and in the Software User's Guide on the CD-ROM.) Printouts are too light. „ If this problem. If possible, try connecting the machine to a different port on your machine is powered on and is on page 24.) „ Set Toner Save mode to verify that the cable and network connections... or have a rough surface. (See Acceptable paper and other print media on the CD-ROM for the type of print media you are having Network problems see your current Network settings. (See Network Configuration List on page 26.) Reconnect the LAN cable to the hub to Off in the Advanced tab...

Users Manual - English
Page 95
... properly loaded in the paper tray or MP tray. „ Remove the paper and load it again. machine for problem. The machine is out of paper or paper is too hot. Do one of the following : „ Refill the paper in the paper tray. several minutes, then reconnect it on page 86... resolution. (See Advanced tab in the back (See Paper jams on the CDROM.) The machine has a mechanical Disconnect the machine from the power for 15 minutes with the power on . The paper is jammed in the duplex tray. (See Paper jams on page 86.) The paper is jammed in the MP (See...
... properly loaded in the paper tray or MP tray. „ Remove the paper and load it again. machine for problem. The machine is out of paper or paper is too hot. Do one of the following : „ Refill the paper in the paper tray. several minutes, then reconnect it on page 86... resolution. (See Advanced tab in the back (See Paper jams on the CDROM.) The machine has a mechanical Disconnect the machine from the power for 15 minutes with the power on . The paper is jammed in the duplex tray. (See Paper jams on page 86.) The paper is jammed in the MP (See...
Users Manual - English
Page 96
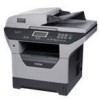
...the MP tray. Call Brother Customer Service to replace the laser unit. 1-877-BROTHER (1-877-276-8437) (in USA) 1-877-BROTHER (in Canada) Replace ...the power for Tray 1. Call Brother Customer Service to replace the PF Kit 1. 1-877-BROTHER (1-877-276-8437) (in USA) 1-877-BROTHER (...Brother Customer Service to replace the paper feeding kit for duplex scanning. Press Stop/Exit. C 1-877-BROTHER (1-877-276-8437) (in USA) 1-877-BROTHER... (in Canada) Replace Parts PF Kit 2 It is already a file on the USB Flash memory drive with a new one...
...the MP tray. Call Brother Customer Service to replace the laser unit. 1-877-BROTHER (1-877-276-8437) (in USA) 1-877-BROTHER (in Canada) Replace ...the power for Tray 1. Call Brother Customer Service to replace the PF Kit 1. 1-877-BROTHER (1-877-276-8437) (in USA) 1-877-BROTHER (...Brother Customer Service to replace the paper feeding kit for duplex scanning. Press Stop/Exit. C 1-877-BROTHER (1-877-276-8437) (in USA) 1-877-BROTHER... (in Canada) Replace Parts PF Kit 2 It is already a file on the USB Flash memory drive with a new one...

Users Manual - English
Page 109
... on a clean, flat surface with a dry, lint-free soft cloth. 1 Cleaning the corona wire C If you have print quality problems, clean the corona wire as follows: a Turn off the machine's power switch. b Open the front cover and slowly take out the drum unit and toner cartridge assembly. IMPORTANT • We recommend... it with a sheet of disposable paper or cloth underneath it in case you place the drum unit and toner cartridge assembly on the machine's power switch. c Wipe the laser scanner window (1) by static electricity, DO NOT touch the electrodes shown in the illustration. 96
... on a clean, flat surface with a dry, lint-free soft cloth. 1 Cleaning the corona wire C If you have print quality problems, clean the corona wire as follows: a Turn off the machine's power switch. b Open the front cover and slowly take out the drum unit and toner cartridge assembly. IMPORTANT • We recommend... it with a sheet of disposable paper or cloth underneath it in case you place the drum unit and toner cartridge assembly on the machine's power switch. c Wipe the laser scanner window (1) by static electricity, DO NOT touch the electrodes shown in the illustration. 96

Users Manual - English
Page 110
... have a vertical stripe. IMPORTANT To avoid print quality problems, DO NOT touch the shaded parts shown in the machine. Note Be sure to return the blue tab to right several times. 1 Troubleshooting and routine maintenance f Plug the machine's power cord back into the AC power outlet first, and then reconnect all cables. C e Close...
... have a vertical stripe. IMPORTANT To avoid print quality problems, DO NOT touch the shaded parts shown in the machine. Note Be sure to return the blue tab to right several times. 1 Troubleshooting and routine maintenance f Plug the machine's power cord back into the AC power outlet first, and then reconnect all cables. C e Close...

Users Manual - English
Page 111
If toner scatters on a clean, flat surface with cold water at once. • To avoid print quality problems, DO NOT touch the shaded parts shown in the illustrations below. IMPORTANT • We recommend that you put the drum unit and toner cartridge assembly .... a Turn off with a sheet of disposable paper or cloth underneath it in case you have print quality problems, clean the drum unit as follows. Unplug the power cord from the AC power outlet. d Put the print sample in front of the drum unit, and find the exact position of the drum unit. c Push...
If toner scatters on a clean, flat surface with cold water at once. • To avoid print quality problems, DO NOT touch the shaded parts shown in the illustrations below. IMPORTANT • We recommend that you put the drum unit and toner cartridge assembly .... a Turn off with a sheet of disposable paper or cloth underneath it in case you have print quality problems, clean the drum unit as follows. Unplug the power cord from the AC power outlet. d Put the print sample in front of the drum unit, and find the exact position of the drum unit. c Push...

Service Manual
Page 73
...will help the service personnel pinpoint and repair other defective elements. 1.1 Precautions Be sure to take voltage measurements with the power switched on, take the greatest of the possible troubles which may occur in future and determine the troubleshooting procedures, so ...sample troubles. warning The fuser unit becomes extremely hot during troubleshooting. (1) Always turn off the power and unplug the power cable before removing any secondary problems from happening during operation. INTRODUCTION Troubleshooting is impossible to anticipate all the precautions to prevent any covers...
...will help the service personnel pinpoint and repair other defective elements. 1.1 Precautions Be sure to take voltage measurements with the power switched on, take the greatest of the possible troubles which may occur in future and determine the troubleshooting procedures, so ...sample troubles. warning The fuser unit becomes extremely hot during troubleshooting. (1) Always turn off the power and unplug the power cable before removing any secondary problems from happening during operation. INTRODUCTION Troubleshooting is impossible to anticipate all the precautions to prevent any covers...

Service Manual
Page 75
This will take one or two hours. 3-3 Confidential If condensation has occurred, leave the machine for at ... the drum unit is moved from a cold place to a warm room, condensation may occur inside the machine, causing various problems as listed below. • Condensation on the optical surfaces such as a desk that is increased, making it . Instruct ...and 80%. (3) The machine is not exposed to direct sunlight, excessive heat, moisture, or dust. ■ Power Supply (1) The AC input power supply described on the rating plate of the machine should be light. • If the exposure drum is ...
This will take one or two hours. 3-3 Confidential If condensation has occurred, leave the machine for at ... the drum unit is moved from a cold place to a warm room, condensation may occur inside the machine, causing various problems as listed below. • Condensation on the optical surfaces such as a desk that is increased, making it . Instruct ...and 80%. (3) The machine is not exposed to direct sunlight, excessive heat, moisture, or dust. ■ Power Supply (1) The AC input power supply described on the rating plate of the machine should be light. • If the exposure drum is ...

Service Manual
Page 78
... current print job and go into cooling down mode, you turned on . 3-17 3-19 3-20 3-21 3-37 Init Unable XX The machine has a mechanical problem. Jam Duplex The paper is too hot. You cannot change the - Drum Error The corona wire on the drum unit. Perform processing with the... the power. Remove the jammed paper from the inside of the machine. Make sure paper is not closed completely or paper was too long. The drum unit has reached Replace the drum unit. Do one of fuser unit does not rise at a specified temperature within specified time. Leave the machine for...
... current print job and go into cooling down mode, you turned on . 3-17 3-19 3-20 3-21 3-37 Init Unable XX The machine has a mechanical problem. Jam Duplex The paper is too hot. You cannot change the - Drum Error The corona wire on the drum unit. Perform processing with the... the power. Remove the jammed paper from the inside of the machine. Make sure paper is not closed completely or paper was too long. The drum unit has reached Replace the drum unit. Do one of fuser unit does not rise at a specified temperature within specified time. Leave the machine for...

Service Manual
Page 112
...surface of the separation pad or the pickup roller dirty or worn out? 1) Clean the surface of the high-voltage power supply PCB broken Is the problem solved after replacing the drive sub ASSY? Pressure plate gear damage Is the pressure plate gear damaged? Main motor failure ...Is the problem solved after replacing the highvoltage power supply PCB ASSY? 4. PAPER FEEDING PROBLEMS Problems related to paper feeding are end user recoverable if following the User Check items. If the same problem occurs again, follow each procedure in the order of...
...surface of the separation pad or the pickup roller dirty or worn out? 1) Clean the surface of the high-voltage power supply PCB broken Is the problem solved after replacing the drive sub ASSY? Pressure plate gear damage Is the pressure plate gear damaged? Main motor failure ...Is the problem solved after replacing the highvoltage power supply PCB ASSY? 4. PAPER FEEDING PROBLEMS Problems related to paper feeding are end user recoverable if following the User Check items. If the same problem occurs again, follow each procedure in the order of...

Service Manual
Page 113
... eject sensor PCB? Paper eject actuator failure Does the paper eject actuator move smoothly? Paper eject sensor PCB failure Is the problem solved after replacing the Highvoltage power supply PCB ASSY? on edge sensor Is there paper powder in the edge sensor? Replace the toner LED Yes PCB ASSY.... Main PCB failure Is the problem solved after replacing the toner LED PCB ASSY? Fuser cover ASSY Is the fuser cover ASSY loose ...
... eject sensor PCB? Paper eject actuator failure Does the paper eject actuator move smoothly? Paper eject sensor PCB failure Is the problem solved after replacing the Highvoltage power supply PCB ASSY? on edge sensor Is there paper powder in the edge sensor? Replace the toner LED Yes PCB ASSY.... Main PCB failure Is the problem solved after replacing the toner LED PCB ASSY? Fuser cover ASSY Is the fuser cover ASSY loose ...

Service Manual
Page 120
... lever. Toner sensor failure Is the "Toner life End" message indicated on the LCD after replacing the current toner cartridge with a new one. Low-voltage power supply PCB failure Is the problem solved after replacing the HVPS PCB ASSY? ■ Poor fixing - No HVPS PCB failure Is the... the main PCB ASSY? Replace the main PCB Yes ASSY. Replace the toner sensor. Replace the toner cartridge with a new one . - Fuser unit failure Is the problem solved Replace the fuser unit. Replace the PS PCB unit. the fuser unit the anti-curl lever? Replace the HVPS PCB ...
... lever. Toner sensor failure Is the "Toner life End" message indicated on the LCD after replacing the current toner cartridge with a new one. Low-voltage power supply PCB failure Is the problem solved after replacing the HVPS PCB ASSY? ■ Poor fixing - No HVPS PCB failure Is the... the main PCB ASSY? Replace the main PCB Yes ASSY. Replace the toner sensor. Replace the toner cartridge with a new one . - Fuser unit failure Is the problem solved Replace the fuser unit. Replace the PS PCB unit. the fuser unit the anti-curl lever? Replace the HVPS PCB ...

Service Manual
Page 131
■ Hollow print by high humidity environment Is the problem solved after setting the drum condensation countermeasure mode to ON? Turn the power on and leave the machine for a few minutes. Yes (Refer to ON. Result Remedy Drum condensation countermeasure mode is set to 5.3 Drum condensation countermeasure mode in Chapter 7) 3-59 Confidential Step 1 Cause Check Condensation of drum unit by condensation -
■ Hollow print by high humidity environment Is the problem solved after setting the drum condensation countermeasure mode to ON? Turn the power on and leave the machine for a few minutes. Yes (Refer to ON. Result Remedy Drum condensation countermeasure mode is set to 5.3 Drum condensation countermeasure mode in Chapter 7) 3-59 Confidential Step 1 Cause Check Condensation of drum unit by condensation -

Service Manual
Page 139
...Replace the control panel Yes PCB. Replace the main PCB Yes ASSY. 3-67 Confidential Is the problem solved after replacing the LCD? Is the problem solved after replacing the main PCB ASSY? 9. Verify if the power switch is displayed on the LCD. - Step 1 2 3 4 5 6 7 8 Possible...PCB unit connected properly? Replace the harness with a Yes normal one . Reconnect the connector No properly. Replace the harness with a Yes normal one . TROUBLESHOOTING OF THE CONTROL PANEL ■ Nothing is turned off. Yes Is the problem solved after replacing the control panel PCB?
...Replace the control panel Yes PCB. Replace the main PCB Yes ASSY. 3-67 Confidential Is the problem solved after replacing the LCD? Is the problem solved after replacing the main PCB ASSY? 9. Verify if the power switch is displayed on the LCD. - Step 1 2 3 4 5 6 7 8 Possible...PCB unit connected properly? Replace the harness with a Yes normal one . Reconnect the connector No properly. Replace the harness with a Yes normal one . TROUBLESHOOTING OF THE CONTROL PANEL ■ Nothing is turned off. Yes Is the problem solved after replacing the control panel PCB?

Service Manual
Page 152
...appropriate fan Charge HVPS PCB failure Low-voltage 3 power supply failure Main PCB 4 Check Is the harness of the appropriate fan connected correctly? panel ASSY? Is the problem solved after replacing the main PCB ASSY? 13. OTHERS PROBLEMS ■ The machine is not turned on, or... the LCD indication does not appear. Low-voltage 4 power supply failure Is the problem solved after replacing the PS PCB unit?
...appropriate fan Charge HVPS PCB failure Low-voltage 3 power supply failure Main PCB 4 Check Is the harness of the appropriate fan connected correctly? panel ASSY? Is the problem solved after replacing the main PCB ASSY? 13. OTHERS PROBLEMS ■ The machine is not turned on, or... the LCD indication does not appear. Low-voltage 4 power supply failure Is the problem solved after replacing the PS PCB unit?

Service Manual
Page 156
Doing this may cause a fire or electrical shock. 4-1 Confidential WARNING • Always turn off the power switch and unplug the power cord from the power outlet before accessing any parts inside the machine. • When opening the front cover or back cover to access any parts inside the machine, never ... as alcohol, benzine, thinner or any type of spray to clean the inside or outside of the machine. PERIODIC MAINTENANCE PARTS To avoid creating secondary problems by mishandling, follow the warnings below during maintenance work. 1.
Doing this may cause a fire or electrical shock. 4-1 Confidential WARNING • Always turn off the power switch and unplug the power cord from the power outlet before accessing any parts inside the machine. • When opening the front cover or back cover to access any parts inside the machine, never ... as alcohol, benzine, thinner or any type of spray to clean the inside or outside of the machine. PERIODIC MAINTENANCE PARTS To avoid creating secondary problems by mishandling, follow the warnings below during maintenance work. 1.


