
Users Manual - English
Page 8
CHAPTER 4 OPTIONS Optional Accessories 4-1 Lower Tray Unit (LT-500 4-2 Installing the Lower Tray Unit 4-3 Network Option NC-4100h (For HL-1850 User Only)4-5 Installing the Network Board 4-5 RAM Expansion 4-9 Installing Additional Memory 4-13 IrDA Interface (...Maintenance Parts 5-2 Toner Cartridge 5-3 TONER LOW Message 5-4 TONER EMPTY Message 5-5 Replacing the Toner Cartridge 5-5 CHANGE DRUM SOON Message 5-11 Replacing the Drum Unit 5-11 Cleaning 5-14 Cleaning the Printer Exterior 5-14 Cleaning the Printer Interior 5-15 Cleaning the Corona Wire 5-17 Maintenance Messages 5-19 vii
CHAPTER 4 OPTIONS Optional Accessories 4-1 Lower Tray Unit (LT-500 4-2 Installing the Lower Tray Unit 4-3 Network Option NC-4100h (For HL-1850 User Only)4-5 Installing the Network Board 4-5 RAM Expansion 4-9 Installing Additional Memory 4-13 IrDA Interface (...Maintenance Parts 5-2 Toner Cartridge 5-3 TONER LOW Message 5-4 TONER EMPTY Message 5-5 Replacing the Toner Cartridge 5-5 CHANGE DRUM SOON Message 5-11 Replacing the Drum Unit 5-11 Cleaning 5-14 Cleaning the Printer Exterior 5-14 Cleaning the Printer Interior 5-15 Cleaning the Corona Wire 5-17 Maintenance Messages 5-19 vii

Users Manual - English
Page 129
... you fit the Toner Cartridge correctly or it lock into the Drum Unit until you hear it may have vertical stripes. 5-9 Clean the Primary Corona Wire inside the Drum Unit by gently sliding the blue tab from the Drum Unit when you put the Drum Unit back in the printer. Caution Make sure that you return the tab to left...
... you fit the Toner Cartridge correctly or it lock into the Drum Unit until you hear it may have vertical stripes. 5-9 Clean the Primary Corona Wire inside the Drum Unit by gently sliding the blue tab from the Drum Unit when you put the Drum Unit back in the printer. Caution Make sure that you return the tab to left...

Users Manual - English
Page 130
Close the Front Cover. Put the Drum Unit back into the printer. See "Cleaning" in this chapter. 5-10 Fig. 5-8 ✒ Note We recommend that you clean the printer when you replace the Toner Cartridge. ☛ 8.
Close the Front Cover. Put the Drum Unit back into the printer. See "Cleaning" in this chapter. 5-10 Fig. 5-8 ✒ Note We recommend that you clean the printer when you replace the Toner Cartridge. ☛ 8.

Users Manual - English
Page 131
... the Drum Unit is a noticeable deterioration in the print quality. ! Under ideal conditions, a drum unit will print. For best performance, only use the printer in each print job and so on paper. CHANGE DRUM SOON Message CHAPTER 5 MAINTENANCE CHANGE DRUM SOON The printer uses a Drum Unit to ...drum will last for , such as the temperature, humidity, type of paper, type of toner used, the number of pages in a clean, dust-free environment with one before there is near the end of printed pages may be significantly less than this estimate. ! You should only use genuine Brother...
... the Drum Unit is a noticeable deterioration in the print quality. ! Under ideal conditions, a drum unit will print. For best performance, only use the printer in each print job and so on paper. CHANGE DRUM SOON Message CHAPTER 5 MAINTENANCE CHANGE DRUM SOON The printer uses a Drum Unit to ...drum will last for , such as the temperature, humidity, type of paper, type of toner used, the number of pages in a clean, dust-free environment with one before there is near the end of printed pages may be significantly less than this estimate. ! You should only use genuine Brother...

Users Manual - English
Page 133
...new Drum Unit until immediately before you pick up . ! Caution Wait to Clean the Printer" in the printer. ☛ 7. Put the drum unit back in this chapter. 5-13 ☛ 4. Reset the drum counter ...unit may separate from the Drum Unit when you put in the printer. Close the Front Cover. ✒ Note We recommend that you clean the printer when you hear it may be damaged. ☛ 5. If an unpacked Drum Unit is will automatically lift up the Drum Unit Assembly. ☛ 6. See "How to unpack a Drum Unit until you replace the Drum Unit. Unpack the new Drum Unit...
...new Drum Unit until immediately before you pick up . ! Caution Wait to Clean the Printer" in the printer. ☛ 7. Put the drum unit back in this chapter. 5-13 ☛ 4. Reset the drum counter ...unit may separate from the Drum Unit when you put in the printer. Close the Front Cover. ✒ Note We recommend that you clean the printer when you hear it may be damaged. ☛ 5. If an unpacked Drum Unit is will automatically lift up the Drum Unit Assembly. ☛ 6. See "How to unpack a Drum Unit until you replace the Drum Unit. Unpack the new Drum Unit...

Users Manual - English
Page 134
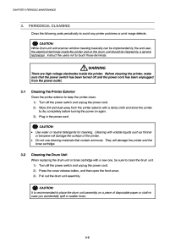
... on the power switch. 5-14 Do not use cleaning materials that contain ammonia. They will damage the surface of the printer. Cleaning Clean the printer exterior and interior routinely. Warning There are stained with toner, clean the printer interior and Drum Unit. ! Before cleaning the printer, make sure you have turned off the printer, and then unplug the power cord. Plug in...
... on the power switch. 5-14 Do not use cleaning materials that contain ammonia. They will damage the surface of the printer. Cleaning Clean the printer exterior and interior routinely. Warning There are stained with toner, clean the printer interior and Drum Unit. ! Before cleaning the printer, make sure you have turned off the printer, and then unplug the power cord. Plug in...

Users Manual - English
Page 135
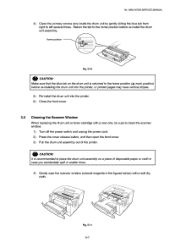
...the outlet. ☛ 2. Before cleaning the printer, make sure you accidentally spill the toner. 5-15 ! Caution Handle the drum unit carefully since it off immediately with water. ✒ Note We recommend that you put the drum unit on a piece of the printer. ! If toner spills on your... it contains toner. Pull the Drum Unit Assembly out of disposable paper or cloth in case you have turned off the power switch, and then unplug the power cord. Warning There are high voltage electrodes inside the printer. Cleaning the Printer Interior CHAPTER 5 MAINTENANCE ☛...
...the outlet. ☛ 2. Before cleaning the printer, make sure you accidentally spill the toner. 5-15 ! Caution Handle the drum unit carefully since it off immediately with water. ✒ Note We recommend that you put the drum unit on a piece of the printer. ! If toner spills on your... it contains toner. Pull the Drum Unit Assembly out of disposable paper or cloth in case you have turned off the power switch, and then unplug the power cord. Warning There are high voltage electrodes inside the printer. Cleaning the Printer Interior CHAPTER 5 MAINTENANCE ☛...

Users Manual - English
Page 137
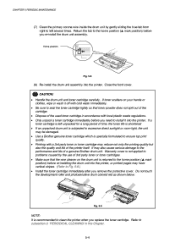
... toner. • To prevent damage to the Home position (L) before putting the drum unit back into the printer. Return the tab to the printer from right to left several times. Home Position Fig. 5-10 5-17 Clean the Primary Corona Wire inside the drum unit by gently sliding the blue tab from static electricity, do not touch the...
... toner. • To prevent damage to the Home position (L) before putting the drum unit back into the printer. Return the tab to the printer from right to left several times. Home Position Fig. 5-10 5-17 Clean the Primary Corona Wire inside the drum unit by gently sliding the blue tab from static electricity, do not touch the...

Users Manual - English
Page 141
... See "Cleaning the Corona Wire" in Chapter 1. Put in the current driver setting. SIZE ERROR T2 SIZE ERROR DX NO DX TRAY DX LEVER ERROR NO TRAY1 CLEAN DRUM UNIT SIZE MISMATCH Set the correct paper that you selected in the correct size of paper can I use into the printer. Specify the... printable paper size. Clean the corona wire. Install the standard paper cassette (Tray 1) into the...
... See "Cleaning the Corona Wire" in Chapter 1. Put in the current driver setting. SIZE ERROR T2 SIZE ERROR DX NO DX TRAY DX LEVER ERROR NO TRAY1 CLEAN DRUM UNIT SIZE MISMATCH Set the correct paper that you selected in the correct size of paper can I use into the printer. Specify the... printable paper size. Clean the corona wire. Install the standard paper cassette (Tray 1) into the...

Users Manual - English
Page 163
... than you use paper that meets our specifications. See "Positioning the Printer" in Chapter 5. • The fixing unit may be damaged. Put in Chapter 5. • Clean the Corona Wire. See "Cleaning the Corona Wire" in Chapter 1. • The drum unit may cause this problem. Install a new drum unit. Call Customer Support. • Make sure you are currently using...
... than you use paper that meets our specifications. See "Positioning the Printer" in Chapter 5. • The fixing unit may be damaged. Put in Chapter 5. • Clean the Corona Wire. See "Cleaning the Corona Wire" in Chapter 1. • The drum unit may cause this problem. Install a new drum unit. Call Customer Support. • Make sure you are currently using...
Users Manual - English
Page 164
....). 94 mm (3.7 in.) 94 mm (3.7 in.) Black Spots Printed pages have found the mark on the drum surface. • Clean the drum unit as follows: 1. Fig. 6-32 3. Turn the drum unit gear by hand while looking at intervals of the drum. Position the print sample in .). When you have black spots at the surface of 94 mm...
....). 94 mm (3.7 in.) 94 mm (3.7 in.) Black Spots Printed pages have found the mark on the drum surface. • Clean the drum unit as follows: 1. Fig. 6-32 3. Turn the drum unit gear by hand while looking at intervals of the drum. Position the print sample in .). When you have black spots at the surface of 94 mm...

Users Manual - English
Page 165
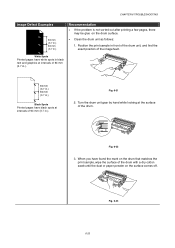
See "Replacing the drum unit" in Chapter 5. 94 mm (3.7 in.) 94 mm (3.7 in.) Printed pages have white spots in black text and graphics at intervals of the drum with anything sharp, such as a ballpoint pen. White Spots Printed pages have black spots at intervals of 94 mm (3.7 in .). 6-26 Put in .) Recommendation ! Caution Do not try to clean the surface of 94 mm (3.7 in .). • The drum unit may be damaged. Image Defect Examples 94 mm (3.7 in.) 94 mm (3.7 in a new drum unit.
See "Replacing the drum unit" in Chapter 5. 94 mm (3.7 in.) 94 mm (3.7 in.) Printed pages have white spots in black text and graphics at intervals of the drum with anything sharp, such as a ballpoint pen. White Spots Printed pages have black spots at intervals of 94 mm (3.7 in .). 6-26 Put in .) Recommendation ! Caution Do not try to clean the surface of 94 mm (3.7 in .). • The drum unit may be damaged. Image Defect Examples 94 mm (3.7 in.) 94 mm (3.7 in a new drum unit.

Users Manual - English
Page 166
... the unpacked drum unit is in a new drum unit. Put in direct sunlight or room light, it may disappear by itself. ABCDEFGH abcdefghijk ABCD abcde 01234 Black Vertical Lines Printed pages are stained with toner or have not used the printer for laser printers, the glue from the sheets may be damaged. Call Customer Support. • Clean the...
... the unpacked drum unit is in a new drum unit. Put in direct sunlight or room light, it may disappear by itself. ABCDEFGH abcdefghijk ABCD abcde 01234 Black Vertical Lines Printed pages are stained with toner or have not used the printer for laser printers, the glue from the sheets may be damaged. Call Customer Support. • Clean the...

Service Manual
Page 7
... 1.1 Initial Check 1.2 Warnings for Maintenance Work 1.3 Identify the Problem 2. PERIODICAL CLEANING 3.1 Cleaning the Printer Exterior 3.2 Cleaning the Drum Unit 3.3 Cleaning the Scanner Window 3.4 Cleaning the Electrical Terminals 4. HL-1850/1870N SERVICE MANUAL 3.10 Process Unit Cover ASSY 3.11 Laser Unit 3.12 Fixing Unit 3.13 Paper Pick-up Roller ASSY 3.14 Feed MP Unit 3.15 Drive Unit 3.16 Low-voltage Power Supply PCB ASSY 3.17 Main PCB...
... 1.1 Initial Check 1.2 Warnings for Maintenance Work 1.3 Identify the Problem 2. PERIODICAL CLEANING 3.1 Cleaning the Printer Exterior 3.2 Cleaning the Drum Unit 3.3 Cleaning the Scanner Window 3.4 Cleaning the Electrical Terminals 4. HL-1850/1870N SERVICE MANUAL 3.10 Process Unit Cover ASSY 3.11 Laser Unit 3.12 Fixing Unit 3.13 Paper Pick-up Roller ASSY 3.14 Feed MP Unit 3.15 Drive Unit 3.16 Low-voltage Power Supply PCB ASSY 3.17 Main PCB...
Service Manual
Page 163
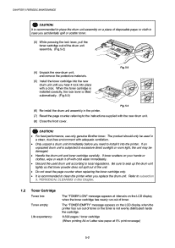
... only genuine Brother toner. Refer to subsection 3. `PERIODICAL CLEANING' in this Chapter. 1.2 Toner Cartridge Toner low: Toner empty: Life expectancy: The "TONER LOW" message appears at 5% print coverage) 5-2 When the toner cartridge is installed correctly, the lock lever is lifted automatically. (Fig.5-3) Fig. 5-2 rr Fig. 5-3 (6) Re-install the drum unit assembly in the printer. (7) Reset...
... only genuine Brother toner. Refer to subsection 3. `PERIODICAL CLEANING' in this Chapter. 1.2 Toner Cartridge Toner low: Toner empty: Life expectancy: The "TONER LOW" message appears at 5% print coverage) 5-2 When the toner cartridge is installed correctly, the lock lever is lifted automatically. (Fig.5-3) Fig. 5-2 rr Fig. 5-3 (6) Re-install the drum unit assembly in the printer. (7) Reset...
Service Manual
Page 165
.... 5-4 Home position 0 .4 (------' Fig. 5-8 (8) Re-install the drum unit assembly into the printer. CHAPTER 5 PERIODIC MAINTENANCE (7) Clean the primary corona wire inside the drum unit by the use of3rdparty toner or toner cartridges. • Make sure that toner powder does not spill out of the cartridge. • Dispose of a genuine Brother drum unit Warranty cover is recommended to left several...
.... 5-4 Home position 0 .4 (------' Fig. 5-8 (8) Re-install the drum unit assembly into the printer. CHAPTER 5 PERIODIC MAINTENANCE (7) Clean the primary corona wire inside the drum unit by the use of3rdparty toner or toner cartridges. • Make sure that toner powder does not spill out of the cartridge. • Dispose of a genuine Brother drum unit Warranty cover is recommended to left several...
Service Manual
Page 167
... will damage the surface of disposable paper or cloth in the power cord. A WARNING There are high voltage electrodes inside the printer and on the drum unit should be sure to clean the drum unit. 1) Turn off the power switch and unplug the power cord. 2) Press the cover release button, and then open the front cover...
... will damage the surface of disposable paper or cloth in the power cord. A WARNING There are high voltage electrodes inside the printer and on the drum unit should be sure to clean the drum unit. 1) Turn off the power switch and unplug the power cord. 2) Press the cover release button, and then open the front cover...
Service Manual
Page 168
Home position 0 4 Fig. 5-10 Return the tab to left several times. HL-1850/1870N SERVICE MANUAL 4) Clean the primary corona wire inside the drum unit by gently sliding the blue tab from right to the home position before re-install the drum unit assembly.
Home position 0 4 Fig. 5-10 Return the tab to left several times. HL-1850/1870N SERVICE MANUAL 4) Clean the primary corona wire inside the drum unit by gently sliding the blue tab from right to the home position before re-install the drum unit assembly.
Service Manual
Page 169
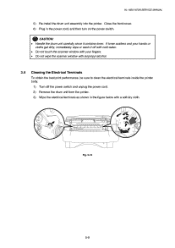
... below with isopropyl alcohol. 3.4 Cleaning the Electrical Terminals To obtain the best print performance, be sure to clean the electrical terminals inside the printer body. 1) Turn off the power switch and unplug the power cord. 2) Remove the drum unit from the printer. 3) Wipe the electrical terminals as.... CAUTION: • Handle the drum unit carefully since it off with cold water. • Do not touch the scanner window with your hands or cloths get dirty, immediately wipe or wash it contains toner. HL-1850/1870N SERVICE MANUAL 5) Re-install the drum unit assembly into the printer.
... below with isopropyl alcohol. 3.4 Cleaning the Electrical Terminals To obtain the best print performance, be sure to clean the electrical terminals inside the printer body. 1) Turn off the power switch and unplug the power cord. 2) Remove the drum unit from the printer. 3) Wipe the electrical terminals as.... CAUTION: • Handle the drum unit carefully since it off with cold water. • Do not touch the scanner window with your hands or cloths get dirty, immediately wipe or wash it contains toner. HL-1850/1870N SERVICE MANUAL 5) Re-install the drum unit assembly into the printer.
Service Manual
Page 175
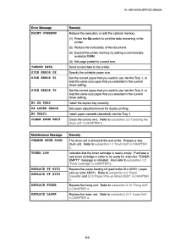
HL-1850/1870N SERVICE MANUAL Error Message PRINT OVERRUN IGNORE DATA SIZE ERROR DX SIZE ERROR T1 SIZE ERROR T2 NO DX TRAY DX LEVER ERROR NO TRAY1 CLEAN DRUM UNIT Remedy Reduce the resolution, or add the optional memory. (1) Press the Go switch to print the data remaining in the printer...5. Refer to subsection 3.2 `Cleaning the drum unit' in CHAPTER 4. Set paper adjustment lever for when the "TONER EMPTY" message is nearly empty. Refer to subsection 3.12 `Fixing Unit" REPLACE LASER Replace the laser unit. Prepare a new drum unit. Replace the fixing unit. Purchase a new toner cartridge ...
HL-1850/1870N SERVICE MANUAL Error Message PRINT OVERRUN IGNORE DATA SIZE ERROR DX SIZE ERROR T1 SIZE ERROR T2 NO DX TRAY DX LEVER ERROR NO TRAY1 CLEAN DRUM UNIT Remedy Reduce the resolution, or add the optional memory. (1) Press the Go switch to print the data remaining in the printer...5. Refer to subsection 3.2 `Cleaning the drum unit' in CHAPTER 4. Set paper adjustment lever for when the "TONER EMPTY" message is nearly empty. Refer to subsection 3.12 `Fixing Unit" REPLACE LASER Replace the laser unit. Prepare a new drum unit. Replace the fixing unit. Purchase a new toner cartridge ...


