
Users Manual - English
Page 13
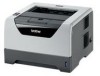
Front view 1 2 3 7 9 6 4 5 8 1 Front Cover Release Button 2 Control Panel 3 Face-down Output Tray Support Flap 1 (Support Flap 1) 4 Front Cover 5 Paper Tray 6 Power Switch 7 Face-down Output Tray 8 Multi-purpose Tray (MP Tray) 9 Face-down Output Tray Support Flap 2 (Support Flap 2) About this Printer 1 1 3
Front view 1 2 3 7 9 6 4 5 8 1 Front Cover Release Button 2 Control Panel 3 Face-down Output Tray Support Flap 1 (Support Flap 1) 4 Front Cover 5 Paper Tray 6 Power Switch 7 Face-down Output Tray 8 Multi-purpose Tray (MP Tray) 9 Face-down Output Tray Support Flap 2 (Support Flap 2) About this Printer 1 1 3

Users Manual - English
Page 16
... page for each printing method by clicking p in the printer driver and this guide are as follows: 2 2 2 Paper tray Multi-purpose tray Optional lower tray unit Duplex unit for automatic duplex printing Tray 1 MP Tray Tray 2 / Tray 3 DX When looking at this page on the CD... installed paper tray or the multi-purpose tray. The names for the paper trays in the table. Printing Methods2 2 Printing Methods 2 About paper Type and size of paper The printer loads paper from the printer driver Plain Paper p p Recycled Paper Bond Paper Thin Paper p Thick Paper or Thicker Paper Transparencies...
... page for each printing method by clicking p in the printer driver and this guide are as follows: 2 2 2 Paper tray Multi-purpose tray Optional lower tray unit Duplex unit for automatic duplex printing Tray 1 MP Tray Tray 2 / Tray 3 DX When looking at this page on the CD... installed paper tray or the multi-purpose tray. The names for the paper trays in the table. Printing Methods2 2 Printing Methods 2 About paper Type and size of paper The printer loads paper from the printer driver Plain Paper p p Recycled Paper Bond Paper Thin Paper p Thick Paper or Thicker Paper Transparencies...

Users Manual - English
Page 18
... 3M CG3300 3M CG3300 Labels Avery laser label L7163 Avery laser labels white #5160 Envelope Antalis River series (DL) (No specific brand recommended) „ Before you buy a lot of paper in the paper tray at the same time because it may occur in the printer. DO NOT put different types of paper, test a small quantity to use...
... 3M CG3300 3M CG3300 Labels Avery laser label L7163 Avery laser labels white #5160 Envelope Antalis River series (DL) (No specific brand recommended) „ Before you buy a lot of paper in the paper tray at the same time because it may occur in the printer. DO NOT put different types of paper, test a small quantity to use...

Users Manual - English
Page 21
Printing Methods 2 2 2 2 b While pressing the blue paper-guide release lever (1), slide the paper guides to use, see About paper on plain paper, bond paper or transparencies from Tray 1, 2 or 3 Note Transparencies are firmly in the slots. 1 11 Printing methods Printing on plain paper, bond paper and transparencies Printing on page 6.) a Pull the paper tray completely out of the printer. Make sure that the guides are only for Tray1. (For the recommended paper to fit the paper size.
Printing Methods 2 2 2 2 b While pressing the blue paper-guide release lever (1), slide the paper guides to use, see About paper on plain paper, bond paper or transparencies from Tray 1, 2 or 3 Note Transparencies are firmly in the slots. 1 11 Printing methods Printing on plain paper, bond paper and transparencies Printing on page 6.) a Pull the paper tray completely out of the printer. Make sure that the guides are only for Tray1. (For the recommended paper to fit the paper size.

Users Manual - English
Page 22
IMPORTANT Make sure the paper guides touch the sides of the paper tray. 2 1 c Put paper in the printer. d Put the paper tray firmly back in the tray, and make sure that it will feed properly. Make sure that the paper is completely inserted into the printer. 12 Printing Methods Note For Legal or Folio size paper, press the release button (1) in the bottom of the paper tray and then pull out the back of the paper so it is below the maximum paper mark (bbb). The side to be printed on must be face down.
IMPORTANT Make sure the paper guides touch the sides of the paper tray. 2 1 c Put paper in the printer. d Put the paper tray firmly back in the tray, and make sure that it will feed properly. Make sure that the paper is completely inserted into the printer. 12 Printing Methods Note For Legal or Folio size paper, press the release button (1) in the bottom of the paper tray and then pull out the back of the paper so it is below the maximum paper mark (bbb). The side to be printed on must be face down.

Users Manual - English
Page 35
...print quality on page 129.) Note • The screens in this section are using the Macintosh Printer Driver, see Duplex Printing on page 62. Manual duplex printing from the paper tray 2 a In the printer driver choose the Basic tab, and choose the Duplex printing mode from the Duplex / Booklet setting... the back cover is closed. • Make sure that the paper tray is completely inserted into the printer. • If paper is curled, straighten it and then put it back in the paper tray or the MP tray. „ If the paper is possible that there may be curled. For more information about ...
...print quality on page 129.) Note • The screens in this section are using the Macintosh Printer Driver, see Duplex Printing on page 62. Manual duplex printing from the paper tray 2 a In the printer driver choose the Basic tab, and choose the Duplex printing mode from the Duplex / Booklet setting... the back cover is closed. • Make sure that the paper tray is completely inserted into the printer. • If paper is curled, straighten it and then put it back in the paper tray or the MP tray. „ If the paper is possible that there may be curled. For more information about ...

Users Manual - English
Page 36
...the top of a stack of the paper. f The printer will automatically print all the odd-numbered pages on one side of the paper first. 2 e Remove the printed even-numbered pages from the output tray and then , in the same order 1, put them back in the paper tray with the printed side face up....Auto Select, put the printed even-numbered pages in the MP tray. • When you put the printed pages in opposite order when the Back output tray is opened. Next, put paper in the paper tray, first empty the tray. The printer will now automatically print all the even-numbered pages on the ...
...the top of a stack of the paper. f The printer will automatically print all the odd-numbered pages on one side of the paper first. 2 e Remove the printed even-numbered pages from the output tray and then , in the same order 1, put them back in the paper tray with the printed side face up....Auto Select, put the printed even-numbered pages in the MP tray. • When you put the printed pages in opposite order when the Back output tray is opened. Next, put paper in the paper tray, first empty the tray. The printer will now automatically print all the even-numbered pages on the ...

Users Manual - English
Page 38
... will print page 6 and then page 5 on the third sheet of paper, and so on the computer screen. 2 1 Put papers in opposite order when the Back output tray is opened. Follow the instructions on . f The printer will now automatically print all the odd-numbered pages. It will print page 4 and... then page 3 on (the blank side) face up and in first. 28 When doing manual duplex printing, the paper must be put in the paper tray in the following way: „ For the paper tray: „...
... will print page 6 and then page 5 on the third sheet of paper, and so on the computer screen. 2 1 Put papers in opposite order when the Back output tray is opened. Follow the instructions on . f The printer will now automatically print all the odd-numbered pages. It will print page 4 and... then page 3 on (the blank side) face up and in first. 28 When doing manual duplex printing, the paper must be put in the paper tray in the following way: „ For the paper tray: „...

Users Manual - English
Page 39
..., see Duplex Printing on both sides of the paper automatically. b For the Windows® printer driver 1 Open the Properties dialog box in the paper tray or MP tray. Printing Methods 2 2 29 button, the Duplex Settings will print on page 62. a Put paper in the printer driver. 2 From the General tab, click the Printing Preferences button. 3 From the...
..., see Duplex Printing on both sides of the paper automatically. b For the Windows® printer driver 1 Open the Properties dialog box in the paper tray or MP tray. Printing Methods 2 2 29 button, the Duplex Settings will print on page 62. a Put paper in the printer driver. 2 From the General tab, click the Printing Preferences button. 3 From the...

Users Manual - English
Page 41
...... button, the Duplex Settings will print a booklet automatically. 31 b For the Windows® printer driver 1 Open the Properties dialog box in the paper tray or MP tray. Printing Methods 2 2 For the BR-Script printer driver 1 Open the Properties dialog box in the printer driver. 2 From the General tab, click the Printing Preferences button. 3 From the Layout...
...... button, the Duplex Settings will print a booklet automatically. 31 b For the Windows® printer driver 1 Open the Properties dialog box in the paper tray or MP tray. Printing Methods 2 2 For the BR-Script printer driver 1 Open the Properties dialog box in the printer driver. 2 From the General tab, click the Printing Preferences button. 3 From the Layout...

Users Manual - English
Page 54
Right-click the Brother HL5340D/HL-5350DN/HL-5370DW series icon and select Properties to access the Accessories tab. 1 Printers for each tray so the paper is used for each paper tray. • Paper Size This setting allows you can add and choose their settings in the Accessories tab as follows. 1 3 2 4 „ Available Options (1) You can manually add and ...
Right-click the Brother HL5340D/HL-5350DN/HL-5370DW series icon and select Properties to access the Accessories tab. 1 Printers for each tray so the paper is used for each paper tray. • Paper Size This setting allows you can add and choose their settings in the Accessories tab as follows. 1 3 2 4 „ Available Options (1) You can manually add and ...

Users Manual - English
Page 90
...not start printing, press Go. Duplex disabled Close the back cover of the printer. Paper jam Clear the paper jam. If the printer does not start printing, press Go. Size mismatch Put the same size paper in the paper tray or MP tray that is A4, Letter, Legal or Folio. The Back Cover LED will ...turn on page 120. LED Control Panel Printer status No tray The paper tray was not detected, install it, or ensure it is open ...
...not start printing, press Go. Duplex disabled Close the back cover of the printer. Paper jam Clear the paper jam. If the printer does not start printing, press Go. Size mismatch Put the same size paper in the paper tray or MP tray that is A4, Letter, Legal or Folio. The Back Cover LED will ...turn on page 120. LED Control Panel Printer status No tray The paper tray was not detected, install it, or ensure it is open ...

Users Manual - English
Page 116
...pages are stained with toner, clean the inside or outside of the printer 6 WARNING Use neutral detergents. a Turn off the printer power switch and then unplug the printer. DO NOT use cleaning materials that you clean the inside of the printer regularly with a dry, lint-free cloth. Routine Maintenance Cleaning 6... NOT use flammable substances, any type of spray an organic solvent/liquids contains alcohol or ammonia to clean the inside of the printer with volatile liquids such as thinner or benzine will damage the surface of the printer. 106 b Pull the paper tray completely out of the...
...pages are stained with toner, clean the inside or outside of the printer 6 WARNING Use neutral detergents. a Turn off the printer power switch and then unplug the printer. DO NOT use cleaning materials that you clean the inside of the printer regularly with a dry, lint-free cloth. Routine Maintenance Cleaning 6... NOT use flammable substances, any type of spray an organic solvent/liquids contains alcohol or ammonia to clean the inside of the printer with volatile liquids such as thinner or benzine will damage the surface of the printer. 106 b Pull the paper tray completely out of the...

Users Manual - English
Page 117
e Wipe the inside the paper tray. g Plug the printer back in the printer. c Wipe the outside of the paper tray with a dry, lint-free cloth to remove dust. 6 f Put the paper tray back in , and then turn on the power switch. 107 Routine Maintenance d Remove anything that is stuck inside of the printer with a dry, lint-free cloth to remove dust.
e Wipe the inside the paper tray. g Plug the printer back in the printer. c Wipe the outside of the paper tray with a dry, lint-free cloth to remove dust. 6 f Put the paper tray back in , and then turn on the power switch. 107 Routine Maintenance d Remove anything that is stuck inside of the printer with a dry, lint-free cloth to remove dust.

Users Manual - English
Page 121
In that case, clean the paper pick-up roller is stained, the printer may not feed paper. d Dampen a soft cloth with lukewarm water and wipe the separator pad (1) in the paper tray with it. 1 111 c Pull the paper tray out of the printer. Routine Maintenance Cleaning the paper pick-up roller 6 If the paper pick-up roller as follows: a Turn off the power switch and unplug the printer. 6 b Unplug the power cord and interface cable from the printer.
In that case, clean the paper pick-up roller is stained, the printer may not feed paper. d Dampen a soft cloth with lukewarm water and wipe the separator pad (1) in the paper tray with it. 1 111 c Pull the paper tray out of the printer. Routine Maintenance Cleaning the paper pick-up roller 6 If the paper pick-up roller as follows: a Turn off the power switch and unplug the printer. 6 b Unplug the power cord and interface cable from the printer.

Users Manual - English
Page 122
Routine Maintenance 6 g Make sure that you have turned off the power switch, and then connect the power cord and interface cable to the printer. h Plug in the printer. e Wipe the two paper pick-up rollers (1) inside the printer. 1 f Put the paper tray back in the power cord and turn on the power switch of the printer. 112
Routine Maintenance 6 g Make sure that you have turned off the power switch, and then connect the power cord and interface cable to the printer. h Plug in the printer. e Wipe the two paper pick-up rollers (1) inside the printer. 1 f Put the paper tray back in the power cord and turn on the power switch of the printer. 112

Users Manual - English
Page 125
... the paper tray. „ The interface cable is securely connected to the printer and the computer. „ The correct driver for the printer has been chosen and is installed. „ The computer is inserted properly in the Status Monitor on page 116. „ Paper handling See Paper handling on page 137. Visit us at http://solutions.brother...
... the paper tray. „ The interface cable is securely connected to the printer and the computer. „ The correct driver for the printer has been chosen and is installed. „ The computer is inserted properly in the Status Monitor on page 116. „ Paper handling See Paper handling on page 137. Visit us at http://solutions.brother...

Users Manual - English
Page 127
...TrueType mode „ Use Printer TrueType® Fonts Service call indications on page 6. „ Load the same size paper that meets Brother's recommended paper specifications. Cancel the print job if you selected in the paper tray, make sure it ready for Tray 3. See Control panel ...paper tray and then press Go. Replace Laser Unit Replace Toner Toner Low Call your dealer or Brother Customer Service for a replacement paper feeding kit (paper pick up roller. Increase the RAMDISK size. Storage Full The RAMDISK size is no space to print the remaining data in the printer...
...TrueType mode „ Use Printer TrueType® Fonts Service call indications on page 6. „ Load the same size paper that meets Brother's recommended paper specifications. Cancel the print job if you selected in the paper tray, make sure it ready for Tray 3. See Control panel ...paper tray and then press Go. Replace Laser Unit Replace Toner Toner Low Call your dealer or Brother Customer Service for a replacement paper feeding kit (paper pick up roller. Increase the RAMDISK size. Storage Full The RAMDISK size is no space to print the remaining data in the printer...

Users Manual - English
Page 129
... you have chosen the MP Tray in the paper tray, make sure that you are using paper that meets Brother recommended paper specifications. (See About paper on page 6.) Problem Recommendation The printer does not feed paper. „ If there is paper in the Paper Source of your software. (See your envelopes. application to remove the paper. The paper slides off the top output...
... you have chosen the MP Tray in the paper tray, make sure that you are using paper that meets Brother recommended paper specifications. (See About paper on page 6.) Problem Recommendation The printer does not feed paper. „ If there is paper in the Paper Source of your software. (See your envelopes. application to remove the paper. The paper slides off the top output...

Users Manual - English
Page 130
...printer, some internal parts of the printer, DO NOT touch the shaded parts shown in the illustration. If the printer still does not start printing automatically, press Go. If the printer does not start printing, check that all the remaining jammed paper has been removed from the printer. If the jammed paper... printing again. 120 The printer will resume printing automatically. Troubleshooting Paper jams and how to clear them 7 Jam MP tray / Tray1 / Tray2 / Tray3 / Inside 7 If a paper jam occurs inside the MP tray or paper tray, the printer will flash the Paper LED as follows. If you...
...printer, some internal parts of the printer, DO NOT touch the shaded parts shown in the illustration. If the printer still does not start printing automatically, press Go. If the printer does not start printing, check that all the remaining jammed paper has been removed from the printer. If the jammed paper... printing again. 120 The printer will resume printing automatically. Troubleshooting Paper jams and how to clear them 7 Jam MP tray / Tray1 / Tray2 / Tray3 / Inside 7 If a paper jam occurs inside the MP tray or paper tray, the printer will flash the Paper LED as follows. If you...


