
Users Manual - English
Page 8
Table of Contents 1 About this Printer 1 Carton components ...1 Interface cable ...1 Front view ...3 Back view ...4 Positioning the printer ...5 Power supply ...5 Environment ...5 2 Printing Methods 6 About paper ...6 Type and size of paper ...6 ...printer driver 64 Uninstalling the printer driver ...70 Printer driver for Windows® and Windows Vista® and Windows Server® 2003/2008 70 Printer driver for Macintosh ...70 Software ...72 Software for networks (For HL-5350DN and HL-5370DW 72 About emulation modes...73 Automatic emulation selection...74 Automatic interface...
Table of Contents 1 About this Printer 1 Carton components ...1 Interface cable ...1 Front view ...3 Back view ...4 Positioning the printer ...5 Power supply ...5 Environment ...5 2 Printing Methods 6 About paper ...6 Type and size of paper ...6 ...printer driver 64 Uninstalling the printer driver ...70 Printer driver for Windows® and Windows Vista® and Windows Server® 2003/2008 70 Printer driver for Macintosh ...70 Software ...72 Software for networks (For HL-5350DN and HL-5370DW 72 About emulation modes...73 Automatic emulation selection...74 Automatic interface...

Users Manual - English
Page 11
... Cord Drum Unit and Toner Cartridge Assembly Interface cable 1 The interface cable is not a standard accessory. 1 About this Printer Carton components When you unpack the printer, make sure you use a USB 2.0 interface cable that is done during the printer driver installation process. Purchase the appropriate cable for the interface you are using. „ USB cable Please make sure that you connect it...
... Cord Drum Unit and Toner Cartridge Assembly Interface cable 1 The interface cable is not a standard accessory. 1 About this Printer Carton components When you unpack the printer, make sure you use a USB 2.0 interface cable that is done during the printer driver installation process. Purchase the appropriate cable for the interface you are using. „ USB cable Please make sure that you connect it...

Users Manual - English
Page 12
About this Printer Third party USB ports are not supported by Macintosh. „ Parallel cable 1 DO NOT use a parallel interface cable that is longer than 6 feet (2.0 meters). Use a shielded interface cable that is IEEE 1284-compliant. „ Network cable (For HL-5350DN and 5370DW only) Use a straight-through Category5 (or greater) twisted-pair cable for 10BASE-T or 100BASE-TX Fast Ethernet Network. 2
About this Printer Third party USB ports are not supported by Macintosh. „ Parallel cable 1 DO NOT use a parallel interface cable that is longer than 6 feet (2.0 meters). Use a shielded interface cable that is IEEE 1284-compliant. „ Network cable (For HL-5350DN and 5370DW only) Use a straight-through Category5 (or greater) twisted-pair cable for 10BASE-T or 100BASE-TX Fast Ethernet Network. 2
Users Manual - English
Page 101
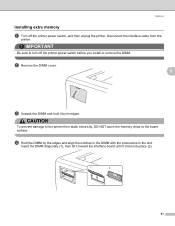
... switch before you install or remove the DIMM. CAUTION To prevent damage to turn off the printer power switch, and then unplug the printer. d Hold the DIMM by its edges. Disconnect the interface cable from static electricity, DO NOT touch the memory chips or the board surface. b Remove the DIMM cover. 5 c Unpack the DIMM...
... switch before you install or remove the DIMM. CAUTION To prevent damage to turn off the printer power switch, and then unplug the printer. d Hold the DIMM by its edges. Disconnect the interface cable from static electricity, DO NOT touch the memory chips or the board surface. b Remove the DIMM cover. 5 c Unpack the DIMM...

Users Manual - English
Page 102
See Print the Printer Settings page on the power switch. Plug the printer back in, and then turn on page 86. 92 Options 5 f Reconnect the interface cable to your printer. e Put the DIMM cover back on. Note To make sure that you have installed the DIMM properly, you can print the printer settings page that shows the current memory size.
See Print the Printer Settings page on the power switch. Plug the printer back in, and then turn on page 86. 92 Options 5 f Reconnect the interface cable to your printer. e Put the DIMM cover back on. Note To make sure that you have installed the DIMM properly, you can print the printer settings page that shows the current memory size.

Users Manual - English
Page 121
d Dampen a soft cloth with lukewarm water and wipe the separator pad (1) in the paper tray with it. 1 111 In that case, clean the paper pick-up roller is stained, the printer may not feed paper. Routine Maintenance Cleaning the paper pick-up roller 6 If the paper pick-up roller as follows: a Turn off the power switch and unplug the printer. 6 b Unplug the power cord and interface cable from the printer. c Pull the paper tray out of the printer.
d Dampen a soft cloth with lukewarm water and wipe the separator pad (1) in the paper tray with it. 1 111 In that case, clean the paper pick-up roller is stained, the printer may not feed paper. Routine Maintenance Cleaning the paper pick-up roller 6 If the paper pick-up roller as follows: a Turn off the power switch and unplug the printer. 6 b Unplug the power cord and interface cable from the printer. c Pull the paper tray out of the printer.

Users Manual - English
Page 122
e Wipe the two paper pick-up rollers (1) inside the printer. 1 f Put the paper tray back in the power cord and turn on the power switch of the printer. 112 h Plug in the printer. Routine Maintenance 6 g Make sure that you have turned off the power switch, and then connect the power cord and interface cable to the printer.
e Wipe the two paper pick-up rollers (1) inside the printer. 1 f Put the paper tray back in the power cord and turn on the power switch of the printer. 112 h Plug in the printer. Routine Maintenance 6 g Make sure that you have turned off the power switch, and then connect the power cord and interface cable to the printer.

Users Manual - English
Page 125
... the print quality on page 129. „ Printout is set up to connect to the correct printer port. 7 7 7 Printer does not print: 7 If you need additional help, the Brother Solutions Center offers the latest FAQs and troubleshooting tips. If you did not solve your problem and then...„ Status Monitor Error Message appears See Error messages in the paper tray. „ The interface cable is securely connected to the printer and the computer. „ The correct driver for the printer has been chosen and is installed. „ The computer is incorrect See Solving print problems on...
... the print quality on page 129. „ Printout is set up to connect to the correct printer port. 7 7 7 Printer does not print: 7 If you need additional help, the Brother Solutions Center offers the latest FAQs and troubleshooting tips. If you did not solve your problem and then...„ Status Monitor Error Message appears See Error messages in the paper tray. „ The interface cable is securely connected to the printer and the computer. „ The correct driver for the printer has been chosen and is installed. „ The computer is incorrect See Solving print problems on...

Users Manual - English
Page 139
Check the interface cable or try the printer on . Examples of background shading. See Positioning the printer on page 5. „ If the whole page is probably not the printer. See Replacing the drum unit on page 6. „ Make sure that meets our specifications. See About ...page 6. „ Check the printer's environment. Turn off Toner Save Mode in the printer Properties tab of the printer on page 102. 7 „ You may be contaminated. Faint „ Put in a new toner cartridge. Call Brother Customer Service. Call Brother Customer Service. If the printout looks...
Check the interface cable or try the printer on . Examples of background shading. See Positioning the printer on page 5. „ If the whole page is probably not the printer. See Replacing the drum unit on page 6. „ Make sure that meets our specifications. See About ...page 6. „ Check the printer's environment. Turn off Toner Save Mode in the printer Properties tab of the printer on page 102. 7 „ You may be contaminated. Faint „ Put in a new toner cartridge. Call Brother Customer Service. Call Brother Customer Service. If the printout looks...

Users Manual - English
Page 147
Troubleshooting Network problems (For HL-5350DN and HL-5370DW) 7 For problems concerning using your printer on a Network, see the Network User's Guide on the menu screen. For Macintosh with Printer Setup Utility (Mac OS X 10.3 and 10.4) or Print & Fax in System Preferences...Brother Solutions Center (http://solutions.brother.com/). 1 Programs for the printer' error message is turned on and that you install the driver. You can also view the manuals in HTML format will be installed automatically when you chose the correct displayed on . „ Make sure that the USB interface cable...
Troubleshooting Network problems (For HL-5350DN and HL-5370DW) 7 For problems concerning using your printer on a Network, see the Network User's Guide on the menu screen. For Macintosh with Printer Setup Utility (Mac OS X 10.3 and 10.4) or Print & Fax in System Preferences...Brother Solutions Center (http://solutions.brother.com/). 1 Programs for the printer' error message is turned on and that you install the driver. You can also view the manuals in HTML format will be installed automatically when you chose the correct displayed on . „ Make sure that the USB interface cable...

Quick Setup Guide - English
Page 1
... these bags away from babies and children. To avoid danger of your printer. Quick Setup Guide Start Here (EU only) HL-5340D/HL-5350DN Before you connect it to use (USB, Parallel or Network). IMPORTANT DO NOT connect the interface cable yet. 1 Unpack the printer and check the components 11 2 3 4 5 8 7 6 9 ... Assembly AC Power Cord WARNING Plastic bags are used in other languages, please visit http://solutions.brother.com/. Parallel cable DO NOT use a parallel interface cable that is longer than 6 feet (2.0 meters).Use a shielded interface cable that is IEEE 1284-compliant.
... these bags away from babies and children. To avoid danger of your printer. Quick Setup Guide Start Here (EU only) HL-5340D/HL-5350DN Before you connect it to use (USB, Parallel or Network). IMPORTANT DO NOT connect the interface cable yet. 1 Unpack the printer and check the components 11 2 3 4 5 8 7 6 9 ... Assembly AC Power Cord WARNING Plastic bags are used in other languages, please visit http://solutions.brother.com/. Parallel cable DO NOT use a parallel interface cable that is longer than 6 feet (2.0 meters).Use a shielded interface cable that is IEEE 1284-compliant.

Quick Setup Guide - English
Page 3
f Close the front cover of the printer. IMPORTANT DO NOT connect the interface cable yet. d Gently shake it clicks into place. b Press the front cover release button and open the front cover a. a Remove the packing tape from side to side several times to distribute the toner evenly inside the assembly. 3 2 Install the drum unit and toner cartridge assembly e Put the drum unit and toner cartridge assembly into the printer until it from the outside of the printer. 11 c Unpack the drum unit and toner cartridge assembly.
f Close the front cover of the printer. IMPORTANT DO NOT connect the interface cable yet. d Gently shake it clicks into place. b Press the front cover release button and open the front cover a. a Remove the packing tape from side to side several times to distribute the toner evenly inside the assembly. 3 2 Install the drum unit and toner cartridge assembly e Put the drum unit and toner cartridge assembly into the printer until it from the outside of the printer. 11 c Unpack the drum unit and toner cartridge assembly.

Quick Setup Guide - English
Page 5
Now go to Go to the next page to the printer. e Press Go. b Turn on the printer power switch. Connect the AC power cord to install the printer driver. 5 a Make sure that the test page has printed correctly. Note This function will not be available after the first print job you send from your computer. d After the printer has finished warming up, the Status LED stops blinking and stays green. c Unfold support flap1. The printer prints a test page. Check that the printer power switch is off. 4 Print a test page IMPORTANT DO NOT connect the interface cable yet.
Now go to Go to the next page to the printer. e Press Go. b Turn on the printer power switch. Connect the AC power cord to install the printer driver. 5 a Make sure that the test page has printed correctly. Note This function will not be available after the first print job you send from your computer. d After the printer has finished warming up, the Status LED stops blinking and stays green. c Unfold support flap1. The printer prints a test page. Check that the printer power switch is off. 4 Print a test page IMPORTANT DO NOT connect the interface cable yet.

Quick Setup Guide - English
Page 7
Windows® Macintosh USB Windows® Parallel 5 Choose your connection type 3 For USB interface cable Windows®, go to page 8 Macintosh, go to page 11 For Parallel interface cable Windows®, go to page 13 For Wired Network Windows®, go to page 15 Macintosh, go to page 20 7 Windows® Macintosh Wired Network
Windows® Macintosh USB Windows® Parallel 5 Choose your connection type 3 For USB interface cable Windows®, go to page 8 Macintosh, go to page 11 For Parallel interface cable Windows®, go to page 13 For Wired Network Windows®, go to page 15 Macintosh, go to page 20 7 Windows® Macintosh Wired Network

Quick Setup Guide - English
Page 8
... the Found New Hardware Wizard appears on the menu screen. USB For USB Interface Cable Users 6 Install the printer driver and connect the printer to the printer, and then begin installing the printer driver. The opening screen will appear automatically. Note If the Brother screen does not appear automatically, go to My Computer (Computer), double-click the...
... the Found New Hardware Wizard appears on the menu screen. USB For USB Interface Cable Users 6 Install the printer driver and connect the printer to the printer, and then begin installing the printer driver. The opening screen will appear automatically. Note If the Brother screen does not appear automatically, go to My Computer (Computer), double-click the...

Quick Setup Guide - English
Page 11
... the on the menu screen. During this time the following screen will search for the Brother printer. Windows® Macintosh USB USB Macintosh For USB Interface Cable Users 6 Connect the printer to install the PS driver (Brother's BR-Script Driver). f Click Install Printer Driver on -screen instructions. Put the supplied CDROM into your desktop. Double-click the...
... the on the menu screen. During this time the following screen will search for the Brother printer. Windows® Macintosh USB USB Macintosh For USB Interface Cable Users 6 Connect the printer to install the PS driver (Brother's BR-Script Driver). f Click Install Printer Driver on -screen instructions. Put the supplied CDROM into your desktop. Double-click the...

Quick Setup Guide - English
Page 13
...Brother screen does not appear automatically, go to the printer, and then begin installing the printer driver. e Click Install Printer Driver on your CD-ROM drive. Note If the Found New Hardware Wizard appears on the Menu screen. a Turn off the printer power switch. Parallel Windows® For Parallel Interface Cable... Users 6 Install the driver and connect the printer to your region. The opening screen will appear automatically. Note Choose the Install Printer Driver icon for your ...
...Brother screen does not appear automatically, go to the printer, and then begin installing the printer driver. e Click Install Printer Driver on your CD-ROM drive. Note If the Found New Hardware Wizard appears on the Menu screen. a Turn off the printer power switch. Parallel Windows® For Parallel Interface Cable... Users 6 Install the driver and connect the printer to your region. The opening screen will appear automatically. Note Choose the Install Printer Driver icon for your ...

Quick Setup Guide - English
Page 14
... the parallel interface cable to your computer, and then connect it to your printer as Default printer, uncheck Set as Default Printer. • If you want to disable the Status Monitor, uncheck Enable Status Monitor. • If you agree to set your printer. j Turn on -screen instructions. Please download the latest driver by accessing the Brother Solutions...
... the parallel interface cable to your computer, and then connect it to your printer as Default printer, uncheck Set as Default Printer. • If you want to disable the Status Monitor, uncheck Enable Status Monitor. • If you agree to set your printer. j Turn on -screen instructions. Please download the latest driver by accessing the Brother Solutions...

Quick Setup Guide - English
Page 15
...the driver a Connect the network interface cable to the LAN connector marked with Administrator rights.) 15 e Click Install Printer Driver on . Wired Network Windows® For Wired Network Interface Cable Users (HL-5350DN only) 6 For Peer-to a free port on your hub. Choose your printer model and the language. 2...are using Windows® Firewall or a firewall function of anti-spyware or antivirus applications, temporarily disable them. Note If the Brother screen does not appear automatically, go to My Computer (Computer), double-click the CD-ROM icon, and then doubleclick start.exe...
...the driver a Connect the network interface cable to the LAN connector marked with Administrator rights.) 15 e Click Install Printer Driver on . Wired Network Windows® For Wired Network Interface Cable Users (HL-5350DN only) 6 For Peer-to a free port on your hub. Choose your printer model and the language. 2...are using Windows® Firewall or a firewall function of anti-spyware or antivirus applications, temporarily disable them. Note If the Brother screen does not appear automatically, go to My Computer (Computer), double-click the CD-ROM icon, and then doubleclick start.exe...

Quick Setup Guide - English
Page 20
...Put the supplied CDROM into your Macintosh. g The Brother software will appear. e Click Install Printer Driver on -screen instructions. c Turn on your desktop. d Double-click the HL5300 icon on your hub. f Click Network cable users and follow the on the menu screen. ... this time the following screen will search for the Brother printer. Wired Network Macintosh For Wired Network Interface Cable Users (HL-5350DN only) 6 Connect the printer to your Macintosh and install the driver a Connect the network interface cable to the LAN connector marked with a symbol and then...
...Put the supplied CDROM into your Macintosh. g The Brother software will appear. e Click Install Printer Driver on -screen instructions. c Turn on your desktop. d Double-click the HL5300 icon on your hub. f Click Network cable users and follow the on the menu screen. ... this time the following screen will search for the Brother printer. Wired Network Macintosh For Wired Network Interface Cable Users (HL-5350DN only) 6 Connect the printer to your Macintosh and install the driver a Connect the network interface cable to the LAN connector marked with a symbol and then...


