

Users Manual - English
Page 2
...and may differ from the actual items. This is a kit used for machine embroidering. For specific details on operating the machine, refer to the Operation Manual provided with your machine. This kit cannot be used for sewing bobbin work. CONTENTS ABOUT BOBBIN WORK ...2 INCLUDED ACCESSORIES ...2 PREPARING FOR BOBBIN WORK ...3......12 ADJUSTING THE THREAD TENSION...13 Adjusting the Upper Thread Tension ...13 Adjusting the Tension of the Bobbin Thread ...13 TROUBLESHOOTING...14 1 This manual describes the procedures for sewing (utility stitches, decorative stitches or free-motion sewing).
...and may differ from the actual items. This is a kit used for machine embroidering. For specific details on operating the machine, refer to the Operation Manual provided with your machine. This kit cannot be used for sewing bobbin work. CONTENTS ABOUT BOBBIN WORK ...2 INCLUDED ACCESSORIES ...2 PREPARING FOR BOBBIN WORK ...3......12 ADJUSTING THE THREAD TENSION...13 Adjusting the Upper Thread Tension ...13 Adjusting the Tension of the Bobbin Thread ...13 TROUBLESHOOTING...14 1 This manual describes the procedures for sewing (utility stitches, decorative stitches or free-motion sewing).

Users Manual - English
Page 3
...) Free-motion sewing INCLUDED ACCESSORIES 1. 2. 3. 4. Bobbin case (gray) (XE8298-001) Bobbin cover with tabs (*See Note.) Screwdriver (small) (X55468-051) CD-ROM (Contains the Operation Manual and the Templates for freemotion sewing.) (USA/CANADA: XE9382-001, Other areas: XE9501-001) Note • Two bobbin covers may be included, depending on the...
...) Free-motion sewing INCLUDED ACCESSORIES 1. 2. 3. 4. Bobbin case (gray) (XE8298-001) Bobbin cover with tabs (*See Note.) Screwdriver (small) (X55468-051) CD-ROM (Contains the Operation Manual and the Templates for freemotion sewing.) (USA/CANADA: XE9382-001, Other areas: XE9501-001) Note • Two bobbin covers may be included, depending on the...

Users Manual - English
Page 8
... installing the flat bed attachment, do not allow it to repeat the procedure from a on installing the needle plate cover, refer to the machine's Operation Manual. a Needle plate cover b Bobbin cover with a new one, be done correctly. → This completes the upper and lower threading. 7 Note • When installing the needle...
... installing the flat bed attachment, do not allow it to repeat the procedure from a on installing the needle plate cover, refer to the machine's Operation Manual. a Needle plate cover b Bobbin cover with a new one, be done correctly. → This completes the upper and lower threading. 7 Note • When installing the needle...

Users Manual - English
Page 10
...reinforcement/reverse stitching have been turned off . m While gently holding threads at the end of the machine, turn the handwheel to the machine's Operation Manual. Depending on the selected stitch, it will be possible to change the stitch length and stitch width settings. l Note • Before sewing, ...several stitches have reached the end of the fabric. For details on adjusting the stitch length and stitch width, refer to the machine's Operation Manual. • Depending on , the thread may become tangled or the needle may not be difficult to pull the bobbin thread up to ...
...reinforcement/reverse stitching have been turned off . m While gently holding threads at the end of the machine, turn the handwheel to the machine's Operation Manual. Depending on the selected stitch, it will be possible to change the stitch length and stitch width settings. l Note • Before sewing, ...several stitches have reached the end of the fabric. For details on adjusting the stitch length and stitch width, refer to the machine's Operation Manual. • Depending on , the thread may become tangled or the needle may not be difficult to pull the bobbin thread up to ...

Users Manual - English
Page 12
... sewing. Place commercially available transfer paper on the stabilizer, then the paper printed with the template on using the quilting foot, refer to the Operation Manual provided with your machine or with a pencil. a Template b Transfer paper c Stabilizer on the machine, and then use freemotion sewing to sew the design. d Once the...
... sewing. Place commercially available transfer paper on the stabilizer, then the paper printed with the template on using the quilting foot, refer to the Operation Manual provided with your machine or with a pencil. a Template b Transfer paper c Stabilizer on the machine, and then use freemotion sewing to sew the design. d Once the...

Users Manual - English
Page 14
... the bobbin thread can be sure to sew trial stitches again in the bobbin case. (Refer to "When tension is difficult to the machine's Operation Manual for bobbin work. To increase the tension of the bobbin thread. Turning the screw too much or providing force in either (rotational) direction may result...
... the bobbin thread can be sure to sew trial stitches again in the bobbin case. (Refer to "When tension is difficult to the machine's Operation Manual for bobbin work. To increase the tension of the bobbin thread. Turning the screw too much or providing force in either (rotational) direction may result...
KIT 2 USER - English
Page 2
... List ...16 Color Change Table for the Embroidery Patterns on the CD-ROM 17 Before using this upgrade kit, be sure to read this Operation Manual for information for proper use. 1
... List ...16 Color Change Table for the Embroidery Patterns on the CD-ROM 17 Before using this upgrade kit, be sure to read this Operation Manual for information for proper use. 1

KIT 2 USER - English
Page 3
... color schemes, then the sample for the selected effect is included, allowing you to expand your operation of the sewing machine. Refer to the Operation Manual on the CD-ROM for use with the upgrade for use . (page 4) • The pen tablet is displayed. (page 6) • The custom thread table setting... to USB media as outlined in the Installation Guide. NEW FEATURES The following features will be saved to the procedure outlined in this upgrade Operation Manual.
... color schemes, then the sample for the selected effect is included, allowing you to expand your operation of the sewing machine. Refer to the Operation Manual on the CD-ROM for use with the upgrade for use . (page 4) • The pen tablet is displayed. (page 6) • The custom thread table setting... to USB media as outlined in the Installation Guide. NEW FEATURES The following features will be saved to the procedure outlined in this upgrade Operation Manual.

KIT 2 USER - English
Page 6
For detailed instructions about operating My Custom Design, refer to the Operation Manual (PDF format) stored on the My Custom Design CD. Note • When you create the embroidery pattern by tracing the picture using the pen tablet, ...
For detailed instructions about operating My Custom Design, refer to the Operation Manual (PDF format) stored on the My Custom Design CD. Note • When you create the embroidery pattern by tracing the picture using the pen tablet, ...
KIT 2 USER - English
Page 7
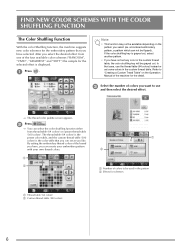
... table (300 colors) is grayed out, select another pattern. • If you select (ex. b Press . → You can not be available depending on the Operation Manual of the machine for schemes a Thread table (64 colors) b Custom thread table (300 colors) 6 FIND NEW COLOR SCHEMES WITH THE COLOR SHUFFLING FUNCTION The Color...
... table (300 colors) is grayed out, select another pattern. • If you select (ex. b Press . → You can not be available depending on the Operation Manual of the machine for schemes a Thread table (64 colors) b Custom thread table (300 colors) 6 FIND NEW COLOR SCHEMES WITH THE COLOR SHUFFLING FUNCTION The Color...
KIT 2 USER - English
Page 8
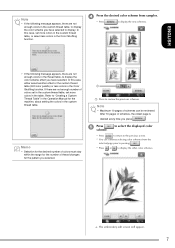
... time you selected. d Press the desired color scheme from the selected page prior to pressing . * Press or to "Creating a Custom Thread Table" in the Operation Manual for the pattern you press . In this case, either select another effect or the custom thread table (300 color palette) or less colors in the...
... time you selected. d Press the desired color scheme from the selected page prior to pressing . * Press or to "Creating a Custom Thread Table" in the Operation Manual for the pattern you press . In this case, either select another effect or the custom thread table (300 color palette) or less colors in the...
KIT 2 USER - English
Page 9
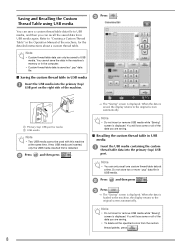
... display returns to the original screen automatically. When the data is saved as ".pcp" data file. ■ Saving the custom thread table in the Operation Manual of the machine, for media b USB media Note • Two USB media cannot be saved to USB media, and then you are saving. • To...
... display returns to the original screen automatically. When the data is saved as ".pcp" data file. ■ Saving the custom thread table in the Operation Manual of the machine, for media b USB media Note • Two USB media cannot be saved to USB media, and then you are saving. • To...
KIT 2 USER - English
Page 11
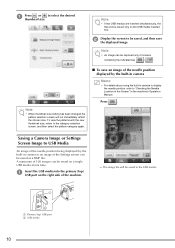
... "Checking the Needle Location in the Screen" in camera or an image of the needle position being displayed by the built-in the machine's Operation Manual. a Primary (top) USB port b USB media 10
... "Checking the Needle Location in the Screen" in camera or an image of the needle position being displayed by the built-in the machine's Operation Manual. a Primary (top) USB port b USB media 10
KIT 2 USER - English
Page 12
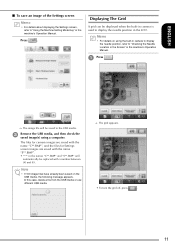
... the needle position in the LCD. Displaying The Grid A grid can be saved to "Checking the Needle Location in the Screen" in the machine's Operation Manual. Press . The files for camera images are saved with the name "C**.BMP", and the files for Settings screen images are saved with the name "S**.BMP... names "C**.BMP" and "S**.BMP" will be displayed when the built-in camera is used to "Using the Machine Setting Mode Key" in the machine's Operation Manual.
... the needle position in the LCD. Displaying The Grid A grid can be saved to "Checking the Needle Location in the Screen" in the machine's Operation Manual. Press . The files for camera images are saved with the name "C**.BMP", and the files for Settings screen images are saved with the name "S**.BMP... names "C**.BMP" and "S**.BMP" will be displayed when the built-in camera is used to "Using the Machine Setting Mode Key" in the machine's Operation Manual.
KIT 2 USER - English
Page 20
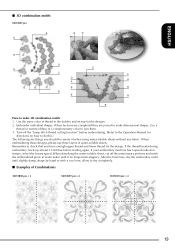
... iron, allow to dry completely. ■ Examples of thread in the bobbin and on how to do this.) The following are joined to the Operation Manual for directions on top for the design. Use the same color of Combinations XKIT2B08.pes × 2 XKIT2B09.pes × 4 XKIT2B10.pes × 4 19 If the...
... iron, allow to dry completely. ■ Examples of thread in the bobbin and on how to do this.) The following are joined to the Operation Manual for directions on top for the design. Use the same color of Combinations XKIT2B08.pes × 2 XKIT2B09.pes × 4 XKIT2B10.pes × 4 19 If the...
Operation Manual
Page 1
Computerized Embroidery and Sewing Machine Operation Manual Product Code: 882-W01/W02
Computerized Embroidery and Sewing Machine Operation Manual Product Code: 882-W01/W02

Operation Manual
Page 3
... 1 Always unplug the machine from the electrical outlet when removing covers, lubricating, or when making any adjustments mentioned in the instruction manual. • To unplug the machine, switch the machine to the symbol "O" position to make any sudden or careless movements, otherwise...machine may fall, resulting in use extension cords. IMPORTANT SAFETY INSTRUCTIONS Please read the "Important Safety Instructions", and then study this manual for future reference. Plug the machine directly into the electrical outlet. • Never drop or insert any air openings blocked....
... 1 Always unplug the machine from the electrical outlet when removing covers, lubricating, or when making any adjustments mentioned in the instruction manual. • To unplug the machine, switch the machine to the symbol "O" position to make any sudden or careless movements, otherwise...machine may fall, resulting in use extension cords. IMPORTANT SAFETY INSTRUCTIONS Please read the "Important Safety Instructions", and then study this manual for future reference. Plug the machine directly into the electrical outlet. • Never drop or insert any air openings blocked....
Operation Manual
Page 4
...use outdoors. 7 For a longer service life: • When storing this machine. If the problem persists, please consult your local authorized Brother dealer. Use only the USB mouse included with this machine, avoid direct sunlight and high humidity locations. Never allow children to play with...is required when sewing: • Always pay close attention is necessary when the machine is used . • Always consult the operation manual when replacing or installing any adjustments in should be used by the manufacturer as described in this machine. Use only the interface cable ...
...use outdoors. 7 For a longer service life: • When storing this machine. If the problem persists, please consult your local authorized Brother dealer. Use only the USB mouse included with this machine, avoid direct sunlight and high humidity locations. Never allow children to play with...is required when sewing: • Always pay close attention is necessary when the machine is used . • Always consult the operation manual when replacing or installing any adjustments in should be used by the manufacturer as described in this machine. Use only the interface cable ...
Operation Manual
Page 11
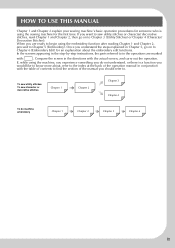
... In the screens appearing in the step-by-step instructions, the parts referred to Chapter 6 (Embroidery Edit) for the first time. HOW TO USE THIS MANUAL Chapter 1 and Chapter 2 explain your sewing machine's basic operation procedures for someone who is a function you would like to know more about, refer to ...the index at the back of the operation manual in conjunction with the table of contents to find the section of the manual you are marked with . Compare the screen in Chapter 5, go on to in the operations are ready to...
... In the screens appearing in the step-by-step instructions, the parts referred to Chapter 6 (Embroidery Edit) for the first time. HOW TO USE THIS MANUAL Chapter 1 and Chapter 2 explain your sewing machine's basic operation procedures for someone who is a function you would like to know more about, refer to ...the index at the back of the operation manual in conjunction with the table of contents to find the section of the manual you are marked with . Compare the screen in Chapter 5, go on to in the operations are ready to...

Operation Manual
Page 12
CONTENTS CONTENTS INTRODUCTION i IMPORTANT SAFETY INSTRUCTIONS i OUTSTANDING FEATURES vi WHAT YOU CAN DO WITH THIS MACHINE ...viii HOW TO USE THIS MANUAL ix NAMES OF MACHINE PARTS AND THEIR FUNCTIONS 1 Machine 1 Needle and Presser Foot Section 2 Embroidery Unit 3 Operation Buttons 3 Using the Flat Bed Attachment 4 Using the ...
CONTENTS CONTENTS INTRODUCTION i IMPORTANT SAFETY INSTRUCTIONS i OUTSTANDING FEATURES vi WHAT YOU CAN DO WITH THIS MACHINE ...viii HOW TO USE THIS MANUAL ix NAMES OF MACHINE PARTS AND THEIR FUNCTIONS 1 Machine 1 Needle and Presser Foot Section 2 Embroidery Unit 3 Operation Buttons 3 Using the Flat Bed Attachment 4 Using the ...


