

Users Manual - English
Page 4
...a complete selection of Brother accessories and supplies available for purchase.) USA: 1-888-879-3232 (voice) 1-800-947-1445 (fax) http://www.brothermall.com From within Canada: 1-800-668-2768 (voice) DESCRIPTION Laser Fax Toner Laser Fax Drum 1 MB Expandable Memory Board (For FAX 2750 Only) 2 MB ...Expandable Memory Board (For FAX 2750 Only) Telephone Line Cord Telephone Handset Handset Curled Cord Dust Cover Wire Extension Paper Tray and...
...a complete selection of Brother accessories and supplies available for purchase.) USA: 1-888-879-3232 (voice) 1-800-947-1445 (fax) http://www.brothermall.com From within Canada: 1-800-668-2768 (voice) DESCRIPTION Laser Fax Toner Laser Fax Drum 1 MB Expandable Memory Board (For FAX 2750 Only) 2 MB ...Expandable Memory Board (For FAX 2750 Only) Telephone Line Cord Telephone Handset Handset Curled Cord Dust Cover Wire Extension Paper Tray and...

Users Manual - English
Page 5
... USA Only 2 About Fax Machines 2 Fax Tones and Handshake 2 ECM (Error Correction Mode 3 FAX 2750 and FAX 3750 Control Panel Overview 4 FAX 2750 and FAX 3750 Control Panel Keys 5 Caution ...7 Packing List...8 Choosing a Location ...9 Assembly ...10 Installing the Drum Unit Assembly (with Toner Cartridge 10 Setting Up the Fax Machine 12 Loading Paper...
... USA Only 2 About Fax Machines 2 Fax Tones and Handshake 2 ECM (Error Correction Mode 3 FAX 2750 and FAX 3750 Control Panel Overview 4 FAX 2750 and FAX 3750 Control Panel Keys 5 Caution ...7 Packing List...8 Choosing a Location ...9 Assembly ...10 Installing the Drum Unit Assembly (with Toner Cartridge 10 Setting Up the Fax Machine 12 Loading Paper...

Users Manual - English
Page 9
... USA Only)...126 Industry Canada Compliance Statement (For Canada Only 126 Important-About the Interface Cable 126 International Energy Star Compliance Statement 126 Important Safety Instructions 127 Notice - vii T A B L E O...Printer Jam ...93 Paper is Jammed in the Multi-purpose Sheet Feeder 94 Paper is Jammed near the Drum Unit or in the Fuser Unit 94 If You Are Having Difficulty with Your Fax Machine 95 Difficulties ...byte modes 101 Fax Machine Connect Failure or Bi-Directional Communication Error 102 Brother HL-6/6V/10h/630series/660series/960/1260/WL-660 102 HP LaserJet series...
... USA Only)...126 Industry Canada Compliance Statement (For Canada Only 126 Important-About the Interface Cable 126 International Energy Star Compliance Statement 126 Important Safety Instructions 127 Notice - vii T A B L E O...Printer Jam ...93 Paper is Jammed in the Multi-purpose Sheet Feeder 94 Paper is Jammed near the Drum Unit or in the Fuser Unit 94 If You Are Having Difficulty with Your Fax Machine 95 Difficulties ...byte modes 101 Fax Machine Connect Failure or Bi-Directional Communication Error 102 Brother HL-6/6V/10h/630series/660series/960/1260/WL-660 102 HP LaserJet series...

Users Manual - English
Page 20
... are the same size.) Dust Cover Document Tray Paper Tray Remote Control Access Card Owner's Manual Quick Reference Drum Unit Assembly (With free Starter Toner Cartridge) Brother StartCard If an item is missing, call Brother Customer Service at 1-800-284-4329 (USA), 1-800-853-6660 (from within Canada) or 1-514-685-6464 (from...
... are the same size.) Dust Cover Document Tray Paper Tray Remote Control Access Card Owner's Manual Quick Reference Drum Unit Assembly (With free Starter Toner Cartridge) Brother StartCard If an item is missing, call Brother Customer Service at 1-800-284-4329 (USA), 1-800-853-6660 (from within Canada) or 1-514-685-6464 (from...
Users Manual - English
Page 22
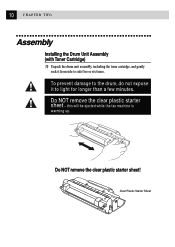
Do NOT remove the clear plastic starter sheet! Do NOT remove the clear plastic starter sheet - this will be ejected while the fax machine is warming up. Clear Plastic Starter Sheet To prevent damage to the drum, do not expose it from side to light for longer than a few minutes. 10 CHAPTER TWO Assembly Installing the Drum Unit Assembly (with Toner Cartridge) 1 Unpack the drum unit assembly, including the toner cartridge, and gently rock it to side five or six times.
Do NOT remove the clear plastic starter sheet! Do NOT remove the clear plastic starter sheet - this will be ejected while the fax machine is warming up. Clear Plastic Starter Sheet To prevent damage to the drum, do not expose it from side to light for longer than a few minutes. 10 CHAPTER TWO Assembly Installing the Drum Unit Assembly (with Toner Cartridge) 1 Unpack the drum unit assembly, including the toner cartridge, and gently rock it to side five or six times.

Users Manual - English
Page 23
11 F A X M A C H I N E S E T U P A N D C O N N E C T I O N S 2 Open the top cover of the fax machine. 3 Holding the drum unit by its handles, insert it into the fax machine. 4 Close the top cover.
11 F A X M A C H I N E S E T U P A N D C O N N E C T I O N S 2 Open the top cover of the fax machine. 3 Holding the drum unit by its handles, insert it into the fax machine. 4 Close the top cover.

Users Manual - English
Page 27
15 F A X M A C H I N E S E T U P A N D C O N N E C T I O N S Attaching Dust Cover s It is essential to keep the dust cover on your fax machine to the now open multi-purpose sheet feeder cover, pressing the dust cover sides around the feeder until they snap into place. 2 Close the multi-purpose sheet feeder cover. s Using the dust cover on your fax machine will prolong the life of the drum unit. 1 Attach the dust cover to prevent the dust from entering the print head and causing damage.
15 F A X M A C H I N E S E T U P A N D C O N N E C T I O N S Attaching Dust Cover s It is essential to keep the dust cover on your fax machine to the now open multi-purpose sheet feeder cover, pressing the dust cover sides around the feeder until they snap into place. 2 Close the multi-purpose sheet feeder cover. s Using the dust cover on your fax machine will prolong the life of the drum unit. 1 Attach the dust cover to prevent the dust from entering the print head and causing damage.

Users Manual - English
Page 102
... Your Paper Size setting may occasionally encounter a difficulty with a new one. setup. If you have a print quality problem, then replace the drum unit with your fax machine often identifies the problem and displays an error message. will be set correctly for the paper you will pause its... automatically are using (see this happens, your fax machine or telephone line. ERROR A poor quality phone line Try the call the Brother Fax-Back System at USA: 1-800-521-2846 From within Canada: 1-800-681-9838 ERROR MESSAGES ERROR MESSAGE CAUSE ACTION CHANGE...
... Your Paper Size setting may occasionally encounter a difficulty with a new one. setup. If you have a print quality problem, then replace the drum unit with your fax machine often identifies the problem and displays an error message. will be set correctly for the paper you will pause its... automatically are using (see this happens, your fax machine or telephone line. ERROR A poor quality phone line Try the call the Brother Fax-Back System at USA: 1-800-521-2846 From within Canada: 1-800-681-9838 ERROR MESSAGES ERROR MESSAGE CAUSE ACTION CHANGE...

Users Manual - English
Page 106
94 CHAPTER THIRTEEN Paper is jammed in fuser unit Paper is jammed near the Drum Unit or in the Multi-purpose Sheet Feeder 1 Open the multi-purpose sheet feeder to pull the jammed paper upward out of the feeder. 2 Close the multi-purpose sheet feeder. 3 Open the top cover and check that a torn piece of paper does not remain inside the fax machine. Multi-purpose Sheet Feeder Paper is Jammed near drum unit Paper is Jammed in the Fuser Unit 1 Open the top cover. 2 Remove the drum unit. 3 Gently pull out the jammed paper. 4 Reinstall the drum unit. 5 Close the top cover.
94 CHAPTER THIRTEEN Paper is jammed in fuser unit Paper is jammed near the Drum Unit or in the Multi-purpose Sheet Feeder 1 Open the multi-purpose sheet feeder to pull the jammed paper upward out of the feeder. 2 Close the multi-purpose sheet feeder. 3 Open the top cover and check that a torn piece of paper does not remain inside the fax machine. Multi-purpose Sheet Feeder Paper is Jammed near drum unit Paper is Jammed in the Fuser Unit 1 Open the top cover. 2 Remove the drum unit. 3 Gently pull out the jammed paper. 4 Reinstall the drum unit. 5 Close the top cover.

Users Manual - English
Page 109
Check the primary settings in . • The toner cartridge and drum unit are the first two lines and last two lines, leaves 62 printable lines. This may be solved in your application software to make sure ... machine cannot print full pages of the page. Reduce the graphic quality or the number of the optional memory boards (ME1000 or ME2000). (Only FAX 2750) Most laser printers have text missing. Check the following: • The fax machine is showing an error message. (See pages 90-92.) The fax machine...
Check the primary settings in . • The toner cartridge and drum unit are the first two lines and last two lines, leaves 62 printable lines. This may be solved in your application software to make sure ... machine cannot print full pages of the page. Reduce the graphic quality or the number of the optional memory boards (ME1000 or ME2000). (Only FAX 2750) Most laser printers have text missing. Check the following: • The fax machine is showing an error message. (See pages 90-92.) The fax machine...

Users Manual - English
Page 111
... sure that the toner cartridge is printed on the page. If you still see white spots and the display shows CHANGE DRUM SOON, replace the drum unit with Software Option) DIFFICULTY Vertical streaks appear in black text and graphic areas. Wipe the electric terminals referring to page...primary corona wire for printing is printed black. Wipe the electric terminals referring to "Regular Maintenance", "Cleaning the Printer" and "Cleaning the Drum Unit" on your copies. Make sure that the tab of the corona wire is at the home position. If after cleaning, you still...
... sure that the toner cartridge is printed on the page. If you still see white spots and the display shows CHANGE DRUM SOON, replace the drum unit with Software Option) DIFFICULTY Vertical streaks appear in black text and graphic areas. Wipe the electric terminals referring to page...primary corona wire for printing is printed black. Wipe the electric terminals referring to "Regular Maintenance", "Cleaning the Printer" and "Cleaning the Drum Unit" on your copies. Make sure that the tab of the corona wire is at the home position. If after cleaning, you still...

Users Manual - English
Page 112
.... A possible cause is that the surface of Regular Marking Markings may disappear by excessive exposure to occur. You may be that meets the specifications. The drum unit is a consumable item and it may clear a blurred page by setting the Print Density function, page 37. 100 C H A P T E R T H I R T E E N ... or at regular intervals. If the markings do not disappear, it is scratched. Printed pages are marked at either edge. Remove the drum unit with a new one. Try rocking them from side to clear this problem. Make sure the fax machine is placed on the ...
.... A possible cause is that the surface of Regular Marking Markings may disappear by excessive exposure to occur. You may be that meets the specifications. The drum unit is a consumable item and it may clear a blurred page by setting the Print Density function, page 37. 100 C H A P T E R T H I R T E E N ... or at regular intervals. If the markings do not disappear, it is scratched. Printed pages are marked at either edge. Remove the drum unit with a new one. Try rocking them from side to clear this problem. Make sure the fax machine is placed on the ...

Users Manual - English
Page 118
Also, follow the steps below to pack the fax machine or it may be damaged, which will void the fax machine's warranty. 1 Remove the line cord and unplug the fax machine from the AC outlet. 2 Open the top cover. 3 Hold the drum unit assembly by its handles and remove it. Top Cover Drum Unit WARNING Remove the drum unit and toner cartridge assembly. 106 C H A P T E R T H I R T E E N Packing and Shipping the Fax Machine Whenever you transport the fax machine, use the packing materials that came with your machine. Leave the toner cartridge installed in the drum unit.
Also, follow the steps below to pack the fax machine or it may be damaged, which will void the fax machine's warranty. 1 Remove the line cord and unplug the fax machine from the AC outlet. 2 Open the top cover. 3 Hold the drum unit assembly by its handles and remove it. Top Cover Drum Unit WARNING Remove the drum unit and toner cartridge assembly. 106 C H A P T E R T H I R T E E N Packing and Shipping the Fax Machine Whenever you transport the fax machine, use the packing materials that came with your machine. Leave the toner cartridge installed in the drum unit.

Users Manual - English
Page 119
Remove the wire extension, document tray, dust cover, paper tray and handset and pack them. 6 Wrap the fax machine in the plastic bag and place it in the original carton with the original packing material. 107 T R O U B L E S H O O T I N G A N D M A I N T E N A N C E Plastic Bag 4 Place the drum unit and toner cartridge assembly into the plastic bag and seal the bag completely. Drum Unit Toner Cartridge 5 Close the top cover.
Remove the wire extension, document tray, dust cover, paper tray and handset and pack them. 6 Wrap the fax machine in the plastic bag and place it in the original carton with the original packing material. 107 T R O U B L E S H O O T I N G A N D M A I N T E N A N C E Plastic Bag 4 Place the drum unit and toner cartridge assembly into the plastic bag and seal the bag completely. Drum Unit Toner Cartridge 5 Close the top cover.

Users Manual - English
Page 120
108 C H A P T E R T H I R T E E N 7 Place documents (manual and printed material) and the drum unit and toner cartridge assembly into the original carton as shown below: 8 Close the carton and tape it shut.
108 C H A P T E R T H I R T E E N 7 Place documents (manual and printed material) and the drum unit and toner cartridge assembly into the original carton as shown below: 8 Close the carton and tape it shut.

Users Manual - English
Page 121
... or other organic solvents to clean the fax machine and do not use water. When you reconnect these lines later, make sure to clean the drum unit during this routine. Cleaning the Document Scanner 1 Unplug the telephone line and then the power cord. Control Panel White Bar Open the Control Panel...
... or other organic solvents to clean the fax machine and do not use water. When you reconnect these lines later, make sure to clean the drum unit during this routine. Cleaning the Document Scanner 1 Unplug the telephone line and then the power cord. Control Panel White Bar Open the Control Panel...

Users Manual - English
Page 122
... Just after you open the top cover of the machine are extremely HOT! Inside the Fax Machine When you have used the fax machine, some internal parts of the fax machine, never touch the shaded parts as it off with your hands or clothes get dirty, immediately wipe or wash it... from the control panel. s Do not touch the scanner window with cold water. 1 Open the top cover. 2 Remove the drum unit assembly. It may cause a crack on the panel. s Handle the drum unit carefully as shown in the diagram below. s Do not use isopropyl alcohol to clean the scanner window or the...
... Just after you open the top cover of the machine are extremely HOT! Inside the Fax Machine When you have used the fax machine, some internal parts of the fax machine, never touch the shaded parts as it off with your hands or clothes get dirty, immediately wipe or wash it... from the control panel. s Do not touch the scanner window with cold water. 1 Open the top cover. 2 Remove the drum unit assembly. It may cause a crack on the panel. s Handle the drum unit carefully as shown in the diagram below. s Do not use isopropyl alcohol to clean the scanner window or the...

Users Manual - English
Page 123
... 5 Close the top cover. 6 Plug in the power cord. Do NOT use isoproply alcohol to the home position (w mark position) before reinstalling the drum unit. See "Replacing the Drum Unit" on a cotton swab. 4 Wipe the gears with a clean dry cloth. 5 Gently wipe the scanner window and the toner sensor with a ... on a drop cloth or large piece of disposable paper to avoid spilling and scattering toner. 1 Carefully turn the drum unit upside down. 2 Clean the primary corona wire inside the drum unit by gently sliding the tab from right to left several times. 3 Return the tab to clean the scanner ...
... 5 Close the top cover. 6 Plug in the power cord. Do NOT use isoproply alcohol to the home position (w mark position) before reinstalling the drum unit. See "Replacing the Drum Unit" on a cotton swab. 4 Wipe the gears with a clean dry cloth. 5 Gently wipe the scanner window and the toner sensor with a ... on a drop cloth or large piece of disposable paper to avoid spilling and scattering toner. 1 Carefully turn the drum unit upside down. 2 Clean the primary corona wire inside the drum unit by gently sliding the tab from right to left several times. 3 Return the tab to clean the scanner ...

Users Manual - English
Page 125
...So, never touch the shaded parts shown in the illustration. HOT! To remove the drum unit, hold each side of the drum by its handles and gently lift the drum forward toward you have used the fax machine, some internal parts of disposable paper to Replace the Toner Cartridge WARNING Just after you . Top... Cover Drum Unit Place the drum unit on a drop cloth or large piece of the ...
...So, never touch the shaded parts shown in the illustration. HOT! To remove the drum unit, hold each side of the drum by its handles and gently lift the drum forward toward you have used the fax machine, some internal parts of disposable paper to Replace the Toner Cartridge WARNING Just after you . Top... Cover Drum Unit Place the drum unit on a drop cloth or large piece of the ...

Users Manual - English
Page 126
The toner cartridge cannot be removed unless the shutter is completely closed, by gently pulling it out. If toner scatters on the toner cartridge forward until it with cold water. WARNING Handle the toner cartridge carefully. 114 C H A P T E R T H I R T E E N Toner Cartridge 2 Gently turn the lever on your hands or clothes, immediately wipe it off or wash it stops. Drum Unit 3 Remove the old toner cartridge from the drum unit by turning the lever fully to the front.
The toner cartridge cannot be removed unless the shutter is completely closed, by gently pulling it out. If toner scatters on the toner cartridge forward until it with cold water. WARNING Handle the toner cartridge carefully. 114 C H A P T E R T H I R T E E N Toner Cartridge 2 Gently turn the lever on your hands or clothes, immediately wipe it off or wash it stops. Drum Unit 3 Remove the old toner cartridge from the drum unit by turning the lever fully to the front.

