

Users Manual - English
Page 5
... 126 5. EMBROIDERING 100 PREPARATION BEFORE SEWING 100 Attaching embroidery foot "Q 100 Fitting embroidery unit 101 Removing the embroidery unit 101 Placing the embroidery unit into its case .....102 Initializing the embroidery unit 102 SELECTING AND SEWING PATTERNS ..........103 Selecting alphabetical characters... in memory ....109 EMBROIDERING 110 Embroidering attractive finishes 110 Setting the fabric into the embroidery frame 110 Fitting the embroidery frame to the embroidery unit 112 Embroidering 113 Embroidering a single color pattern when "MULTI COLOR" is displayed 115...
... 126 5. EMBROIDERING 100 PREPARATION BEFORE SEWING 100 Attaching embroidery foot "Q 100 Fitting embroidery unit 101 Removing the embroidery unit 101 Placing the embroidery unit into its case .....102 Initializing the embroidery unit 102 SELECTING AND SEWING PATTERNS ..........103 Selecting alphabetical characters... in memory ....109 EMBROIDERING 110 Embroidering attractive finishes 110 Setting the fabric into the embroidery frame 110 Fitting the embroidery frame to the embroidery unit 112 Embroidering 113 Embroidering a single color pattern when "MULTI COLOR" is displayed 115...

Users Manual - English
Page 6
... IN MACHINE) 171 Utility stitches 171 Character sewing 171 Character embroidering chart 174 Frame pattern embroidering chart 174 PATTERNS (MEMORY CARD 175 One point mark embroidery pattern 175 *MY CUSTOM STITCHTM is under application for a registered trademark in the...
... IN MACHINE) 171 Utility stitches 171 Character sewing 171 Character embroidering chart 174 Frame pattern embroidering chart 174 PATTERNS (MEMORY CARD 175 One point mark embroidery pattern 175 *MY CUSTOM STITCHTM is under application for a registered trademark in the...

Users Manual - English
Page 9
...foot* 16 Side cutter 17 Embroidery set (Regular) 18 Embroidery frame (Regular) 19 Embroidery sheet (Regular) 20 Net* 21 Embroidery set (Large) 22 Embroidery frame (Large) 23 Embroidery sheet (Large) 24 Embroidery set (Small) 25 Embroidery frame (Small) 26 Embroidery sheet (Small) 27 Screw* 28 Foot controller 29 Embroidery unit 30 Hard case Part Code U.S.A....instruction book. * The extra spool pin which is provided as an accessory should be used for sewing machine model PC-8200. 7 only) Foot controller: Model J2 This foot controller can be attached to the end of the bobbin winder shaft during use....
...foot* 16 Side cutter 17 Embroidery set (Regular) 18 Embroidery frame (Regular) 19 Embroidery sheet (Regular) 20 Net* 21 Embroidery set (Large) 22 Embroidery frame (Large) 23 Embroidery sheet (Large) 24 Embroidery set (Small) 25 Embroidery frame (Small) 26 Embroidery sheet (Small) 27 Screw* 28 Foot controller 29 Embroidery unit 30 Hard case Part Code U.S.A....instruction book. * The extra spool pin which is provided as an accessory should be used for sewing machine model PC-8200. 7 only) Foot controller: Model J2 This foot controller can be attached to the end of the bobbin winder shaft during use....

Users Manual - English
Page 32
...With the accessory compartment off the machine, the feed dog adjustment lever can be seen on to the right will raise. * When the embroidery unit is on the base of the presser foot holder, push the presser foot holder upward with both hands as far as well. Raise the...are lowered during this time, otherwise injury may result. While pressing the black button to the left of embroidery foot "Q", pull embroidery foot "Q" downward to the left of the embroidery foot "Q", push embroidery foot "Q" upward with both hands as far as it will go to touch the needle during button ...
...With the accessory compartment off the machine, the feed dog adjustment lever can be seen on to the right will raise. * When the embroidery unit is on the base of the presser foot holder, push the presser foot holder upward with both hands as far as well. Raise the...are lowered during this time, otherwise injury may result. While pressing the black button to the left of embroidery foot "Q", pull embroidery foot "Q" downward to the left of the embroidery foot "Q", push embroidery foot "Q" upward with both hands as far as it will go to touch the needle during button ...

Users Manual - English
Page 102
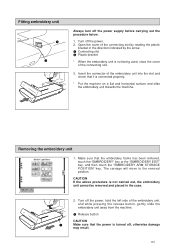
... it . 5 3. If embroidering onto fabrics which could result in designated case. (6) Do not carry the machine while the embroidery unit is connected. (7) Always set your machine on and the "START/STOP" button is difficult, place the stabilizer fabric underneath the frame...then turn off the power. 2. Attaching embroidery foot "Q" CAUTION Be sure to remove it . NOTES ON THE EMBROIDERY UNIT (1) Always turn off the main power switch when connecting or removing the embroidery unit and embroidery card (memory card). (2) Connect embroidery unit firmly into the plug connector and socket...
... it . 5 3. If embroidering onto fabrics which could result in designated case. (6) Do not carry the machine while the embroidery unit is connected. (7) Always set your machine on and the "START/STOP" button is difficult, place the stabilizer fabric underneath the frame...then turn off the power. 2. Attaching embroidery foot "Q" CAUTION Be sure to remove it . NOTES ON THE EMBROIDERY UNIT (1) Always turn off the main power switch when connecting or removing the embroidery unit and embroidery card (memory card). (2) Connect embroidery unit firmly into the plug connector and socket...
Users Manual - English
Page 103
... carrying out the procedure below. 1. Insert the connector of the connecting slot. 3. Removing the embroidery unit 1. CAUTION If the above procedure is turned off the power, hold the left side of the embroidery unit, and while pressing the release button, gently slide the embroidery unit away from the machine. 1 Release button CAUTION 1 Make sure that the...
... carrying out the procedure below. 1. Insert the connector of the connecting slot. 3. Removing the embroidery unit 1. CAUTION If the above procedure is turned off the power, hold the left side of the embroidery unit, and while pressing the release button, gently slide the embroidery unit away from the machine. 1 Release button CAUTION 1 Make sure that the...
Users Manual - English
Page 104
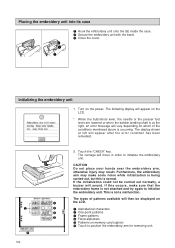
... available will move in order to initialize the embroidery unit. The following display will appear on the power. Furthermore, the embroidery arm may result. This is not attached and try again to initialize the embroidery unit. If this occurs, make some noise while initialization...shaft is normal. Placing the embroidery unit into its case 1 Hook the embroidery unit onto the tab inside the case. 2 Secure the embroidery unit with the band. 3 Close the cover. 2 1 Initializing the embroidery unit 1. CAUTION Do not place your hands near the embroidery arm, otherwise injury may ...
... available will move in order to initialize the embroidery unit. The following display will appear on the power. Furthermore, the embroidery arm may result. This is not attached and try again to initialize the embroidery unit. If this occurs, make some noise while initialization...shaft is normal. Placing the embroidery unit into its case 1 Hook the embroidery unit onto the tab inside the case. 2 Secure the embroidery unit with the band. 3 Close the cover. 2 1 Initializing the embroidery unit 1. CAUTION Do not place your hands near the embroidery arm, otherwise injury may ...
Users Manual - English
Page 114
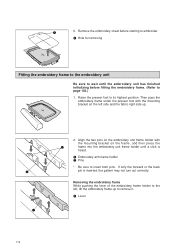
...mounting bracket on the frame, and then press the 2 frame into the embroidery unit frame holder until the embroidery unit has finished initializing before starting to embroider. 1 Hole for removing Fitting the embroidery frame to the embroidery unit Be sure to the left side and the fabric right side up to ...page 102.) 1. 1 6. Removing the embroidery frame While pushing the lever of the embroidery frame holder to wait until a click is...
...mounting bracket on the frame, and then press the 2 frame into the embroidery unit frame holder until the embroidery unit has finished initializing before starting to embroider. 1 Hole for removing Fitting the embroidery frame to the embroidery unit Be sure to the left side and the fabric right side up to ...page 102.) 1. 1 6. Removing the embroidery frame While pushing the lever of the embroidery frame holder to wait until a click is...

Users Manual - English
Page 115
... for each part will be embroidered and the sewing machine will then stop the sewing machine and cut off any color you are using the embroidery unit, the foot controller cannot be used at the left hand while leaving a certain amount of the seam. * If you like. 2. The order of the screen...
... for each part will be embroidered and the sewing machine will then stop the sewing machine and cut off any color you are using the embroidery unit, the foot controller cannot be used at the left hand while leaving a certain amount of the seam. * If you like. 2. The order of the screen...
Users Manual - English
Page 131
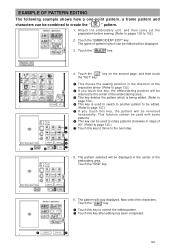
... EXAMPLE OF PATTERN EDITING The following example shows how a one-point pattern, a frame pattern and characters can be displayed in the center of the embroidery area. This function cannot be used to switch to another pattern to be edited. (Refer to page 137.) 5 If you touch this key, ...to the next step. 2 3 4 7 5. The types of the embroidering area. 3 This key deletes the pattern which can be reversed horizontally. Attach the embroidery unit, and then carry out the preparation before sewing. (Refer to pages 100 to the center of patterns which is being edited. (Refer to page 134...
... EXAMPLE OF PATTERN EDITING The following example shows how a one-point pattern, a frame pattern and characters can be displayed in the center of the embroidery area. This function cannot be used to switch to another pattern to be edited. (Refer to page 137.) 5 If you touch this key, ...to the next step. 2 3 4 7 5. The types of the embroidering area. 3 This key deletes the pattern which can be reversed horizontally. Attach the embroidery unit, and then carry out the preparation before sewing. (Refer to pages 100 to the center of patterns which is being edited. (Refer to page 134...

Users Manual - English
Page 143
... left will then be displayed. 2. RETRIEVING RETRIEVING CHARACTERS AND PATTERNS This machine has three memory function areas; Embroidery function: saves characters and memory card patterns when using the embroidery or embroidery edit function. 1 Preparation: Remove the embroidery unit if retrieving patterns saved on the sewing side of the machine. 1 Release button * Make sure that the...
... left will then be displayed. 2. RETRIEVING RETRIEVING CHARACTERS AND PATTERNS This machine has three memory function areas; Embroidery function: saves characters and memory card patterns when using the embroidery or embroidery edit function. 1 Preparation: Remove the embroidery unit if retrieving patterns saved on the sewing side of the machine. 1 Release button * Make sure that the...
Users Manual - English
Page 144
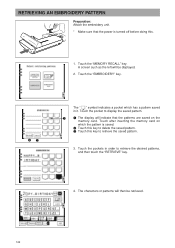
Touch the "MEMORY RECALL" key. A screen such as the left will then be displayed. 2. The characters or patterns will be retrieved. 142 RETRIEVING AN EMBROIDERY PATTERN Preparation: Attach the embroidery unit. * Make sure that the patterns are saved on which has a pattern saved in order to retrieve the desired patterns, and then touch the...
Touch the "MEMORY RECALL" key. A screen such as the left will then be displayed. 2. The characters or patterns will be retrieved. 142 RETRIEVING AN EMBROIDERY PATTERN Preparation: Attach the embroidery unit. * Make sure that the patterns are saved on which has a pattern saved in order to retrieve the desired patterns, and then touch the...
Users Manual - English
Page 145
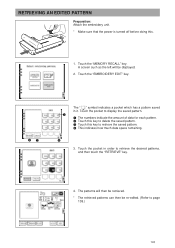
...will be re-edited. (Refer to retrieve the desired patterns, and then touch the "RETRIEVE" key. 4. RETRIEVING AN EDITED PATTERN Preparation: Attach the embroidery unit. * Make sure that the power is turned off before doing this key to retrieve the saved pattern. 4 This indicates how much data space remaining... 1 The numbers indicate the amount of data for each pattern. 2 Touch this key to delete the saved pattern. 3 Touch this . 1. Touch the "EMBROIDERY EDIT" key. 32 The " " symbol indicates a pocket which has a pattern saved in order to page 138.) 143 A screen such as the left will...
...will be re-edited. (Refer to retrieve the desired patterns, and then touch the "RETRIEVE" key. 4. RETRIEVING AN EDITED PATTERN Preparation: Attach the embroidery unit. * Make sure that the power is turned off before doing this key to retrieve the saved pattern. 4 This indicates how much data space remaining... 1 The numbers indicate the amount of data for each pattern. 2 Touch this key to delete the saved pattern. 3 Touch this . 1. Touch the "EMBROIDERY EDIT" key. 32 The " " symbol indicates a pocket which has a pattern saved in order to page 138.) 143 A screen such as the left will...
Users Manual - English
Page 149
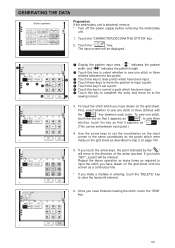
... correct a point which have finished creating the stitch, touch the "END" key. 147 GENERATING THE DATA Preparation If the embroidery unit is attached, remove. * Turn off the power supply before removing the embroidery unit. 1. To input the stitch which were made on the grid sheet as required to sew one stitch, touch the key...
... correct a point which have finished creating the stitch, touch the "END" key. 147 GENERATING THE DATA Preparation If the embroidery unit is attached, remove. * Turn off the power supply before removing the embroidery unit. 1. To input the stitch which were made on the grid sheet as required to sew one stitch, touch the key...
Users Manual - English
Page 155
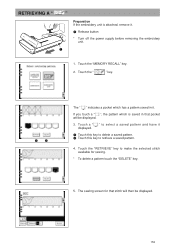
... be displayed. 153 The sewing screen for sewing. * To delete a pattern touch the "DELETE" key. 5. RETRIEVING A " " Preparation If the embroidery unit is saved in it . 1 Release button * Turn off the power supply before removing the embroidery unit. 1 1. Touch the " " key. 12 The " " indicates a pocket which is attached, remove it . Touch the "MEMORY RECALL" key...
... be displayed. 153 The sewing screen for sewing. * To delete a pattern touch the "DELETE" key. 5. RETRIEVING A " " Preparation If the embroidery unit is saved in it . 1 Release button * Turn off the power supply before removing the embroidery unit. 1 1. Touch the " " key. 12 The " " indicates a pocket which is attached, remove it . Touch the "MEMORY RECALL" key...

Users Manual - English
Page 160
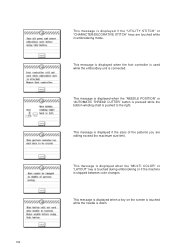
This message is displayed when the embroidering unit is trying to initialize while the embroidery foot is locked. Warning messages This message is displayed motor is lowered. This message is displayed when the machine finds that the upper thread is ... touched while there is cut. This message is displayed when the "START/STOP" or "AUTOMATIC THREAD CUTTER" button is pressed while the presser foot or embroidery foot is required, the machine will not start and it will instruct you with an alarm and warning message on LCD. ERROR MESSAGES If the...
This message is displayed when the embroidering unit is trying to initialize while the embroidery foot is locked. Warning messages This message is displayed motor is lowered. This message is displayed when the machine finds that the upper thread is ... touched while there is cut. This message is displayed when the "START/STOP" or "AUTOMATIC THREAD CUTTER" button is pressed while the presser foot or embroidery foot is required, the machine will not start and it will instruct you with an alarm and warning message on LCD. ERROR MESSAGES If the...
Users Manual - English
Page 162
... STITCH" keys are editing exceed the maximum size limit. This message is connected. This message is displayed when the foot controller is used while the embroidery unit is displayed if the sizes of the patterns you are touched while in embroidering mode. This message is displayed when the "NEEDLE POSITION" or "AUTOMATIC...
... STITCH" keys are editing exceed the maximum size limit. This message is connected. This message is displayed when the foot controller is used while the embroidery unit is displayed if the sizes of the patterns you are touched while in embroidering mode. This message is displayed when the "NEEDLE POSITION" or "AUTOMATIC...
Users Manual - English
Page 163
... the "START/STOP" button is pressed while the foot controller is lowered. This message is displayed when the embroidery unit is attached while the needle is still connected. This message is displayed when the embroidery pattern is touched when in editing mode. This message is displayed if the "START/STOP" button is larger...
... the "START/STOP" button is pressed while the foot controller is lowered. This message is displayed when the embroidery unit is attached while the needle is still connected. This message is displayed when the embroidery pattern is touched when in editing mode. This message is displayed if the "START/STOP" button is larger...
Users Manual - English
Page 165
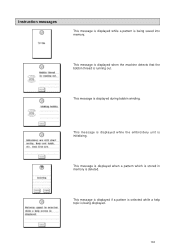
This message is displayed when a pattern which is stored in memory is being displayed. 163 Instruction messages This message is displayed while a pattern is deleted. This message is displayed while the embroidery unit is displayed during bobbin winding. This message is initializing. This message is displayed if a pattern is selected while a help topic is running out. This message is displayed when the machine detects that the bobbin thread is being saved into memory.
This message is displayed when a pattern which is stored in memory is being displayed. 163 Instruction messages This message is displayed while a pattern is deleted. This message is displayed while the embroidery unit is displayed during bobbin winding. This message is initializing. This message is displayed if a pattern is selected while a help topic is running out. This message is displayed when the machine detects that the bobbin thread is being saved into memory.
Users Manual - English
Page 169
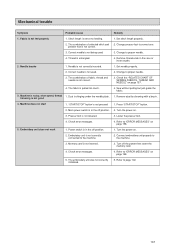
...presser foot to the machine. 3. Remove dust by cleaning with a brush. 4. Main power switch is not correct. 3. Embroidery unit does not work 4. Connect embroidery unit properly to correct one. Refer to "ERROR MESSAGES" on . 3. Thread is pulled too much. 3. Needle breaks 1....power on page 158. 1. Refer to "ERROR MESSAGES" on page 157. 4. Embroidery unit is not used . 3. Stitch length is not correct. 3. Remove thread-ends in the off position. 2. The embroidery unit was not correctly initialized. 5. presser foot is set at no feeding. 1. ...
...presser foot to the machine. 3. Remove dust by cleaning with a brush. 4. Main power switch is not correct. 3. Embroidery unit does not work 4. Connect embroidery unit properly to correct one. Refer to "ERROR MESSAGES" on . 3. Thread is pulled too much. 3. Needle breaks 1....power on page 158. 1. Refer to "ERROR MESSAGES" on page 157. 4. Embroidery unit is not used . 3. Stitch length is not correct. 3. Remove thread-ends in the off position. 2. The embroidery unit was not correctly initialized. 5. presser foot is set at no feeding. 1. ...


