
Accessory Catalog
Page 4
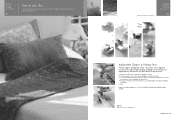
Brother General Sewing Accessories 05 Sew as you like. Position the presser foot over the ...presser foot, and then tighten the clamp screw with just right pressure. 1. Requires Low Shank Adapter for ULT series, PC-6500, PC-8200 and PC-8500 sewing machines. Its position can be adjusted exactly on the presser foot. 4. Screw on either left ). 2....the presser foot so that the needle fits on the opening on the edge of zipper/piping, avoiding the non-flat parts of zipper/piping, and presses the fabric with a screwdriver. 5. Use these utility presser feet and accessories to add ...
Brother General Sewing Accessories 05 Sew as you like. Position the presser foot over the ...presser foot, and then tighten the clamp screw with just right pressure. 1. Requires Low Shank Adapter for ULT series, PC-6500, PC-8200 and PC-8500 sewing machines. Its position can be adjusted exactly on the presser foot. 4. Screw on either left ). 2....the presser foot so that the needle fits on the opening on the edge of zipper/piping, avoiding the non-flat parts of zipper/piping, and presses the fabric with a screwdriver. 5. Use these utility presser feet and accessories to add ...

Accessory Catalog
Page 6
... presser foot. 3. Raise the needle and the presser foot. 4. Slowly sew 2-3 stitches, making sure the fabric is rolling around the curled part of the foot. 8. Sew along the guide. SA135 GHILOP Picot Foot Creates shell-looking edges on lightweight fabrics. 1. Increase upper thread tension....foot. 2. Hold the fabric from the edge and sew 2-3 stitches. 4. Non Stick Foot Designed for details.) www.brother.com Lower the needle into the curled part of the fabric. Position the edge of the fabric. Lower the needle into the fabric approximately 1/8" from the back...
... presser foot. 3. Raise the needle and the presser foot. 4. Slowly sew 2-3 stitches, making sure the fabric is rolling around the curled part of the foot. 8. Sew along the guide. SA135 GHILOP Picot Foot Creates shell-looking edges on lightweight fabrics. 1. Increase upper thread tension....foot. 2. Hold the fabric from the edge and sew 2-3 stitches. 4. Non Stick Foot Designed for details.) www.brother.com Lower the needle into the curled part of the fabric. Position the edge of the fabric. Lower the needle into the fabric approximately 1/8" from the back...

Users Manual - English
Page 1
... into any object into water. "IMPORTANT SAFETY INSTRUCTIONS" When using a sewing machine, basic safety precautions should never be taken, including the following: "Read all moving parts. "SAVE THESE INSTRUCTIONS" "This sewing machine is intended for household use bent needles. 13. To reduce the risk of burns, fire, electric shock, or injury...
... into any object into water. "IMPORTANT SAFETY INSTRUCTIONS" When using a sewing machine, basic safety precautions should never be taken, including the following: "Read all moving parts. "SAVE THESE INSTRUCTIONS" "This sewing machine is intended for household use bent needles. 13. To reduce the risk of burns, fire, electric shock, or injury...

Users Manual - English
Page 3
...9679; Replacing or removing the needle or any assemblies, the presser feet, needle, or other parts ● A power failure occurs during use extension cords. When storing your nearest authorized Brother service center. 1 To fully enjoy all the features incorporated we suggest that you study this... booklet. Do not store the sewing machine beside a space heater, iron, or other moving parts. 2. Always consult the operation manual ...
...9679; Replacing or removing the needle or any assemblies, the presser feet, needle, or other parts ● A power failure occurs during use extension cords. When storing your nearest authorized Brother service center. 1 To fully enjoy all the features incorporated we suggest that you study this... booklet. Do not store the sewing machine beside a space heater, iron, or other moving parts. 2. Always consult the operation manual ...

Users Manual - English
Page 4
... fell seam 72 APPLIQUES 73 Sewing the applique around corners 73 APPLIQUE QUILTS 74 SCALLOP STITCH 75 SMOCKING STITCH 76 CONTENTS CHAPTER 1 SETTING UP 5 PRINCIPAL PARTS 5 OTHER INCLUDED ACCESSORIES 7 OPTIONS 8 SELECTION KEYS 9 Screen messages guide you through each operation 9 OPERATION BUTTONS 10 Using the operation buttons 10 USING THE SCREEN KEYS...
... fell seam 72 APPLIQUES 73 Sewing the applique around corners 73 APPLIQUE QUILTS 74 SCALLOP STITCH 75 SMOCKING STITCH 76 CONTENTS CHAPTER 1 SETTING UP 5 PRINCIPAL PARTS 5 OTHER INCLUDED ACCESSORIES 7 OPTIONS 8 SELECTION KEYS 9 Screen messages guide you through each operation 9 OPERATION BUTTONS 10 Using the operation buttons 10 USING THE SCREEN KEYS...

Users Manual - English
Page 6
MY CUSTOM STITCHTM (Function for making own stitch) 145 MAKING THE ILLUSTRATION 145 GENERATING THE DATA 147 EDITING AN EXISTING " 149 Moving a point 149 Moving part or all of a pattern 150 Inserting new points 150 Once you have finished editing 151 STORING THE " " WHICH YOU HAVE ENTERED 152 RETRIEVING A " 153 MAINTENANCE ...
MY CUSTOM STITCHTM (Function for making own stitch) 145 MAKING THE ILLUSTRATION 145 GENERATING THE DATA 147 EDITING AN EXISTING " 149 Moving a point 149 Moving part or all of a pattern 150 Inserting new points 150 Once you have finished editing 151 STORING THE " " WHICH YOU HAVE ENTERED 152 RETRIEVING A " 153 MAINTENANCE ...
Users Manual - English
Page 7
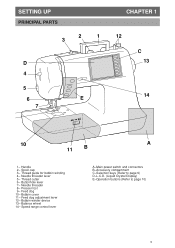
Needle threader lever 5- Buttonhole lever 7- Balance wheel 14- Handle 2- Presser foot 9- Bobbin cover 11- Feed dog 10- Thread cutter 6- Thread guide for bobbin winding 4- Feed dog adjustment lever 12- SETTING UP PRINCIPAL PARTS 2 1 3 D 4 5 6 E 7 CHAPTER 1 12 C 13 14 10 11 B A 1- Speed range control lever A-Main power switch and connectors B-Accessory compartment C-Selection keys (Refer to page 9) D-L.C.D. (Liquid Crystal Display) E-Operation buttons (Refer to page 10) 5 Needle threader 8- Bobbin winder device 13- Spool cap 3-
Needle threader lever 5- Buttonhole lever 7- Balance wheel 14- Handle 2- Presser foot 9- Bobbin cover 11- Feed dog 10- Thread cutter 6- Thread guide for bobbin winding 4- Feed dog adjustment lever 12- SETTING UP PRINCIPAL PARTS 2 1 3 D 4 5 6 E 7 CHAPTER 1 12 C 13 14 10 11 B A 1- Speed range control lever A-Main power switch and connectors B-Accessory compartment C-Selection keys (Refer to page 9) D-L.C.D. (Liquid Crystal Display) E-Operation buttons (Refer to page 10) 5 Needle threader 8- Bobbin winder device 13- Spool cap 3-

Users Manual - English
Page 8
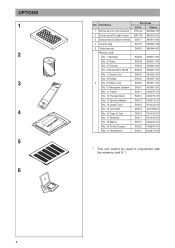
...shown in a polarized outlet only one blade wider than the other). If it still does not fit, contact a qualified electrician to power supply. Part Name Part Code 1 Buttonhole foot "A" X57789-101 2 Embroidery foot "Q" XA2159-101 3 Overcasting foot "G" X51162-001 4 Monogramming foot "N" X53840-201 5 ... the sewing machine, or when removing covers or changing bulbs, the machine or the electrical set X58358-001 * Always use BROTHER accessories recommended for foot controller operation. 4 Power cord Use to connect machine to install the proper outlet. CAUTION - When ...
...shown in a polarized outlet only one blade wider than the other). If it still does not fit, contact a qualified electrician to power supply. Part Name Part Code 1 Buttonhole foot "A" X57789-101 2 Embroidery foot "Q" XA2159-101 3 Overcasting foot "G" X51162-001 4 Monogramming foot "N" X53840-201 5 ... the sewing machine, or when removing covers or changing bulbs, the machine or the electrical set X58358-001 * Always use BROTHER accessories recommended for foot controller operation. 4 Power cord Use to connect machine to install the proper outlet. CAUTION - When ...

Users Manual - English
Page 9
... sheet which is inserted in the instruction book. * The extra spool pin which is provided as an accessory should be used for sewing machine model PC-8200. 7 OTHER INCLUDED ACCESSORIES 1 2 3 4 5 6 7 8 9 10 11 12 13 14 15 17 16 18 19 21 20 22 23 24 25 26 27 28 ...) 24 Embroidery set (Small) 25 Embroidery frame (Small) 26 Embroidery sheet (Small) 27 Screw* 28 Foot controller 29 Embroidery unit 30 Hard case Part Code U.S.A. Others 136492-101 X54243-001 130489-001 184783-001 184944-001 XA4527-001 135793-001 X55467-051 X55468-051 130013-003 130012-003 XA3336...
... sheet which is inserted in the instruction book. * The extra spool pin which is provided as an accessory should be used for sewing machine model PC-8200. 7 OTHER INCLUDED ACCESSORIES 1 2 3 4 5 6 7 8 9 10 11 12 13 14 15 17 16 18 19 21 20 22 23 24 25 26 27 28 ...) 24 Embroidery set (Small) 25 Embroidery frame (Small) 26 Embroidery sheet (Small) 27 Screw* 28 Foot controller 29 Embroidery unit 30 Hard case Part Code U.S.A. Others 136492-101 X54243-001 130489-001 184783-001 184944-001 XA4527-001 135793-001 X55467-051 X55468-051 130013-003 130012-003 XA3336...
Users Manual - English
Page 10
Part Name 1 Brother poly 40 color thread set 2 Brother poly #60 bobbin thread 3 Backing material (Stabilizer material) 4 Country bag 5 Grid sheet set Memory card* No. 1 Alphabet No. 2 Flower No. 3 Dinosaur No. 6 Moskowitz's World No. 7 ... No. 14 Large Floral No. 15 Cute Kids No. 16 Dogs & Cats No. 17 Nintendo No. 19 Marine No. 20 Petite Designs No. 21 Needlework Part Code U.S.A. Others ETS-40 X80928-100 EBT-SG X80918-001 SA517 X80914-001 SA152 X80922-002 SA500 X80948-001 SA298 SA299 SA300 SA303 SA304 SA305...
Part Name 1 Brother poly 40 color thread set 2 Brother poly #60 bobbin thread 3 Backing material (Stabilizer material) 4 Country bag 5 Grid sheet set Memory card* No. 1 Alphabet No. 2 Flower No. 3 Dinosaur No. 6 Moskowitz's World No. 7 ... No. 14 Large Floral No. 15 Cute Kids No. 16 Dogs & Cats No. 17 Nintendo No. 19 Marine No. 20 Petite Designs No. 21 Needlework Part Code U.S.A. Others ETS-40 X80928-100 EBT-SG X80918-001 SA517 X80914-001 SA152 X80922-002 SA500 X80948-001 SA298 SA299 SA300 SA303 SA304 SA305...
Users Manual - English
Page 13
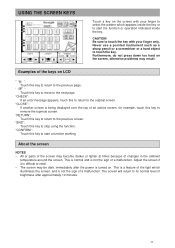
... original screen. Adjust the screen if it is difficult to touch the key. Examples of changes in the ambient temperature around the screen. All or parts of the screen may become darker or lighter at times because of the keys on the screen, otherwise problems may be dark, immediately after approximately...
... original screen. Adjust the screen if it is difficult to touch the key. Examples of changes in the ambient temperature around the screen. All or parts of the screen may become darker or lighter at times because of the keys on the screen, otherwise problems may be dark, immediately after approximately...

Users Manual - English
Page 34
... as bobbin winding and upper threading will be displayed. 3. Touch the " " key to find out how to embroider. 8 Touch this key to display the next part of basic operations such as left will 2 6 appear on this key if a problem occurs while sewing. 2.
... as bobbin winding and upper threading will be displayed. 3. Touch the " " key to find out how to embroider. 8 Touch this key to display the next part of basic operations such as left will 2 6 appear on this key if a problem occurs while sewing. 2.
Users Manual - English
Page 35
... is turned on, the straight stitch (left) is inserted into the machine at all 1 times while sewing, and keep your hands away from all moving parts such as the 3 needle, balance wheel and thread take-up lever, otherwise injury may result. -
... is turned on, the straight stitch (left) is inserted into the machine at all 1 times while sewing, and keep your hands away from all moving parts such as the 3 needle, balance wheel and thread take-up lever, otherwise injury may result. -
Users Manual - English
Page 39
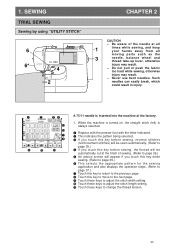
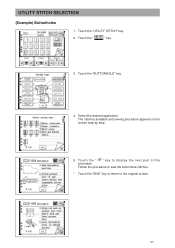
Touch the "BUTTONHOLE" key. 4. Follow the procedure to sew the buttonhole stitches. * Touch the "END" key to return to display the next part of the procedure. Touch the " " key to the original screen. 37 UTILITY STITCH SELECTION (Example) Buttonholes 1. Touch the "UTILITY STITCH" key. 2. Touch the " " key. 3. Select the desired application. The stitches available and sewing procedure appears on the screen step by step. 5.
Touch the "BUTTONHOLE" key. 4. Follow the procedure to sew the buttonhole stitches. * Touch the "END" key to return to display the next part of the procedure. Touch the " " key to the original screen. 37 UTILITY STITCH SELECTION (Example) Buttonholes 1. Touch the "UTILITY STITCH" key. 2. Touch the " " key. 3. Select the desired application. The stitches available and sewing procedure appears on the screen step by step. 5.
Users Manual - English
Page 41
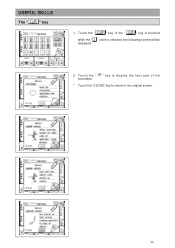
If the " " key is touched while the " " stitch is selected, the following screen will be displayed. 2. USEFUL SKILLS The " " key 1. Touch the " " key to display the next part of the procedure. * Touch the "CLOSE" key to return to the original screen. 39 Touch the " " key.
If the " " key is touched while the " " stitch is selected, the following screen will be displayed. 2. USEFUL SKILLS The " " key 1. Touch the " " key to display the next part of the procedure. * Touch the "CLOSE" key to return to the original screen. 39 Touch the " " key.
Users Manual - English
Page 67
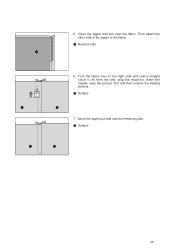
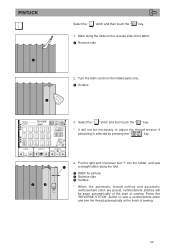
I 1 Surface 7. 5. Turn the fabric over the fabric. Then attach the other side of the zipper to the right side and sew a straight stitch 5 cm from the end, stop the machine, lower the needle, raise the presser foot and then remove the basting stitches. Move the zipper pull and sew the remaining part. 1 Surface 65 Close the zipper and turn over to the fabric. 1 Reverse side 6.
I 1 Surface 7. 5. Turn the fabric over the fabric. Then attach the other side of the zipper to the right side and sew a straight stitch 5 cm from the end, stop the machine, lower the needle, raise the presser foot and then remove the basting stitches. Move the zipper pull and sew the remaining part. 1 Surface 65 Close the zipper and turn over to the fabric. 1 Reverse side 6.
Users Manual - English
Page 71
Turn the fabric and iron the folded parts only. 1 Surface 3. Select the " " stitch and then touch the " " key. * It will be necessary to sew a reinforcement stitch and trim the thread automatically at the ...
Turn the fabric and iron the folded parts only. 1 Surface 3. Select the " " stitch and then touch the " " key. * It will be necessary to sew a reinforcement stitch and trim the thread automatically at the ...

Users Manual - English
Page 82
... these patterns. Pull out several threads from one area on shirt fronts. This will leave the fabric frayed in this one edge of the frayed part. 3. Attach presser foot "N". Illustration of finished product. 80 A more attractive finish can be obtained if you , turn the fabric and sew... the other edge of the frayed part, aligning the stitches so they are parallel. 4. About 5 or 6 threads will not touch the presser foot before starting sewing. With the back side...
... these patterns. Pull out several threads from one area on shirt fronts. This will leave the fabric frayed in this one edge of the frayed part. 3. Attach presser foot "N". Illustration of finished product. 80 A more attractive finish can be obtained if you , turn the fabric and sew... the other edge of the frayed part, aligning the stitches so they are parallel. 4. About 5 or 6 threads will not touch the presser foot before starting sewing. With the back side...
Users Manual - English
Page 83
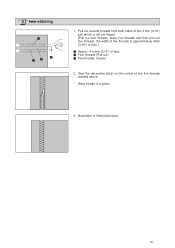
Pull out several threads from both sides of the 4 mm (3/16") part which is not yet frayed. [Pull out four threads, leave five threads and then pull out four threads, the width of five threads is a option. 3. Illustration of the five threads created above. * Wing needle is approximately 4mm (3/16") or less.] 1 Approx. 4.0 mm (3/16") or less. 2 Four threads (Pull out) 3 Five threads (Leave) 2. Sew the decorative stitch on the center of finished product. 81 " " hem-stitching 1.
Pull out several threads from both sides of the 4 mm (3/16") part which is not yet frayed. [Pull out four threads, leave five threads and then pull out four threads, the width of five threads is a option. 3. Illustration of the five threads created above. * Wing needle is approximately 4mm (3/16") or less.] 1 Approx. 4.0 mm (3/16") or less. 2 Four threads (Pull out) 3 Five threads (Leave) 2. Sew the decorative stitch on the center of finished product. 81 " " hem-stitching 1.

Users Manual - English
Page 102
... connector of stabilizer fabric can be ironed, or in serious injury. 5 1. If the power is left on a level surface. * The sewing speed is an indispensable part of stretch fabrics, thin fabrics and fabric with both hands to remove it . While pressing the button to the left of the embroidery foot "Q", push...
... connector of stabilizer fabric can be ironed, or in serious injury. 5 1. If the power is left on a level surface. * The sewing speed is an indispensable part of stretch fabrics, thin fabrics and fabric with both hands to remove it . While pressing the button to the left of the embroidery foot "Q", push...

