

Accessory Catalog
Page 13
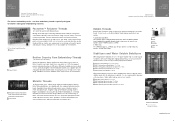
...1. The ruffling blade on lightweight fabric. Use a stiff card to guide your first row of the grooves. 4. Sew slowly for details.) Brother Embellishment Feet Pin Tuck Foot 24 Ruffler Foot Pin Tuck Foot This presser foot has 7 grooves and produces perfect pin tucks and corded pin ... of the presser foot is moved forward, its teeth catch a fabric and force it forward into the slot, and stitch slowly. 3. www.brother.com Install and manually thread a twin needle. 2. Draw a reference line to slide the fabric from left into gathers or tucks. A specially designed bobbin cover is...
...1. The ruffling blade on lightweight fabric. Use a stiff card to guide your first row of the grooves. 4. Sew slowly for details.) Brother Embellishment Feet Pin Tuck Foot 24 Ruffler Foot Pin Tuck Foot This presser foot has 7 grooves and produces perfect pin tucks and corded pin ... of the presser foot is moved forward, its teeth catch a fabric and force it forward into the slot, and stitch slowly. 3. www.brother.com Install and manually thread a twin needle. 2. Draw a reference line to slide the fabric from left into gathers or tucks. A specially designed bobbin cover is...
Accessory Catalog
Page 34
...wonderful set as well as fur or terrycloth. Individual colors are strong, soft and smooth, and perfectly balanced to hoop your instruction manual for Brother Embroidery machines, but compatible with straight, zig zag or decorative stitches. Dependable thread delivery through machine tensions. Made to create machine ...; 6000D, Duetta™ 4500D/Innov-is 4000D, 2500D, 1500D, 1200 series, PC and ULT series machines and the PE-400D and Innov-is Project Book (See page 33 for details.) www.brother.com Consult your fabric properly with a stabilizer. Make sure you just the right...
...wonderful set as well as fur or terrycloth. Individual colors are strong, soft and smooth, and perfectly balanced to hoop your instruction manual for Brother Embroidery machines, but compatible with straight, zig zag or decorative stitches. Dependable thread delivery through machine tensions. Made to create machine ...; 6000D, Duetta™ 4500D/Innov-is 4000D, 2500D, 1500D, 1200 series, PC and ULT series machines and the PE-400D and Innov-is Project Book (See page 33 for details.) www.brother.com Consult your fabric properly with a stabilizer. Make sure you just the right...

Users Manual - English
Page 2
...To unplug, grasp the plug, not the cord. 10. Replace bulb with any adjustments in the needle area, such as described in this manual. Keep ventilation openings of the machine and foot control free from all instructions before using." The wrong plate can cause the needle to the symbol...may deflect the needle causing it has been dropped or damaged, or dropped into any opening. 6. Young children should be used as contained in this manual. 3. Never operate the machine with same type rated 12V 5 watts. Keep fingers away from the accumulation of lint, dust, and loose cloth. ...
...To unplug, grasp the plug, not the cord. 10. Replace bulb with any adjustments in the needle area, such as described in this manual. Keep ventilation openings of the machine and foot control free from all instructions before using." The wrong plate can cause the needle to the symbol...may deflect the needle causing it has been dropped or damaged, or dropped into any opening. 6. Young children should be used as contained in this manual. 3. Never operate the machine with same type rated 12V 5 watts. Keep fingers away from the accumulation of lint, dust, and loose cloth. ...

Users Manual - English
Page 4
... incorporated we suggest that you study this machine, avoid direct sunlight and high humidity locations. Always consult the operation manual when replacing or installing any other parts to keep your nearest authorized Brother service center. 1 Do not store anything on the needle while sewing. Do not store the machine beside a space heater...
... incorporated we suggest that you study this machine, avoid direct sunlight and high humidity locations. Always consult the operation manual when replacing or installing any other parts to keep your nearest authorized Brother service center. 1 Do not store anything on the needle while sewing. Do not store the machine beside a space heater...
Users Manual - English
Page 23
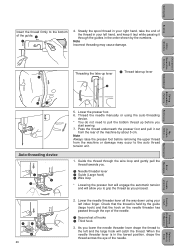
... the thread across the eye of the needle. Setting Up Sewing Insert the thread firmly to the bottom of hooks 2 Third hook 3. Thread the needle manually or using your left hand, and keep it taut while passing it out from the machine or damage may cause damage. Note Always raise the...
... the thread across the eye of the needle. Setting Up Sewing Insert the thread firmly to the bottom of hooks 2 Third hook 3. Thread the needle manually or using your left hand, and keep it taut while passing it out from the machine or damage may cause damage. Note Always raise the...
Users Manual - English
Page 30
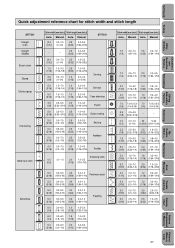
...) (3/32-1/8) 5.0 2.5-7.0 2.5 1.0-2.5 (3/16) (3/32-1/4) (3/32) (1/16-3/32) My Custom Stitch TM Error Maintenance Messages Trouble shooting Sewing Chart Patterns (Programmed in Machine) Patterns (Memory Card) 27 Manual Auto. Manual [0.0 0.0-7.0 2.5 0.2-5.0 (0.0)] (0-1/4) (3/32) (1/64-3/16) STITCH - - 2.5 0.2-5.0 (3/32) (1/64-3/16) [0.0 (0.0)] 0.0-7.0 (0-1/4) 2.5 1.5-2.5 (3/32) (1/16-3/32) 1.0 1.0-3.0 2.5 1.0-4.0 (1/16) (1/16-1/8) (3/32) (1/16-3/16) 3.5 0.0-7.0 1.4 0.0-4.0 (1/8) (0-1/4) (1/16) (0-3/16) Darning 5.0 1.5-7.0 1.0 0.2-4.0 (3/16) (1/16-1/4) (1/16) (1/64-1/16) Bar...
...) (3/32-1/8) 5.0 2.5-7.0 2.5 1.0-2.5 (3/16) (3/32-1/4) (3/32) (1/16-3/32) My Custom Stitch TM Error Maintenance Messages Trouble shooting Sewing Chart Patterns (Programmed in Machine) Patterns (Memory Card) 27 Manual Auto. Manual [0.0 0.0-7.0 2.5 0.2-5.0 (0.0)] (0-1/4) (3/32) (1/64-3/16) STITCH - - 2.5 0.2-5.0 (3/32) (1/64-3/16) [0.0 (0.0)] 0.0-7.0 (0-1/4) 2.5 1.5-2.5 (3/32) (1/16-3/32) 1.0 1.0-3.0 2.5 1.0-4.0 (1/16) (1/16-1/8) (3/32) (1/16-3/16) 3.5 0.0-7.0 1.4 0.0-4.0 (1/8) (0-1/4) (1/16) (0-3/16) Darning 5.0 1.5-7.0 1.0 0.2-4.0 (3/16) (1/16-1/4) (1/16) (1/64-1/16) Bar...

Users Manual - English
Page 31
... and Decorative Stitches Embroidering Editing Embroidery Patterns Retrieving My Custom Stitch TM STITCH Decorative stitch Stitch width [mm (inch.)] Stitch length [mm (inch.)] Auto. Manual 4.0 0.0-7.0 2.5 1.0-4.0 (3/16) (0.0-1/4) (3/32) (1/16-3/16) 4.0 0.0-7.0 3.0 2.0-4.0 (3/16) (0.0-1/4) (1/8) (1/16-3/16) 5.5 0.0-7.0 1.6 1.0-4.0 (3/16) (0.0-1/4) (1/16) (1/16-3/16) 3.5 0.0-7.0 1.6 0.2-4.0 (1/8) (0.0-1/4) (1/16) (1/64-1/16) 0.0 0.0-7.0 2.5 1.0-4.0 (0) (0.0-1/4) (3/32) (1/16-3/16) 5.0 1.5-7.0 1.0 0.2-4.0 (3/16) (1/16-1/4) (1/16) (1/64-3/16) - - - - - - - - - - - - Lateral...
... and Decorative Stitches Embroidering Editing Embroidery Patterns Retrieving My Custom Stitch TM STITCH Decorative stitch Stitch width [mm (inch.)] Stitch length [mm (inch.)] Auto. Manual 4.0 0.0-7.0 2.5 1.0-4.0 (3/16) (0.0-1/4) (3/32) (1/16-3/16) 4.0 0.0-7.0 3.0 2.0-4.0 (3/16) (0.0-1/4) (1/8) (1/16-3/16) 5.5 0.0-7.0 1.6 1.0-4.0 (3/16) (0.0-1/4) (1/16) (1/16-3/16) 3.5 0.0-7.0 1.6 0.2-4.0 (1/8) (0.0-1/4) (1/16) (1/64-1/16) 0.0 0.0-7.0 2.5 1.0-4.0 (0) (0.0-1/4) (3/32) (1/16-3/16) 5.0 1.5-7.0 1.0 0.2-4.0 (3/16) (1/16-1/4) (1/16) (1/64-3/16) - - - - - - - - - - - - Lateral...

Users Manual - English
Page 38
... if the screen is difficult to read. 0 Touch this key if the pattern is distorted. Touch the " " key to the original screen. A Touch this operation manual. Touch the " " key. Touch the "OPERATION GUIDE" key. A screen such as bobbin winding and upper threading will be displayed. 3. Setting Up Sewing Utility Stitches Characters...
... if the screen is difficult to read. 0 Touch this key if the pattern is distorted. Touch the " " key to the original screen. A Touch this operation manual. Touch the " " key. Touch the "OPERATION GUIDE" key. A screen such as bobbin winding and upper threading will be displayed. 3. Setting Up Sewing Utility Stitches Characters...
Users Manual - English
Page 87
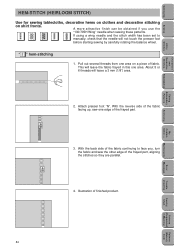
... and sew the other edge of the frayed part, aligning the stitches so they are parallel. 4. With the back side of the fabric continuing to manually, check that the needle will not touch the presser foot before starting sewing by carefully rotating the balance wheel. Retrieving My Custom Stitch TM Error...
... and sew the other edge of the frayed part, aligning the stitches so they are parallel. 4. With the back side of the fabric continuing to manually, check that the needle will not touch the presser foot before starting sewing by carefully rotating the balance wheel. Retrieving My Custom Stitch TM Error...


