
Users Manual - English
Page 6
... out partway through a design...65 Stopping while embroidering ...66 Bobbin Case Adjustment 68 Correct tension...68 Bobbin thread is loose...68 Bobbin thread is tight ...68 APPENDIX 69 Care and Maintenance ...70 Cleaning the machine surface ...70 Cleaning the race ...70 Attaching the Embroidery Foot 72 Attaching the embroidery Foot "Q" ...72 Troubleshooting ...74 Error messages ...78 Adjusting the...
... out partway through a design...65 Stopping while embroidering ...66 Bobbin Case Adjustment 68 Correct tension...68 Bobbin thread is loose...68 Bobbin thread is tight ...68 APPENDIX 69 Care and Maintenance ...70 Cleaning the machine surface ...70 Cleaning the race ...70 Attaching the Embroidery Foot 72 Attaching the embroidery Foot "Q" ...72 Troubleshooting ...74 Error messages ...78 Adjusting the...
Users Manual - English
Page 7
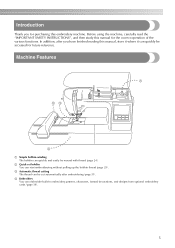
... "IMPORTANT SAFETY INSTRUCTIONS", and then study this embroidery machine. b Quick-set bobbin You can embroider built-in embroidery patterns, characters, framed decorations, and designs from optional embroidery cards (page 39). 5 c Automatic thread cutting The thread can quickly and easily be wound with thread (page 24). Machine Features 1 23 4 a Simple bobbin-winding The bobbin can be accessed for the correct operation of...
... "IMPORTANT SAFETY INSTRUCTIONS", and then study this embroidery machine. b Quick-set bobbin You can embroider built-in embroidery patterns, characters, framed decorations, and designs from optional embroidery cards (page 39). 5 c Automatic thread cutting The thread can quickly and easily be wound with thread (page 24). Machine Features 1 23 4 a Simple bobbin-winding The bobbin can be accessed for the correct operation of...
Users Manual - English
Page 9
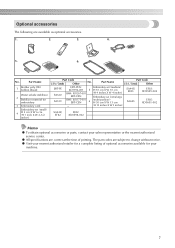
...X81267-001 (H 4 inches X W 4 inches) EBT-CEN Embroidery set (small) 4 H 2 cm X W 6 cm (H 1 inch X W 2-1/2 inches) Part Code U.S.A. / Canada Other No. Part Name 1 Brother poly #90 bobbin thread Water solude stabilizer 2 Stabilizer material for your sales representative or ...embroidery 3 Embroidery card Embroidery set (extra large BM3: X81175-001 EBT-CEN 6 (multi-position)) H 30 cm X W 13 cm - (H 12 inches X W 5 inches) SA443/ EF83 SA445 EF83: XD0599-002 EF85: XD0601-002 SA442/ EF82 EF82: XD0598-002 Memo z To obtain optional accessories or parts, contact your machine...
...X81267-001 (H 4 inches X W 4 inches) EBT-CEN Embroidery set (small) 4 H 2 cm X W 6 cm (H 1 inch X W 2-1/2 inches) Part Code U.S.A. / Canada Other No. Part Name 1 Brother poly #90 bobbin thread Water solude stabilizer 2 Stabilizer material for your sales representative or ...embroidery 3 Embroidery card Embroidery set (extra large BM3: X81175-001 EBT-CEN 6 (multi-position)) H 30 cm X W 13 cm - (H 12 inches X W 5 inches) SA443/ EF83 SA445 EF83: XD0599-002 EF85: XD0601-002 SA442/ EF82 EF82: XD0598-002 Memo z To obtain optional accessories or parts, contact your machine...
Users Manual - English
Page 10
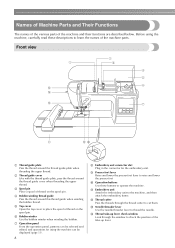
... descriptions to learn the names of thread on the spool pin. Front view a Thread guide plate Pass the thread around this thread guide when winding the bobbin thread. m Needle threader lever Use the needle threader lever to the machine, and then attach the embroidery frame. Before using the machine can be displayed (page 11). 8 h Embroidery unit connector slot Plug in...
... descriptions to learn the names of thread on the spool pin. Front view a Thread guide plate Pass the thread around this thread guide when winding the bobbin thread. m Needle threader lever Use the needle threader lever to the machine, and then attach the embroidery frame. Before using the machine can be displayed (page 11). 8 h Embroidery unit connector slot Plug in...

Users Manual - English
Page 12
...under the presser foot or while the machine is stopped to the machine may occur. a Start/stop button Press the start/stop button to easily perform various basic machine operations. Orange: The machine is winding the bobbin thread, or the bobbin winder shaft is embroidering. The button ...and the bobbin threads. Green: The machine is ready to embroider or is moved to the machine may occur. z When cutting thread thicker than #30, nylon thread or other special threads, use the thread cutter on the side of the machine. 10 CAUTION ● Do not press the thread cutter button...
...under the presser foot or while the machine is stopped to the machine may occur. a Start/stop button Press the start/stop button to easily perform various basic machine operations. Orange: The machine is winding the bobbin thread, or the bobbin winder shaft is embroidering. The button ...and the bobbin threads. Green: The machine is ready to embroider or is moved to the machine may occur. z When cutting thread thicker than #30, nylon thread or other special threads, use the thread cutter on the side of the machine. 10 CAUTION ● Do not press the thread cutter button...
Users Manual - English
Page 13
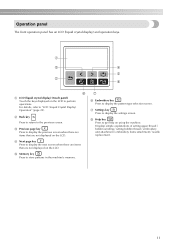
...a c d e b h f a LCD (liquid crystal display) (touch panel) Touch the keys displayed on the LCD. g f Embroidery key Press to perform operations. Operation panel The front operation panel has an LCD (liquid crystal display) and operation keys. For details, refer ...to display the next screen when there are items that are not displayed on using the machine. Displays simple explanations of setting upper thread / bobbin winding / setting bobbin thread / embroidery unit attachment / embroidery frame attachment / needle replacement. 11 d Next page key Press to display the settings ...
...a c d e b h f a LCD (liquid crystal display) (touch panel) Touch the keys displayed on the LCD. g f Embroidery key Press to perform operations. Operation panel The front operation panel has an LCD (liquid crystal display) and operation keys. For details, refer ...to display the next screen when there are items that are not displayed on using the machine. Displays simple explanations of setting upper thread / bobbin winding / setting bobbin thread / embroidery unit attachment / embroidery frame attachment / needle replacement. 11 d Next page key Press to display the settings ...

Users Manual - English
Page 16
...embroidery are as follows. 1 Attaching the embroidery unit Attach the embroidery unit. (If the embroidery unit is not attached, the machine does not operate.) For details, refer to "Attaching the embroidery unit" (page 15). ↓ 2 Checking the needle Use a needle matched to "Upper Threading" (page 30). 14 thread...Attach a stabilizer material to "Adjusting the layout" (page 61). ↓ 8 Setting up the embroidery Set up the bobbin thread For the bobbin thread, wind embroidery bobbin thread and set it in place. For details, refer to the pattern. For details on replacing the...
...embroidery are as follows. 1 Attaching the embroidery unit Attach the embroidery unit. (If the embroidery unit is not attached, the machine does not operate.) For details, refer to "Attaching the embroidery unit" (page 15). ↓ 2 Checking the needle Use a needle matched to "Upper Threading" (page 30). 14 thread...Attach a stabilizer material to "Adjusting the layout" (page 61). ↓ 8 Setting up the embroidery Set up the bobbin thread For the bobbin thread, wind embroidery bobbin thread and set it in place. For details, refer to the pattern. For details on replacing the...
Users Manual - English
Page 25
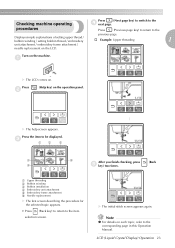
Press b (Help key) on the machine. LCD (Liquid Crystal Display) Operation 23 Turn on the operation panel. Press the item to ... explanations of setting upper thread / bobbin winding / setting bobbin thread / embroidery † Example: Upper threading 1 unit attachment / embroidery frame attachment / needle replacement on . X The help screen appears. Checking machine operating Press (Next page key) to switch to the previous page. a Upper threading b Bobbin winding c Bobbin installation d Embroidery unit attachment e Embroidery frame attachment f Needle replacement...
Press b (Help key) on the machine. LCD (Liquid Crystal Display) Operation 23 Turn on the operation panel. Press the item to ... explanations of setting upper thread / bobbin winding / setting bobbin thread / embroidery † Example: Upper threading 1 unit attachment / embroidery frame attachment / needle replacement on . X The help screen appears. Checking machine operating Press (Next page key) to switch to the previous page. a Upper threading b Bobbin winding c Bobbin installation d Embroidery unit attachment e Embroidery frame attachment f Needle replacement...

Users Manual - English
Page 26
... b Spool cap Open the top cover. Press down on the machine. GETTING READY Winding/Installing the Bobbin This section describes how to prepare the bobbin thread. Bobbin precautions Be sure to the machine. ● The included bobbin was designed specifically for this machine. Use only the included bobbin or bobbins of the same type (part code: SA156, SFB: XA5539151). 2 a Notch...
... b Spool cap Open the top cover. Press down on the machine. GETTING READY Winding/Installing the Bobbin This section describes how to prepare the bobbin thread. Bobbin precautions Be sure to the machine. ● The included bobbin was designed specifically for this machine. Use only the included bobbin or bobbins of the same type (part code: SA156, SFB: XA5539151). 2 a Notch...

Users Manual - English
Page 29
... built into the slit in the bobbin winder seat, the thread may become tangled in the bobbin or the needle may be damaged. CAUTION ● When the bobbin winding becomes slow, stop the machine, otherwise the machine may bend or break when the bobbin thread starts to cut the end of the thread through the guide l slit in cutter...
... built into the slit in the bobbin winder seat, the thread may become tangled in the bobbin or the needle may be damaged. CAUTION ● When the bobbin winding becomes slow, stop the machine, otherwise the machine may bend or break when the bobbin thread starts to cut the end of the thread through the guide l slit in cutter...
Users Manual - English
Page 30
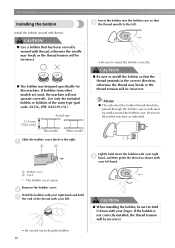
... e hand, and then guide the thread as indicated. a Bobbin cover b Latch X The bobbin cover opens. CAUTION ● Use a bobbin that has been correctly wound with thread. Install the bobbin wound with thread, otherwise the needle may break or the thread tension will be incorrect. ● The bobbin was designed specifically for this machine. Slide the bobbin cover latch to the right...
... e hand, and then guide the thread as indicated. a Bobbin cover b Latch X The bobbin cover opens. CAUTION ● Use a bobbin that has been correctly wound with thread. Install the bobbin wound with thread, otherwise the needle may break or the thread tension will be incorrect. ● The bobbin was designed specifically for this machine. Slide the bobbin cover latch to the right...

Users Manual - English
Page 31
... can start embroidering without pulling up the bobbin thread. Next, thread the upper thread. Continue with the procedure in the lower-left corner of the bobbin case. Winding/Installing the Bobbin 29 If it is finished. g Insert the tab in "Upper Threading" (page 30). Note z Make sure that the thread is correctly inserted through the slot as shown...
... can start embroidering without pulling up the bobbin thread. Next, thread the upper thread. Continue with the procedure in the lower-left corner of the bobbin case. Winding/Installing the Bobbin 29 If it is finished. g Insert the tab in "Upper Threading" (page 30). Note z Make sure that the thread is correctly inserted through the slot as shown...

Users Manual - English
Page 41
... 54 Using an embroidery card (sold separately 55 Embroidering 56 Embroidering attractive finishes .....56 Embroidering a pattern 57 Appliquéing 59 Editing and Saving Patterns 61 Adjusting the layout 61 Storing patterns 63 Adjusting the thread tension...........64 Resewing 65 Thread runs out partway through a design 65 Stopping while embroidering .........66 Bobbin Case Adjustment...
... 54 Using an embroidery card (sold separately 55 Embroidering 56 Embroidering attractive finishes .....56 Embroidering a pattern 57 Appliquéing 59 Editing and Saving Patterns 61 Adjusting the layout 61 Storing patterns 63 Adjusting the thread tension...........64 Resewing 65 Thread runs out partway through a design 65 Stopping while embroidering .........66 Bobbin Case Adjustment...

Users Manual - English
Page 42
...careful when embroidering overlapping patterns. What to prevent poor quality embroidery designs. ■ Fabric Prepare the fabric for embroidery machines. The needle may become tangled. 40 Note z For good quality embroidery designs be sure to break. Not using a stabilizer ... embroidery designs. If you want to raise the needle. To check the fabric thickness, attach the embroidery frame to the embroidery unit, and use embroidery thread designed for embroidery. We recommend stabilizer material for embroidering. Note z Always use the embroidery bobbin thread. EMBROIDERY ...
...careful when embroidering overlapping patterns. What to prevent poor quality embroidery designs. ■ Fabric Prepare the fabric for embroidery machines. The needle may become tangled. 40 Note z For good quality embroidery designs be sure to break. Not using a stabilizer ... embroidery designs. If you want to raise the needle. To check the fabric thickness, attach the embroidery frame to the embroidery unit, and use embroidery thread designed for embroidery. We recommend stabilizer material for embroidering. Note z Always use the embroidery bobbin thread. EMBROIDERY ...
Users Manual - English
Page 49
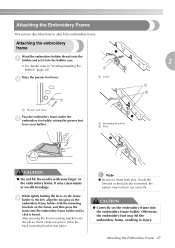
... clicks into place, press the back mounting bracket into the embroidery frame holder. Attaching the embroidery frame Wind the embroidery bobbin thread onto the a bobbin and set the embroidery frame into place. While lightly holding the lever on the frame, and then press the frame into the bobbin case. • For details, refer to the left, align the...
... clicks into place, press the back mounting bracket into the embroidery frame holder. Attaching the embroidery frame Wind the embroidery bobbin thread onto the a bobbin and set the embroidery frame into place. While lightly holding the lever on the frame, and then press the frame into the bobbin case. • For details, refer to the left, align the...

Users Manual - English
Page 58
... frame (page 43) are done, you use with this machine. Note z Before embroidering, check that go into sewing beautiful embroidery. Other embroidery threads may strike the object and cause a poor finish to "Optional accessories" (page 7). See the explanation of the embroidery frame. Thread Upper thread Bobbin thread Use embroidery thread, or country embroidery thread intended for embroidering and appliquéing. For details...
... frame (page 43) are done, you use with this machine. Note z Before embroidering, check that go into sewing beautiful embroidery. Other embroidery threads may strike the object and cause a poor finish to "Optional accessories" (page 7). See the explanation of the embroidery frame. Thread Upper thread Bobbin thread Use embroidery thread, or country embroidery thread intended for embroidering and appliquéing. For details...

Users Manual - English
Page 67
... partway through a design When the upper thread or the bobbin thread runs out while embroidering, the machine stops. Press . c Press (Back one stitch) increases the stitch number. Restart the embroidery. Press (Back one stitch) to the d beginning of the mistaken color. e Editing and Saving Patterns 65 c Press . e Press (Start/stop button) to stop button) to...
... partway through a design When the upper thread or the bobbin thread runs out while embroidering, the machine stops. Press . c Press (Back one stitch) increases the stitch number. Restart the embroidery. Press (Back one stitch) to the d beginning of the mistaken color. e Editing and Saving Patterns 65 c Press . e Press (Start/stop button) to stop button) to...

Users Manual - English
Page 70
...careful not to over -tighten the screw, approximately 30-45 degrees to increase bobbin tension. EMBROIDERY Bobbin Case Adjustment The bobbin case installed in this machine can be sure to remove the bobbin from the bobbin case. ● DO NOT adjust the position of the Phillips (a) screw on...the slotted-head (b) screw to adjust the bobbin tension for embroidering. The insertion below describes how to adjust the bobbin case tension. Correct tension Upper thread slightly appears on the right side of fabric seems to the bobbin case. Bobbin thread is difficult to turn, do not use...
...careful not to over -tighten the screw, approximately 30-45 degrees to increase bobbin tension. EMBROIDERY Bobbin Case Adjustment The bobbin case installed in this machine can be sure to remove the bobbin from the bobbin case. ● DO NOT adjust the position of the Phillips (a) screw on...the slotted-head (b) screw to adjust the bobbin tension for embroidering. The insertion below describes how to adjust the bobbin case tension. Correct tension Upper thread slightly appears on the right side of fabric seems to the bobbin case. Bobbin thread is difficult to turn, do not use...

Users Manual - English
Page 73
... apply oil to f remove any lint and dust from the race and bobbin thread sensor and their surrounding area. a b 2 1 a Projection b Spring 1 a Bobbin case Care and Maintenance 71 For a new bobbin case (part code: XD1855- Insert the bobbin case so that the projection g on the bobbin case aligns with the spring. Use the cleaning brush or a vacuum...
... apply oil to f remove any lint and dust from the race and bobbin thread sensor and their surrounding area. a b 2 1 a Projection b Spring 1 a Bobbin case Care and Maintenance 71 For a new bobbin case (part code: XD1855- Insert the bobbin case so that the projection g on the bobbin case aligns with the spring. Use the cleaning brush or a vacuum...
Users Manual - English
Page 77
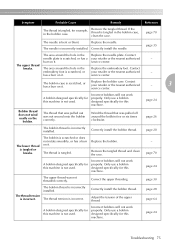
... Replace the embroidery foot. Contact embroidery foot is scratched, or has a your retailer or the nearest authorized - The bobbin case is not used. Contact your retailer or the nearest authorized service center. - 3 A bobbin designed specifically for this machine is scratched, or has a burr on it . Only use a bobbin designed specifically for this machine. page 24 Bobbin thread does not...
... Replace the embroidery foot. Contact embroidery foot is scratched, or has a your retailer or the nearest authorized - The bobbin case is not used. Contact your retailer or the nearest authorized service center. - 3 A bobbin designed specifically for this machine is scratched, or has a burr on it . Only use a bobbin designed specifically for this machine. page 24 Bobbin thread does not...


