
Users Guide
Page 2
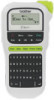
End of the label maker. NOTE When using optional AC adapter 1. 2. ELECTRONIC LABELING SYSTEM H110 www.brother.com 1 GETTING STARTED Power Supply and Tape Cassette 1 2 Print head Cutter's edge Tape exit slot Cassette cover Tape cutter lever Tape guides Toothed Wheel Open the cassette cover by pressing the above indicated area at the top end of tape Insert a tape cassette, making sure it snaps into place.
End of the label maker. NOTE When using optional AC adapter 1. 2. ELECTRONIC LABELING SYSTEM H110 www.brother.com 1 GETTING STARTED Power Supply and Tape Cassette 1 2 Print head Cutter's edge Tape exit slot Cassette cover Tape cutter lever Tape guides Toothed Wheel Open the cassette cover by pressing the above indicated area at the top end of tape Insert a tape cassette, making sure it snaps into place.

Users Guide
Page 15
battery 1 6 HELPFUL HINTS (continued) Short Cuts Print Option Unit Resetting the label maker CAUTION NOTE Battery Recommendations 1 Turn off the label maker, hold down and , and then press to turn the label maker back on. 2 First release the power button, and then 1. Cellophane tape 2 release and .
battery 1 6 HELPFUL HINTS (continued) Short Cuts Print Option Unit Resetting the label maker CAUTION NOTE Battery Recommendations 1 Turn off the label maker, hold down and , and then press to turn the label maker back on. 2 First release the power button, and then 1. Cellophane tape 2 release and .


