
Raster Command Reference
Page 4
...flow for USB connection (with feeding 30 ESC i z Print information command 31 M Select compression mode 32 ESC i A Specify the page number in "cut each * labels 33 ESC i M Various mode 34 ESC i K Expanded mode 34 5. Switch automatic status notification mode 29 g Raster graphics transfer 29 w Two-color raster graphics transfer...feeding at the end of print data for Network (Standard TCP/IP port) Connection 43 Appendix A: USB Specifications 44 Appendix B: Introducing the Brother Developer Center 45 - Printing Using Raster Commands 3 2. i - Print Command List 20 4.
...flow for USB connection (with feeding 30 ESC i z Print information command 31 M Select compression mode 32 ESC i A Specify the page number in "cut each * labels 33 ESC i M Various mode 34 ESC i K Expanded mode 34 5. Switch automatic status notification mode 29 g Raster graphics transfer 29 w Two-color raster graphics transfer...feeding at the end of print data for Network (Standard TCP/IP port) Connection 43 Appendix A: USB Specifications 44 Appendix B: Introducing the Brother Developer Center 45 - Printing Using Raster Commands 3 2. i - Print Command List 20 4.

Raster Command Reference
Page 9
..., 66h, 00h, 09h, 07h, 00h, 00h, 00h, 00h 4 Various mode To select "Auto Cut" 1Bh, 69h, 4Dh, 40h 5 Specify the page When an auto cut . * labels" For each sheets, 1Bh, 69h, 41h, 01h 6 Expanded mode To select "Cut at the beginning of the following: (1) initialization commands, (2) control codes, (3) raster data, and...
..., 66h, 00h, 09h, 07h, 00h, 00h, 00h, 00h 4 Various mode To select "Auto Cut" 1Bh, 69h, 4Dh, 40h 5 Specify the page When an auto cut . * labels" For each sheets, 1Bh, 69h, 41h, 01h 6 Expanded mode To select "Cut at the beginning of the following: (1) initialization commands, (2) control codes, (3) raster data, and...

Raster Command Reference
Page 16
... Descriptions for the numbers in the print data on each * labels" The number of the first page. - 12 - 2. Printing Command Details". Switch automatic 4 status notification mode Dynamically switches whether an automatic status notification is given during printing. 5 Job ID setting commands Internal specification commands Since this is a command for outputting with feeding...
... Descriptions for the numbers in the print data on each * labels" The number of the first page. - 12 - 2. Printing Command Details". Switch automatic 4 status notification mode Dynamically switches whether an automatic status notification is given during printing. 5 Job ID setting commands Internal specification commands Since this is a command for outputting with feeding...

Raster Command Reference
Page 19
... offset of masked area 9 Width of masked area 2 Length 4 Print area length 6 Length offset 8 Length offset of masked area 10 Length of masked area ID Label Size 1 2 3 4 5 6 17 mm x 54 mm 269 0.66" x 2.1" 17.0 mm 201 dots 53.9 mm 636 dots 14.0 mm 165 dots 47.9 mm 566 dots 1.5 mm 18...
... offset of masked area 9 Width of masked area 2 Length 4 Print area length 6 Length offset 8 Length offset of masked area 10 Length of masked area ID Label Size 1 2 3 4 5 6 17 mm x 54 mm 269 0.66" x 2.1" 17.0 mm 201 dots 53.9 mm 636 dots 14.0 mm 165 dots 47.9 mm 566 dots 1.5 mm 18...

Raster Command Reference
Page 20
...Type Minimum Margin Setting Maximum Margin Setting Continuous length tape 3 mm 0.12" 35 dots 127 mm 5" 1500 dots Die-cut labels The length offset indicated in "(b) Die-cut labels Fixed Maximum Length 1000 mm 11811 dots Fixed *1 The number of dots in the table is defined below . it is ...for 300 dpi; Type Minimum Length Continuous length tape 12.7 mm 150 dots Die-cut labels" of "2.3.2 Page size" is difference in the high-resolution mode. - 16 - 2. Raster Command Reference 60 mm x 86 mm 383 2.3" x 3.4" 62 mm x 29 mm 274 2.4" ...
...Type Minimum Margin Setting Maximum Margin Setting Continuous length tape 3 mm 0.12" 35 dots 127 mm 5" 1500 dots Die-cut labels The length offset indicated in "(b) Die-cut labels Fixed Maximum Length 1000 mm 11811 dots Fixed *1 The number of dots in the table is defined below . it is ...for 300 dpi; Type Minimum Length Continuous length tape 12.7 mm 150 dots Die-cut labels" of "2.3.2 Page size" is difference in the high-resolution mode. - 16 - 2. Raster Command Reference 60 mm x 86 mm 383 2.3" x 3.4" 62 mm x 29 mm 274 2.4" ...

Raster Command Reference
Page 22
... Number of Pins for Right Margin 29 6 12 12 0 12 Number of Bytes for Raster Graphics Transfer 90 90 90 90 90 90 Die-cut labels: Label Size 17mm x 54mm 17mm x 87mm Number of Pins for Left Margin 555 555 Number of Print Area Pins 165 165 Number of Pins for Right...
... Number of Pins for Right Margin 29 6 12 12 0 12 Number of Bytes for Raster Graphics Transfer 90 90 90 90 90 90 Die-cut labels: Label Size 17mm x 54mm 17mm x 87mm Number of Pins for Left Margin 555 555 Number of Print Area Pins 165 165 Number of Pins for Right...

Raster Command Reference
Page 24
... two-color printing) Zero raster graphics Print command Print command with feeding Print information command Select compression mode Specify the page number in "cut each * labels" Various mode Expanded mode - 20 - 3. Print Command List
... two-color printing) Zero raster graphics Print command Print command with feeding Print information command Select compression mode Specify the page number in "cut each * labels" Various mode Expanded mode - 20 - 3. Print Command List

Raster Command Reference
Page 27
... 10h 20h 40h 80h Mask 01h 02h 04h 08h 10h 20h 40h 80h Definition "No media" error "End of media" error (only for die-cut labels) Cutter jam (Not used) Printer in use Printer turned off High-voltage adapter (not used) Fan motor error (not used) Definition "Replace media" error "Expansion...
... 10h 20h 40h 80h Mask 01h 02h 04h 08h 10h 20h 40h 80h Definition "No media" error "End of media" error (only for die-cut labels) Cutter jam (Not used) Printer in use Printer turned off High-voltage adapter (not used) Fan motor error (not used) Definition "Replace media" error "Expansion...

Raster Command Reference
Page 28
... at 00h Media Media Width 12 mm 12 29 mm 29 38 mm 38 50 mm 50 54 mm 54 62 mm 62 (b) Die-cut labels * Media Width: The width of the die-cut section is indicated. * Media Length: The length of the die-cut section is indicated. Printing Command Details...
... at 00h Media Media Width 12 mm 12 29 mm 29 38 mm 38 50 mm 50 54 mm 54 62 mm 62 (b) Die-cut labels * Media Width: The width of the die-cut section is indicated. * Media Length: The length of the die-cut section is indicated. Printing Command Details...

Raster Command Reference
Page 29
Printing Command Details Used for both paper and film. (5) Status type Status Type Value Reply to status request 00h Printing completed 01h Error occurred 02h Turned off 04h Notification 05h Phase change 06h (Not used) 08h to 20h (Reserved) 21h to FFh If an error occurred during printing, the printer returns the error status. - 25 - 4. Raster Command Reference (4) Media type Media Type No media Continuous length tape Die-cut labels Value 00h 4Ah 4Bh Description Used as print information when the media type is not indicated. Used for both paper and film.
Printing Command Details Used for both paper and film. (5) Status type Status Type Value Reply to status request 00h Printing completed 01h Error occurred 02h Turned off 04h Notification 05h Phase change 06h (Not used) 08h to 20h (Reserved) 21h to FFh If an error occurred during printing, the printer returns the error status. - 25 - 4. Raster Command Reference (4) Media type Media Type No media Continuous length tape Die-cut labels Value 00h 4Ah 4Bh Description Used as print information when the media type is not indicated. Used for both paper and film.
Raster Command Reference
Page 31
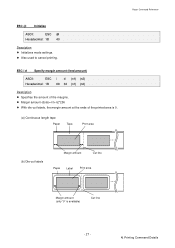
...} Hexadecimal: 1B 69 64 {n1} {n2} Description Specifies the amount of the margins. Margin amount (dots)=n1+n2*256 With die-cut labels, the margin amount at the ends of the printed area is 0. (a) Continuous length tape Paper Tape Print area (b) Die-cut...
...} Hexadecimal: 1B 69 64 {n1} {n2} Description Specifies the amount of the margins. Margin amount (dots)=n1+n2*256 With die-cut labels, the margin amount at the ends of the printed area is 0. (a) Continuous length tape Paper Tape Print area (b) Die-cut...

Raster Command Reference
Page 35
... values are set to print quality (invalid for two-color printing) 0x80: Printer recovery always on {n2}: Media type Continuous length tape: 0Ah Die-cut labels: 0Bh {n3}: {n4}: {n3}: Media width (mm) {n4}: Media length (mm) For the media of width 62 mm × length 100 mm, specify as a single...
... values are set to print quality (invalid for two-color printing) 0x80: Printer recovery always on {n2}: Media type Continuous length tape: 0Ah Die-cut labels: 0Bh {n3}: {n4}: {n3}: Media width (mm) {n4}: Media length (mm) For the media of width 62 mm × length 100 mm, specify as a single...

Raster Command Reference
Page 37
... "raster graphics transfer" command is based on print head Feeding direction ESC i A Specify the page number in "cut each label). As shown below, with compression, the number of unused pins is specified, you can specify page number (1 - 255) in "cut each... * labels" ASCII: ESC i A {n} Hexadecimal: 1B 69 41 {n} Parameters Definitions of {n} Page number = n1 (1 - 255) Default is 1 (cut each * labels". - 33 - 4. Raster line with compression Raster line with compression, this becomes 90 bytes ...
... "raster graphics transfer" command is based on print head Feeding direction ESC i A Specify the page number in "cut each label). As shown below, with compression, the number of unused pins is specified, you can specify page number (1 - 255) in "cut each... * labels" ASCII: ESC i A {n} Hexadecimal: 1B 69 41 {n} Parameters Definitions of {n} Page number = n1 (1 - 255) Default is 1 (cut each * labels". - 33 - 4. Raster line with compression Raster line with compression, this becomes 90 bytes ...

Users Guide
Page 2
...subject to change without notice. Brother reserves the right to make sure you read it before you use the Label Printer. i Available Manuals Visit the Brother support website at support.brother.com and click Manuals on your Label Printer. The available options and...information about safety and operation. The Label Printer shown in the illustrations may vary depending on the Brother support website This guide provides safety information; This guide provides additional information about using the Label Printer, make changes without notice in the ...
...subject to change without notice. Brother reserves the right to make sure you read it before you use the Label Printer. i Available Manuals Visit the Brother support website at support.brother.com and click Manuals on your Label Printer. The available options and...information about safety and operation. The Label Printer shown in the illustrations may vary depending on the Brother support website This guide provides safety information; This guide provides additional information about using the Label Printer, make changes without notice in the ...

Users Guide
Page 3
Indicates information or directions that can help you better understand and use the product more efficiently. Symbols Used in damage, or failed operations. Ignoring them may result in This Guide The following symbols are used throughout this guide: WARNING CAUTION Important Note Tells you what to do to the Label Printer. Indicates notes that provide information or directions that should be followed. ii Tells you about procedures you must follow to avoid minor personal injury or damage to avoid the risk of injury.
Indicates information or directions that can help you better understand and use the product more efficiently. Symbols Used in damage, or failed operations. Ignoring them may result in This Guide The following symbols are used throughout this guide: WARNING CAUTION Important Note Tells you what to do to the Label Printer. Indicates notes that provide information or directions that should be followed. ii Tells you about procedures you must follow to avoid minor personal injury or damage to avoid the risk of injury.
Users Guide
Page 4
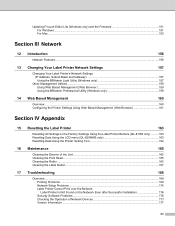
Brother accepts no responsibility for applying CD/DVD labels. DO NOT use DK Rolls for any loss or damage of data caused by affixing a small piece of the label with your CD/DVD player's instruction guide regarding applying CD/DVD labels. DO NOT use thermal paper ...or dust. Before applying the label, clean the surface to a wet, dirty, or oily surface, it is attached to which the label will fade with , unauthorized accessories or supplies. iii General Precautions DK Roll (DK Label and DK Tape) Use only genuine Brother accessories and supplies (with sunlight...
Brother accepts no responsibility for applying CD/DVD labels. DO NOT use DK Rolls for any loss or damage of data caused by affixing a small piece of the label with your CD/DVD player's instruction guide regarding applying CD/DVD labels. DO NOT use thermal paper ...or dust. Before applying the label, clean the surface to a wet, dirty, or oily surface, it is attached to which the label will fade with , unauthorized accessories or supplies. iii General Precautions DK Roll (DK Label and DK Tape) Use only genuine Brother accessories and supplies (with sunlight...

Users Guide
Page 6
... Connecting Using Wi-Fi...23 Connecting Using a Wired LAN (QL-820NWB only 28 Bluetooth Connection (QL-820NWB only 28 Connecting the Label Printer to a Barcode Scanner using Bluetooth (QL-820NWB only 29 Printing from a Computer...30 Available Applications...30 Creating Labels from Your Computer 31 Attaching Labels ...32 3 Printing Using the Mobile Device 33 Installing Applications...
... Connecting Using Wi-Fi...23 Connecting Using a Wired LAN (QL-820NWB only 28 Bluetooth Connection (QL-820NWB only 28 Connecting the Label Printer to a Barcode Scanner using Bluetooth (QL-820NWB only 29 Printing from a Computer...30 Available Applications...30 Creating Labels from Your Computer 31 Attaching Labels ...32 3 Printing Using the Mobile Device 33 Installing Applications...

Users Guide
Page 7
... Dialog Box ...51 Menu Bar ...53 Basic Tab...54 Advanced Tab ...55 Display Tab (QL-820NWB only) ...56 Management Tab ...57 Applying Setting Changes to Multiple Label Printers 58 P-touch Template Settings for Windows 59 P-touch Template Settings Dialog Box 60 Printer ...Serializing)...82 Printing with Numbering (Serializing) Advanced Operation 83 6 Other Functions 84 Confirming the Label Printer Settings ...84 2-Color Printing Configuration with Other Applications 85 Mass Storage Mode (QL-820NWB only 86 Description...86 Using the Mass Storage Mode ...87 JPEG Printing ...88 Template...
... Dialog Box ...51 Menu Bar ...53 Basic Tab...54 Advanced Tab ...55 Display Tab (QL-820NWB only) ...56 Management Tab ...57 Applying Setting Changes to Multiple Label Printers 58 P-touch Template Settings for Windows 59 P-touch Template Settings Dialog Box 60 Printer ...Serializing)...82 Printing with Numbering (Serializing) Advanced Operation 83 6 Other Functions 84 Confirming the Label Printer Settings ...84 2-Color Printing Configuration with Other Applications 85 Mass Storage Mode (QL-820NWB only 86 Description...86 Using the Mass Storage Mode ...87 JPEG Printing ...88 Template...

Users Guide
Page 8
...101 Adjusting the Color Range, Brightness, and Contrast 104 For Mac...106 Starting P-touch Editor ...106 Operation modes ...107 Transferring Data to the Label Printer 107 2-Color Printing Configuration ...108 Adjusting the Color Range...109 How to use the P-touch Address Book (Windows only 110 Starting the ...P-touch Address Book 110 Creating a new contact...112 8 How to use P-touch Editor Lite (Windows only) 114 How to use P-touch Editor Lite (QL-810W only) (Windows only 114 How to use P-touch Editor Lite LAN (Windows only 118 9 How to Use P-touch Transfer Manager and P-touch Library (...
...101 Adjusting the Color Range, Brightness, and Contrast 104 For Mac...106 Starting P-touch Editor ...106 Operation modes ...107 Transferring Data to the Label Printer 107 2-Color Printing Configuration ...108 Adjusting the Color Range...109 How to use the P-touch Address Book (Windows only 110 Starting the ...P-touch Address Book 110 Creating a new contact...112 8 How to use P-touch Editor Lite (Windows only) 114 How to use P-touch Editor Lite (QL-810W only) (Windows only 114 How to use P-touch Editor Lite LAN (Windows only 118 9 How to Use P-touch Transfer Manager and P-touch Library (...
Users Guide
Page 9
... Settings Using Web Based Management (Web Browser 161 Section IV Appendix 15 Resetting the Label Printer 163 Resetting All Settings to the Factory Settings Using the Label Printer Buttons (QL-810W only) ..........163 Resetting Data Using the LCD menu (QL-820NWB only 163 Resetting Data Using the Printer Setting Tool 164 16 Maintenance 165 Cleaning...
... Settings Using Web Based Management (Web Browser 161 Section IV Appendix 15 Resetting the Label Printer 163 Resetting All Settings to the Factory Settings Using the Label Printer Buttons (QL-810W only) ..........163 Resetting Data Using the LCD menu (QL-820NWB only 163 Resetting Data Using the Printer Setting Tool 164 16 Maintenance 165 Cleaning...


