

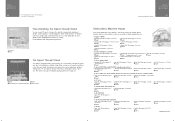
Accessory Catalog
Page 9
SABOBCLIP ABCDEFGHIP SA599 A:QuattroTM 6000D Knee Lifter A newly configured knee lifter...1500D,QC-1000 SATFM6000D A:QuattroTM6000D www.brother.com Select the one appropriate for your machine to -thread cassette system. Brother General Sewing Accessories 15 Bobbins Bobbins and Bobbin Clips Knee Lifter Bobbins There are waiting for your machine....Foot as you are two different sizes. One package includes ten bobbins. 11.5 mm 1/2" SA156 ABCDEFGHIP SA155 JKLMNO 9.2 mm 3/8" Bobbins and Bobbin Clips 10 reusable high-quality and high-performance SA156 Bobbins with an easy to attach, ...
SABOBCLIP ABCDEFGHIP SA599 A:QuattroTM 6000D Knee Lifter A newly configured knee lifter...1500D,QC-1000 SATFM6000D A:QuattroTM6000D www.brother.com Select the one appropriate for your machine to -thread cassette system. Brother General Sewing Accessories 15 Bobbins Bobbins and Bobbin Clips Knee Lifter Bobbins There are waiting for your machine....Foot as you are two different sizes. One package includes ten bobbins. 11.5 mm 1/2" SA156 ABCDEFGHIP SA155 JKLMNO 9.2 mm 3/8" Bobbins and Bobbin Clips 10 reusable high-quality and high-performance SA156 Bobbins with an easy to attach, ...
Accessory Catalog
Page 33
... QuattroTM 6000D Embroidery Machine Hoops Select hoops appropriate for details, www.brother.com. Take control of spool sizes. Ask your machine. Brother Embroidery ...Brother Embroidery Accessories 64 For all embroidery and sewing/embroidery machines. The spool pins can be removed to the machine as well as a thread locking system which keeps those loose ends tamed when not in the storage slots. For Quattro™ 6000D... Stand snaps securely in the proper color sequence for thread delivery or bobbin storage. Allows easy access to provide 10 vertical spool pins for your...
... QuattroTM 6000D Embroidery Machine Hoops Select hoops appropriate for details, www.brother.com. Take control of spool sizes. Ask your machine. Brother Embroidery ...Brother Embroidery Accessories 64 For all embroidery and sewing/embroidery machines. The spool pins can be removed to the machine as well as a thread locking system which keeps those loose ends tamed when not in the storage slots. For Quattro™ 6000D... Stand snaps securely in the proper color sequence for thread delivery or bobbin storage. Allows easy access to provide 10 vertical spool pins for your...
Users Manual - English
Page 12
...Machine 1 Needle and Presser Foot Section 2 Embroidery Unit 3 Operation Buttons 3 Using the Flat Bed Attachment 4 Using the Accessory Case 4 Storing Bobbin Clips 5 Using the Embroidery Unit Carrying Case 5 Included Accessories 5 Options 8 Using the Spool Stand 9 Chapter 1 Getting Ready 11 TURNING THE...148 SEWING STITCH PATTERNS 152 Sewing Attractive Finishes 152 Basic Sewing 152 Making Adjustments 153 EDITING STITCH PATTERNS 155 Changing the Size 157 Changing the Length (for 7mm Satin Stitch Patterns Only 157 Creating a Vertical Mirror Image 157 Creating a Horizontal Mirror...
...Machine 1 Needle and Presser Foot Section 2 Embroidery Unit 3 Operation Buttons 3 Using the Flat Bed Attachment 4 Using the Accessory Case 4 Storing Bobbin Clips 5 Using the Embroidery Unit Carrying Case 5 Included Accessories 5 Options 8 Using the Spool Stand 9 Chapter 1 Getting Ready 11 TURNING THE...148 SEWING STITCH PATTERNS 152 Sewing Attractive Finishes 152 Basic Sewing 152 Making Adjustments 153 EDITING STITCH PATTERNS 155 Changing the Size 157 Changing the Length (for 7mm Satin Stitch Patterns Only 157 Creating a Vertical Mirror Image 157 Creating a Horizontal Mirror...

Users Manual - English
Page 13
... Foot "W 183 Attaching the Embroidery Unit 184 SELECTING PATTERNS 186 Selecting Embroidery Patterns/Brother "Exclusives"/Greek Alphabet Patterns/Floral Alphabet Patterns/Utility Embroidery Patterns 189 Selecting Alphabet Character... Power 225 MAKING EMBROIDERY ADJUSTMENTS ..........227 Adjusting Thread Tension 227 Adjusting the Alternate Bobbin Case (with No Color on the Screw 228 Using the Automatic Thread Cutting ... EDITING PATTERNS 267 Moving the Pattern 269 Rotating the Pattern 269 Changing the Size of the Pattern 270 Deleting the Pattern 271 Changing the Configuration of Alphabet ...
... Foot "W 183 Attaching the Embroidery Unit 184 SELECTING PATTERNS 186 Selecting Embroidery Patterns/Brother "Exclusives"/Greek Alphabet Patterns/Floral Alphabet Patterns/Utility Embroidery Patterns 189 Selecting Alphabet Character... Power 225 MAKING EMBROIDERY ADJUSTMENTS ..........227 Adjusting Thread Tension 227 Adjusting the Alternate Bobbin Case (with No Color on the Screw 228 Using the Automatic Thread Cutting ... EDITING PATTERNS 267 Moving the Pattern 269 Rotating the Pattern 269 Changing the Size of the Pattern 270 Deleting the Pattern 271 Changing the Configuration of Alphabet ...

Users Manual - English
Page 51
... the shaft. a Groove in this order to sew embroidery, you can conveniently wind the bobbin using the main spool pin to display a video example of the same type (part code: SA156, (SFB: XA5539-151)). * Actual size a This model b Other models c 11.5 mm (approx. 7/16 inch) a Supplemental ...spool pin a Turn the main top cover. Use only the included bobbin or bobbins of bobbin winding on the shaft 37 Getting Ready o in the bobbin b Spring on the LCD (see page 34)....
... the shaft. a Groove in this order to sew embroidery, you can conveniently wind the bobbin using the main spool pin to display a video example of the same type (part code: SA156, (SFB: XA5539-151)). * Actual size a This model b Other models c 11.5 mm (approx. 7/16 inch) a Supplemental ...spool pin a Turn the main top cover. Use only the included bobbin or bobbins of bobbin winding on the shaft 37 Getting Ready o in the bobbin b Spring on the LCD (see page 34)....

Users Manual - English
Page 57
... the left hand. 43 CAUTION • Use a bobbin thread that * Actual size a This model b Other models c 11.5 mm (approx. 7/16 inch) • Before inserting or changing the bobbin, be incorrect. c Remove the bobbin cover. If bobbins from other button is pressed and the machine starts sewing. f Hold the bobbin lightly with your right hand, and then...
... the left hand. 43 CAUTION • Use a bobbin thread that * Actual size a This model b Other models c 11.5 mm (approx. 7/16 inch) • Before inserting or changing the bobbin, be incorrect. c Remove the bobbin cover. If bobbins from other button is pressed and the machine starts sewing. f Hold the bobbin lightly with your right hand, and then...

Users Manual - English
Page 66
.... Memo • See page 9 to assemble the spool stand. • See page 41 to wind the bobbin when using the spool stand. ■ Using the Spool Stand • Be sure to the machine. (see...onto the spool pin. a Spool holder 52 b Place the spool of thread remaining, choose the appropriate sized spool cap (large or medium). This spool stand can hold two spools of the spool felt, and... larger than the spool, the thread may catch and sewing performance may suffer. • Depending on the size of spool or the amount of so that the thread thread on the spool pin so that is used...
.... Memo • See page 9 to assemble the spool stand. • See page 41 to wind the bobbin when using the spool stand. ■ Using the Spool Stand • Be sure to the machine. (see...onto the spool pin. a Spool holder 52 b Place the spool of thread remaining, choose the appropriate sized spool cap (large or medium). This spool stand can hold two spools of the spool felt, and... larger than the spool, the thread may catch and sewing performance may suffer. • Depending on the size of spool or the amount of so that the thread thread on the spool pin so that is used...
Users Manual - English
Page 72
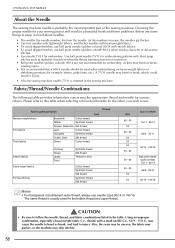
...; To avoid skipped stitches, use ball point needle (golden colored) 90/14 when sewing character or decorative stitches. • Use needle 75/11 for the bobbin thread and upper thread. Please refer to use. CAUTION • Be sure to keep in the table. CHANGING THE NEEDLE About the Needle The sewing... point needle (gold colored) 75/11 - 90/14 65/9 - 90/14 90/14 - 100/16 Memo • For transparent monofilament nylon thread, always use needle sizes 90/14 or 100/16. The same thread is inserted in the sewing machine. As the numbers increase, the needles get thicker. • Use fine...
...; To avoid skipped stitches, use ball point needle (golden colored) 90/14 when sewing character or decorative stitches. • Use needle 75/11 for the bobbin thread and upper thread. Please refer to use. CAUTION • Be sure to keep in the table. CHANGING THE NEEDLE About the Needle The sewing... point needle (gold colored) 75/11 - 90/14 65/9 - 90/14 90/14 - 100/16 Memo • For transparent monofilament nylon thread, always use needle sizes 90/14 or 100/16. The same thread is inserted in the sewing machine. As the numbers increase, the needles get thicker. • Use fine...

Users Manual - English
Page 101
... j Insert foot. ing, do not use a fine needle, size 75/11, and a short stitch length. For heavier fabrics, use the basting stitch for gather- b Press the "Reverse/Reinforcement Stitch" button to be displayed. • Slowly rotate the handwheel toward you (counterclockwise), pull up the bobbin thread and pull a length of top and...
... j Insert foot. ing, do not use a fine needle, size 75/11, and a short stitch length. For heavier fabrics, use the basting stitch for gather- b Press the "Reverse/Reinforcement Stitch" button to be displayed. • Slowly rotate the handwheel toward you (counterclockwise), pull up the bobbin thread and pull a length of top and...
Users Manual - English
Page 195
...186 ■ Copyright Information 186 ■ Pattern Selection Screens 187 Selecting Embroidery Patterns/Brother "Exclusives"/Greek Alphabet Patterns/Floral Alphabet Patterns/Utility Embroidery Patterns 189 Selecting Alphabet Character...Sheet ........221 Sewing Embroidery Patterns 222 ADJUSTMENTS DURING THE EMBROIDERY PROCESS 223 If the Bobbin Runs Out of Thread 223 If the Thread Breaks During Sewing 224 Restarting from... the Pattern Position 234 Aligning the Pattern and the Needle 235 Changing the Size 236 Rotating the Pattern 237 Creating a Horizontal Mirror Image 238 Changing the ...
...186 ■ Copyright Information 186 ■ Pattern Selection Screens 187 Selecting Embroidery Patterns/Brother "Exclusives"/Greek Alphabet Patterns/Floral Alphabet Patterns/Utility Embroidery Patterns 189 Selecting Alphabet Character...Sheet ........221 Sewing Embroidery Patterns 222 ADJUSTMENTS DURING THE EMBROIDERY PROCESS 223 If the Bobbin Runs Out of Thread 223 If the Thread Breaks During Sewing 224 Restarting from... the Pattern Position 234 Aligning the Pattern and the Needle 235 Changing the Size 236 Rotating the Pattern 237 Creating a Horizontal Mirror Image 238 Changing the ...
Users Manual - English
Page 196
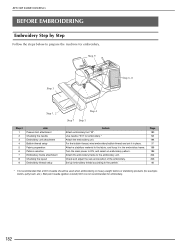
.... Step 9 Step 3 Step 6, 8 Step 1, 2 Step # 1 2 3 4 5 6 7 8 9 Aim Presser foot attachment Checking the needle Embroidery unit attachment Bobbin thread setup Fabric preparation Pattern selection Embroidery frame attachment Checking the layout Embroidery thread setup Step 4 Step 7 Step 5 Action Attach embroidery foot "W". For the... bobbin thread, wind embroidery bobbin thread and set it in place. Check and adjust the size and position of the embroidery. Page 183 58 184 37 198 186 204 206 46 *...
.... Step 9 Step 3 Step 6, 8 Step 1, 2 Step # 1 2 3 4 5 6 7 8 9 Aim Presser foot attachment Checking the needle Embroidery unit attachment Bobbin thread setup Fabric preparation Pattern selection Embroidery frame attachment Checking the layout Embroidery thread setup Step 4 Step 7 Step 5 Action Attach embroidery foot "W". For the... bobbin thread, wind embroidery bobbin thread and set it in place. Check and adjust the size and position of the embroidery. Page 183 58 184 37 198 186 204 206 46 *...

Operation Manual Kit 1 - English
Page 2
... Motion Sewing 12 CREATING BOBBIN WORK (EMBROIDERY 13 Selecting the Pattern...13 Start Embroidering...14 ADJUSTING THE THREAD TENSION 17 TROUBLESHOOTING...18 Chapter 2 New Features and New Patterns 19 HOW TO USE NEW FEATURES 20 Displaying the Fabric While Aligning the Embroidery Position 20 CHANGING THE PATTERN SIZE WHILE MAINTAINING THE DESIRED...
... Motion Sewing 12 CREATING BOBBIN WORK (EMBROIDERY 13 Selecting the Pattern...13 Start Embroidering...14 ADJUSTING THE THREAD TENSION 17 TROUBLESHOOTING...18 Chapter 2 New Features and New Patterns 19 HOW TO USE NEW FEATURES 20 Displaying the Fabric While Aligning the Embroidery Position 20 CHANGING THE PATTERN SIZE WHILE MAINTAINING THE DESIRED...

Operation Manual Kit 1 - English
Page 8
...carefully trim the thread tail as close to the bobbin thread Insert bobbin into bobbin case so the thread unwinds from the left side. For precautions on winding the bobbin for sewing in damage or injuries. 11.5 mm (approx. 7/16 inch) Actual size This model Other models Note • Slowly and... evenly wind the thread around the bobbin by hand. Using any other bobbin may be damaged. a Beginning of wound ...
...carefully trim the thread tail as close to the bobbin thread Insert bobbin into bobbin case so the thread unwinds from the left side. For precautions on winding the bobbin for sewing in damage or injuries. 11.5 mm (approx. 7/16 inch) Actual size This model Other models Note • Slowly and... evenly wind the thread around the bobbin by hand. Using any other bobbin may be damaged. a Beginning of wound ...
Operation Manual Kit 1 - English
Page 14
... the embroidery edit screen ( ). Memo • When an embroidery pattern for bobbin work is selected, the automatic thread cutting function is selected. d Turn on page 5. g Press , then advance to page 10 or 11 (page numbers are for small thumbnail size) of the pattern selection screen for each pattern, see page 26. If...
... the embroidery edit screen ( ). Memo • When an embroidery pattern for bobbin work is selected, the automatic thread cutting function is selected. d Turn on page 5. g Press , then advance to page 10 or 11 (page numbers are for small thumbnail size) of the pattern selection screen for each pattern, see page 26. If...
Operation Manual Kit 1 - English
Page 15
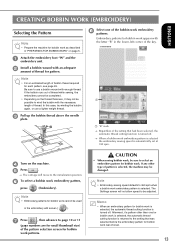
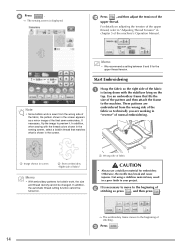
... the pattern shown in chapter 5 of the pattern and then attach the frame to the machine. Start Embroidering Note • Since bobbin work , the size and thread density cannot be turned on adjusting the tension of the upper thread, refer to "Adjusting Thread Tension" in the screen .... → The embroidery frame moves to the beginning of stitching. Otherwise, the needle may result in the sewing screen, select a bobbin thread that fits the size of the machine's Operation Manual. a Hoop the fabric so the right side of the fabric is facing down with the thread colors ...
... the pattern shown in chapter 5 of the pattern and then attach the frame to the machine. Start Embroidering Note • Since bobbin work , the size and thread density cannot be turned on adjusting the tension of the upper thread, refer to "Adjusting Thread Tension" in the screen .... → The embroidery frame moves to the beginning of stitching. Otherwise, the needle may result in the sewing screen, select a bobbin thread that fits the size of the machine's Operation Manual. a Hoop the fabric so the right side of the fabric is facing down with the thread colors ...
Operation Manual Kit 1 - English
Page 27
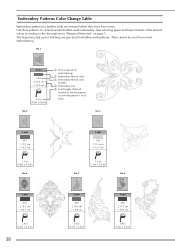
...4.5 m (3.9m + 0.6 m) No.2 a Time required for normal embroidering. They cannot be used for embroidering b Embroidery thread color c Embroidery thread color number d Embroidery size e Total length of thread needed to sew the pattern (to sew the pattern + to tie ends) No.3 1 min 030 17.5 cm 9.7 cm 1.5 m (0.9m...reversed when they have been sewn. Use these patterns to create beautiful bobbin work patterns. Embroidery Patterns Color Change Table Embroidery patterns for bobbin work are specified for bobbin work embroidery after selecting upper and lower threads of the desired colors ...
...4.5 m (3.9m + 0.6 m) No.2 a Time required for normal embroidering. They cannot be used for embroidering b Embroidery thread color c Embroidery thread color number d Embroidery size e Total length of thread needed to sew the pattern (to sew the pattern + to tie ends) No.3 1 min 030 17.5 cm 9.7 cm 1.5 m (0.9m...reversed when they have been sewn. Use these patterns to create beautiful bobbin work patterns. Embroidery Patterns Color Change Table Embroidery patterns for bobbin work are specified for bobbin work embroidery after selecting upper and lower threads of the desired colors ...

KIT 3 USER MANUAL - English
Page 23
...), and then attach the frame to display the sewing screen. d Press e Press to the embroidery machine. c Hoop fabric in the embroidery frame with a size of the two stickers are within the embroidering area. A: First pattern B: Second pattern a Press (frame patterns) in the sewing screen. → The pattern... selected pattern to the next one) appears. 22 As an example, we will use the embroidery frame with the upper thread and the bobbin thread. CHANGING THE POSITION OF A STICKER While using the camera to connect patterns as shown below , and then press . in the Embroidery...
...), and then attach the frame to display the sewing screen. d Press e Press to the embroidery machine. c Hoop fabric in the embroidery frame with a size of the two stickers are within the embroidering area. A: First pattern B: Second pattern a Press (frame patterns) in the sewing screen. → The pattern... selected pattern to the next one) appears. 22 As an example, we will use the embroidery frame with the upper thread and the bobbin thread. CHANGING THE POSITION OF A STICKER While using the camera to connect patterns as shown below , and then press . in the Embroidery...


