
Users Manual - English
Page 2
...Work Free-Motion Sewing ...11 Templates for machine embroidering. For specific details on operating the machine, refer to the Operation Manual provided with your machine. This manual describes the procedures for choosing our product. BEFORE YOU START Thank you for sewing bobbin work. The images and patterns used... in this manual are for illustration purposes and may differ from the actual items. This is a kit used for Free-Motion Sewing ...12 ADJUSTING ...
...Work Free-Motion Sewing ...11 Templates for machine embroidering. For specific details on operating the machine, refer to the Operation Manual provided with your machine. This manual describes the procedures for choosing our product. BEFORE YOU START Thank you for sewing bobbin work. The images and patterns used... in this manual are for illustration purposes and may differ from the actual items. This is a kit used for Free-Motion Sewing ...12 ADJUSTING ...

Users Manual - English
Page 3
Bobbin case (gray) (XE8298-001) Bobbin cover with tabs (*See Note.) Screwdriver (small) (X55468-051) CD-ROM (Contains the Operation Manual and the Templates for freemotion sewing.) (USA/CANADA: XE9382-001, Other areas: XE9501-001) Note • Two bobbin covers may be included, depending on the ...
Bobbin case (gray) (XE8298-001) Bobbin cover with tabs (*See Note.) Screwdriver (small) (X55468-051) CD-ROM (Contains the Operation Manual and the Templates for freemotion sewing.) (USA/CANADA: XE9382-001, Other areas: XE9501-001) Note • Two bobbin covers may be included, depending on the ...

Users Manual - English
Page 8
... tabs, otherwise the thread may become tangled or the needle may be included, depending on installing the needle plate cover, refer to the machine's Operation Manual. Use the bobbin cover with the same shape as the bobbin cover included with tabs. Note • When installing the needle plate cover, do not...
... tabs, otherwise the thread may become tangled or the needle may be included, depending on installing the needle plate cover, refer to the machine's Operation Manual. Use the bobbin cover with the same shape as the bobbin cover included with tabs. Note • When installing the needle plate cover, do not...

Users Manual - English
Page 10
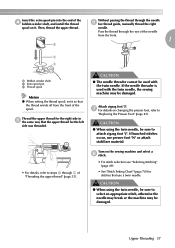
... the machine, turn the handwheel to check the sewing results. For details on adjusting the upper thread tension, refer to the machine's Operation Manual. • Depending on , the thread may become tangled or the needle may not be damaged. i j Turn on adjusting the stitch length... and stitch width, refer to the machine's Operation Manual. Memo • For best results, select a longer stitch length and a wider stitch width. For details on the machine. We recommend selecting a...
... the machine, turn the handwheel to check the sewing results. For details on adjusting the upper thread tension, refer to the machine's Operation Manual. • Depending on , the thread may become tangled or the needle may not be damaged. i j Turn on adjusting the stitch length... and stitch width, refer to the machine's Operation Manual. Memo • For best results, select a longer stitch length and a wider stitch width. For details on the machine. We recommend selecting a...

Users Manual - English
Page 12
... side of your fabric and the stabilizer will be on page 8. • Use the quilting foot provided with your nearest authorized dealer to the Operation Manual provided with your machine or with this kit contains template data for "CREATING BOBBIN WORK" beginning on the top of the wrong side of your...
... side of your fabric and the stabilizer will be on page 8. • Use the quilting foot provided with your nearest authorized dealer to the Operation Manual provided with your machine or with this kit contains template data for "CREATING BOBBIN WORK" beginning on the top of the wrong side of your...

Users Manual - English
Page 14
... top surface of the bobbin thread. To increase the tension of the bobbin thread, turn the slotted-head (-) screw 30° to the machine's Operation Manual for bobbin work. Note • Turning the screw on page 6.) To decrease the tension of the bobbin thread, turn the slotted-head (-) screw 30°...
... top surface of the bobbin thread. To increase the tension of the bobbin thread, turn the slotted-head (-) screw 30° to the machine's Operation Manual for bobbin work. Note • Turning the screw on page 6.) To decrease the tension of the bobbin thread, turn the slotted-head (-) screw 30°...
Operation Manual
Page 1
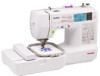
Computerized Embroidery and Sewing Machine Operation Manual Product Code 885-V31/V32/V33 GETTING READY SEWING BASICS UTILITY STITCHES EMBROIDERY APPENDIX Please visit us at http://solutions.brother.com where you can get product support and answers to frequently asked questions (FAQs).
Computerized Embroidery and Sewing Machine Operation Manual Product Code 885-V31/V32/V33 GETTING READY SEWING BASICS UTILITY STITCHES EMBROIDERY APPENDIX Please visit us at http://solutions.brother.com where you can get product support and answers to frequently asked questions (FAQs).
Operation Manual
Page 3
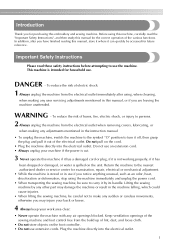
... future reference. Important Safety Instructions Please read the "Important Safety Instructions", and then study this manual, or if you are leaving the machine unattended. Do not use an extension cord. • Always unplug your work area clear: • Never ...of the various functions. Plug the machine directly into the electrical outlet. This machine is intended for purchasing this manual, store it where it by any user servicing adjustments mentioned in the instruction manual • To unplug the machine, switch the machine to the symbol "O" position to turn it off, then...
... future reference. Important Safety Instructions Please read the "Important Safety Instructions", and then study this manual, or if you are leaving the machine unattended. Do not use an extension cord. • Always unplug your work area clear: • Never ...of the various functions. Plug the machine directly into the electrical outlet. This machine is intended for purchasing this manual, store it where it by any user servicing adjustments mentioned in the instruction manual • To unplug the machine, switch the machine to the symbol "O" position to turn it off, then...
Operation Manual
Page 4
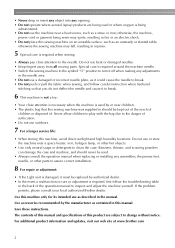
..., and follow the troubleshooting table in the back of this manual. If the problem persists, please consult your local authorized Brother dealer. The contents of this manual and specifications of the operation manual to inspect and adjust the machine yourself. For additional product ...information and updates, visit our web site at www.brother.com 2 • Never drop or...
..., and follow the troubleshooting table in the back of this manual. If the problem persists, please consult your local authorized Brother dealer. The contents of this manual and specifications of the operation manual to inspect and adjust the machine yourself. For additional product ...information and updates, visit our web site at www.brother.com 2 • Never drop or...
Operation Manual
Page 11
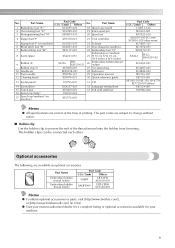
...) Part Code U.S.A. / Canada Others SAEBT EBT-CEN X81164-001 SAEBT999 EBT-CEBN XC5520-001 Memo z To obtain optional accessories or parts, visit [http://www.brother.com/], or [http://www.brothermall.com] (in USA). Part Name 1 Buttonhole foot "A" 2 Overcasting foot "G" 3 Monogramming foot "N" Part Code U.S.A. / ... H 10 cm X W 10 cm (H 4 inches X W 4 inches) 26 Embroidery bobbin thread (white) 27 Accessory bag 28 Soft cover 29 Operation manual 30 Quick reference guide 13 Eyelet punch 135793-001 31 CD 14 Screwdriver 15 Touch pen 16 Spool cap (large) 17 Spool cap (medium) (on...
...) Part Code U.S.A. / Canada Others SAEBT EBT-CEN X81164-001 SAEBT999 EBT-CEBN XC5520-001 Memo z To obtain optional accessories or parts, visit [http://www.brother.com/], or [http://www.brothermall.com] (in USA). Part Name 1 Buttonhole foot "A" 2 Overcasting foot "G" 3 Monogramming foot "N" Part Code U.S.A. / ... H 10 cm X W 10 cm (H 4 inches X W 4 inches) 26 Embroidery bobbin thread (white) 27 Accessory bag 28 Soft cover 29 Operation manual 30 Quick reference guide 13 Eyelet punch 135793-001 31 CD 14 Screwdriver 15 Touch pen 16 Spool cap (large) 17 Spool cap (medium) (on...
Operation Manual
Page 23
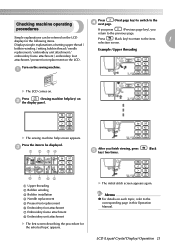
... help screen appears. X The initial stitch screen appears again. Checking machine operating Press (Next page key) to switch to the corresponding page in this Operation Manual. bobbin winding / setting bobbin thread / needle replacement / embroidery unit attachment / Example: Upper threading embroidery frame attachment / embroidery foot attachment / presser foot replacement on the sewing...
... help screen appears. X The initial stitch screen appears again. Checking machine operating Press (Next page key) to switch to the corresponding page in this Operation Manual. bobbin winding / setting bobbin thread / needle replacement / embroidery unit attachment / Example: Upper threading embroidery frame attachment / embroidery foot attachment / presser foot replacement on the sewing...
Operation Manual
Page 33
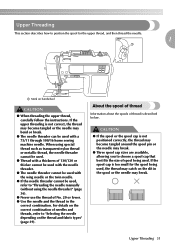
... ● When threading the upper thread, carefully follow the instructions. For details on the correct combination of needles and threads, refer to "Threading the needle manually (without using special thread such as transparent nylon thread or metallic thread, the needle threader cannot be used. ● Thread with a thickness of 130/120...
... ● When threading the upper thread, carefully follow the instructions. For details on the correct combination of needles and threads, refer to "Threading the needle manually (without using special thread such as transparent nylon thread or metallic thread, the needle threader cannot be used. ● Thread with a thickness of 130/120...
Operation Manual
Page 38
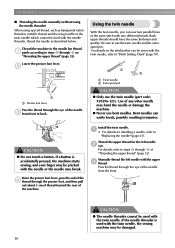
... of the machine. Raise the presser foot lever, pass the end of the d thread through the eye of "Threading the upper thread" (page 32). Manually thread the left needle b eye. CAUTION ● The needle threader cannot be used with the upper c thread. Thread the machine to the needle bar ... sewing, and your finger may be pricked with the twin needle, the sewing machine may be damaged. 36 GETTING READY ■ Threading the needle manually (without using the needle threader) When using special thread, such as described below. Using the twin needle With the twin needle, you can be...
... of the machine. Raise the presser foot lever, pass the end of the d thread through the eye of "Threading the upper thread" (page 32). Manually thread the left needle b eye. CAUTION ● The needle threader cannot be used with the upper c thread. Thread the machine to the needle bar ... sewing, and your finger may be pricked with the twin needle, the sewing machine may be damaged. 36 GETTING READY ■ Threading the needle manually (without using the needle threader) When using special thread, such as described below. Using the twin needle With the twin needle, you can be...
Operation Manual
Page 39
... to "Replacing the Presser Foot" (page 43). CAUTION ● When using the twin needle, be damaged. Pass the thread through the needle f bar thread guide, manually thread the right needle. Turn on changing the presser foot, refer to select an appropriate stitch, otherwise the needle may break or the machine may...
... to "Replacing the Presser Foot" (page 43). CAUTION ● When using the twin needle, be damaged. Pass the thread through the needle f bar thread guide, manually thread the right needle. Turn on changing the presser foot, refer to select an appropriate stitch, otherwise the needle may break or the machine may...
Operation Manual
Page 72
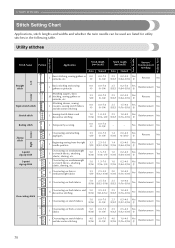
..., darning, etc. Utility stitches Twin Needle Walking Foot Presser Foot Stitch Name Pattern Application Stitch Width [mm (inch)] Auto Manual 1 J Basic stitching, sewing gathers or pintucks, etc. 0.0 (0) 0.0-7.0 (0-1/4) Stitch Length [mm (inch)] Auto Manual Reverse/ Reinforcement Stitching 2.5 0.2-5.0 Yes (3/32) (1/64-3/16) (J) Reverse No Left Straight stitch 2 J Basic stitching and sewing gathers or pintucks...
..., darning, etc. Utility stitches Twin Needle Walking Foot Presser Foot Stitch Name Pattern Application Stitch Width [mm (inch)] Auto Manual 1 J Basic stitching, sewing gathers or pintucks, etc. 0.0 (0) 0.0-7.0 (0-1/4) Stitch Length [mm (inch)] Auto Manual Reverse/ Reinforcement Stitching 2.5 0.2-5.0 Yes (3/32) (1/64-3/16) (J) Reverse No Left Straight stitch 2 J Basic stitching and sewing gathers or pintucks...
Operation Manual
Page 73
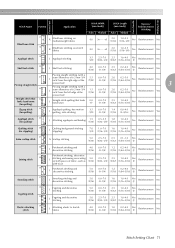
... Blind hem stitch 18 R Blind hem stitching on mediumweight fabrics R Blind hem stitching on stretch fabrics Stitch Width [mm (inch)] Stitch Length [mm (inch)] Auto Manual Auto Manual Reverse/ Reinforcement Stitching 00 3← - →3 2.0 (1/16) 1.0-3.5 (1/16-1/8) No Reinforcement No 00 3← - →3 2.0 (1/16) 1.0-3.5 (1/16-1/8) No Reinforcement No 19 Appliqué stitch J Appliqu...
... Blind hem stitch 18 R Blind hem stitching on mediumweight fabrics R Blind hem stitching on stretch fabrics Stitch Width [mm (inch)] Stitch Length [mm (inch)] Auto Manual Auto Manual Reverse/ Reinforcement Stitching 00 3← - →3 2.0 (1/16) 1.0-3.5 (1/16-1/8) No Reinforcement No 00 3← - →3 2.0 (1/16) 1.0-3.5 (1/16-1/8) No Reinforcement No 19 Appliqué stitch J Appliqu...
Operation Manual
Page 74
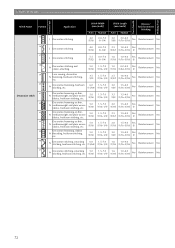
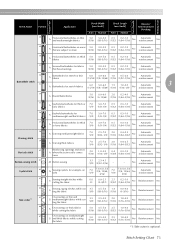
UTILITY STITCHES Presser Foot Twin Needle Walking Foot Stitch Name Pattern Application 35 J Decorative stitching Stitch Width [mm (inch)] Auto 4.0 (3/16) Manual 0.0-7.0 (0-1/4) Stitch Length [mm (inch)] Auto Manual Reverse/ Reinforcement Stitching 3.0 (1/8) 2.0-4.0 (1/16-3/16) No Reinforcement No 36 J Decorative stitching 4.0 (3/16) 0.0-7.0 (0-1/4) 2.5 1.0-4.0 Yes (3/32) (1/16-3/16) (J) Reinforcement No 37 J Decorative stitching 5.5 (7/32) 0.0-7.0 (0-1/4) 1.6 1.0-4.0 Yes (1/16) (1/16...
UTILITY STITCHES Presser Foot Twin Needle Walking Foot Stitch Name Pattern Application 35 J Decorative stitching Stitch Width [mm (inch)] Auto 4.0 (3/16) Manual 0.0-7.0 (0-1/4) Stitch Length [mm (inch)] Auto Manual Reverse/ Reinforcement Stitching 3.0 (1/8) 2.0-4.0 (1/16-3/16) No Reinforcement No 36 J Decorative stitching 4.0 (3/16) 0.0-7.0 (0-1/4) 2.5 1.0-4.0 Yes (3/32) (1/16-3/16) (J) Reinforcement No 37 J Decorative stitching 5.5 (7/32) 0.0-7.0 (0-1/4) 1.6 1.0-4.0 Yes (1/16) (1/16...
Operation Manual
Page 75
... Twin Needle Walking Foot Stitch Name Pattern Application 48 A Horizontal buttonholes on thin and mediumweight fabrics Stitch Width [mm (inch)] Stitch Length [mm (inch)] Auto Manual Auto Manual Reverse/ Reinforcement Stitching 5.0 (3/16) 3.0-5.0 (1/8-3/16) 0.5 (1/32) 0.2-1.0 (1/64-1/16) No Automatic reinforcement No 49 A Horizontal buttonholes on areas that are subject to strain 5.0 (3/16) 3.0-5.0 (1/8-3/16...
... Twin Needle Walking Foot Stitch Name Pattern Application 48 A Horizontal buttonholes on thin and mediumweight fabrics Stitch Width [mm (inch)] Stitch Length [mm (inch)] Auto Manual Auto Manual Reverse/ Reinforcement Stitching 5.0 (3/16) 3.0-5.0 (1/8-3/16) 0.5 (1/32) 0.2-1.0 (1/64-1/16) No Automatic reinforcement No 49 A Horizontal buttonholes on areas that are subject to strain 5.0 (3/16) 3.0-5.0 (1/8-3/16...
Operation Manual
Page 76
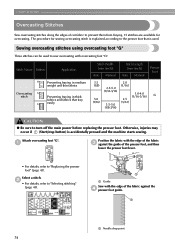
.... 15 stitches are available for sewing overcasting stitch is explained according to the presser foot that fray easily Stitch Width [mm (inch)] Auto Manual Stitch Length [mm (inch)] Auto Manual Presser Foot 3.5 2.0 (1/8) (1/16) 2.5-5.0 (3/32-3/16) 1.0-4.0 (1/16-3/16) G 5.0 2.5 (3/16) (3/32) 3.5-5.0 (1/8-3/16) CAUTION ● Be sure to "Selecting stitching" (page 49). Otherwise, injuries may...
.... 15 stitches are available for sewing overcasting stitch is explained according to the presser foot that fray easily Stitch Width [mm (inch)] Auto Manual Stitch Length [mm (inch)] Auto Manual Presser Foot 3.5 2.0 (1/8) (1/16) 2.5-5.0 (3/32-3/16) 1.0-4.0 (1/16-3/16) G 5.0 2.5 (3/16) (3/32) 3.5-5.0 (1/8-3/16) CAUTION ● Be sure to "Selecting stitching" (page 49). Otherwise, injuries may...
Operation Manual
Page 77
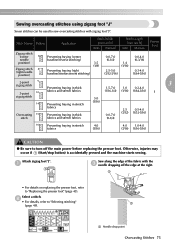
Stitch Name Pattern Application Stitch Width [mm (inch)] Auto Manual Stitch Length [mm (inch)] Auto Manual Presser Foot Zigzag stitch (center 7 needle position) Zigzag stitch 8 (right needle position) Preventing fraying (center baseline/reverse stitching) 3.5 (1/8) Preventing fraying (right baseline/reinforcement stitching) 0.0-7.0 (0-1/4) 2.5-5.0 (3/32-3/...
Stitch Name Pattern Application Stitch Width [mm (inch)] Auto Manual Stitch Length [mm (inch)] Auto Manual Presser Foot Zigzag stitch (center 7 needle position) Zigzag stitch 8 (right needle position) Preventing fraying (center baseline/reverse stitching) 3.5 (1/8) Preventing fraying (right baseline/reinforcement stitching) 0.0-7.0 (0-1/4) 2.5-5.0 (3/32-3/...


