
Users Manual - English
Page 8
... the fabric 126 Setting the fabric in the embroidery frame ...127 Attaching the Embroidery Frame 130 Attaching the embroidery frame ...130 Removing the embroidery frame ...131 Selecting Embroidery Patterns 132 Copyright information ...132 Embroidery pattern types ...132 LCD (liquid crystal display)...embroidery card ...138 Embroidering...139 Embroidering a pattern ...139 Appliquéing ...141 Editing and Saving Patterns 143 Adjusting the layout and the size...143 Adjusting the thread tension ...145 Connecting character patterns ...146 Resewing ...147 Thread runs out partway through a design...
... the fabric 126 Setting the fabric in the embroidery frame ...127 Attaching the Embroidery Frame 130 Attaching the embroidery frame ...130 Removing the embroidery frame ...131 Selecting Embroidery Patterns 132 Copyright information ...132 Embroidery pattern types ...132 LCD (liquid crystal display)...embroidery card ...138 Embroidering...139 Embroidering a pattern ...139 Appliquéing ...141 Editing and Saving Patterns 143 Adjusting the layout and the size...143 Adjusting the thread tension ...145 Connecting character patterns ...146 Resewing ...147 Thread runs out partway through a design...

Users Manual - English
Page 9
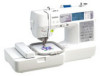
... light The convenient LED lamp makes it easy to -use needle threader You can select from optional embroidery cards (page 117). 7 e Quick-set bobbin You can embroider built-in embroidery patterns, characters, framed decorations, and designs from the built-in stitches You can thread the needle easily by one press of fabric weights... warming up the bobbin thread (page 27). d Seven-point feed dogs Ensure smooth, even feeding of multiple fabric layers and a variety of a button (page 22). i Embroidery You can start sewing without pulling up (page 12).
... light The convenient LED lamp makes it easy to -use needle threader You can select from optional embroidery cards (page 117). 7 e Quick-set bobbin You can embroider built-in embroidery patterns, characters, framed decorations, and designs from the built-in stitches You can thread the needle easily by one press of fabric weights... warming up the bobbin thread (page 27). d Seven-point feed dogs Ensure smooth, even feeding of multiple fabric layers and a variety of a button (page 22). i Embroidery You can start sewing without pulling up (page 12).

Users Manual - English
Page 45
... position button) once or a twice to "Attaching the Embroidery Foot" (page 120). c a a Needle position button Turn off the sewing machine. Replacing the Presser Foot 43 a CAUTION z Before replacing the presser foot, be sure to bend or break. ● Only use presser feet designed specifically for this sewing machine. Press the black button...
... position button) once or a twice to "Attaching the Embroidery Foot" (page 120). c a a Needle position button Turn off the sewing machine. Replacing the Presser Foot 43 a CAUTION z Before replacing the presser foot, be sure to bend or break. ● Only use presser feet designed specifically for this sewing machine. Press the black button...

Users Manual - English
Page 120
.... What to "Optional accessories" (page 9). z When embroidering on thin materials like towels. If you want to sew incorrectly. If there is necessary for embroidery. Memo z For good quality embroidery designs be embroidered. For details, refer to prepare The following is space between the presser foot and the fabric, the fabric can be sure...
.... What to "Optional accessories" (page 9). z When embroidering on thin materials like towels. If you want to sew incorrectly. If there is necessary for embroidery. Memo z For good quality embroidery designs be embroidered. For details, refer to prepare The following is space between the presser foot and the fabric, the fabric can be sure...

Users Manual - English
Page 128
...stabilizer material to prevent poor quality embroidery designs. Furthermore, the pattern may break or bend if you are using a stabilizer material for embroidery. Use a water soluble sheet on an embroidery frame. CAUTION ● Always use stabilizer material when sewing embroidery projects. Attach a stabilizer material...and stretch the fabric in USA). To obtain optional accessories or parts, visit [http://www.brother.com/], or [http:// www.brothermall.com] (in the embroidery frame without using stabilizers with adhesive, place b the adhesive surface of the stabilizer material ...
...stabilizer material to prevent poor quality embroidery designs. Furthermore, the pattern may break or bend if you are using a stabilizer material for embroidery. Use a water soluble sheet on an embroidery frame. CAUTION ● Always use stabilizer material when sewing embroidery projects. Attach a stabilizer material...and stretch the fabric in USA). To obtain optional accessories or parts, visit [http://www.brother.com/], or [http:// www.brothermall.com] (in the embroidery frame without using stabilizers with adhesive, place b the adhesive surface of the stabilizer material ...

Users Manual - English
Page 141
..., and thread the b needle. 4 a Embroidery frames that can be changed. Note z Before using the needle threader, be used for embroidering b Current color step/Number of colors in design c Current name of color d Current color part e Next color part • Refer to "Threading the upper thread" (page ...32). Give the thread a little slack. thread colors can be sure to "LCD Pass the thread through the embroidery foot c hole, and hold...
..., and thread the b needle. 4 a Embroidery frames that can be changed. Note z Before using the needle threader, be used for embroidering b Current color step/Number of colors in design c Current name of color d Current color part e Next color part • Refer to "Threading the upper thread" (page ...32). Give the thread a little slack. thread colors can be sure to "LCD Pass the thread through the embroidery foot c hole, and hold...

Users Manual - English
Page 146
...been moved will return to its original position. Layout key Press this key to move to "Saving patterns" (page 150). EMBROIDERY Size key Increases/decreases the size of the design. •Press screen. z You can save patterns you change position keys, it . to return to the previous Trial...and lower left Rotates the pattern 1degree to the right Returns the pattern to its initial position. Increases size Change position keys Moves the embroidery position up, down, left and right. Press (Back key) to return to original size. When the pattern was moved with the ...
...been moved will return to its original position. Layout key Press this key to move to "Saving patterns" (page 150). EMBROIDERY Size key Increases/decreases the size of the design. •Press screen. z You can save patterns you change position keys, it . to return to the previous Trial...and lower left Rotates the pattern 1degree to the right Returns the pattern to its initial position. Increases size Change position keys Moves the embroidery position up, down, left and right. Press (Back key) to return to original size. When the pattern was moved with the ...

Users Manual - English
Page 148
... position where you can sew "DEF". a Press to turn it to lower left of the design. a b a Embroidery start position b Embroidery end position Enter "DEF" and press . EMBROIDERY Connecting character patterns If the character pattern is finished, trim the thread h leaving the end of ...the thread longer than usual. Example: Connecting "ABC" with "DEF" Enter "ABC" and press . Then reset the fabric in the embroidery frame, in the embroidery frame, follow the steps below. d Press . X The stitching starting point is set to . Press c (Back key). i Press ....
... position where you can sew "DEF". a Press to turn it to lower left of the design. a b a Embroidery start position b Embroidery end position Enter "DEF" and press . EMBROIDERY Connecting character patterns If the character pattern is finished, trim the thread h leaving the end of ...the thread longer than usual. Example: Connecting "ABC" with "DEF" Enter "ABC" and press . Then reset the fabric in the embroidery frame, in the embroidery frame, follow the steps below. d Press . X The stitching starting point is set to . Press c (Back key). i Press ....

Users Manual - English
Page 149
...design. b Press . Press (Back one more time to go to previous color. Resewing When the wrong upper thread color has been sewn, it can be resewn with the correct color. Press one color) to return to the d beginning of "ABC". Set up the correct color for the upper thread. a a Embroidery...the presser foot, and then press m (Start/Stop button) to embroider "DEF". Use (change position keys) to move l the needle to the embroidery end position of the mistaken color. c 4 When you have finished embroidering, cut the n thread. Press . e Press (Start/stop the a ...
...design. b Press . Press (Back one more time to go to previous color. Resewing When the wrong upper thread color has been sewn, it can be resewn with the correct color. Press one color) to return to the d beginning of "ABC". Set up the correct color for the upper thread. a a Embroidery...the presser foot, and then press m (Start/Stop button) to embroider "DEF". Use (change position keys) to move l the needle to the embroidery end position of the mistaken color. c 4 When you have finished embroidering, cut the n thread. Press . e Press (Start/stop the a ...

Users Manual - English
Page 150
...one stitch) to move the d needle back about 10 stitches and resume sewing. Check the current needle count on the screen. Restart the embroidery. Memo z If the needle count is not displayed, display the needle count on the screen b and make a note of it is ...following screen. Move the needle back about 10 stitches. (Forward one stitch) increases the stitch number. e Press c (Embroidery key). EMBROIDERY Thread runs out partway through a design When the upper thread or the bobbin thread runs out while sewing, the sewing machine stops. If you have changed the...
...one stitch) to move the d needle back about 10 stitches and resume sewing. Check the current needle count on the screen. Restart the embroidery. Memo z If the needle count is not displayed, display the needle count on the screen b and make a note of it is ...following screen. Move the needle back about 10 stitches. (Forward one stitch) increases the stitch number. e Press c (Embroidery key). EMBROIDERY Thread runs out partway through a design When the upper thread or the bobbin thread runs out while sewing, the sewing machine stops. If you have changed the...

Users Manual - English
Page 164
... an unacceptable card format cannot be read by this machine. • Design data saved in embroidery mode, but the embroidery unit is not attached. 28 The embroidery key was pressed when the embroidery unit is not attached. 29 The bobbin winder is pressed in a hoop size not compatible with your machine has been selected. 27...
... an unacceptable card format cannot be read by this machine. • Design data saved in embroidery mode, but the embroidery unit is not attached. 28 The embroidery key was pressed when the embroidery unit is not attached. 29 The bobbin winder is pressed in a hoop size not compatible with your machine has been selected. 27...

Instruction Manual/USB Connection - English and Spanish
Page 4
... will have a wide range of Brother embroidery cards, as well as CDs with a USB port as desired. ■ Trademarks • IBM is a registered trademark or a trademark of International Business Machines Corporation. • Microsoft and Windows are registered trademarks or trademarks of our original data design systems to edit the embroidery data. ■ Types of themes...
... will have a wide range of Brother embroidery cards, as well as CDs with a USB port as desired. ■ Trademarks • IBM is a registered trademark or a trademark of International Business Machines Corporation. • Microsoft and Windows are registered trademarks or trademarks of our original data design systems to edit the embroidery data. ■ Types of themes...


