
Users Manual - English
Page 8
... display) operation ...133 Selecting alphabet characters ...136 Selecting an embroidery pattern ...137 Selecting a frame pattern...137 Using an embroidery card ...138 Embroidering...139 Embroidering a pattern ...139 Appliquéing ...141 Editing and Saving Patterns 143 Adjusting the layout and the size...143 Adjusting the thread tension ...145 Connecting character patterns ...146 Resewing ...147...
... display) operation ...133 Selecting alphabet characters ...136 Selecting an embroidery pattern ...137 Selecting a frame pattern...137 Using an embroidery card ...138 Embroidering...139 Embroidering a pattern ...139 Appliquéing ...141 Editing and Saving Patterns 143 Adjusting the layout and the size...143 Adjusting the thread tension ...145 Connecting character patterns ...146 Resewing ...147...

Users Manual - English
Page 9
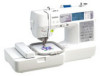
...When the green light is on dark fabrics. i Embroidery You can be cut automatically after sewing (page 55, 62). f Bright light The convenient LED lamp makes it easy to work on , the machine is warming up the bobbin thread (page 27). A red or orange light indicates ... to -use needle threader You can wind bobbins with one press of fabric weights (page 11). Machine Features 9 a Automatic thread cutting The thread can embroider built-in embroidery patterns, characters, framed decorations, and designs from the built-in utility stitches available (page 70). d Seven-point feed dogs ...
...When the green light is on dark fabrics. i Embroidery You can be cut automatically after sewing (page 55, 62). f Bright light The convenient LED lamp makes it easy to work on , the machine is warming up the bobbin thread (page 27). A red or orange light indicates ... to -use needle threader You can wind bobbins with one press of fabric weights (page 11). Machine Features 9 a Automatic thread cutting The thread can embroider built-in embroidery patterns, characters, framed decorations, and designs from the built-in utility stitches available (page 70). d Seven-point feed dogs ...

Users Manual - English
Page 11
...thread (white) Embroidery bobbin thread (black) Part Code U.S.A. / Canada Others SAEBT EBT-CEN X81164-001 SAEBT999 EBT-CEBN XC5520-001 Memo z To obtain optional accessories or parts, visit [http://www.brother.com/], or [http://www.brothermall.com] (in USA). Optional accessories The following are correct at the time of the thread... wound onto the bobbin from loosening. The bobbin clips can be connected each other areas) XC1807-121 XC1074-051 XD0474-151 SA432 EF62: XA6628-102 XC6283-001 XC4487-021 XC4842-022 XE3116-201 XE3118-001 XE3365-101(SE-350, LB-6770...
...thread (white) Embroidery bobbin thread (black) Part Code U.S.A. / Canada Others SAEBT EBT-CEN X81164-001 SAEBT999 EBT-CEBN XC5520-001 Memo z To obtain optional accessories or parts, visit [http://www.brother.com/], or [http://www.brothermall.com] (in USA). Optional accessories The following are correct at the time of the thread... wound onto the bobbin from loosening. The bobbin clips can be connected each other areas) XC1807-121 XC1074-051 XD0474-151 SA432 EF62: XA6628-102 XC6283-001 XC4487-021 XC4842-022 XE3116-201 XE3118-001 XE3365-101(SE-350, LB-6770...

Users Manual - English
Page 12
... attachment when sewing cylindrical pieces such as sleeve cuffs. k Thread cutter (page 56) Pass the threads through the thread cutter to operate the machine. Front view a Thread guide cover (page 24, 33) Pass the thread under this thread guide cover when winding the bobbin thread and threading the machine. g Embroidery unit connector slot (page 123) Plug in the connector...
... attachment when sewing cylindrical pieces such as sleeve cuffs. k Thread cutter (page 56) Pass the threads through the thread cutter to operate the machine. Front view a Thread guide cover (page 24, 33) Pass the thread under this thread guide cover when winding the bobbin thread and threading the machine. g Embroidery unit connector slot (page 123) Plug in the connector...

Users Manual - English
Page 13
...when sewing buttonholes and bar tacks. d Needle plate (page 67) The needle plate is marked with guides for the selected stitching. c Embroidery card slot (page 138) Insert the embroidery card. e Main power switch (page 17) Use the main power switch to be exchanged. d Air vent The air vent allows ... use your machine. 11 h Drop feed lever (page 88) Use the drop feed lever to sew one stitch. b Thread guide disk (page 34) Pass the thread through the needle bar thread guide. f Bobbin cover/bobbin case (page 28) Remove the bobbin cover, and then insert the bobbin into the power...
...when sewing buttonholes and bar tacks. d Needle plate (page 67) The needle plate is marked with guides for the selected stitching. c Embroidery card slot (page 138) Insert the embroidery card. e Main power switch (page 17) Use the main power switch to be exchanged. d Air vent The air vent allows ... use your machine. 11 h Drop feed lever (page 88) Use the drop feed lever to sew one stitch. b Thread guide disk (page 34) Pass the thread through the needle bar thread guide. f Bobbin cover/bobbin case (page 28) Remove the bobbin cover, and then insert the bobbin into the power...

Users Manual - English
Page 15
... key to select a utility stitch. Displays simple explanations of setting upper thread / bobbin winding / setting bobbin thread / needle replacement / embroidery unit attachment / embroidery frame attachment / embroidery foot attachment / presser foot replacement. 13 g Embroidery key Press this key to sew embroidery. d Next page key Displays the next page when there are items ... The front operation panel has an LCD (liquid crystal display) and operation keys. h Settings key Press to enter alphabet character embroidery or embroidery patterns you have edited or adjusted, etc.
... key to select a utility stitch. Displays simple explanations of setting upper thread / bobbin winding / setting bobbin thread / needle replacement / embroidery unit attachment / embroidery frame attachment / embroidery foot attachment / presser foot replacement. 13 g Embroidery key Press this key to sew embroidery. d Next page key Displays the next page when there are items ... The front operation panel has an LCD (liquid crystal display) and operation keys. h Settings key Press to enter alphabet character embroidery or embroidery patterns you have edited or adjusted, etc.

Users Manual - English
Page 20
... 159) for messages displayed on the front of stitches contained i Horizontal mirror image j Automatic thread cutting k Automatic reverse/reinforcement l Single/twin needle sewing and needle stop position Memo z A different screen is displayed when the embroidery unit is turned on, the LCD comes on the screen with your finger or a touch ...foot to "Operation panel" (page 13). GETTING READY LCD (Liquid Crystal Display) Operation Selected stitch, pattern settings and messages are explained in "Selecting an embroidery pattern" (page 137). Viewing the LCD When the power is attached.
... 159) for messages displayed on the front of stitches contained i Horizontal mirror image j Automatic thread cutting k Automatic reverse/reinforcement l Single/twin needle sewing and needle stop position Memo z A different screen is displayed when the embroidery unit is turned on, the LCD comes on the screen with your finger or a touch ...foot to "Operation panel" (page 13). GETTING READY LCD (Liquid Crystal Display) Operation Selected stitch, pattern settings and messages are explained in "Selecting an embroidery pattern" (page 137). Viewing the LCD When the power is attached.

Users Manual - English
Page 21
Down Up Allows the stitch width to embroider/Needle count/ Thread number (#123) (When "Thread No.#123" is selected) Embroidery/Country/Madeira poly/Madeira rayon/Sulky/ Robison Anton Display unit Selects the measurement units that is automatically selected when ... Allows the language used in reverse highlighting are displayed (only for the embroidery and sewing machine. - Memo z The item shown in the screens to the next page. 1 Attribute Needle position Stitch width control Thread color display Icon Details Settings Specifies where the needle is positioned when the ...
Down Up Allows the stitch width to embroider/Needle count/ Thread number (#123) (When "Thread No.#123" is selected) Embroidery/Country/Madeira poly/Madeira rayon/Sulky/ Robison Anton Display unit Selects the measurement units that is automatically selected when ... Allows the language used in reverse highlighting are displayed (only for the embroidery and sewing machine. - Memo z The item shown in the screens to the next page. 1 Attribute Needle position Stitch width control Thread color display Icon Details Settings Specifies where the needle is positioned when the ...

Users Manual - English
Page 23
..., press e key) two times. (Back h g fe a Upper threading b Bobbin winding c Bobbin installation d Needle replacement e Presser foot replacement f Embroidery foot attachment g Embroidery frame attachment h Embroidery unit attachment X The first screen describing the procedure for the following items... to the corresponding page in this Operation Manual. bobbin winding / setting bobbin thread / needle replacement / embroidery unit attachment / Example: Upper threading embroidery frame attachment / embroidery foot attachment / presser foot replacement on b the display panel. X The sewing...
..., press e key) two times. (Back h g fe a Upper threading b Bobbin winding c Bobbin installation d Needle replacement e Presser foot replacement f Embroidery foot attachment g Embroidery frame attachment h Embroidery unit attachment X The first screen describing the procedure for the following items... to the corresponding page in this Operation Manual. bobbin winding / setting bobbin thread / needle replacement / embroidery unit attachment / Example: Upper threading embroidery frame attachment / embroidery foot attachment / presser foot replacement on b the display panel. X The sewing...

Users Manual - English
Page 25
...being used . a b a Spool cap b Spool pin CAUTION ● If the spool or the spool cap is horizontal and the thread unwinds to choose a spool cap that the thread unwinds correctly, the thread may be damaged. ● Winding/Installing the Bobbin 23 Slide the spool onto the pin so that the spool is... left. Pick up in the bobbin. Slide the spool cap as far as possible to its original position. Memo z For embroidering, use the embroidery bobbin thread. Slide the spool cap onto the spool pin and f return the spool pin to the right as shown, with the rounded side on the ...
...being used . a b a Spool cap b Spool pin CAUTION ● If the spool or the spool cap is horizontal and the thread unwinds to choose a spool cap that the thread unwinds correctly, the thread may be damaged. ● Winding/Installing the Bobbin 23 Slide the spool onto the pin so that the spool is... left. Pick up in the bobbin. Slide the spool cap as far as possible to its original position. Memo z For embroidering, use the embroidery bobbin thread. Slide the spool cap onto the spool pin and f return the spool pin to the right as shown, with the rounded side on the ...

Users Manual - English
Page 42
... when sewing thick fabrics (such as denim) with thin needles (such as denim, use a bent needle. If the combination of the fabric or thread. ■ Embroidery needles Use a 75/11 home sewing machine needle. Before using the needle, place the flat side of the needle on thick fabrics such as 65.../9 to 100/16 needle, regardless of the fabric, thread and needle is even. When embroidering on a flat surface and check that the distance between ...
... when sewing thick fabrics (such as denim) with thin needles (such as denim, use a bent needle. If the combination of the fabric or thread. ■ Embroidery needles Use a 75/11 home sewing machine needle. Before using the needle, place the flat side of the needle on thick fabrics such as 65.../9 to 100/16 needle, regardless of the fabric, thread and needle is even. When embroidering on a flat surface and check that the distance between ...

Users Manual - English
Page 120
..., refer to "Optional accessories" (page 9). For the bobbin thread, use the embroidery thread or country thread. ■ Fabric Prepare the fabric for embroidery to the fabric to use embroidery thread designed for embroidery. z Before starting to sew, be sure to prevent poor quality embroidery designs. If there is enough bobbin thread. For details, refer to "Attaching a stabilizer material to sew...
..., refer to "Optional accessories" (page 9). For the bobbin thread, use the embroidery thread or country thread. ■ Fabric Prepare the fabric for embroidery to the fabric to use embroidery thread designed for embroidery. z Before starting to sew, be sure to prevent poor quality embroidery designs. If there is enough bobbin thread. For details, refer to "Attaching a stabilizer material to sew...

Users Manual - English
Page 121
... size, refer to "Adjusting the layout and the size" (page 143). ↓ 9 Embroidery thread setup Set up embroidery thread according to the embroidery unit. For details on selecting embroidery patterns, refer to "Upper Threading" (page 31). For details on setting up the thread, refer to "Selecting Embroidery Patterns" (page 132). ↓ 8 Checking the layout Check and adjust the size...
... size, refer to "Adjusting the layout and the size" (page 143). ↓ 9 Embroidery thread setup Set up embroidery thread according to the embroidery unit. For details on selecting embroidery patterns, refer to "Upper Threading" (page 31). For details on setting up the thread, refer to "Selecting Embroidery Patterns" (page 132). ↓ 8 Checking the layout Check and adjust the size...

Users Manual - English
Page 132
... until it into the bobbin case. • For details, refer to attach the embroidery frame. Attaching the embroidery frame Wind the embroidery bobbin thread onto the a bobbin and set the embroidery frame into e the embroidery carriage frame holder from the top. EMBROIDERY Attaching the Embroidery Frame This section describes how to "Winding/Installing the Bobbin" (page 22). Line...
... until it into the bobbin case. • For details, refer to attach the embroidery frame. Attaching the embroidery frame Wind the embroidery bobbin thread onto the a bobbin and set the embroidery frame into e the embroidery carriage frame holder from the top. EMBROIDERY Attaching the Embroidery Frame This section describes how to "Winding/Installing the Bobbin" (page 22). Line...

Users Manual - English
Page 134
...types of copyright law and is strictly prohibited. For details, refer to the instructions displayed on the various types of embroidery patterns available and the procedure for private use of copyrighted patterns is an infringement of characters: upper case/lower case/...numbers/symbols/European characters. The patterns are intended for selecting a pattern. e Patterns saved in the sewing machine and embroidery cards are completed by changing the upper thread according to "Selecting a frame pattern" (page 137). Copyright information The patterns saved in the machine's memory Press ...
...types of copyright law and is strictly prohibited. For details, refer to the instructions displayed on the various types of embroidery patterns available and the procedure for private use of copyrighted patterns is an infringement of characters: upper case/lower case/...numbers/symbols/European characters. The patterns are intended for selecting a pattern. e Patterns saved in the sewing machine and embroidery cards are completed by changing the upper thread according to "Selecting a frame pattern" (page 137). Copyright information The patterns saved in the machine's memory Press ...

Users Manual - English
Page 135
...machine's memory. f Press this key to the previous screen. d Press this key to the type selection screen. TIME: Time required for embroidery will be explained below. ■ Operation keys † Setting the display while embroidering Press (Settings key) and then (Next page key... the item by pressing . The use of the keys for embroidering b Returns to adjust language or change the thread color display or other settings. Selecting Embroidery Patterns 133 LCD (liquid crystal display) operation The LCD (liquid crystal display) is operated using the operation keys ...
...machine's memory. f Press this key to the previous screen. d Press this key to the type selection screen. TIME: Time required for embroidery will be explained below. ■ Operation keys † Setting the display while embroidering Press (Settings key) and then (Next page key... the item by pressing . The use of the keys for embroidering b Returns to adjust language or change the thread color display or other settings. Selecting Embroidery Patterns 133 LCD (liquid crystal display) operation The LCD (liquid crystal display) is operated using the operation keys ...

Users Manual - English
Page 141
... number set displayed for embroidering and appliquéing. c a b d e Set the embroidery thread, and thread the b needle. 4 a Embroidery frames that can be sure to "Threading the upper thread" (page 32). Embroidering 139 For details, refer to "LCD Pass the thread through the embroidery foot c hole, and hold it lightly in design c Current name of the color shown a on...
... number set displayed for embroidering and appliquéing. c a b d e Set the embroidery thread, and thread the b needle. 4 a Embroidery frames that can be sure to "Threading the upper thread" (page 32). Embroidering 139 For details, refer to "LCD Pass the thread through the embroidery foot c hole, and hold it lightly in design c Current name of the color shown a on...

Users Manual - English
Page 142
... presser foot lever. h X The embroidery begins again. Set up embroidery thread for the next color, i and repeat steps b through h. Press , and the display will appear on the display. j a a Start/stop button CAUTION ● Use the embroidery frame that matches the size of the stitching. Press (Start.../stop button). d a a Presser foot lever Press e (Start/stop button) again. Cut the excess thread. Otherwise, the embroidery frame may be hit by the presser foot and cause injury or needle breakage. Memo z For the automatic cutting setting, ...
... presser foot lever. h X The embroidery begins again. Set up embroidery thread for the next color, i and repeat steps b through h. Press , and the display will appear on the display. j a a Start/stop button CAUTION ● Use the embroidery frame that matches the size of the stitching. Press (Start.../stop button). d a a Presser foot lever Press e (Start/stop button) again. Cut the excess thread. Otherwise, the embroidery frame may be hit by the presser foot and cause injury or needle breakage. Memo z For the automatic cutting setting, ...

Users Manual - English
Page 150
...e Press c (Embroidery key). Press (Start/stop button) to move the d needle back about 10 stitches and resume sewing. Press (Back one stitch) to stop the a sewing machine. EMBROIDERY Thread runs out partway through a design When the upper thread or the bobbin thread runs out while ...sewing, the sewing machine stops. Memo z When the bobbin thread runs out, cut the threads and remove the embroidery frame before it .
...e Press c (Embroidery key). Press (Start/stop button) to move the d needle back about 10 stitches and resume sewing. Press (Back one stitch) to stop the a sewing machine. EMBROIDERY Thread runs out partway through a design When the upper thread or the bobbin thread runs out while ...sewing, the sewing machine stops. Memo z When the bobbin thread runs out, cut the threads and remove the embroidery frame before it .

Users Manual - English
Page 167
... embroidery foot installation 120 B embroidery foot removal 122 embroidery frame 127 back key 13 embroidery frame installation 130 bar tack stitch 103 embroidery frame removal 131 basic sewing 48 embroidery key 13 basting stitch 78 embroidery pattern selection 132 beep 163 embroidery pattern types 132 blind hem stitch 80 embroidery sets 9 bobbin 22 embroidery sheet 128 bobbin case removal 152 embroidery threads...
... embroidery foot installation 120 B embroidery foot removal 122 embroidery frame 127 back key 13 embroidery frame installation 130 bar tack stitch 103 embroidery frame removal 131 basic sewing 48 embroidery key 13 basting stitch 78 embroidery pattern selection 132 beep 163 embroidery pattern types 132 blind hem stitch 80 embroidery sets 9 bobbin 22 embroidery sheet 128 bobbin case removal 152 embroidery threads...


