
Users Manual - English
Page 1
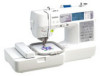
Computerized Embroidery and Sewing Machine Operation Manual Product Code 885-V31/V32/V33 GETTING READY SEWING BASICS UTILITY STITCHES EMBROIDERY APPENDIX Please visit us at http://solutions.brother.com where you can get product support and answers to frequently asked questions (FAQs).
Computerized Embroidery and Sewing Machine Operation Manual Product Code 885-V31/V32/V33 GETTING READY SEWING BASICS UTILITY STITCHES EMBROIDERY APPENDIX Please visit us at http://solutions.brother.com where you can get product support and answers to frequently asked questions (FAQs).

Users Manual - English
Page 3
... read the "Important Safety Instructions", and then study this manual for purchasing this embroidery and sewing machine. This machine is stored or in the machine falling, which could cause injuries. • When lifting the sewing machine, be accessed for household use an extension cord. • Always unplug your work... you notice anything unusual, such as an odor, heat, discoloration or deformation, stop using the machine immediately and unplug the power cord. • When transporting the sewing machine, be sure to carry it by any other part may injure your back or knees. 4 Always...
... read the "Important Safety Instructions", and then study this manual for purchasing this embroidery and sewing machine. This machine is stored or in the machine falling, which could cause injuries. • When lifting the sewing machine, be accessed for household use an extension cord. • Always unplug your work... you notice anything unusual, such as an odor, heat, discoloration or deformation, stop using the machine immediately and unplug the power cord. • When transporting the sewing machine, be sure to carry it by any other part may injure your back or knees. 4 Always...

Users Manual - English
Page 9
... can embroider built-in embroidery patterns, characters, framed decorations, and designs from the built-in stitches You can start sewing without pulling up (page 12). A red or orange light indicates an error or that the machine is ready to work on , the machine is warming up the bobbin...fabrics. d Seven-point feed dogs Ensure smooth, even feeding of multiple fabric layers and a variety of a button (page 22). i Embroidery You can be cut automatically after sewing (page 55, 62). c Built-in utility stitches available (page 70). e Quick-set bobbin You can select from optional...
... can embroider built-in embroidery patterns, characters, framed decorations, and designs from the built-in stitches You can start sewing without pulling up (page 12). A red or orange light indicates an error or that the machine is ready to work on , the machine is warming up the bobbin...fabrics. d Seven-point feed dogs Ensure smooth, even feeding of multiple fabric layers and a variety of a button (page 22). i Embroidery You can be cut automatically after sewing (page 55, 62). c Built-in utility stitches available (page 70). e Quick-set bobbin You can select from optional...

Users Manual - English
Page 12
...or check how to raise and lower the presser foot . g Embroidery unit connector slot (page 123) Plug in the LCD. l Needle threader lever (page 35) Use the needle threader lever to learn the names of the sewing machine and their functions are described below. d Bobbin winder (page 22... when winding the bobbin. Before using the sewing machine, carefully read these buttons to cut them. e LCD (liquid crystal display) (touch panel) (page 18) Setting for the selected stitch or pattern and error messages appear in the connector for the embroidery unit. m Thread tension dial (page 59...
...or check how to raise and lower the presser foot . g Embroidery unit connector slot (page 123) Plug in the LCD. l Needle threader lever (page 35) Use the needle threader lever to learn the names of the sewing machine and their functions are described below. d Bobbin winder (page 22... when winding the bobbin. Before using the sewing machine, carefully read these buttons to cut them. e LCD (liquid crystal display) (touch panel) (page 18) Setting for the selected stitch or pattern and error messages appear in the connector for the embroidery unit. m Thread tension dial (page 59...

Users Manual - English
Page 13
...bobbin case and race. c Embroidery card slot (page 138) Insert the embroidery card. Memo z Refer to sew one stitch. g Feed dogs (page 88) The feed dogs feed the fabric in the sewing direction. a Handle Carry the sewing machine by its handle when transporting the machine. Do not cover the air... vent while the sewing machine is installed onto the ...
...bobbin case and race. c Embroidery card slot (page 138) Insert the embroidery card. Memo z Refer to sew one stitch. g Feed dogs (page 88) The feed dogs feed the fabric in the sewing direction. a Handle Carry the sewing machine by its handle when transporting the machine. Do not cover the air... vent while the sewing machine is installed onto the ...

Users Manual - English
Page 15
... panel The front operation panel has an LCD (liquid crystal display) and operation keys. i Sewing machine help on the LCD. Displays simple explanations of setting upper thread / bobbin winding / setting bobbin thread / needle replacement / embroidery unit attachment / embroidery frame attachment / embroidery foot attachment / presser foot replacement. 13 d Next page key Displays the next page when...
... panel The front operation panel has an LCD (liquid crystal display) and operation keys. i Sewing machine help on the LCD. Displays simple explanations of setting upper thread / bobbin winding / setting bobbin thread / needle replacement / embroidery unit attachment / embroidery frame attachment / embroidery foot attachment / presser foot replacement. 13 d Next page key Displays the next page when...

Users Manual - English
Page 20
... contained i Horizontal mirror image j Automatic thread cutting k Automatic reverse/reinforcement l Single/twin needle sewing and needle stop position Memo z A different screen is displayed when the embroidery unit is turned on, the LCD comes on the right side of the sewing machine. Viewing the LCD When the power is attached. Change the screen on the... icons with your finger or a touch pen. GETTING READY LCD (Liquid Crystal Display) Operation Selected stitch, pattern settings and messages are explained in "Selecting an embroidery pattern" (page 137).
... contained i Horizontal mirror image j Automatic thread cutting k Automatic reverse/reinforcement l Single/twin needle sewing and needle stop position Memo z A different screen is displayed when the embroidery unit is turned on, the LCD comes on the right side of the sewing machine. Viewing the LCD When the power is attached. Change the screen on the... icons with your finger or a touch pen. GETTING READY LCD (Liquid Crystal Display) Operation Selected stitch, pattern settings and messages are explained in "Selecting an embroidery pattern" (page 137).

Users Manual - English
Page 21
... Initial needle position Language Selects whether "1 Straight stitch (left)" or "3 Straight stitch (middle)" that are displayed (only for the embroidery and sewing machine. - Memo z The item shown in the screens to the next page. 1 Attribute Needle position Stitch width control Thread color display ...Details Settings Specifies where the needle is positioned when the sewing machine is the number for embroidering) (page 134). Allows the language used in reverse highlighting are listed below. For details on the embroidery screen (page 133). English/German/French/ Italian/Dutch/...
... Initial needle position Language Selects whether "1 Straight stitch (left)" or "3 Straight stitch (middle)" that are displayed (only for the embroidery and sewing machine. - Memo z The item shown in the screens to the next page. 1 Attribute Needle position Stitch width control Thread color display ...Details Settings Specifies where the needle is positioned when the sewing machine is the number for embroidering) (page 134). Allows the language used in reverse highlighting are listed below. For details on the embroidery screen (page 133). English/German/French/ Italian/Dutch/...

Users Manual - English
Page 23
... LCD comes on b the display panel. LCD (Liquid Crystal Display) Operation 21 Press (Sewing machine help screen appears. bobbin winding / setting bobbin thread / needle replacement / embroidery unit attachment / Example: Upper threading embroidery frame attachment / embroidery foot attachment / presser foot replacement on the sewing machine. c a b cd After you return to the previous page. X The initial stitch screen appears...
... LCD comes on b the display panel. LCD (Liquid Crystal Display) Operation 21 Press (Sewing machine help screen appears. bobbin winding / setting bobbin thread / needle replacement / embroidery unit attachment / Example: Upper threading embroidery frame attachment / embroidery foot attachment / presser foot replacement on the sewing machine. c a b cd After you return to the previous page. X The initial stitch screen appears...

Users Manual - English
Page 25
...spool pin and remove the spool d cap that is horizontal and the thread unwinds to the right as shown, with the rounded side on the sewing machine. Slide the spool cap as far as possible to the front at the bottom. 1 Place the bobbin on the bobbin until it snaps into ... of spool being used . Turn on the left. Memo z For embroidering, use the embroidery bobbin thread. a b a Notch b Bobbin winder shaft spring Slide the bobbin winder in the bobbin. Pick up in the spool or the machine may become tangled around the spool pin. Press down on the bobbin winder shaft so...
...spool pin and remove the spool d cap that is horizontal and the thread unwinds to the right as shown, with the rounded side on the sewing machine. Slide the spool cap as far as possible to the front at the bottom. 1 Place the bobbin on the bobbin until it snaps into ... of spool being used . Turn on the left. Memo z For embroidering, use the embroidery bobbin thread. a b a Notch b Bobbin winder shaft spring Slide the bobbin winder in the bobbin. Pick up in the spool or the machine may become tangled around the spool pin. Press down on the bobbin winder shaft so...

Users Manual - English
Page 42
... needle combinations are shown in the table (page 39). Checking the needle Sewing with thin needles (such as 65/9 to 100/16 needle, regardless of the fabric or thread. ■ Embroidery needles Use a 75/11 home sewing machine needle. a b a Flat side b Needle type marking CAUTION z If... The lower the thread number is bent. a a a Flat surface 40 z A 75/11 needle is already installed when the sewing machine is not correct, particularly when sewing thick fabrics (such as denim, use a bent needle. In addition, the stitching may be skipped stitches. When embroidering on a ...
... needle combinations are shown in the table (page 39). Checking the needle Sewing with thin needles (such as 65/9 to 100/16 needle, regardless of the fabric or thread. ■ Embroidery needles Use a 75/11 home sewing machine needle. a b a Flat side b Needle type marking CAUTION z If... The lower the thread number is bent. a a a Flat surface 40 z A 75/11 needle is already installed when the sewing machine is not correct, particularly when sewing thick fabrics (such as denim, use a bent needle. In addition, the stitching may be skipped stitches. When embroidering on a ...

Users Manual - English
Page 45
... Foot This section describes how to "Attaching the Embroidery Foot" (page 120). Use of the d presser foot holder. z Zigzag foot "J" is already installed when the sewing machine is accidentally pressed and the machine starts sewing. a CAUTION z Before replacing the presser foot, be sure to turn off the sewing machine. Otherwise, injuries may occur if a button is purchased...
... Foot This section describes how to "Attaching the Embroidery Foot" (page 120). Use of the d presser foot holder. z Zigzag foot "J" is already installed when the sewing machine is accidentally pressed and the machine starts sewing. a CAUTION z Before replacing the presser foot, be sure to turn off the sewing machine. Otherwise, injuries may occur if a button is purchased...

Users Manual - English
Page 47
...presser foot holder Raise the presser foot lever. Replacing the Presser Foot 45 Remove the presser foot holder when cleaning the sewing machine or when installing a presser foot that Align the presser foot holder with the included screwdriver. Otherwise, injuries may occur... the screwdriver in your finger or the presser foot when attaching/removing it. embroidery foot, optional free-motion open toe quilting foot "O" and optional walking foot. If the screw is accidentally pressed and the machine starts sewing. c a d b a Screwdriver b Presser foot holder c Presser foot...
...presser foot holder Raise the presser foot lever. Replacing the Presser Foot 45 Remove the presser foot holder when cleaning the sewing machine or when installing a presser foot that Align the presser foot holder with the included screwdriver. Otherwise, injuries may occur... the screwdriver in your finger or the presser foot when attaching/removing it. embroidery foot, optional free-motion open toe quilting foot "O" and optional walking foot. If the screw is accidentally pressed and the machine starts sewing. c a d b a Screwdriver b Presser foot holder c Presser foot...

Users Manual - English
Page 120
... (page 126). ■ Needle Use a 75/11 home sewing machine needle. Prepare a piece of the pattern you continue embroidering when the bobbin thread is placed. Note z Always use stabilizer when sewing embroidery projects, especially when embroidering on thick fabrics such as pattern stitching...and stretch fabrics, be embroidered. For details, refer to use a 90/14 home sewing machine needle. EMBROIDERY Embroidering Neatly This section describes the preparations and basic procedures for embroidery machines. Use a water soluble sheet on large pieces of fabric, arrange the fabric so ...
... (page 126). ■ Needle Use a 75/11 home sewing machine needle. Prepare a piece of the pattern you continue embroidering when the bobbin thread is placed. Note z Always use stabilizer when sewing embroidery projects, especially when embroidering on thick fabrics such as pattern stitching...and stretch fabrics, be embroidered. For details, refer to use a 90/14 home sewing machine needle. EMBROIDERY Embroidering Neatly This section describes the preparations and basic procedures for embroidery machines. Use a water soluble sheet on large pieces of fabric, arrange the fabric so ...

Users Manual - English
Page 122
... lever X The presser foot is accidentally pressed and the machine starts sewing. a a Needle position button Note z The needle is correctly raised when the mark on the back of d the presser foot holder to attach the embroidery foot "Q". Check the handwheel mark is at the top ...holder releases the presser foot. 120 Turn off the sewing machine. a CAUTION z Before attaching the embroidery foot, be sure to raise the needle. Have the included embroidery foot "Q" and a screwdriver ready. EMBROIDERY Attaching the Embroidery Foot This section describes how to detach the presser ...
... lever X The presser foot is accidentally pressed and the machine starts sewing. a a Needle position button Note z The needle is correctly raised when the mark on the back of d the presser foot holder to attach the embroidery foot "Q". Check the handwheel mark is at the top ...holder releases the presser foot. 120 Turn off the sewing machine. a CAUTION z Before attaching the embroidery foot, be sure to raise the needle. Have the included embroidery foot "Q" and a screwdriver ready. EMBROIDERY Attaching the Embroidery Foot This section describes how to detach the presser ...

Users Manual - English
Page 124
... the presser foot holder. Raise the presser foot lever. Turn the screwdriver toward the back. CAUTION z Before removing the embroidery foot, be sure to turn off the sewing machine. e • For details, refer to raise the needle. Otherwise, injuries may occur if a button is raised. 122... a a Needle position button Turn off the sewing machine. a While pressing in the lever at the back of the d embroidery foot with your finger, loosen the presser foot holder screw, and then remove embroidery foot "Q". c a a Presser foot lever X The presser foot ...
... the presser foot holder. Raise the presser foot lever. Turn the screwdriver toward the back. CAUTION z Before removing the embroidery foot, be sure to turn off the sewing machine. e • For details, refer to raise the needle. Otherwise, injuries may occur if a button is raised. 122... a a Needle position button Turn off the sewing machine. a While pressing in the lever at the back of the d embroidery foot with your finger, loosen the presser foot holder screw, and then remove embroidery foot "Q". c a a Presser foot lever X The presser foot ...

Users Manual - English
Page 125
... . Note z Do not touch the connector in place. Note z Always turn off to attach the embroidery unit. a Pull the flat bed attachment off the sewing machine before attaching the embroidery unit. It may result. Embroidery unit precautions Attaching the embroidery unit CAUTION ● Do not move it may cause malfunctions. It may cause malfunctions. z Do not...
... . Note z Do not touch the connector in place. Note z Always turn off to attach the embroidery unit. a Pull the flat bed attachment off the sewing machine before attaching the embroidery unit. It may result. Embroidery unit precautions Attaching the embroidery unit CAUTION ● Do not move it may cause malfunctions. It may cause malfunctions. z Do not...

Users Manual - English
Page 126
...near the carriage, turn the power on the sewing machine. Push it in until it clicks and stops. Note z Make sure that no gap between the embroidery unit and the sewing machine, otherwise the embroidery pattern may result. a X The embroidery unit is displayed. Turn on again. X The... screen for selecting the embroidery pattern type is attached. It may return to the initial display....
...near the carriage, turn the power on the sewing machine. Push it in until it clicks and stops. Note z Make sure that no gap between the embroidery unit and the sewing machine, otherwise the embroidery pattern may result. a X The embroidery unit is displayed. Turn on again. X The... screen for selecting the embroidery pattern type is attached. It may return to the initial display....

Users Manual - English
Page 127
... saved. b Hold the release button on removing the embroidery frame, refer to the left. Turn off the sewing machine before removing the embroidery unit. c a Release button X The embroidery unit separates from the sewing machine. 4 CAUTION CAUTION ● Do not carry the embroidery unit by holding the carriage. Attaching the Embroidery Unit 125 It may cause malfunctions if removed when...
... saved. b Hold the release button on removing the embroidery frame, refer to the left. Turn off the sewing machine before removing the embroidery unit. c a Release button X The embroidery unit separates from the sewing machine. 4 CAUTION CAUTION ● Do not carry the embroidery unit by holding the carriage. Attaching the Embroidery Unit 125 It may cause malfunctions if removed when...

Instruction Manual/USB Connection - English and Spanish
Page 4
... Me/2000/XP/Vista (Windows 98SE requires a driver. The local authorized Brother dealer will manage embroidery data. ■ Tajima (.dst) Embroidery Data • .dst data is a registered trademark or a trademark of International Business Machines Corporation. • Microsoft and Windows are many venues available for purchasing additional... specific to its proprietary programs. All other than that saved using our data design systems or sewing machines may break when sewing with a variety of Brother embroidery cards, as well as CDs with a stitch density that is too fine or when...
... Me/2000/XP/Vista (Windows 98SE requires a driver. The local authorized Brother dealer will manage embroidery data. ■ Tajima (.dst) Embroidery Data • .dst data is a registered trademark or a trademark of International Business Machines Corporation. • Microsoft and Windows are many venues available for purchasing additional... specific to its proprietary programs. All other than that saved using our data design systems or sewing machines may break when sewing with a variety of Brother embroidery cards, as well as CDs with a stitch density that is too fine or when...


