Operation Manual
Page 1
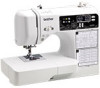
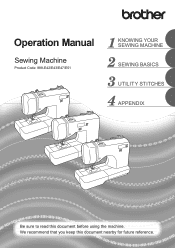
We recommend that you keep this document before using the machine. Operation Manual Sewing Machine Product Code: 888-E42/E43/E47/E51 KNOWING YOUR SEWING MACHINE SEWING BASICS UTILITY STITCHES APPENDIX Be sure to read this document nearby for future reference.
We recommend that you keep this document before using the machine. Operation Manual Sewing Machine Product Code: 888-E42/E43/E47/E51 KNOWING YOUR SEWING MACHINE SEWING BASICS UTILITY STITCHES APPENDIX Be sure to read this document nearby for future reference.
Operation Manual
Page 3
...not use an extension cord. • Always unplug your back or knees. 1 To reduce the risk of electric shock: 1 Always unplug the machine from the electrical outlet when making any user servicing adjustments mentioned in this manual, or if you notice anything unusual, such as an odor, heat... the electrical outlet immediately after using, when cleaning, when making any adjustments mentioned in the instruction manual: • To unplug the machine, switch the machine to the symbol "O" position to turn it off, then grasp the plug and pull it by any sudden or careless movements, otherwise ...
...not use an extension cord. • Always unplug your back or knees. 1 To reduce the risk of electric shock: 1 Always unplug the machine from the electrical outlet when making any user servicing adjustments mentioned in this manual, or if you notice anything unusual, such as an odor, heat... the electrical outlet immediately after using, when cleaning, when making any adjustments mentioned in the instruction manual: • To unplug the machine, switch the machine to the symbol "O" position to turn it off, then grasp the plug and pull it by any sudden or careless movements, otherwise ...
Operation Manual
Page 4
...machine... disposed of the machine and foot control ...machine is being sewn may fall, resulting in fire...machine, avoid direct sunlight and high humidity locations. otherwise, the machine, power cord or garment being administered. • Do not use or store the machine...machine is used by or near children. • The plastic bag that this machine... adjust the machine yourself. Do not use the machine near a ...life: • When storing this machine on the foot controller. •... the machine needle. • Switch the machine to ...or iron; Plug the machine directly into the electrical outlet...
...machine... disposed of the machine and foot control ...machine is being sewn may fall, resulting in fire...machine, avoid direct sunlight and high humidity locations. otherwise, the machine, power cord or garment being administered. • Do not use or store the machine...machine is used by or near children. • The plastic bag that this machine... adjust the machine yourself. Do not use the machine near a ...life: • When storing this machine on the foot controller. •... the machine needle. • Switch the machine to ...or iron; Plug the machine directly into the electrical outlet...

Operation Manual
Page 5
... or instruction concerning use as described in this manual. For additional product information, visit our web site at www.brother.com SAVE THESE INSTRUCTIONS This machine is intended for household use plugs with the fuse cover omitted. • If the available electrical outlet is not... manual. Use accessories recommended by the manufacturer as marked on plug. • Always replace the fuse cover. Children should contact your authorized Brother dealer to BS 1362, i.e. carrying the mark, rating as contained in a safe way and understand the hazards involved. FOR USERS IN...
... or instruction concerning use as described in this manual. For additional product information, visit our web site at www.brother.com SAVE THESE INSTRUCTIONS This machine is intended for household use plugs with the fuse cover omitted. • If the available electrical outlet is not... manual. Use accessories recommended by the manufacturer as marked on plug. • Always replace the fuse cover. Children should contact your authorized Brother dealer to BS 1362, i.e. carrying the mark, rating as contained in a safe way and understand the hazards involved. FOR USERS IN...
Operation Manual
Page 6
...main parts ...8 Needle and presser foot section ...9 Operation buttons ...9 Operation panel ...10 Spool pin ...11 Flip chart ...12 USING YOUR SEWING MACHINE 13 Power supply precautions ...13 Power supply ...14 Foot controller ...14 Sewing speed controller (for models equipped with the start/stop button 15 ...Changing the needle stop position ...15 Changing the initial needle position ...15 Cancelling the operation beep ...16 THREADING THE MACHINE 17 Winding the bobbin ...17 Lower threading ...22 Upper threading ...25 Drawing up the lower thread ...30 REPLACING THE NEEDLE 31 ...
...main parts ...8 Needle and presser foot section ...9 Operation buttons ...9 Operation panel ...10 Spool pin ...11 Flip chart ...12 USING YOUR SEWING MACHINE 13 Power supply precautions ...13 Power supply ...14 Foot controller ...14 Sewing speed controller (for models equipped with the start/stop button 15 ...Changing the needle stop position ...15 Changing the initial needle position ...15 Cancelling the operation beep ...16 THREADING THE MACHINE 17 Winding the bobbin ...17 Lower threading ...22 Upper threading ...25 Drawing up the lower thread ...30 REPLACING THE NEEDLE 31 ...
Operation Manual
Page 7
...Satin stitches ...89 Mirror image stitches ...90 Character stitches ...93 MAINTENANCE ...95 Restrictions on oiling ...95 Precautions on storing the machine ...95 Cleaning the machine surface ...95 Cleaning the race ...95 TROUBLESHOOTING ...98 Frequent troubleshooting topics ...98 Upper thread tightened up ...98 Tangled thread on... wrong side of fabric ...99 Incorrect thread tension ...102 Fabric is caught in the machine and cannot be removed 103 Error message "E6" appears in the LCD ...107 List of symptoms ...109 ERROR MESSAGES ...114 Operation ...
...Satin stitches ...89 Mirror image stitches ...90 Character stitches ...93 MAINTENANCE ...95 Restrictions on oiling ...95 Precautions on storing the machine ...95 Cleaning the machine surface ...95 Cleaning the race ...95 TROUBLESHOOTING ...98 Frequent troubleshooting topics ...98 Upper thread tightened up ...98 Tangled thread on... wrong side of fabric ...99 Incorrect thread tension ...102 Fabric is caught in the machine and cannot be removed 103 Error message "E6" appears in the LCD ...107 List of symptoms ...109 ERROR MESSAGES ...114 Operation ...

Operation Manual
Page 8
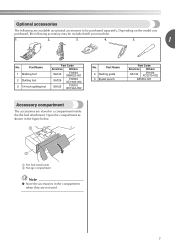
... Twin needle 12 Ball point needle (gold colored) 13 Cleaning brush 14 Disc-shaped screwdriver 15 Spool cap (large) 16 Spool cap (medium) (on the machine model. 1. 2. 3. 4. 5. 6. 7. 8. 9. 10. 11. 12. 13. 75/11 1 needle 90/14 1 needle 100/16 1 needle 16. 17. 18. 19. 90/14 ... Bobbin (4) (One is missing or damaged, contact your authorized dealer. (Part code: 132730-122) ● The included accessories vary depending on machine) 17 Spool cap (small) 18 Extra spool pin 19 Foot controller Part Code Americas Others 131096-121 XD0360-021 X59476-051 XC1074-051 130012-024...
... Twin needle 12 Ball point needle (gold colored) 13 Cleaning brush 14 Disc-shaped screwdriver 15 Spool cap (large) 16 Spool cap (medium) (on the machine model. 1. 2. 3. 4. 5. 6. 7. 8. 9. 10. 11. 12. 13. 75/11 1 needle 90/14 1 needle 100/16 1 needle 16. 17. 18. 19. 90/14 ... Bobbin (4) (One is missing or damaged, contact your authorized dealer. (Part code: 132730-122) ● The included accessories vary depending on machine) 17 Spool cap (small) 18 Extra spool pin 19 Foot controller Part Code Americas Others 131096-121 XD0360-021 X59476-051 XC1074-051 130012-024...
Operation Manual
Page 9
... Others SA132 F016N: XC2215-052 XZ5051-001 Accessory compartment The accessories are not used. 7 Open the compartment as optional accessories to be included with your machine. 1. 2. 3. 4. 5. 1 No. a Flat bed attachment b Storage compartment Note ● Store the accessories in the compartment when they are stored in the figure below. Depending on the...
... Others SA132 F016N: XC2215-052 XZ5051-001 Accessory compartment The accessories are not used. 7 Open the compartment as optional accessories to be included with your machine. 1. 2. 3. 4. 5. 1 No. a Flat bed attachment b Storage compartment Note ● Store the accessories in the compartment when they are stored in the figure below. Depending on the...

Operation Manual
Page 10
... thread. The main parts a Bobbin winder (page 17) This winds the thread onto the bobbin for use this operation manual may differ from the actual machine. i Spool pin (page 11, 17 and 25) This holds the spool of the upper thread. l Main power and sewing light switch (page 14)... panel differs depending on and off. q Presser foot lever (page 25) This is used to start and stop sewing. KNOWING YOUR SEWING MACHINE NAMES OF MACHINE PARTS AND THEIR FUNCTIONS The illustrations in the foot controller plug. k Air vent This vent allows the air surrounding the motor to raise and...
... thread. The main parts a Bobbin winder (page 17) This winds the thread onto the bobbin for use this operation manual may differ from the actual machine. i Spool pin (page 11, 17 and 25) This holds the spool of the upper thread. l Main power and sewing light switch (page 14)... panel differs depending on and off. q Presser foot lever (page 25) This is used to start and stop sewing. KNOWING YOUR SEWING MACHINE NAMES OF MACHINE PARTS AND THEIR FUNCTIONS The illustrations in the foot controller plug. k Air vent This vent allows the air surrounding the motor to raise and...

Operation Manual
Page 11
... without pulling up the bobbin thread. m Presser foot lever Raise and lower the presser foot lever to easily perform various basic sewing machine operations. i Quick-set the bobbin. Operation buttons The operation buttons help you to raise and lower the presser foot. b Start/...Pressing the button twice sews one stitch. Needle and presser foot section e Presser foot The presser foot applies pressure consistently on the sewing machine model. Attach the appropriate presser foot for models equipped with the needle threader) (page 28) b Buttonhole lever Lower the buttonhole lever...
... without pulling up the bobbin thread. m Presser foot lever Raise and lower the presser foot lever to easily perform various basic sewing machine operations. i Quick-set the bobbin. Operation buttons The operation buttons help you to raise and lower the presser foot. b Start/...Pressing the button twice sews one stitch. Needle and presser foot section e Presser foot The presser foot applies pressure consistently on the sewing machine model. Attach the appropriate presser foot for models equipped with the needle threader) (page 28) b Buttonhole lever Lower the buttonhole lever...
Operation Manual
Page 12
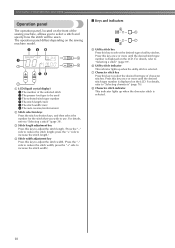
The operation panel differs depending on the sewing machine model. press the "+" side to increase the stitch length.) d Stitch width adjustment key Press this key once or more until the desired stitch type number ... (liquid crystal display) 1 The number of the selected stitch 2 The presser foot type to be sewn. KNOWING YOUR SEWING MACHINE Operation panel The operation panel, located on the front of the sewing machine, allows you to select a stitch and specify how the stitch will be used 3 The selected stitch type number 4 The...
The operation panel differs depending on the sewing machine model. press the "+" side to increase the stitch length.) d Stitch width adjustment key Press this key once or more until the desired stitch type number ... (liquid crystal display) 1 The number of the selected stitch 2 The presser foot type to be sewn. KNOWING YOUR SEWING MACHINE Operation panel The operation panel, located on the front of the sewing machine, allows you to select a stitch and specify how the stitch will be used 3 The selected stitch type number 4 The...
Operation Manual
Page 13
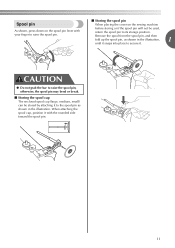
... the cover on the spool pin lever with the rounded side toward the spool pin. 11 Spool pin As shown, press down on the sewing machine before storing or if the spool pin will not be stored by attaching it to the spool pin as shown in the illustration.
... the cover on the spool pin lever with the rounded side toward the spool pin. 11 Spool pin As shown, press down on the sewing machine before storing or if the spool pin will not be stored by attaching it to the spool pin as shown in the illustration.

Operation Manual
Page 14
For models equipped with your finger to flip the chart. Flip chart You can check the pattern numbers of the machine, as shown. KNOWING YOUR SEWING MACHINE ■ Installing the spool pin If the spool pin has been removed from the a machine, insert the tab on the spool pin into b place. Hold the notch with a flip chart on the machine. For models equipped with a flip chart on the top panel 1 a Hole b Tab Push the spool pin down until it locks into the hole on the back of the stitches using the flip chart on the front panel 1 a Notch 12
For models equipped with your finger to flip the chart. Flip chart You can check the pattern numbers of the machine, as shown. KNOWING YOUR SEWING MACHINE ■ Installing the spool pin If the spool pin has been removed from the a machine, insert the tab on the spool pin into b place. Hold the notch with a flip chart on the machine. For models equipped with a flip chart on the top panel 1 a Hole b Tab Push the spool pin down until it locks into the hole on the back of the stitches using the flip chart on the front panel 1 a Notch 12
Operation Manual
Page 15
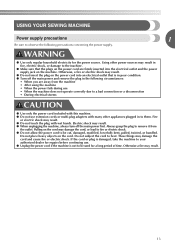
... Always grasp the plug to observe the following circumstances: • When you are firmly inserted into an electrical outlet that the plugs on the machine. Fire or electric shock may result. ● Do not touch the plug with many other power sources may result. ● Do not insert... fire or electric shock. Do not subject the cord to be used for the power source. Otherwise a fire may result. ● When unplugging the machine, always turn off the main power and remove the plug in to be cut, damaged, modified, forcefully bent, pulled, twisted, or bundled. WARNING &#...
... Always grasp the plug to observe the following circumstances: • When you are firmly inserted into an electrical outlet that the plugs on the machine. Fire or electric shock may result. ● Do not touch the plug with many other power sources may result. ● Do not insert... fire or electric shock. Do not subject the cord to be used for the power source. Otherwise a fire may result. ● When unplugging the machine, always turn off the main power and remove the plug in to be cut, damaged, modified, forcefully bent, pulled, twisted, or bundled. WARNING &#...

Operation Manual
Page 16
... power switch to fit in use. If the plug does not fit fully in any way. When you press the foot controller down lightly, the machine will stop button). 14 a Foot controller Insert the foot controller plug into a wall outlet. this plug is placed on the foot controller. To reduce the... one blade wider than the other). Note ● When the foot controller is plugged in order to build up on the foot controller when the machine is not a malfunction. only) ● This appliance has a polarized plug (one way. Do not modify the plug in the outlet, reverse the plug. When you...
... power switch to fit in use. If the plug does not fit fully in any way. When you press the foot controller down lightly, the machine will stop button). 14 a Foot controller Insert the foot controller plug into a wall outlet. this plug is placed on the foot controller. To reduce the... one blade wider than the other). Note ● When the foot controller is plugged in order to build up on the foot controller when the machine is not a malfunction. only) ● This appliance has a polarized plug (one way. Do not modify the plug in the outlet, reverse the plug. When you...

Operation Manual
Page 17
...the needle in the fabric when sewing is stopped. a a Sewing speed controller • The speed set to the lowered position. 15 The machine can be set to the center needle position. Turn off . ● Perform the same operation to change the needle stop position changes to ... b key) on the left and turn on . Memo ● The specified initial needle position is maintained even after the machine is turned off the sewing machine. Sewing speed controller Changing the initial needle (for models equipped with position the start/stop button) Normally, the straight stitch (left...
...the needle in the fabric when sewing is stopped. a a Sewing speed controller • The speed set to the lowered position. 15 The machine can be set to the center needle position. Turn off . ● Perform the same operation to change the needle stop position changes to ... b key) on the left and turn on . Memo ● The specified initial needle position is maintained even after the machine is turned off the sewing machine. Sewing speed controller Changing the initial needle (for models equipped with position the start/stop button) Normally, the straight stitch (left...

Operation Manual
Page 18
This setting can be changed so that machine beeps. 16 After turning on the sewing machine, release the "-" side of (stitch width b adjustment key) and turn on the sewing machine. a Hold down the "-" side of (stitch width adjustment key). Memo ● Perform the same operation to beep each time a key is pressed. X The machine is now set so that it is set to change the setting so that the machine does not beep. KNOWING YOUR SEWING MACHINE Cancelling the operation beep When the sewing machine is purchased, it will not beep. Turn off the sewing machine.
This setting can be changed so that machine beeps. 16 After turning on the sewing machine, release the "-" side of (stitch width b adjustment key) and turn on the sewing machine. a Hold down the "-" side of (stitch width adjustment key). Memo ● Perform the same operation to beep each time a key is pressed. X The machine is now set so that it is set to change the setting so that the machine does not beep. KNOWING YOUR SEWING MACHINE Cancelling the operation beep When the sewing machine is purchased, it will not beep. Turn off the sewing machine.

Operation Manual
Page 19
...thread guide b Bobbin winder shaft c Bobbin CAUTION ● Only use bobbins from other bobbins may cause damage to the machine. ● We designed the bobbin that have been designed for this machine. The thread may bend or break. If you use bobbins (part code: SA156, SFB: XA5539-151) that comes ... pin. 17 b CAUTION ● Do not grab the bar to raise the spool pin when winding the bobbin. Remove the spool cap. THREADING THE MACHINE Winding the bobbin This section describes how to wind the thread onto the bobbin. • For details on the spool pin lever a with your finger....
...thread guide b Bobbin winder shaft c Bobbin CAUTION ● Only use bobbins from other bobbins may cause damage to the machine. ● We designed the bobbin that have been designed for this machine. The thread may bend or break. If you use bobbins (part code: SA156, SFB: XA5539-151) that comes ... pin. 17 b CAUTION ● Do not grab the bar to raise the spool pin when winding the bobbin. Remove the spool cap. THREADING THE MACHINE Winding the bobbin This section describes how to wind the thread onto the bobbin. • For details on the spool pin lever a with your finger....

Operation Manual
Page 20
... the spool cap positioned toward the left hand. Slide the spool onto the pin so that there is no slack in the spool or the machine may be damaged. cb Slide the spool cap onto the spool pin. a a Spool cap (small) b Spool (cross-wound thread) c Space While holding the spool with..., and leave a small space between the cap and the spool. If the spool cap is too small for the spool being used. KNOWING YOUR SEWING MACHINE Fully insert the spool of spool being used, the thread may catch on the slit in the thread that best fits the size of thread...
... the spool cap positioned toward the left hand. Slide the spool onto the pin so that there is no slack in the spool or the machine may be damaged. cb Slide the spool cap onto the spool pin. a a Spool cap (small) b Spool (cross-wound thread) c Space While holding the spool with..., and leave a small space between the cap and the spool. If the spool cap is too small for the spool being used. KNOWING YOUR SEWING MACHINE Fully insert the spool of spool being used, the thread may catch on the slit in the thread that best fits the size of thread...

Operation Manual
Page 21
... on the bobbin. b Hook c Pre-tension disk d Pull it may tangle around the bobbin and cause the needle to break. 19 a Spring on the sewing machine. Turn on the shaft b Notch c 7 - 10 cm (3 - 4 inches) Trim the excess thread above the bobbin. Put the bobbin onto the bobbin winder shaft... Pull 1 cm (1/2 inch) of the thread, gently j press the foot controller or press (start/stop button) (for models equipped with the start /stop the machine. If the thread is too short, 1 not pulled taut or held at an angle, injuries may not be operated using the foot controller, connect the...
... on the bobbin. b Hook c Pre-tension disk d Pull it may tangle around the bobbin and cause the needle to break. 19 a Spring on the sewing machine. Turn on the shaft b Notch c 7 - 10 cm (3 - 4 inches) Trim the excess thread above the bobbin. Put the bobbin onto the bobbin winder shaft... Pull 1 cm (1/2 inch) of the thread, gently j press the foot controller or press (start/stop button) (for models equipped with the start /stop the machine. If the thread is too short, 1 not pulled taut or held at an angle, injuries may not be operated using the foot controller, connect the...


