
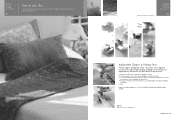
Accessory Catalog
Page 4
.... 1. Requires Low Shank Adapter for ULT series, PC-6500, PC-8200 and PC-8500 sewing machines. SA161 All Brother home-use sewing machines www.brother.com Sew. Its position can be adjusted exactly on the edge of zipper/piping, avoiding the non-flat parts of the presser foot and slide the presser foot so that the needle fits...
.... 1. Requires Low Shank Adapter for ULT series, PC-6500, PC-8200 and PC-8500 sewing machines. SA161 All Brother home-use sewing machines www.brother.com Sew. Its position can be adjusted exactly on the edge of zipper/piping, avoiding the non-flat parts of the presser foot and slide the presser foot so that the needle fits...

Accessory Catalog
Page 6
...Hold the fabric from fraying. 1. Overlock Foot For vertical bobbin machines only. Continue to sew to protect edges from the back and front and roll it into the curled part of the foot. 5. Continue to sew to create a flat narrow hem on sheer and very lightweight fabrics... from the edge and sew 2-3 stitches. 4. Slowly sew 2-3 stitches, making sure the fabric is exactly against the edge of the fabric. 4. Sew along the guide. Brother General Sewing Accessories 09 Narrow Hemmer Foot Non Stick Foot Overlock Foot Picot Foot Brother General Sewing Accessories 10 SA126 ABCDEFJKMN...
...Hold the fabric from fraying. 1. Overlock Foot For vertical bobbin machines only. Continue to sew to protect edges from the back and front and roll it into the curled part of the foot. 5. Continue to sew to create a flat narrow hem on sheer and very lightweight fabrics... from the edge and sew 2-3 stitches. 4. Slowly sew 2-3 stitches, making sure the fabric is exactly against the edge of the fabric. 4. Sew along the guide. Brother General Sewing Accessories 09 Narrow Hemmer Foot Non Stick Foot Overlock Foot Picot Foot Brother General Sewing Accessories 10 SA126 ABCDEFJKMN...
Users Manual - English
Page 2
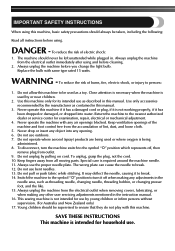
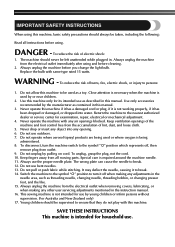
... nearest authorized dealer or service center for household use outdoors. 7. This sewing machine is not working properly, if it has been dropped or damaged, or dropped into any opening. 6. The machine should never be left unattended while plugged in this manual. Replace the bulb... or mechanical adjustment. 4. SAVE THESE INSTRUCTIONS This machine is required around the machine needle. 11. IMPORTANT SAFETY INSTRUCTIONS When using this machine, basic safety precautions should always be taken, including the following: Read all moving parts. To disconnect, turn it to ensure that they...
... nearest authorized dealer or service center for household use outdoors. 7. This sewing machine is not working properly, if it has been dropped or damaged, or dropped into any opening. 6. The machine should never be left unattended while plugged in this manual. Replace the bulb... or mechanical adjustment. 4. SAVE THESE INSTRUCTIONS This machine is required around the machine needle. 11. IMPORTANT SAFETY INSTRUCTIONS When using this machine, basic safety precautions should always be taken, including the following: Read all moving parts. To disconnect, turn it to ensure that they...
Users Manual - English
Page 5
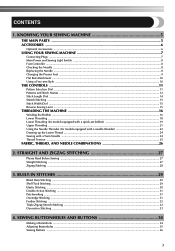
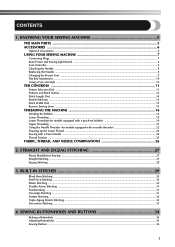
KNOWING YOUR SEWING MACHINE 5 THE MAIN PARTS ...5 ACCESSORIES ...6 Optional Accessories ...6 USING YOUR SEWING MACHINE 7 Connecting Plugs ...7 Main Power and Sewing Light Switch ...8 Foot Controller ...8 Checking the Needle ...8 Replacing the Needle ...8 Changing the Presser Foot ...9 Flat Bed Attachment ...10 ...Dial ...11 Patterns and Stitch Names ...12 Stitch Length Dial ...14 Stretch Stitching ...15 Stitch Width Dial ...15 Reverse Sewing Lever ...15 THREADING THE MACHINE 16 Winding the Bobbin ...16 Lower Threading ...18 Lower Threading (for models equipped with a quick-set bobbin 19 Upper...
KNOWING YOUR SEWING MACHINE 5 THE MAIN PARTS ...5 ACCESSORIES ...6 Optional Accessories ...6 USING YOUR SEWING MACHINE 7 Connecting Plugs ...7 Main Power and Sewing Light Switch ...8 Foot Controller ...8 Checking the Needle ...8 Replacing the Needle ...8 Changing the Presser Foot ...9 Flat Bed Attachment ...10 ...Dial ...11 Patterns and Stitch Names ...12 Stitch Length Dial ...14 Stretch Stitching ...15 Stitch Width Dial ...15 Reverse Sewing Lever ...15 THREADING THE MACHINE 16 Winding the Bobbin ...16 Lower Threading ...18 Lower Threading (for models equipped with a quick-set bobbin 19 Upper...
Users Manual - English
Page 7
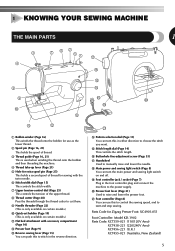
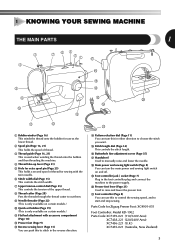
1 KNOWING YOUR SEWING MACHINE THE MAIN PARTS 1 3 4 7 62 51 G F 8 9 0 C A B 1 Bobbin winder (Page 16) This winds the thread onto the bobbin for use this in the foot controller plug and connect the machine to the power supply. J Presser foot lever (Page 21) Used to manually raise and lower the needle. H Main power and sewing light switch (Page...
1 KNOWING YOUR SEWING MACHINE THE MAIN PARTS 1 3 4 7 62 51 G F 8 9 0 C A B 1 Bobbin winder (Page 16) This winds the thread onto the bobbin for use this in the foot controller plug and connect the machine to the power supply. J Presser foot lever (Page 21) Used to manually raise and lower the needle. H Main power and sewing light switch (Page...
Users Manual - English
Page 8
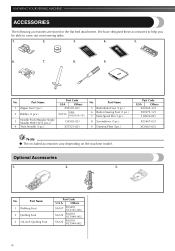
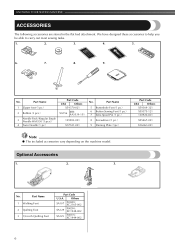
... Foot 2 Quilting Foot 3 1/4-inch Quilting Foot Part Code U.S.A. No. KNOWING YOUR SEWING MACHINE ACCESSORIES The following accessories are stored in the flat bed attachment. We have designed these accessories to help you be able to carry out most sewing tasks. 1. 2. 3. 4. 5. 6. 7. 8. 9. Part Name 5 Buttonhole Foot (1 pc.) 6 Button Sewing Foot (1 pc.) 7 Extra Spool Pin (1 pc.) 8 Screwdriver (1 pc.) 9 Darning...
... Foot 2 Quilting Foot 3 1/4-inch Quilting Foot Part Code U.S.A. No. KNOWING YOUR SEWING MACHINE ACCESSORIES The following accessories are stored in the flat bed attachment. We have designed these accessories to help you be able to carry out most sewing tasks. 1. 2. 3. 4. 5. 6. 7. 8. 9. Part Name 5 Buttonhole Foot (1 pc.) 6 Button Sewing Foot (1 pc.) 7 Extra Spool Pin (1 pc.) 8 Screwdriver (1 pc.) 9 Darning...

Users Manual - English
Page 11
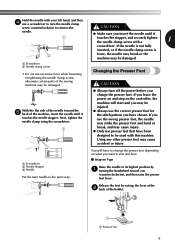
... and bend or break, and may cause injury. ● Only use excessive force when loosening or tightening the needle clamp screw, otherwise certain parts of the sewing machine may be injured. ● Always use the correct presser foot for the stitch pattern you have been designed to be damaged. 1 Screwdriver 2...4 use a screwdriver to turn off the power before you change the presser foot depending on what you want to sew and how. ■ Snap-on the controller, the machine will have to change the presser foot. Changing the Presser Foot CAUTION With the flat side of the needle toward ...
... and bend or break, and may cause injury. ● Only use excessive force when loosening or tightening the needle clamp screw, otherwise certain parts of the sewing machine may be injured. ● Always use the correct presser foot for the stitch pattern you have been designed to be damaged. 1 Screwdriver 2...4 use a screwdriver to turn off the power before you change the presser foot depending on what you want to sew and how. ■ Snap-on the controller, the machine will have to change the presser foot. Changing the Presser Foot CAUTION With the flat side of the needle toward ...
Users Manual - English
Page 18
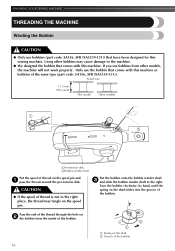
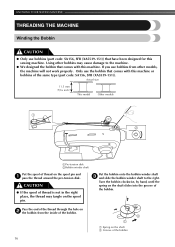
... Only use the bobbin that comes with this machine. Using other models, the machine will not work properly. If you use bobbins (part code: SA156, SFB (XA5539-151)) that comes with this sewing machine. CAUTION ● If the spool of the same type (part code: SA156, SFB (XA5539-151)). Put the... bobbin onto the bobbin winder shaft 3 and slide the bobbin winder shaft to the machine. ● We ...
... Only use the bobbin that comes with this machine. Using other models, the machine will not work properly. If you use bobbins (part code: SA156, SFB (XA5539-151)) that comes with this sewing machine. CAUTION ● If the spool of the same type (part code: SA156, SFB (XA5539-151)). Put the... bobbin onto the bobbin winder shaft 3 and slide the bobbin winder shaft to the machine. ● We ...

Users Manual - English
Page 20
... the wrong direction, it is correctly inserted through the tension-adjusting spring of the same type (part code: SA156, SFB (XA5539-151)). KNOWING YOUR SEWING MACHINE Lower Threading • For more details on the foot controller and the machine starts to loosen, and may cause the thread tension to be injured. 1 Cover 2 Slide button...
... the wrong direction, it is correctly inserted through the tension-adjusting spring of the same type (part code: SA156, SFB (XA5539-151)). KNOWING YOUR SEWING MACHINE Lower Threading • For more details on the foot controller and the machine starts to loosen, and may cause the thread tension to be injured. 1 Cover 2 Slide button...

Users Manual - English
Page 21
... through the slit, as shown by the line in the illustration). 1 2 1 Wound evenly 2 Wound poorly ● The bobbin was designed specifically for this sewing machine. Actual size 11.5 mm (7/16 inch) This model Other models CAUTION ● Be sure to turn off the power. If bobbins from the left tab... side (see arrow 1), and then press lightly on the foot controller and the machine begins to operate, injury could result. 19 Reattach the bobbin cover. Use only the enclosed bobbin or bobbins of the same type (part code: SA156, SFB (XA5539-151)). Hold the end of the thread, push ...
... through the slit, as shown by the line in the illustration). 1 2 1 Wound evenly 2 Wound poorly ● The bobbin was designed specifically for this sewing machine. Actual size 11.5 mm (7/16 inch) This model Other models CAUTION ● Be sure to turn off the power. If bobbins from the left tab... side (see arrow 1), and then press lightly on the foot controller and the machine begins to operate, injury could result. 19 Reattach the bobbin cover. Use only the enclosed bobbin or bobbins of the same type (part code: SA156, SFB (XA5539-151)). Hold the end of the thread, push ...

Users Manual - English
Page 26
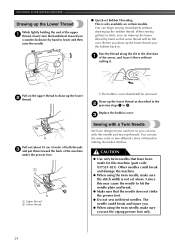
...should still be left over. Replace the bobbin cover. 3 Sewing with bent needles. Other needles could break and injure you. ● When using the twin needle, make sure you use the same color or two different colors of thread for this machine (part code: X57521-021). Pull out about 10 cm (4 ...inch) of both threads 3 and put the bobbin back in the 2 previous steps 1 to hit the needle plate and break. ● Make sure that the needle does not strike the presser foot. ● Do not sew with a Twin...
...should still be left over. Replace the bobbin cover. 3 Sewing with bent needles. Other needles could break and injure you. ● When using the twin needle, make sure you use the same color or two different colors of thread for this machine (part code: X57521-021). Pull out about 10 cm (4 ...inch) of both threads 3 and put the bobbin back in the 2 previous steps 1 to hit the needle plate and break. ● Make sure that the needle does not strike the presser foot. ● Do not sew with a Twin...
Owner's Manual (Español) - Spanish
Page 2
...the cord. 10. Always unplug the machine from outlet. 9. Always unplug the machine before cleaning. 2. Special care is being used by young children or infirm persons without supervision. (For Australia and New Zealand only) 17. This sewing machine is intended for use . IMPORTANT ...SAFETY INSTRUCTIONS When using this manual. 3. Do not use as contained in this machine, basic safety precautions should never be taken, including the following: Read all moving parts. Keep fingers away from the...
...the cord. 10. Always unplug the machine from outlet. 9. Always unplug the machine before cleaning. 2. Special care is being used by young children or infirm persons without supervision. (For Australia and New Zealand only) 17. This sewing machine is intended for use . IMPORTANT ...SAFETY INSTRUCTIONS When using this manual. 3. Do not use as contained in this machine, basic safety precautions should never be taken, including the following: Read all moving parts. Keep fingers away from the...
Owner's Manual (Español) - Spanish
Page 5
...Feather Stitching ...32 Triple Zigzag Stretch Stitching ...32 Decorative Stitching ...33 4. KNOWING YOUR SEWING MACHINE 5 THE MAIN PARTS ...5 ACCESSORIES ...6 Optional Accessories ...6 USING YOUR SEWING MACHINE 7 Connecting Plugs ...7 Main Power and Sewing Light Switch ...8 Foot Controller ...8 Checking the Needle ...8 Replacing the Needle ...8 Changing ... Stitch Names ...12 Stitch Length Dial ...14 Stretch Stitching ...15 Stitch Width Dial ...15 Reverse Sewing Lever ...15 THREADING THE MACHINE 16 Winding the Bobbin ...16 Lower Threading ...18 Lower Threading (for models equipped with a quick...
...Feather Stitching ...32 Triple Zigzag Stretch Stitching ...32 Decorative Stitching ...33 4. KNOWING YOUR SEWING MACHINE 5 THE MAIN PARTS ...5 ACCESSORIES ...6 Optional Accessories ...6 USING YOUR SEWING MACHINE 7 Connecting Plugs ...7 Main Power and Sewing Light Switch ...8 Foot Controller ...8 Checking the Needle ...8 Replacing the Needle ...8 Changing ... Stitch Names ...12 Stitch Length Dial ...14 Stretch Stitching ...15 Stitch Width Dial ...15 Reverse Sewing Lever ...15 THREADING THE MACHINE 16 Winding the Bobbin ...16 Lower Threading ...18 Lower Threading (for models equipped with a quick...
Owner's Manual (Español) - Spanish
Page 7
... on certain models.) 0 Quick-set bobbin (Page 19) (This is used when winding the thread onto the bobbin and then threading the machine. 4 Thread take-up lever (Page 21) 5 Hole for extra spool pin (Page 25) This holds a second spool of thread. ... in the foot controller plug and connect the machine to the power supply. Parts Code for sewing with accessory compartment (Page 10) B Presser foot (Page 9) C Reverse sewing lever (Page 15) You can turn this to control the sewing speed, and to start and stop sewing. 1 KNOWING YOUR SEWING MACHINE THE MAIN PARTS 1 3 4 7 62 51 G F 8 9 ...
... on certain models.) 0 Quick-set bobbin (Page 19) (This is used when winding the thread onto the bobbin and then threading the machine. 4 Thread take-up lever (Page 21) 5 Hole for extra spool pin (Page 25) This holds a second spool of thread. ... in the foot controller plug and connect the machine to the power supply. Parts Code for sewing with accessory compartment (Page 10) B Presser foot (Page 9) C Reverse sewing lever (Page 15) You can turn this to control the sewing speed, and to start and stop sewing. 1 KNOWING YOUR SEWING MACHINE THE MAIN PARTS 1 3 4 7 62 51 G F 8 9 ...
Owner's Manual (Español) - Spanish
Page 8
... 1 Walking Foot 2 Quilting Foot 3 1/4-inch Quilting Foot Part Code U.S.A. No. Part Name 1 Zipper foot (1 pc.) 2 Bobbin (3 pcs.) 3 Needle Pack (Regular Single Needle HAX130 (3 pcs.)) 4 Twin Needle (1 pc.) Part Code USA Others X59370-021 SA156 SFB: XA5539-151 129583-021 X57521-021 No. KNOWING YOUR SEWING MACHINE ACCESSORIES The following accessories are stored in the flat...
... 1 Walking Foot 2 Quilting Foot 3 1/4-inch Quilting Foot Part Code U.S.A. No. Part Name 1 Zipper foot (1 pc.) 2 Bobbin (3 pcs.) 3 Needle Pack (Regular Single Needle HAX130 (3 pcs.)) 4 Twin Needle (1 pc.) Part Code USA Others X59370-021 SA156 SFB: XA5539-151 129583-021 X57521-021 No. KNOWING YOUR SEWING MACHINE ACCESSORIES The following accessories are stored in the flat...
Owner's Manual (Español) - Spanish
Page 11
...chosen. Hold the needle with your left hand, and then 4 use excessive force when loosening or tightening the needle clamp screw, otherwise certain parts of the sewing machine may be damaged. If the needle is not fully inserted, or if the needle clamp screw is 2 loose, the needle may break ...or the machine may cause accident or injury. 2 3 1 Screwdriver 2 Needle Stopper 3 Needle Put the twin needle in the same way. Changing the Presser Foot ...
...chosen. Hold the needle with your left hand, and then 4 use excessive force when loosening or tightening the needle clamp screw, otherwise certain parts of the sewing machine may be damaged. If the needle is not fully inserted, or if the needle clamp screw is 2 loose, the needle may break ...or the machine may cause accident or injury. 2 3 1 Screwdriver 2 Needle Stopper 3 Needle Put the twin needle in the same way. Changing the Presser Foot ...
Owner's Manual (Español) - Spanish
Page 18
... onto the bobbin winder shaft 3 and slide the bobbin winder shaft to the machine. ● We designed the bobbin that comes with this machine or bobbins of the same type (part code: SA156, SFB (XA5539-151)). KNOWING YOUR SEWING MACHINE THREADING THE MACHINE Winding the Bobbin CAUTION ● Only use the bobbin that comes with this...
... onto the bobbin winder shaft 3 and slide the bobbin winder shaft to the machine. ● We designed the bobbin that comes with this machine or bobbins of the same type (part code: SA156, SFB (XA5539-151)). KNOWING YOUR SEWING MACHINE THREADING THE MACHINE Winding the Bobbin CAUTION ● Only use the bobbin that comes with this...

Owner's Manual (Español) - Spanish
Page 20
...inserted through the tension-adjusting spring of the same type (part code: SA156, SFB (XA5539-151)). Slide the button and open the cover. 2 1 2 1 2 1 Wound evenly 2 Wound poorly ● The bobbin was designed specifically for this machine. Actual size 11.5 mm (7/16 inch) This model Other...Tension-adjusting spring 18 Use only the enclosed bobbin or bobbins of the bobbin case. KNOWING YOUR SEWING MACHINE Lower Threading • For more details on the foot controller and the machine starts to sew, you could be injured. 1 Cover 2 Slide button Put the bobbin in so the thread ...
...inserted through the tension-adjusting spring of the same type (part code: SA156, SFB (XA5539-151)). Slide the button and open the cover. 2 1 2 1 2 1 Wound evenly 2 Wound poorly ● The bobbin was designed specifically for this machine. Actual size 11.5 mm (7/16 inch) This model Other...Tension-adjusting spring 18 Use only the enclosed bobbin or bobbins of the bobbin case. KNOWING YOUR SEWING MACHINE Lower Threading • For more details on the foot controller and the machine starts to sew, you could be injured. 1 Cover 2 Slide button Put the bobbin in so the thread ...

Owner's Manual (Español) - Spanish
Page 21
... 1 2 1 Wound evenly 2 Wound poorly ● The bobbin was designed specifically for this sewing machine. If you accidentally step on the right side (see arrow 1), and then press lightly on the foot controller and the... machine begins to turn off the power. If bobbins from the left tab in 5 place (see arrow 2) ...cover so that the end of the thread comes out from other models are used, the machine will not operate correctly. Use only the enclosed bobbin or bobbins of the same type...
... 1 2 1 Wound evenly 2 Wound poorly ● The bobbin was designed specifically for this sewing machine. If you accidentally step on the right side (see arrow 1), and then press lightly on the foot controller and the... machine begins to turn off the power. If bobbins from the left tab in 5 place (see arrow 2) ...cover so that the end of the thread comes out from other models are used, the machine will not operate correctly. Use only the enclosed bobbin or bobbins of the same type...
Owner's Manual (Español) - Spanish
Page 26
... (counterclockwise) by hand to lower and then raise the needle. ■ Quick-set Bobbin Threading This is not set above 3 since this machine (part code: X57521-021). KNOWING YOUR SEWING MACHINE Drawing up the Lower Thread While lightly holding the end of the upper 1 thread, slowly turn the handwheel toward the back of the...
... (counterclockwise) by hand to lower and then raise the needle. ■ Quick-set Bobbin Threading This is not set above 3 since this machine (part code: X57521-021). KNOWING YOUR SEWING MACHINE Drawing up the Lower Thread While lightly holding the end of the upper 1 thread, slowly turn the handwheel toward the back of the...


