
Users Manual - English
Page 2
..., set the main switch to be left unattended while plugged in the instruction manual. 16. To unplug, grasp the plug, not the cord. 10. This sewing machine is not working properly, if it has been dropped or damaged, or dropped into any object into water. Always use . Do not pull or...
..., set the main switch to be left unattended while plugged in the instruction manual. 16. To unplug, grasp the plug, not the cord. 10. This sewing machine is not working properly, if it has been dropped or damaged, or dropped into any object into water. Always use . Do not pull or...

Users Manual - English
Page 3
... 'L' or colored red or brown. With alternative plugs, an approved fuse must be removed from the socket outlet. 2 The main power/sewing light switch turns the main power and sewing light on or off the main plug from the main leads must be sure to replace the fuse only with an identical... wires in this main lead are colored in accordance with bared flexible cords is cut off . 1 Turn on the plug. CONNECTING PLUGS AND MAIN POWER/SEWING LIGHT SWITCH 1 2 1.
... 'L' or colored red or brown. With alternative plugs, an approved fuse must be removed from the socket outlet. 2 The main power/sewing light switch turns the main power and sewing light on or off the main plug from the main leads must be sure to replace the fuse only with an identical... wires in this main lead are colored in accordance with bared flexible cords is cut off . 1 Turn on the plug. CONNECTING PLUGS AND MAIN POWER/SEWING LIGHT SWITCH 1 2 1.

Users Manual - English
Page 4
... ...10 Recommended Widths and Lengths for Stitches 11 Stitch Length Dial ...13 Stretch Stitching ...13 Stitch Width Dial ...14 Reverse Sewing Lever ...14 Drop Feed Lever (if the machine is equipped with a drop feed lever 14 THREADING THE MACHINE 15 Winding... Stitching ...30 Decorative Stitching ...30 Making a Buttonhole (1-Step Automatic Buttonhole 30 Making a Buttonhole (4-Step Buttonhole) ...31 Adjusting Buttonholes ...33 Sewing Buttons ...33 Zipper Insertion ...34 Gathering ...35 Darning...35 Appliqués ...36 Monogramming and Embroidering ...36 MAINTENANCE ...38 Changing the Light ...
... ...10 Recommended Widths and Lengths for Stitches 11 Stitch Length Dial ...13 Stretch Stitching ...13 Stitch Width Dial ...14 Reverse Sewing Lever ...14 Drop Feed Lever (if the machine is equipped with a drop feed lever 14 THREADING THE MACHINE 15 Winding... Stitching ...30 Decorative Stitching ...30 Making a Buttonhole (1-Step Automatic Buttonhole 30 Making a Buttonhole (4-Step Buttonhole) ...31 Adjusting Buttonholes ...33 Sewing Buttons ...33 Zipper Insertion ...34 Gathering ...35 Darning...35 Appliqués ...36 Monogramming and Embroidering ...36 MAINTENANCE ...38 Changing the Light ...

Users Manual - English
Page 5
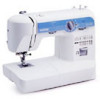
...thread. 7 Stitch width dial (page 14) This controls the stitch width. 8 Pattern selection dial (page 10) You can turn the main power and sewing light on certain models. 4 D Handle E Balance wheel Turn toward you want. 9 Stitch length dial (page 13) This controls the length of the stitches...you (counterclockwise) to stitch in the foot controller plug and connect the machine to start and stop sewing. H Presser foot lever (page 8) This raises and lowers the presser foot. KNOWING YOUR SEWING MACHINE PRINCIPAL PARTS 1 Bobbin-winding assembly (page 15) This winds the thread onto the bobbin, ...
...thread. 7 Stitch width dial (page 14) This controls the stitch width. 8 Pattern selection dial (page 10) You can turn the main power and sewing light on certain models. 4 D Handle E Balance wheel Turn toward you want. 9 Stitch length dial (page 13) This controls the length of the stitches...you (counterclockwise) to stitch in the foot controller plug and connect the machine to start and stop sewing. H Presser foot lever (page 8) This raises and lowers the presser foot. KNOWING YOUR SEWING MACHINE PRINCIPAL PARTS 1 Bobbin-winding assembly (page 15) This winds the thread onto the bobbin, ...

Users Manual - English
Page 6
... 4 Step Buttonhole) 5 X57521-001 6 SA156(For U.S.A.) SFB(XA5539-151)(For other countries) 7 X55467-021 8 130920-021 9 XA3442-121 1 Buttonhole foot (1 pc.) 2 Zipper foot (1 pc.) 3 Button sewing foot (1 pc.) 4 Needle pack (regular single needle HAX130) (3 pcs.) 5 Twin needle (1 pc.) 6 Bobbins (3 pcs.) 7 Screwdriver (1 pc.) 8 Extra spool pin (1 pc.) 9 Darning plate (1pc.) (When the... Zealand) The above accessories are stored in the accessory bag inside the extension table. These accessories have been designed to help you carry out most sewing tasks. 5
... 4 Step Buttonhole) 5 X57521-001 6 SA156(For U.S.A.) SFB(XA5539-151)(For other countries) 7 X55467-021 8 130920-021 9 XA3442-121 1 Buttonhole foot (1 pc.) 2 Zipper foot (1 pc.) 3 Button sewing foot (1 pc.) 4 Needle pack (regular single needle HAX130) (3 pcs.) 5 Twin needle (1 pc.) 6 Bobbins (3 pcs.) 7 Screwdriver (1 pc.) 8 Extra spool pin (1 pc.) 9 Darning plate (1pc.) (When the... Zealand) The above accessories are stored in the accessory bag inside the extension table. These accessories have been designed to help you carry out most sewing tasks. 5

Users Manual - English
Page 7
...; Do not touch the plug with many other appliances plugged in the following circumstances: • When you are away from the outlet. KNOWING YOUR SEWING MACHINE USING YOUR SEWING MACHINE WARNING ● Use only regular household electricity for a long period of time, otherwise a fire may damage the cord and cause fire or...
...; Do not touch the plug with many other appliances plugged in the following circumstances: • When you are away from the outlet. KNOWING YOUR SEWING MACHINE USING YOUR SEWING MACHINE WARNING ● Use only regular household electricity for a long period of time, otherwise a fire may damage the cord and cause fire or...

Users Manual - English
Page 8
...from the socket outlet. ● When servicing the machine, removing covers or changing bulbs, the machine must be injured. ● Only use sewing-machine needles for home use . Note ● When leaving the machine unattended, the main switch of the machine should make sure that nothing...only) ● This appliance has a polarized plug (one way. When you may bend or break and cause injury. ● Never sew with Models XL-5500/XL-5600/XL-5700/ XL-5510/XL-5610/XL-5710. . Other needles may be unplugged. (For U.S.A. To reduce the risk of cloth and dust to install the proper outlet. If...
...from the socket outlet. ● When servicing the machine, removing covers or changing bulbs, the machine must be injured. ● Only use sewing-machine needles for home use . Note ● When leaving the machine unattended, the main switch of the machine should make sure that nothing...only) ● This appliance has a polarized plug (one way. When you may bend or break and cause injury. ● Never sew with Models XL-5500/XL-5600/XL-5700/ XL-5510/XL-5610/XL-5710. . Other needles may be unplugged. (For U.S.A. To reduce the risk of cloth and dust to install the proper outlet. If...

Users Manual - English
Page 9
...If a needle is already installed, remove it by 4 loosening the needle clamp with a screwdriver and pulling the needle down. 1 Checking the Needle The sewing needle must always be straight 1 and sharp for the stitch pattern you use presser feet that have been designed to change the presser foot. Using... the flat 2 side of the needle on a flat surface as shown. 1 Screwdriver • Do not use the correct presser foot for smooth sewing. You will start and you change the presser foot depending on the controller, the machine will have chosen. Release the foot by turning 1 the ...
...If a needle is already installed, remove it by 4 loosening the needle clamp with a screwdriver and pulling the needle down. 1 Checking the Needle The sewing needle must always be straight 1 and sharp for the stitch pattern you use presser feet that have been designed to change the presser foot. Using... the flat 2 side of the needle on a flat surface as shown. 1 Screwdriver • Do not use the correct presser foot for smooth sewing. You will start and you change the presser foot depending on the controller, the machine will have chosen. Release the foot by turning 1 the ...

Users Manual - English
Page 10
... and hard-to-reach areas. Converting to Free-arm Style Free-arm sewing is in the correct place, the bar should snap in line with the correct orientation, the needle may strike the presser foot, which may bend ...
... and hard-to-reach areas. Converting to Free-arm Style Free-arm sewing is in the correct place, the bar should snap in line with the correct orientation, the needle may strike the presser foot, which may bend ...

Users Manual - English
Page 11
KNOWING YOUR SEWING MACHINE THE CONTROLS Pattern Selection Dial To choose a stitch, simply turn the pattern selection dial in either direction. Stitch widths and lengths are shown on ...
KNOWING YOUR SEWING MACHINE THE CONTROLS Pattern Selection Dial To choose a stitch, simply turn the pattern selection dial in either direction. Stitch widths and lengths are shown on ...

Users Manual - English
Page 13
KNOWING YOUR SEWING MACHINE ■ 17 Stitches Pattern 1 Stitch Name 1-STEP AUTOMATIC BUTTONHOLE Recommended Width [mm (inch)] 3-5 (1/8-3/16) 2 STRAIGHT STITCH 0-5 (0-3/16) (Changes needle position) 3 ZIGZAG STITCH 0-5 (0-3/16) 4 BLIND ...
KNOWING YOUR SEWING MACHINE ■ 17 Stitches Pattern 1 Stitch Name 1-STEP AUTOMATIC BUTTONHOLE Recommended Width [mm (inch)] 3-5 (1/8-3/16) 2 STRAIGHT STITCH 0-5 (0-3/16) (Changes needle position) 3 ZIGZAG STITCH 0-5 (0-3/16) 4 BLIND ...

Users Manual - English
Page 14
...for making buttonholes and decorative stitches. SS 1 10 2 2 3 1 ■ Adjusting the stretch stitching The machine is used when sewing on the stitch length dial represent the stitch length in millimeters (mm) (1/25"). This is not fed. Stretch Stitching ■ Selecting... position). 1 Stitch length dial 2 Longer 3 Shorter 13 CAUTION ● If the stitches are bunched together, lengthen the stitch length and continue sewing. To determine the exact dial position, first test the stitch and length settings on a scrap piece of the material. 5 SHELL TUCK STITCH 3-5...
...for making buttonholes and decorative stitches. SS 1 10 2 2 3 1 ■ Adjusting the stretch stitching The machine is used when sewing on the stitch length dial represent the stitch length in millimeters (mm) (1/25"). This is not fed. Stretch Stitching ■ Selecting... position). 1 Stitch length dial 2 Longer 3 Shorter 13 CAUTION ● If the stitches are bunched together, lengthen the stitch length and continue sewing. To determine the exact dial position, first test the stitch and length settings on a scrap piece of the material. 5 SHELL TUCK STITCH 3-5...

Users Manual - English
Page 15
...: Feed dogs are down. 3 Down position: Feed dogs are selected, the needle position can use reverse sewing for backtacking and reinforcing seams. To sew in reverse, push the reverse sewing lever in as far as possible and hold it in that position while you may need to the job ... are up. 14 THE HIGHER THE NUMBER, THE WIDER THE STITCH. 1 Drop Feed Lever (if the machine is being done. When monogramming, embroidering, darning or sewing on the dial represent the stitch width. Note ● The dial cannot be changed from left to adjust the stitch. - 1 SS 2 + 3 • •...
...: Feed dogs are down. 3 Down position: Feed dogs are selected, the needle position can use reverse sewing for backtacking and reinforcing seams. To sew in reverse, push the reverse sewing lever in as far as possible and hold it in that position while you may need to the job ... are up. 14 THE HIGHER THE NUMBER, THE WIDER THE STITCH. 1 Drop Feed Lever (if the machine is being done. When monogramming, embroidering, darning or sewing on the dial represent the stitch width. Note ● The dial cannot be changed from left to adjust the stitch. - 1 SS 2 + 3 • •...

Users Manual - English
Page 16
... THE MACHINE Winding the Bobbin CAUTION ● Only use the bobbin (part code: SA156, SFB (XA5539-151)) that has been designed for this sewing machine. If bobbins from the inside of thread is not in the right place, the thread may cause damage to wind the thread around the... disc. Pass the end of the thread, gently 4 press the foot controller to the machine. ● The bobbin was designed specifically for this sewing machine. Use only the enclosed bobbin or bobbins of the clutch engaging when beginning to the right. ● Immediately after winding the bobbin, it ...
... THE MACHINE Winding the Bobbin CAUTION ● Only use the bobbin (part code: SA156, SFB (XA5539-151)) that has been designed for this sewing machine. If bobbins from the inside of thread is not in the right place, the thread may cause damage to wind the thread around the... disc. Pass the end of the thread, gently 4 press the foot controller to the machine. ● The bobbin was designed specifically for this sewing machine. Use only the enclosed bobbin or bobbins of the clutch engaging when beginning to the right. ● Immediately after winding the bobbin, it ...

Users Manual - English
Page 17
...loosen, and may break the needle. 1 2 1 Wound evenly 2 Wound poorly 1 2 1 Wound evenly 2 Wound poorly ● The bobbin was designed specifically for this sewing machine. Open the shuttle cover behind the extension 2 table on the foot controller and the machine starts to work, you accidentally step on the front... of the machine and pull the bobbin case out of the same type (part code: SA156, SFB (XA5539-151)). KNOWING YOUR SEWING MACHINE CAUTION ● Make sure you turn the power off while threading the machine. If bobbins from older models are used, the machine ...
...loosen, and may break the needle. 1 2 1 Wound evenly 2 Wound poorly 1 2 1 Wound evenly 2 Wound poorly ● The bobbin was designed specifically for this sewing machine. Open the shuttle cover behind the extension 2 table on the foot controller and the machine starts to work, you accidentally step on the front... of the machine and pull the bobbin case out of the same type (part code: SA156, SFB (XA5539-151)). KNOWING YOUR SEWING MACHINE CAUTION ● Make sure you turn the power off while threading the machine. If bobbins from older models are used, the machine ...

Users Manual - English
Page 18
... to turn off the machine before servicing it enters the delivery eye under the tension spring (fig. A-2 A-3 1 1 Tension spring CAUTION ● Make sure you start sewing. 17 If the thread unrolls in fig. Holding the bobbin case by the latch, fully 4 insert the bobbin case into the bobbin case. (See fig...
... to turn off the machine before servicing it enters the delivery eye under the tension spring (fig. A-2 A-3 1 1 Tension spring CAUTION ● Make sure you start sewing. 17 If the thread unrolls in fig. Holding the bobbin case by the latch, fully 4 insert the bobbin case into the bobbin case. (See fig...

Users Manual - English
Page 19
... highest position. Pull up lever 18 Bring the thread through guides. 3 4 23 1 3 Tension discs 4 Thread take-up lever and around to the left. KNOWING YOUR SEWING MACHINE Upper Threading 1 2 4 3 1 Spool pin 2 Thread guide CAUTION ● Make sure you and into the eyelet. 1 1 1 Thread take-up lever 1 Spool pin 2 Thread guide 3 Tension...
... highest position. Pull up lever 18 Bring the thread through guides. 3 4 23 1 3 Tension discs 4 Thread take-up lever and around to the left. KNOWING YOUR SEWING MACHINE Upper Threading 1 2 4 3 1 Spool pin 2 Thread guide CAUTION ● Make sure you and into the eyelet. 1 1 1 Thread take-up lever 1 Spool pin 2 Thread guide 3 Tension...

Users Manual - English
Page 20
... the presser foot lever and the thread take-up before you feed the upper thread. ● If you incorrectly feed the thread you may cause sewing problems. Using the Needle Threader (models equipped with the bottom of the machine (away from front to "O". Lower the presser foot lever. 1 1 2 3 1 Needle holder 2 Needle...
... the presser foot lever and the thread take-up before you feed the upper thread. ● If you incorrectly feed the thread you may cause sewing problems. Using the Needle Threader (models equipped with the bottom of the machine (away from front to "O". Lower the presser foot lever. 1 1 2 3 1 Needle holder 2 Needle...

Users Manual - English
Page 21
...the back of the machine. Make sure the main power switch is not necessary to 5 draw up the bobbin thread.) (Refer to page 21.) Start sewing as usual. (It is off when threading the needle by hand. CAUTION ● The needle threader can , however, draw up the lower thread ..., you can only use needles in the cover. If you wish. Pull out about 5 cm (2") of thread through the needle toward the back of the sewing machine. 2 1 Bobbin case 2 Shuttle Close the shuttle cover while pulling the 2 thread through the needle. 1 2 1 1 Hook 2 Thread Quick Thread-Setting System FAST START ...
...the back of the machine. Make sure the main power switch is not necessary to 5 draw up the bobbin thread.) (Refer to page 21.) Start sewing as usual. (It is off when threading the needle by hand. CAUTION ● The needle threader can , however, draw up the lower thread ..., you can only use needles in the cover. If you wish. Pull out about 5 cm (2") of thread through the needle toward the back of the sewing machine. 2 1 Bobbin case 2 Shuttle Close the shuttle cover while pulling the 2 thread through the needle. 1 2 1 1 Hook 2 Thread Quick Thread-Setting System FAST START ...

Users Manual - English
Page 22
...to the front (counterclockwise) once by hand to hit the needle plate and break. ● Do not sew with a Twin Needle We have designed your machine so you . ■ Attaching the Extra Spool Pin Put...; Use only twin needles that have caught the 3 lower thread in a loop. You can sew with this may cause the needle to lower, then raise the needle. The upper thread should pass ...between the toes of the presser foot. 1 Sewing with bent needles. Drawing up the lower thread. 1 2 1 Upper thread 2 Lower thread loop Pull out...
...to the front (counterclockwise) once by hand to hit the needle plate and break. ● Do not sew with a Twin Needle We have designed your machine so you . ■ Attaching the Extra Spool Pin Put...; Use only twin needles that have caught the 3 lower thread in a loop. You can sew with this may cause the needle to lower, then raise the needle. The upper thread should pass ...between the toes of the presser foot. 1 Sewing with bent needles. Drawing up the lower thread. 1 2 1 Upper thread 2 Lower thread loop Pull out...


