
Digital Video Software (Windows) Ver.19 Instruction Manual
Page 2
...3 System Requirements 4 What is Digital Video Software 5 Installing the Digital Video Software 6 Before Downloading Still Images 10 Connecting the Camcorder to a Computer 10 Downloading Still Images (ZoomBrowser EX 12 Starting CameraWindow 13 Using the Computer to Download Still Images 14 Auto-Downloading...50 Printing Still Images (PhotoRecord 53 Adding Sound to a Still Image 56 Applying DPOF Settings 57 Reviewing and Changing the Settings of the Camcorder 60 Uninstalling the Software 62 Uninstalling ZoomBrowser EX 62 Uninstalling the TWAIN Driver/WIA Driver 63 Troubleshooting ......
...3 System Requirements 4 What is Digital Video Software 5 Installing the Digital Video Software 6 Before Downloading Still Images 10 Connecting the Camcorder to a Computer 10 Downloading Still Images (ZoomBrowser EX 12 Starting CameraWindow 13 Using the Computer to Download Still Images 14 Auto-Downloading...50 Printing Still Images (PhotoRecord 53 Adding Sound to a Still Image 56 Applying DPOF Settings 57 Reviewing and Changing the Settings of the Camcorder 60 Uninstalling the Software 62 Uninstalling ZoomBrowser EX 62 Uninstalling the TWAIN Driver/WIA Driver 63 Troubleshooting ......
Digital Video Software (Windows) Ver.19 Instruction Manual
Page 8
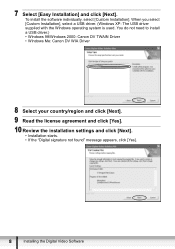
... [Next]. You do not need to install a USB driver.) • Windows 98/Windows 2000: Canon DV TWAIN Driver • Windows Me: Canon DV WIA Driver 8 Select your country/region and click [Next]. 9 Read the license agreement and click [Yes]. 10 Review the installation settings and click [Next]. • Installation starts. • If the "Digital...
... [Next]. You do not need to install a USB driver.) • Windows 98/Windows 2000: Canon DV TWAIN Driver • Windows Me: Canon DV WIA Driver 8 Select your country/region and click [Next]. 9 Read the license agreement and click [Yes]. 10 Review the installation settings and click [Next]. • Installation starts. • If the "Digital...
Digital Video Software (Windows) Ver.19 Instruction Manual
Page 60
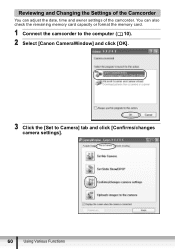
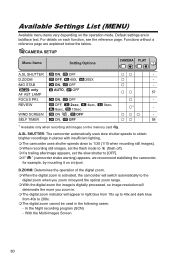
Reviewing and Changing the Settings of the camcorder. You can adjust the date, time and owner settings of the Camcorder You can also check the remaining memory card capacity or format the memory card. 1 Connect the camcorder to the computer ( 10). 2 Select [Canon CameraWindow] and click [OK]. 3 Click the [Set to Camera] tab and click [Confirms/changes camera settings]. 60 Using Various Functions
Reviewing and Changing the Settings of the camcorder. You can adjust the date, time and owner settings of the Camcorder You can also check the remaining memory card capacity or format the memory card. 1 Connect the camcorder to the computer ( 10). 2 Select [Canon CameraWindow] and click [OK]. 3 Click the [Set to Camera] tab and click [Confirms/changes camera settings]. 60 Using Various Functions

Digital Video Software (Macintosh) Ver.19 Instruction Manual
Page 2
...Digital Video Software 5 Installing the Digital Video Software 6 Before Downloading Still Images 9 Connecting the Camcorder to a Computer 9 CameraWindow Automatic Launch Setting 10 Mac OS 10.2 - 10.3 10 Mac OS 10.1.5 10 Downloading Still Images (ImageBrowser 11 Using the Computer to Download Still Images 11 Auto-downloading 11 ...Printing (Exif 2.2 Compliant 50 Adding Sound to a Still Image 51 Applying DPOF Settings 52 Reviewing and Changing the Settings of the Camcorder 54 Uninstalling the Software 56 Uninstalling ImageBrowser and PhotoStitch 56 Troubleshooting ...57 2 Contents
...Digital Video Software 5 Installing the Digital Video Software 6 Before Downloading Still Images 9 Connecting the Camcorder to a Computer 9 CameraWindow Automatic Launch Setting 10 Mac OS 10.2 - 10.3 10 Mac OS 10.1.5 10 Downloading Still Images (ImageBrowser 11 Using the Computer to Download Still Images 11 Auto-downloading 11 ...Printing (Exif 2.2 Compliant 50 Adding Sound to a Still Image 51 Applying DPOF Settings 52 Reviewing and Changing the Settings of the Camcorder 54 Uninstalling the Software 56 Uninstalling ImageBrowser and PhotoStitch 56 Troubleshooting ...57 2 Contents
Digital Video Software (Macintosh) Ver.19 Instruction Manual
Page 7
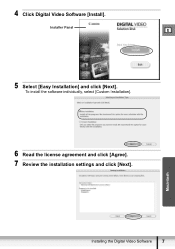
Installer Panel E 5 Select [Easy Installation] and click [Next]. Macintosh Installing the Digital Video Software 7 To install the software individually, select [Custom Installation]. 6 Read the license agreement and click [Agree]. 7 Review the installation settings and click [Next]. 4 Click Digital Video Software [Install].
Installer Panel E 5 Select [Easy Installation] and click [Next]. Macintosh Installing the Digital Video Software 7 To install the software individually, select [Custom Installation]. 6 Read the license agreement and click [Agree]. 7 Review the installation settings and click [Next]. 4 Click Digital Video Software [Install].
Digital Video Software (Macintosh) Ver.19 Instruction Manual
Page 54
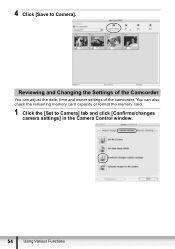
4 Click [Save to Camera] tab and click [Confirms/changes camera settings] in the Camera Control window. 54 Using Various Functions You can adjust the date, time and owner settings of the Camcorder You can also check the remaining memory card capacity or format the memory card. 1 Click the [Set to Camera]. Reviewing and Changing the Settings of the camcorder.
4 Click [Save to Camera] tab and click [Confirms/changes camera settings] in the Camera Control window. 54 Using Various Functions You can adjust the date, time and owner settings of the Camcorder You can also check the remaining memory card capacity or format the memory card. 1 Click the [Set to Camera]. Reviewing and Changing the Settings of the camcorder.

DC20/DC10 Instruction Manual
Page 14
... SCR button ( 54) / PLAYLIST button ( 85) Lens cover switch ( 33, 35) ( - closed) 14 Speaker ( 43) FUNC. Components Guide Left side view Right side view (record review) button ( 34) / (rewind) button ( 40) / -
... SCR button ( 54) / PLAYLIST button ( 85) Lens cover switch ( 33, 35) ( - closed) 14 Speaker ( 43) FUNC. Components Guide Left side view Right side view (record review) button ( 34) / (rewind) button ( 40) / -

DC20/DC10 Instruction Manual
Page 34
... delete the scene by a battery pack, the camcorder will automatically shut off if left without any operations for 5 minutes ( 84). Reviewing the Last Scene Recorded In record pause mode: Press and release the (record review) button. • The camcorder plays back the last scene and returns to record...omni selector ( ) to select the icon and press ( ) to return to specification. The last scene review is powered by selecting ( ) the icon ( 87). Approximately 30 seconds before the camcorder shuts off, " AUTO POWER OFF" appears in the center of the pixels may occasionally misfire or appear ...
... delete the scene by a battery pack, the camcorder will automatically shut off if left without any operations for 5 minutes ( 84). Reviewing the Last Scene Recorded In record pause mode: Press and release the (record review) button. • The camcorder plays back the last scene and returns to record...omni selector ( ) to select the icon and press ( ) to return to specification. The last scene review is powered by selecting ( ) the icon ( 87). Approximately 30 seconds before the camcorder shuts off, " AUTO POWER OFF" appears in the center of the pixels may occasionally misfire or appear ...
DC20/DC10 Instruction Manual
Page 80
... example, by mounting it on the memory card . D.ZOOM: Determines the operation of the digital zoom. When the digital zoom is activated, the camcorder will switch automatically to the digital zoom when you zoom in beyond the optical zoom range. With the digital zoom the image is digitally ... D.ZOOM IMG STAB only AF AST LAMP FOCUS PRI. Available Settings List (MENU) Available menu items vary depending on each function, see the reference page. REVIEW WIND SCREEN SELF TIMER ON, OFF, ON, AUTO, OFF 40X, OFF OFF 200X ON, OFF, 8sec, ON ON, OFF 2sec, 10sec , OFF OFF 4sec, 6sec...
... example, by mounting it on the memory card . D.ZOOM: Determines the operation of the digital zoom. When the digital zoom is activated, the camcorder will switch automatically to the digital zoom when you zoom in beyond the optical zoom range. With the digital zoom the image is digitally ... D.ZOOM IMG STAB only AF AST LAMP FOCUS PRI. Available Settings List (MENU) Available menu items vary depending on each function, see the reference page. REVIEW WIND SCREEN SELF TIMER ON, OFF, ON, AUTO, OFF 40X, OFF OFF 200X ON, OFF, 8sec, ON ON, OFF 2sec, 10sec , OFF OFF 4sec, 6sec...
DC20/DC10 Instruction Manual
Page 81
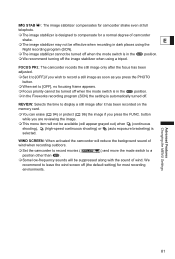
... recommend to compensate for a normal degree of wind when recording outdoors. Set the camcorder to record movies ( ) and move the mode switch to record a still image as soon as you are reviewing the image. This menu item will be turned off when the mode switch is in... the position. We recommend turning off the image stabilizer when using a tripod. IMG STAB : The image stabilizer compensates for camcorder shake even at full telephoto. &#...
... recommend to compensate for a normal degree of wind when recording outdoors. Set the camcorder to record movies ( ) and move the mode switch to record a still image as soon as you are reviewing the image. This menu item will be turned off when the mode switch is in... the position. We recommend turning off the image stabilizer when using a tripod. IMG STAB : The image stabilizer compensates for camcorder shake even at full telephoto. &#...
DC20/DC10 Instruction Manual
Page 87
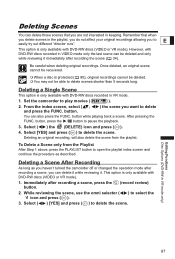
...mode). To Delete a Scene only from the playlist. While reviewing the scene, use the omni selector ( icon and press ( ). ) to open the playlist index screen and continue the procedure as you haven't turned the camcorder off or changed the operation mode after recording a scene, ...press the button. (record review) 2. However, with DVD-RW discs recorded in VR mode. 1. button. ) the scene you want to ...
...mode). To Delete a Scene only from the playlist. While reviewing the scene, use the omni selector ( icon and press ( ). ) to open the playlist index screen and continue the procedure as you haven't turned the camcorder off or changed the operation mode after recording a scene, ...press the button. (record review) 2. However, with DVD-RW discs recorded in VR mode. 1. button. ) the scene you want to ...
DC20/DC10 Instruction Manual
Page 94
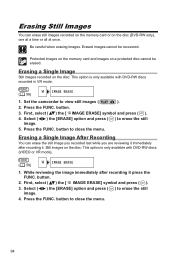
... is only available with DVD-RW discs (VIDEO or VR mode). ( 59) IMAGE ERASE 1. Set the camcorder to erase the still 5. First, select ( ) the [ IMAGE ERASE] symbol and press ( ). 4. Press the FUNC. button. 2. While reviewing the image immediately after recording it press the FUNC. button to close the menu. button. 3. Press the... (DVD-RW only), one at a time or all at once. Erasing Still Images You can erase the still image you recorded last while you are reviewing it immediately after recording it .
... is only available with DVD-RW discs (VIDEO or VR mode). ( 59) IMAGE ERASE 1. Set the camcorder to erase the still 5. First, select ( ) the [ IMAGE ERASE] symbol and press ( ). 4. Press the FUNC. button. 2. While reviewing the image immediately after recording it press the FUNC. button to close the menu. button. 3. Press the... (DVD-RW only), one at a time or all at once. Erasing Still Images You can erase the still image you recorded last while you are reviewing it immediately after recording it .
DC20/DC10 Instruction Manual
Page 96
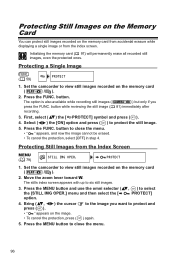
... view still images recorded on the memory card ( / ). 2. Protecting Still Images from the index screen. Set the camcorder to view still images recorded on the memory card ( / ). 2. Bring ( , ) the cursor press appears on the memory card from accidental erasure ...will permanently erase all recorded still images, even the protected ones. Select ( ) the [ON] option and press ( ) to select PROTECT] 4. button. button while reviewing the still image ( recording. ) but only if you want to protect and ) again. 5. button to close the menu. 96 Move the zoom lever toward W....
... view still images recorded on the memory card ( / ). 2. Protecting Still Images from the index screen. Set the camcorder to view still images recorded on the memory card ( / ). 2. Bring ( , ) the cursor press appears on the memory card from accidental erasure ...will permanently erase all recorded still images, even the protected ones. Select ( ) the [ON] option and press ( ) to select PROTECT] 4. button. button while reviewing the still image ( recording. ) but only if you want to protect and ) again. 5. button to close the menu. 96 Move the zoom lever toward W....
DC20/DC10 Instruction Manual
Page 145
... save 84 Print order 121 Print/share button 106, 110, 115 Printing 114 Protecting still images 96 Protecting the disc 90 R Record review 34 Recording - Stills 35 Recording data 45 Recording mode 60 Recording programs 46 Recording reminder 19 Recording time display 19 Remote sensor 25 ...RESET 123 Resetting file numbers 84 Review - Movies 34 Review - Stills 81 Roxio MyDVD for Canon 104 S Scene Editing 85 SCN - Stills 41 Playlist 85 Portrait (SCN 46 Power - N ND filter 140...
... save 84 Print order 121 Print/share button 106, 110, 115 Printing 114 Protecting still images 96 Protecting the disc 90 R Record review 34 Recording - Stills 35 Recording data 45 Recording mode 60 Recording programs 46 Recording reminder 19 Recording time display 19 Remote sensor 25 ...RESET 123 Resetting file numbers 84 Review - Movies 34 Review - Stills 81 Roxio MyDVD for Canon 104 S Scene Editing 85 SCN - Stills 41 Playlist 85 Portrait (SCN 46 Power - N ND filter 140...


