
ZoomBrowser EX 6.5 for Windows Instruction Manual
Page 2
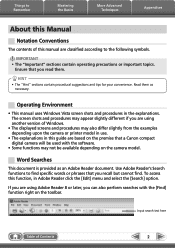
... "Important" sections contain operating precautions or important topics. The screen shots and procedures may also differ slightly from the examples depending upon the camera or printer model in use. • The explanations in this guide are classified according to the following symbols. Use Adobe Reader's Search functions to find specific words...
... "Important" sections contain operating precautions or important topics. The screen shots and procedures may also differ slightly from the examples depending upon the camera or printer model in use. • The explanations in this guide are classified according to the following symbols. Use Adobe Reader's Search functions to find specific words...

ZoomBrowser EX 6.5 for Windows Instruction Manual
Page 13
... the computer, you can also use it to Remember Mastering the Basics More Advanced Techniques Appendices 4 Click [2. Printer and Layout Settings] and set the categories as desired. Print]. Table of an image. Sets the printer, paper size and borderless printing settings. Printing will start. Click here to insert text onto an image...
... the computer, you can also use it to Remember Mastering the Basics More Advanced Techniques Appendices 4 Click [2. Printer and Layout Settings] and set the categories as desired. Print]. Table of an image. Sets the printer, paper size and borderless printing settings. Printing will start. Click here to insert text onto an image...

ZoomBrowser EX 6.5 for Windows Instruction Manual
Page 15
Table of the selected image and print it. Things to rotate or trim. Printer and Layout Settings] and set the categories as desired. Sets the printer and paper size settings. Rotates selected images. Click here to crop a portion of Contents 15 Printing will start. Configures the printing of rows or columns. 5 Click [3. Sets the number of the shooting information, comments, headers, footers or page numbers. Print]. Select an image to Remember Mastering the Basics More Advanced Techniques Appendices 4 Click [2.
Table of the selected image and print it. Things to rotate or trim. Printer and Layout Settings] and set the categories as desired. Sets the printer and paper size settings. Rotates selected images. Click here to crop a portion of Contents 15 Printing will start. Configures the printing of rows or columns. 5 Click [3. Sets the number of the shooting information, comments, headers, footers or page numbers. Print]. Select an image to Remember Mastering the Basics More Advanced Techniques Appendices 4 Click [2.
Digital Video Software (Windows) Ver.19 Instruction Manual
Page 12
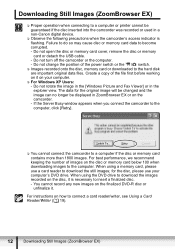
... Do not change the position of images on your computer's DVD drive. For instructions on the camcorder. - Downloading Still Images (ZoomBrowser EX) Proper operation when connecting to a computer or printer cannot be displayed in the explorer view. Do not open the disc or memory card cover,... original image will be changed and the image can no longer be guaranteed if the disc inserted into the camcorder was recorded or used in a non-Canon digital device. Observe the following precautions when the camcorder's access indicator is necessary to insert a finalized disc. -
... Do not change the position of images on your computer's DVD drive. For instructions on the camcorder. - Downloading Still Images (ZoomBrowser EX) Proper operation when connecting to a computer or printer cannot be displayed in the explorer view. Do not open the disc or memory card cover,... original image will be changed and the image can no longer be guaranteed if the disc inserted into the camcorder was recorded or used in a non-Canon digital device. Observe the following precautions when the camcorder's access indicator is necessary to insert a finalized disc. -

Digital Video Software (Windows) Ver.19 Instruction Manual
Page 53
...print an index, select [Contact Sheet Print]. Doing so may not be printed. If this program to the printer (when the camcorder's access indicator is a printing program. When you are using a network printer and the printer name (including the network path) exceeds 31 characters, it may cause memory card data to become corrupted. &#... Using Various Functions 53 E Do not open the memory card cover, remove the memory card, detach the USB cable or turn off the camcorder while data is being transferred to lay out the still images for printing. You can use this happens, click the...
...print an index, select [Contact Sheet Print]. Doing so may not be printed. If this program to the printer (when the camcorder's access indicator is a printing program. When you are using a network printer and the printer name (including the network path) exceeds 31 characters, it may cause memory card data to become corrupted. &#... Using Various Functions 53 E Do not open the memory card cover, remove the memory card, detach the USB cable or turn off the camcorder while data is being transferred to lay out the still images for printing. You can use this happens, click the...
Digital Video Software (Windows) Ver.19 Instruction Manual
Page 54
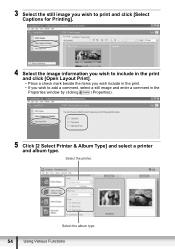
Select the printer. Select the album type. 54 Using Various Functions 3 Select the still image you wish to print and click [Select Captions for Printing]. 4 Select the image information you wish to include in the print and click [Open Layout Print]. • Place a check mark beside the items you wish include in the print. • If you wish to add a comment, select a still image and enter a comment in the Properties window by clicking (Properties). 5 Click [2 Select Printer & Album Type] and select a printer and album type.
Select the printer. Select the album type. 54 Using Various Functions 3 Select the still image you wish to print and click [Select Captions for Printing]. 4 Select the image information you wish to include in the print and click [Open Layout Print]. • Place a check mark beside the items you wish include in the print. • If you wish to add a comment, select a still image and enter a comment in the Properties window by clicking (Properties). 5 Click [2 Select Printer & Album Type] and select a printer and album type.
Digital Video Software (Windows) Ver.19 Instruction Manual
Page 57
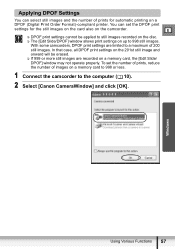
... some camcorders, DPOF print settings are recorded on up to 998 still images. E DPOF print settings cannot be erased. If 999 or more still images are limited to the computer ( 10). 2 Select [Canon CameraWindow] and click [OK]. Applying DPOF ...Settings You can set the number of prints, reduce the number of images on a memory card to 998 or less. 1 Connect the camcorder to a maximum of prints for the still images on the card also on a DPOF (Digital Print Order Format)-compliant printer...
... some camcorders, DPOF print settings are recorded on up to 998 still images. E DPOF print settings cannot be erased. If 999 or more still images are limited to the computer ( 10). 2 Select [Canon CameraWindow] and click [OK]. Applying DPOF ...Settings You can set the number of prints, reduce the number of images on a memory card to 998 or less. 1 Connect the camcorder to a maximum of prints for the still images on the card also on a DPOF (Digital Print Order Format)-compliant printer...
Digital Video Software (Windows) Ver.19 Instruction Manual
Page 65
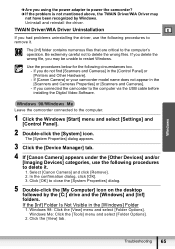
...below for the following procedures to remove it . 1. If you do not find [Scanners and Cameras] in the [Control Panel] or [Printers and Other Hardware]. - Windows Me: Click the [Tools] menu and select [Folder Options]. 2. TWAIN Driver/WIA Driver Uninstallation E If you...in the [Scanners and Cameras Properties] or [Scanners and Cameras]. - If [Canon Camera] or your camcorder model name does not appear in the [Windows] Folder 1. Leave the camcorder connected to delete the wrong files. Select [Canon Camera] and click [Remove]. 2. Click [OK] to close the [System Properties...
...below for the following procedures to remove it . 1. If you do not find [Scanners and Cameras] in the [Control Panel] or [Printers and Other Hardware]. - Windows Me: Click the [Tools] menu and select [Folder Options]. 2. TWAIN Driver/WIA Driver Uninstallation E If you...in the [Scanners and Cameras Properties] or [Scanners and Cameras]. - If [Canon Camera] or your camcorder model name does not appear in the [Windows] Folder 1. Leave the camcorder connected to delete the wrong files. Select [Canon Camera] and click [Remove]. 2. Click [OK] to close the [System Properties...
Digital Video Software (Macintosh) Ver.19 Instruction Manual
Page 11
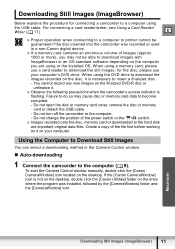
...new images on the finalized DVD-R disc or unfinalize it. Observe the following precautions when the camcorder's access indicator is not on the desktop, double click the [Canon Utilities] folder on the drive where the program was recorded or used in the Camera Control window. &#... use a card reader to download the still images; E Proper operation when connecting to a computer or printer cannot be guaranteed if the disc inserted into the camcorder was installed, followed by the [CameraWindow] folder and the [CameraWindow] icon. When using the USB cable. for connecting...
...new images on the finalized DVD-R disc or unfinalize it. Observe the following precautions when the camcorder's access indicator is not on the desktop, double click the [Canon Utilities] folder on the drive where the program was recorded or used in the Camera Control window. &#... use a card reader to download the still images; E Proper operation when connecting to a computer or printer cannot be guaranteed if the disc inserted into the camcorder was installed, followed by the [CameraWindow] folder and the [CameraWindow] icon. When using the USB cable. for connecting...

Digital Video Software (Macintosh) Ver.19 Instruction Manual
Page 52
...up to 998 still images. You can select still images and the number of 200 still images. With some camcorders, DPOF print settings are recorded on a DPOF (Digital Print Order Format)-compliant printer. To set the DPOF print settings for automatic printing on a memory card, the [Edit Slide/ DPOF] window...window • When connecting a card reader/writer, click the [Set to a maximum of prints for the still images on the card also on the camcorder. DPOF print settings cannot be erased. If 999 or more still images are limited to Memory Card] tab and click [Set Slide...
...up to 998 still images. You can select still images and the number of 200 still images. With some camcorders, DPOF print settings are recorded on a DPOF (Digital Print Order Format)-compliant printer. To set the DPOF print settings for automatic printing on a memory card, the [Edit Slide/ DPOF] window...window • When connecting a card reader/writer, click the [Set to a maximum of prints for the still images on the card also on the camcorder. DPOF print settings cannot be erased. If 999 or more still images are limited to Memory Card] tab and click [Set Slide...
DC20/DC10 Instruction Manual
Page 77
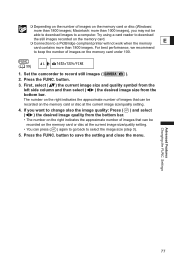
...button to record still images ( ). 2. Settings 77 Macintosh: more than 1000 images), you want to select the image size (step 3). 5. Set the camcorder to save the setting and close the menu. The number on the right indicates the approximate number of images that can press ( ) again to go... memory card or disc at the current image size/quality setting. 4. Press the FUNC. For best performance, we recommend to a PictBridge compliant printer will not work when the memory E card contains more than 1800 images; Try using a card reader to download the still images recorded on...
...button to record still images ( ). 2. Settings 77 Macintosh: more than 1000 images), you want to select the image size (step 3). 5. Set the camcorder to save the setting and close the menu. The number on the right indicates the approximate number of images that can press ( ) again to go... memory card or disc at the current image size/quality setting. 4. Press the FUNC. For best performance, we recommend to a PictBridge compliant printer will not work when the memory E card contains more than 1800 images; Try using a card reader to download the still images recorded on...
DC20/DC10 Instruction Manual
Page 92
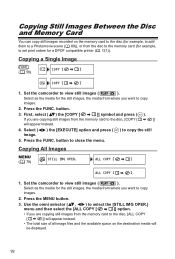
...button to view still images ( ). Set the camcorder to close the menu. Select ( image. ) the [EXECUTE] option and press ( ) to copy images. 2. Copying All Images MENU ( 79) STILL IMG OPER. Press the FUNC. Select as the media for a DPOF compatible printer ( 121)). If you want to the disc,... the memory card to copy images. 2. Press the MENU button. 3. First, select ( ) the [COPY [ ]] symbol and press ( ). Set the camcorder to the disc, [COPY [ ]] will be displayed. 92 Use the omni selector ( , ) to select the [STILL IMG OPER.] menu and then select...
...button to view still images ( ). Set the camcorder to close the menu. Select ( image. ) the [EXECUTE] option and press ( ) to copy images. 2. Copying All Images MENU ( 79) STILL IMG OPER. Press the FUNC. Select as the media for a DPOF compatible printer ( 121)). If you want to the disc,... the memory card to copy images. 2. Press the MENU button. 3. First, select ( ) the [COPY [ ]] symbol and press ( ). Set the camcorder to the disc, [COPY [ ]] will be displayed. 92 Use the omni selector ( , ) to select the [STILL IMG OPER.] menu and then select...
DC20/DC10 Instruction Manual
Page 114
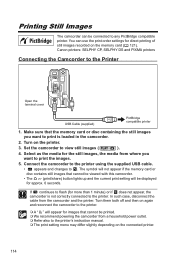
... print setting menu may differ slightly depending on the connected printer. 114 Canon printers: SELPHY CP, SELPHY DS and PIXMA printers Connecting the Camcorder to . Set the camcorder to any PictBridge compatible printer. Select as the media for the still images, the media from the camcorder and the printer. Make sure that cannot be displayed for approx. 6 seconds. Turn...
... print setting menu may differ slightly depending on the connected printer. 114 Canon printers: SELPHY CP, SELPHY DS and PIXMA printers Connecting the Camcorder to . Set the camcorder to any PictBridge compatible printer. Select as the media for the still images, the media from the camcorder and the printer. Make sure that cannot be displayed for approx. 6 seconds. Turn...
DC20/DC10 Instruction Manual
Page 115
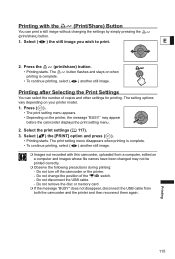
Printing with this camcorder, uploaded from both the camcorder and the printer and then reconnect them again. Select ( ) the still image you wish to print. Select the print settings ( 117). 3. Do not change the position ... simply pressing the (print/share) button. 1. Printing 115 The setting options vary depending on the printer, the message "BUSY." Do not turn off the camcorder or the printer. - Press ( ). • The print setting menu appears. • Depending on your printer model. 1. Select ( ) the [PRINT] option and press ( ). • Printing starts. Do not ...
Printing with this camcorder, uploaded from both the camcorder and the printer and then reconnect them again. Select ( ) the still image you wish to print. Select the print settings ( 117). 3. Do not change the position ... simply pressing the (print/share) button. 1. Printing 115 The setting options vary depending on the printer, the message "BUSY." Do not turn off the camcorder or the printer. - Press ( ). • The print setting menu appears. • Depending on your printer model. 1. Select ( ) the [PRINT] option and press ( ). • Printing starts. Do not ...
DC20/DC10 Instruction Manual
Page 116
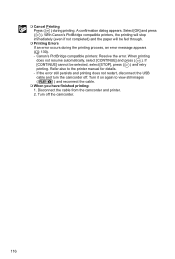
... the cable. When you have finished printing: 1. A confirmation dialog appears. Turn it on again to the printer manual for details. - Select [OK] and press ( ). Disconnect the cable from the camcorder and printer. 2. With Canon's PictBridge compatible printers, the printing will stop immediately (even if not completed) and the paper will be selected, select [STOP...
... the cable. When you have finished printing: 1. A confirmation dialog appears. Turn it on again to the printer manual for details. - Select [OK] and press ( ). Disconnect the cable from the camcorder and printer. 2. With Canon's PictBridge compatible printers, the printing will stop immediately (even if not completed) and the paper will be selected, select [STOP...
DC20/DC10 Instruction Manual
Page 117
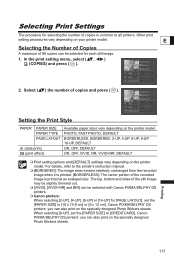
... ( ) the number of 99 copies can also print on the specially designed Photo Stickers sheets. Canon PIXMA/SELPHY DS printers: you can be selected with Canon PIXMA/SELPHY DS printers. Canon printers: When selecting [2-UP], [4-UP], [9-UP] or [16-UP] for each still image. 1. Selecting Print ...129; [VIVID], [VIVID+NR] and [NR] can also print on your printer model. When selecting [8-UP], set the [PAPER SIZE] to [CREDITCARD]. Canon PIXMA/SELPHY DS printers: you can be selected for [PAGE LAYOUT], set the [PAPER SIZE] to [10 x 14.8 cm] or [9 x 13 cm]. PHOTO, FAST PHOTO, DEFAULT...
... ( ) the number of 99 copies can also print on the specially designed Photo Stickers sheets. Canon PIXMA/SELPHY DS printers: you can be selected with Canon PIXMA/SELPHY DS printers. Canon printers: When selecting [2-UP], [4-UP], [9-UP] or [16-UP] for each still image. 1. Selecting Print ...129; [VIVID], [VIVID+NR] and [NR] can also print on your printer model. When selecting [8-UP], set the [PAPER SIZE] to [CREDITCARD]. Canon PIXMA/SELPHY DS printers: you can be selected for [PAGE LAYOUT], set the [PAPER SIZE] to [10 x 14.8 cm] or [9 x 13 cm]. PHOTO, FAST PHOTO, DEFAULT...

DC20/DC10 Instruction Manual
Page 118
In the print setting menu, select ( , ) (date) and press ( ). 2. Select ( ) the paper type and press ( ). Select the paper type of the paper set in your printer. 3. Paper Settings 1. Select the paper size of the paper set in the Print 1. Select ( ) the paper size and press ( ). Select ( ) a layout option and press ( ). Including the Date in your printer. 4. Select ( ) a date print option and press ( ). 118 In the print setting menu, select ( , ) [PAPER] and press ( ). 2.
In the print setting menu, select ( , ) (date) and press ( ). 2. Select ( ) the paper type and press ( ). Select the paper type of the paper set in your printer. 3. Paper Settings 1. Select the paper size of the paper set in the Print 1. Select ( ) the paper size and press ( ). Select ( ) a layout option and press ( ). Including the Date in your printer. 4. Select ( ) a date print option and press ( ). 118 In the print setting menu, select ( , ) [PAPER] and press ( ). 2.
DC20/DC10 Instruction Manual
Page 120
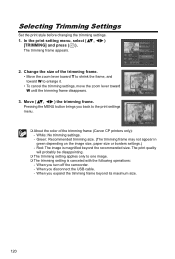
Move ( , ) the trimming frame. White: No trimming settings. - Red: The image is canceled with the following operations: - When you turn off the camcorder. - In the print setting menu, select ( , ) [TRIMMING] and press ( ). The print quality will probably be disappointing. The trimming ...frame may not appear in green depending on the image size, paper size or borders settings.) - Change the size of the trimming frame (Canon CP printers only): - When you expand the trimming frame beyond the recommended size. When you back to one image. The trimming setting is...
Move ( , ) the trimming frame. White: No trimming settings. - Red: The image is canceled with the following operations: - When you turn off the camcorder. - In the print setting menu, select ( , ) [TRIMMING] and press ( ). The print quality will probably be disappointing. The trimming ...frame may not appear in green depending on the image size, paper size or borders settings.) - Change the size of the trimming frame (Canon CP printers only): - When you expand the trimming frame beyond the recommended size. When you back to one image. The trimming setting is...
DC20/DC10 Instruction Manual
Page 121
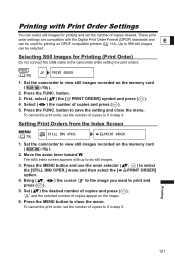
... ( ). 5. Up to 998 still images can be selected. Selecting Still Images for printing on the memory card ( / ). 2. Set the camcorder to the camcorder while setting the print orders. ( 59) PRINT ORDER 1. Select ( ) the number of copies desired. Setting Print Orders from the Index Screen MENU...Order) Do not connect the USB cable to view still images recorded on DPOF compatible printers ( 114). " " and the selected number of copies to view still images recorded on the image. 6. Printing 121 Set the camcorder to 0 in step 5. Bring ( , press ( ). ) the cursor to the...
... ( ). 5. Up to 998 still images can be selected. Selecting Still Images for printing on the memory card ( / ). 2. Set the camcorder to the camcorder while setting the print orders. ( 59) PRINT ORDER 1. Select ( ) the number of copies desired. Setting Print Orders from the Index Screen MENU...Order) Do not connect the USB cable to view still images recorded on DPOF compatible printers ( 114). " " and the selected number of copies to view still images recorded on the image. 6. Printing 121 Set the camcorder to 0 in step 5. Bring ( , press ( ). ) the cursor to the...
DC20/DC10 Instruction Manual
Page 122
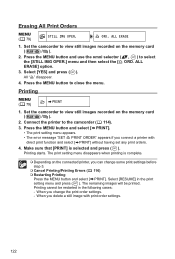
...will be restarted in the print setting menu and press ( ). All " " disappear. 4. Printing cannot be printed. When you connect a printer with print order settings. 122 Printing starts. The print setting menu disappears when printing is selected and press ( ). Erasing All Print Orders MENU... ( 79) STILL IMG OPER. Set the camcorder to the camcorder ( 114). 3. Set the camcorder to view still images recorded on the connected printer, you change some print settings before step 3. Cancel Printing/Printing Errors ( 116...
...will be restarted in the print setting menu and press ( ). All " " disappear. 4. Printing cannot be printed. When you connect a printer with print order settings. 122 Printing starts. The print setting menu disappears when printing is selected and press ( ). Erasing All Print Orders MENU... ( 79) STILL IMG OPER. Set the camcorder to the camcorder ( 114). 3. Set the camcorder to view still images recorded on the connected printer, you change some print settings before step 3. Cancel Printing/Printing Errors ( 116...

