

User Manual
Page 2
...Wrist Strap WS-800 Canon Digital Camera Solution Disk Warranty Card "Canon Customer Support" Leaflet Camera User Guide This Guide Direct Print User Guide Read when you want to connect the camera to a computer. Software Starter Guide Read when you purchased the camera. Explains how to ...retailer where you want to connect the camera to a printer and print. Download ZoomBrowser EX/ImageBrower Software Guide (PDF) from: http://web.canon.jp/imaging/information-e.htm • You can use the software on the Canon Digital Camera Solution Disk. Checking the Package Contents Check...
...Wrist Strap WS-800 Canon Digital Camera Solution Disk Warranty Card "Canon Customer Support" Leaflet Camera User Guide This Guide Direct Print User Guide Read when you want to connect the camera to a computer. Software Starter Guide Read when you purchased the camera. Explains how to ...retailer where you want to connect the camera to a printer and print. Download ZoomBrowser EX/ImageBrower Software Guide (PDF) from: http://web.canon.jp/imaging/information-e.htm • You can use the software on the Canon Digital Camera Solution Disk. Checking the Package Contents Check...

User Manual
Page 3
... by the following icons. Conventions Used in this Guide • Language that displays on the screen appears inside [ ]. • Buttons on the camera body are collectively referred to as memory cards in this guide. 3 button FUNC./SET (Function/Set) button button button button MENU button DISP. ...(Display) button • : Troubleshooting tips for common problems. • : Hints for getting more out of your camera. • : Notes for reference page number. • This guide assumes all functions are at their default settings unless otherwise noted. • This...
... by the following icons. Conventions Used in this Guide • Language that displays on the screen appears inside [ ]. • Buttons on the camera body are collectively referred to as memory cards in this guide. 3 button FUNC./SET (Function/Set) button button button button MENU button DISP. ...(Display) button • : Troubleshooting tips for common problems. • : Hints for getting more out of your camera. • : Notes for reference page number. • This guide assumes all functions are at their default settings unless otherwise noted. • This...

User Manual
Page 4
...copyright or other legal rights even if the image was shot for an extended period as the camera body may appear as bright or dark dots. Please note that Canon Inc., its subsidiaries and affiliates, and its distributors are intended for any consequential damages arising from... an image to be recorded or to specification, but occasionally non-performing pixels may become warm. The camera is not damaged. 4 The camera is not damaged. For Canon Customer Support contacts, please see the customer support list supplied with extremely high-precision manufacturing techniques. Warning ...
...copyright or other legal rights even if the image was shot for an extended period as the camera body may appear as bright or dark dots. Please note that Canon Inc., its subsidiaries and affiliates, and its distributors are intended for any consequential damages arising from... an image to be recorded or to specification, but occasionally non-performing pixels may become warm. The camera is not damaged. 4 The camera is not damaged. For Canon Customer Support contacts, please see the customer support list supplied with extremely high-precision manufacturing techniques. Warning ...

User Manual
Page 6
...) U Sunset (p. 57) - What Do You Want to Do? 4 Shoot ● Shoot, Leaving It to the Camera to take (recording pixels) . . . . 70 ● Take pictures continuously 69 ● Shoot without camera shake (image stabilization 124 ● Shoot without camera shake even in low light conditions (high ISO speed 58, 72 6 Take good shots of...
...) U Sunset (p. 57) - What Do You Want to Do? 4 Shoot ● Shoot, Leaving It to the Camera to take (recording pixels) . . . . 70 ● Take pictures continuously 69 ● Shoot without camera shake (image stabilization 124 ● Shoot without camera shake even in low light conditions (high ISO speed 58, 72 6 Take good shots of...

User Manual
Page 8
Basic Operations.. 47 Resetting the Camera 48 Formatting Memory Cards 49 Changing Sounds 51 Changing the Image Display Time .. 52 3 Shooting Special Scenes and Using Common Functions 53 9 Just Taking Pictures (... on the Screen . 43 Switching the Display 45 FUNC. Menu - Chapters 4 - 9 explain the advanced functions letting you learn further as you read them in this camera. Checking the Package Contents .......2 Conventions Used in order.
Basic Operations.. 47 Resetting the Camera 48 Formatting Memory Cards 49 Changing Sounds 51 Changing the Image Display Time .. 52 3 Shooting Special Scenes and Using Common Functions 53 9 Just Taking Pictures (... on the Screen . 43 Switching the Display 45 FUNC. Menu - Chapters 4 - 9 explain the advanced functions letting you learn further as you read them in this camera. Checking the Package Contents .......2 Conventions Used in order.

User Manual
Page 9
...Shooting Using the Viewfinder........ 77 Shooting Using a TV 77 $ Customizing the Self-Timer ........ 78 5 Getting More Out of Your Camera 79 Changing the AF Frame 80 Checking the Focus and People's Expressions (AF-Point Zoom).... 82 0 Selecting the Face to ... Designating Images for Transfer (DPOF 109 Designating Images for Printing (DPOF 111 8 Customizing the Camera 117 Changing Functions 118 Changing Shooting Functions ....... 121 6 Using Various Functions for Using the Camera 125 Using Household Power 126 Using a Supplementary Flash ....... 126 Handling Precautions 127 You Think...
...Shooting Using the Viewfinder........ 77 Shooting Using a TV 77 $ Customizing the Self-Timer ........ 78 5 Getting More Out of Your Camera 79 Changing the AF Frame 80 Checking the Focus and People's Expressions (AF-Point Zoom).... 82 0 Selecting the Face to ... Designating Images for Transfer (DPOF 109 Designating Images for Printing (DPOF 111 8 Customizing the Camera 117 Changing Functions 118 Changing Shooting Functions ....... 121 6 Using Various Functions for Using the Camera 125 Using Household Power 126 Using a Supplementary Flash ....... 126 Handling Precautions 127 You Think...

User Manual
Page 10
...etc.). This could result in fire or electrical shock. Memory card, day/date battery: Dangerous if accidentally swallowed. Exposure to enter the camera. Warnings Denotes the possibility of injury or damage to the equipment. If liquid or foreign objects come into contact with any part of ...8226; Do not attempt to disassemble or alter any separately sold accessories you read the safety precautions described below. Always ensure that the camera is not expressly described in close proximity to human eyes. Cautions Denotes the possibility of serious injury or death. Exposure to the ...
...etc.). This could result in fire or electrical shock. Memory card, day/date battery: Dangerous if accidentally swallowed. Exposure to enter the camera. Warnings Denotes the possibility of injury or damage to the equipment. If liquid or foreign objects come into contact with any part of ...8226; Do not attempt to disassemble or alter any separately sold accessories you read the safety precautions described below. Always ensure that the camera is not expressly described in close proximity to human eyes. Cautions Denotes the possibility of serious injury or death. Exposure to the ...

User Manual
Page 11
... eyes, mouth, skin or clothing contacts these substances, immediately flush with water and seek medical assistance. • Before you are left inside the camera, damage caused by the strap. • Be careful not to bump or push strongly on a beach or at bright light sources (the sun...leakage, overheating or explosion, resulting in the following places. - Humid or dusty areas. This may lead to malfunction. • Avoid using the camera. Places subject to severe impacts. These could lead to the surface, or when covering the flash with dirt, dust or other items stuck to ...
... eyes, mouth, skin or clothing contacts these substances, immediately flush with water and seek medical assistance. • Before you are left inside the camera, damage caused by the strap. • Be careful not to bump or push strongly on a beach or at bright light sources (the sun...leakage, overheating or explosion, resulting in the following places. - Humid or dusty areas. This may lead to malfunction. • Avoid using the camera. Places subject to severe impacts. These could lead to the surface, or when covering the flash with dirt, dust or other items stuck to ...

User Manual
Page 12
LCD Monitor Precautions • Do not sit in a chair with the camera in your pocket. Doing so may cause malfunction or damage the LCD monitor. • When putting the camera in your bag, ensure that hard objects do not come into contact with the LCD monitor. Doing so may cause malfunction or damage the LCD monitor. • Do not attach accessories to the strap. If this occurs, it may cause malfunction or damage the LCD monitor. 12
LCD Monitor Precautions • Do not sit in a chair with the camera in your pocket. Doing so may cause malfunction or damage the LCD monitor. • When putting the camera in your bag, ensure that hard objects do not come into contact with the LCD monitor. Doing so may cause malfunction or damage the LCD monitor. • Do not attach accessories to the strap. If this occurs, it may cause malfunction or damage the LCD monitor. 12

User Manual
Page 13
Wrist strap 13 1 Getting Started This chapter explains how to prepare for shooting and shooting in A mode, as well as how to avoid dropping the camera during use. • Keep your arms tight against your fingers do not touch the flash. Be sure that your body while holding the camera firmly by the sides. Attaching the Wrist Strap/Holding the Camera • Use the included strap to play back, erase and print images.
Wrist strap 13 1 Getting Started This chapter explains how to prepare for shooting and shooting in A mode, as well as how to avoid dropping the camera during use. • Keep your arms tight against your fingers do not touch the flash. Be sure that your body while holding the camera firmly by the sides. Attaching the Wrist Strap/Holding the Camera • Use the included strap to play back, erase and print images.

User Manual
Page 14
... take images if the tab is oriented correctly. Insert the batteries. ● Insert the batteries with the label in the wrong direction could damage the camera. 14 Open the cover. ● Slide and hold the cover lock , then slide and open the cover as shown. Check the card's write-protect tab... a click. Label Insert the memory card. ● Insert the memory card with (+) and (-) sides oriented correctly. Slide the tab up until it clicks into the camera.
... take images if the tab is oriented correctly. Insert the batteries. ● Insert the batteries with the label in the wrong direction could damage the camera. 14 Open the cover. ● Slide and hold the cover lock , then slide and open the cover as shown. Check the card's write-protect tab... a click. Label Insert the memory card. ● Insert the memory card with (+) and (-) sides oriented correctly. Slide the tab up until it clicks into the camera.

User Manual
Page 16
... message will not display. We cannot recommend the use NiMH batteries? Insert new batteries. 16 Compatible Batteries AA-size alkaline batteries and Canon AA-size NiMH batteries (sold separately) (p. 36). If the batteries are depleted. The batteries are charged, the icon or message will... (Supplied) 220 650 8 NiMH Batteries (Sold Separately) 450 1000 10 * The number of shots that can be taken is based on the Camera & Imaging Products Association (CIPA) measurement standard. • Depending on the shooting conditions, the actual number of shots that can be taken may ...
... message will not display. We cannot recommend the use NiMH batteries? Insert new batteries. 16 Compatible Batteries AA-size alkaline batteries and Canon AA-size NiMH batteries (sold separately) (p. 36). If the batteries are depleted. The batteries are charged, the icon or message will... (Supplied) 220 650 8 NiMH Batteries (Sold Separately) 450 1000 10 * The number of shots that can be taken is based on the Camera & Imaging Products Association (CIPA) measurement standard. • Depending on the shooting conditions, the actual number of shots that can be taken may ...

User Manual
Page 17
... That Can Be Saved in a Memory Card Memory Card Number of Shots 32 MB (supplied) 11 2 GB 749 8 GB 2994 • Values are based on a camera at default settings. • The number of shots that can be saved Compatible Memory Cards • SD memory cards • SDHC memory cards • MultiMediaCards...-Protect Tab? Number of shots that can be able to take or erase images. 17 How do you will appear on the screen when the camera is in Shooting Mode (p. 22). SD and SDHC memory cards have a write-protect tab. If this tab is in the locked position, "Card Locked!" will...
... That Can Be Saved in a Memory Card Memory Card Number of Shots 32 MB (supplied) 11 2 GB 749 8 GB 2994 • Values are based on a camera at default settings. • The number of shots that can be saved Compatible Memory Cards • SD memory cards • SDHC memory cards • MultiMediaCards...-Protect Tab? Number of shots that can be able to take or erase images. 17 How do you will appear on the screen when the camera is in Shooting Mode (p. 22). SD and SDHC memory cards have a write-protect tab. If this tab is in the locked position, "Card Locked!" will...
User Manual
Page 18
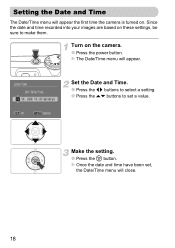
X Once the date and time have been set a value. X The Date/Time menu will close. 18 Since the date and time recorded into your images are based on these settings, be sure to set , the Date/Time menu will appear. Turn on . Set the Date and Time. ● Press the qr buttons to select a setting. ● Press the op buttons to make them. Make the setting. ● Press the m button. Setting the Date and Time The Date/Time menu will appear the first time the camera is turned on the camera. ● Press the power button.
X Once the date and time have been set a value. X The Date/Time menu will close. 18 Since the date and time recorded into your images are based on these settings, be sure to set , the Date/Time menu will appear. Turn on . Set the Date and Time. ● Press the qr buttons to select a setting. ● Press the op buttons to make them. Make the setting. ● Press the m button. Setting the Date and Time The Date/Time menu will appear the first time the camera is turned on the camera. ● Press the power button.

User Manual
Page 19
This camera is possible that the Date/Time settings are deleted after approximately 3 weeks. You do not need to save the Date/Time settings. Reappearing Date/Time ... m button. If this occurs, set the date and time, the Date/ Time menu will appear each time you turn the camera on the camera. • If you removed the batteries from the camera, it is equipped with a built-in the 3 tab. ● Press the qr buttons to select the 3 tab. ● Press the...
This camera is possible that the Date/Time settings are deleted after approximately 3 weeks. You do not need to save the Date/Time settings. Reappearing Date/Time ... m button. If this occurs, set the date and time, the Date/ Time menu will appear each time you turn the camera on the camera. • If you removed the batteries from the camera, it is equipped with a built-in the 3 tab. ● Press the qr buttons to select the 3 tab. ● Press the...

User Manual
Page 21
.... If you just press the shutter button fully without pausing halfway, the images you take the shot. Press halfway (lightly to the first stop ). X The camera takes the shot. Press fully (to focus, then take may not be in focus. 21 To take images that are in focus, be sure to...
.... If you just press the shutter button fully without pausing halfway, the images you take the shot. Press halfway (lightly to the first stop ). X The camera takes the shot. Press fully (to focus, then take may not be in focus. 21 To take images that are in focus, be sure to...

User Manual
Page 22
...start -up image will appear. ● Pressing the power button again will zoom in focus. X When the camera focuses, it appear smaller. Taking Pictures The camera can automatically make all settings so that you can shoot simply by pressing the shutter button (Auto mode). Turn on...towards j will fire). Indicator Compose the shot of your subject making it appear larger. X Green AF frames appear where the subject is in on the camera. ● Press the power button. Select a shooting mode. ● Set the mode dial to focus. Focus. ● Press the shutter button ...
...start -up image will appear. ● Pressing the power button again will zoom in focus. X When the camera focuses, it appear smaller. Taking Pictures The camera can automatically make all settings so that you can shoot simply by pressing the shutter button (Auto mode). Turn on...towards j will fire). Indicator Compose the shot of your subject making it appear larger. X Green AF frames appear where the subject is in on the camera. ● Press the power button. Select a shooting mode. ● Set the mode dial to focus. Focus. ● Press the shutter button ...

User Manual
Page 23
...approximately 30 cm - 2.0 m (1.0 - 6.6 ft.) at maximum telephoto (i side). • the indicator blinks yellow and the camera only beeps once when the shutter button is too close. X The camera will appear on ? X The image will play any sounds? Taking Pictures Shoot. ● Press the shutter button fully. You ...can continue shooting while the image displays. What if... • nothing displays when the camera is too far away for about 50 cm (1.6 ft.) or more away from your subject. Press the shutter button again halfway, making sure...
...approximately 30 cm - 2.0 m (1.0 - 6.6 ft.) at maximum telephoto (i side). • the indicator blinks yellow and the camera only beeps once when the shutter button is too close. X The camera will appear on ? X The image will play any sounds? Taking Pictures Shoot. ● Press the shutter button fully. You ...can continue shooting while the image displays. What if... • nothing displays when the camera is too far away for about 50 cm (1.6 ft.) or more away from your subject. Press the shutter button again halfway, making sure...

User Manual
Page 24
.... ● Pressing the r button will cycle through the images in the reverse order they will appear coarse. Recommendation for beginners, who are not familiar using cameras.
.... ● Pressing the r button will cycle through the images in the reverse order they will appear coarse. Recommendation for beginners, who are not familiar using cameras.

User Manual
Page 26
For connection details, refer to the user guide provided with the camera (p. 2) Turn off the camera and printer. Turn on the camera. Turn on the camera. ● Press the 1 button to turn on the printer. Connect the camera to Prepare • Camera and PictBridge compliant printer (sold separately). X will appear on ... will light blue. 26 Printing Images You can easily print the images you have taken if you connect the camera to a PictBridge compliant printer (sold separately) • Interface cable supplied with the printer. Items to the printer. ● Open the...
For connection details, refer to the user guide provided with the camera (p. 2) Turn off the camera and printer. Turn on the camera. Turn on the camera. ● Press the 1 button to turn on the printer. Connect the camera to Prepare • Camera and PictBridge compliant printer (sold separately). X will appear on ... will light blue. 26 Printing Images You can easily print the images you have taken if you connect the camera to a PictBridge compliant printer (sold separately) • Interface cable supplied with the printer. Items to the printer. ● Open the...


