OPTURA20 OPTURA10 Instruction Manual
Page 2
...in Subpart B of Part 15 of copyrighted materials may cause harmful interference to provide reasonable protection against harmful interference in the manual. One Canon Plaza, Lake Success, NY 11042, U.S.A. Important Usage Instructions E WARNING: TO REDUCE THE RISK OF FIRE OR ELECTRIC SHOCK, DO ...class B digital device, pursuant to comply with Part 15 of the FCC Rules. REFER SERVICING TO QUALIFIED SERVICE PERSONNEL. Digital Video Camcorder, OPTURA20/OPTURA10 systems This device complies with class B limits in accordance with the limits for help. If this equipment does cause ...
...in Subpart B of Part 15 of copyrighted materials may cause harmful interference to provide reasonable protection against harmful interference in the manual. One Canon Plaza, Lake Success, NY 11042, U.S.A. Important Usage Instructions E WARNING: TO REDUCE THE RISK OF FIRE OR ELECTRIC SHOCK, DO ...class B digital device, pursuant to comply with Part 15 of the FCC Rules. REFER SERVICING TO QUALIFIED SERVICE PERSONNEL. Digital Video Camcorder, OPTURA20/OPTURA10 systems This device complies with class B limits in accordance with the limits for help. If this equipment does cause ...
OPTURA20 OPTURA10 Instruction Manual
Page 3
The CA-570 Compact refers to the Canon Digital Video Camcorder Power Adapter should be walked on an unstable cart, stand, tripod, bracket or table. for the grounding electrode. Heed Warnings - This is operated. Do not ...
The CA-570 Compact refers to the Canon Digital Video Camcorder Power Adapter should be walked on an unstable cart, stand, tripod, bracket or table. for the grounding electrode. Heed Warnings - This is operated. Do not ...
OPTURA20 OPTURA10 Instruction Manual
Page 5
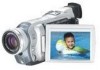
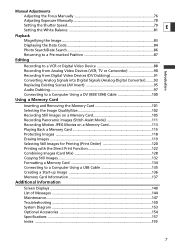
Introduction Trademark Acknowledgements • Canon and Bubble Jet are supplied with the camcorder: E ❍ Digital Video Camcorder OPTURA20/OPTURA10 Instruction Manual This manual explains the camcorder operations from basic video recording to the use of the full range of features. ❍ ... download/upload images from the memory card to the memory card using the provided software. Reference Guide The following manuals are registered trademarks of Canon Inc. • D is a trademark. • logo is a trademark. • Windows® is either a registered trademark or...
Introduction Trademark Acknowledgements • Canon and Bubble Jet are supplied with the camcorder: E ❍ Digital Video Camcorder OPTURA20/OPTURA10 Instruction Manual This manual explains the camcorder operations from basic video recording to the use of the full range of features. ❍ ... download/upload images from the memory card to the memory card using the provided software. Reference Guide The following manuals are registered trademarks of Canon Inc. • D is a trademark. • logo is a trademark. • Windows® is either a registered trademark or...
OPTURA20 OPTURA10 Instruction Manual
Page 6
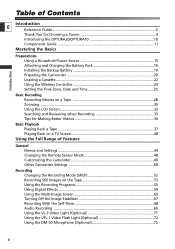
...Guide ...5 Thank You for Choosing a Canon 9 Introducing the OPTURA20/OPTURA10 10 Components Guide ...11 Mastering the Basics Introduction Preparations Using a Household Power Source 15 Attaching and Charging the Battery Pack 16 Installing the Backup Battery 19 Preparing the Camcorder 20 Loading a Cassette ...22 Using the ...40 Using the Full Range of Features General Menus and Settings ...43 Changing the Remote Sensor Mode 48 Customizing the Camcorder 49 Other Camcorder Settings 50 Recording Changing the Recording Mode (SP/LP 52 Recording Still Images on the Tape 53 Using the ...
...Guide ...5 Thank You for Choosing a Canon 9 Introducing the OPTURA20/OPTURA10 10 Components Guide ...11 Mastering the Basics Introduction Preparations Using a Household Power Source 15 Attaching and Charging the Battery Pack 16 Installing the Backup Battery 19 Preparing the Camcorder 20 Loading a Cassette ...22 Using the ...40 Using the Full Range of Features General Menus and Settings ...43 Changing the Remote Sensor Mode 48 Customizing the Camcorder 49 Other Camcorder Settings 50 Recording Changing the Recording Mode (SP/LP 52 Recording Still Images on the Tape 53 Using the ...
OPTURA20 OPTURA10 Instruction Manual
Page 7
... Search 86 Returning to a Pre-marked Position 87 Editing Recording to a VCR or Digital Video Device 88 Recording from Analog Video Devices (VCR, TV or Camcorder 90 Recording from Digital Video Devices (DV Dubbing 91 Converting Analog Signals into Digital Signals (Analog-Digital Converter) ........93 Replacing Existing Scenes (AV Insert 95...
... Search 86 Returning to a Pre-marked Position 87 Editing Recording to a VCR or Digital Video Device 88 Recording from Analog Video Devices (VCR, TV or Camcorder 90 Recording from Digital Video Devices (DV Dubbing 91 Converting Analog Signals into Digital Signals (Analog-Digital Converter) ........93 Replacing Existing Scenes (AV Insert 95...
OPTURA20 OPTURA10 Instruction Manual
Page 8
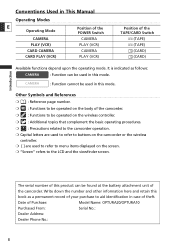
...CAMERA PLAY (VCR) CARD CAMERA CARD PLAY (VCR) Position of the POWER Switch CAMERA PLAY (VCR) CAMERA PLAY (VCR) Position of the camcorder. ❍ : Functions to be operated on the wireless controller. ❍ : Additional topics that complement the basic operating procedures. ❍ : Precautions... the operating mode. Other Symbols and References ❍ : Reference page number. ❍ : Functions to aid identification in case of the camcorder. Write down the number and other information here and retain this book as follows: CAMERA : Function can be used in this mode. The...
...CAMERA PLAY (VCR) CARD CAMERA CARD PLAY (VCR) Position of the POWER Switch CAMERA PLAY (VCR) CAMERA PLAY (VCR) Position of the camcorder. ❍ : Functions to be operated on the wireless controller. ❍ : Additional topics that complement the basic operating procedures. ❍ : Precautions... the operating mode. Other Symbols and References ❍ : Reference page number. ❍ : Functions to aid identification in case of the camcorder. Write down the number and other information here and retain this book as follows: CAMERA : Function can be used in this mode. The...
OPTURA20 OPTURA10 Instruction Manual
Page 9
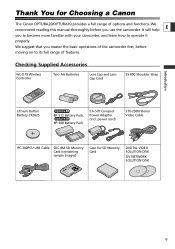
...Pack, BP-508 Battery Pack CA-570 Compact Power Adapter (incl. It will help E you master the basic operations of the camcorder first, before you use the camcorder. power cord) STV-250N Stereo Video Cable IFC-300PCU USB Cable SDC-8M SD Memory Card (containing sample images) Case for ...Choosing a Canon The Canon OPTURA20/OPTURA10 provides a full range of features. We suggest that you to become more familiar with your camcorder, and learn how to its full range of options and functions. Thank You for SD...
...Pack, BP-508 Battery Pack CA-570 Compact Power Adapter (incl. It will help E you master the basic operations of the camcorder first, before you use the camcorder. power cord) STV-250N Stereo Video Cable IFC-300PCU USB Cable SDC-8M SD Memory Card (containing sample images) Case for ...Choosing a Canon The Canon OPTURA20/OPTURA10 provides a full range of features. We suggest that you to become more familiar with your camcorder, and learn how to its full range of options and functions. Thank You for SD...
OPTURA20 OPTURA10 Instruction Manual
Page 10
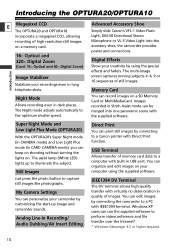
...captures moving subjects in USB port. Night Mode Allows recording even in Recording/ Audio Dubbing/AV Insert Editing Advanced Accessory Shoe Simply slide Canon's VFL-1 Video Flash Light, DM-50 Directional Stereo Microphone or VL-3 Video Light into one panoramic scene with the supplied software. ...The assist lamp (White LED) lights up image and camcorder sounds. USB Terminal Allows transfer of memory card data to illuminate the subject. IEEE1394 DV Terminal The DV terminal allows high-quality ...
...captures moving subjects in USB port. Night Mode Allows recording even in Recording/ Audio Dubbing/AV Insert Editing Advanced Accessory Shoe Simply slide Canon's VFL-1 Video Flash Light, DM-50 Directional Stereo Microphone or VL-3 Video Light into one panoramic scene with the supplied software. ...The assist lamp (White LED) lights up image and camcorder sounds. USB Terminal Allows transfer of memory card data to illuminate the subject. IEEE1394 DV Terminal The DV terminal allows high-quality ...
OPTURA20 OPTURA10 Instruction Manual
Page 15
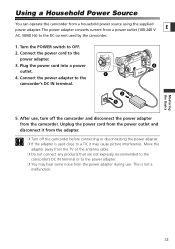
... hear some noise from the TV or the antenna cable. ❍ Do not connect any products that are not expressly recommended to the camcorder's DC IN terminal or to the power adapter. ❍ You may cause picture interference. Mastering the Basics 15 Connect the power cord to ... the power adapter to the power adapter. 3. q 4. Turn the POWER switch to a TV, it from the adapter. ❍ Turn off the camcorder and disconnect the power adapter from a household power source using the supplied power adapter. Plug the power cord into a power r outlet. After use ....
... hear some noise from the TV or the antenna cable. ❍ Do not connect any products that are not expressly recommended to the camcorder's DC IN terminal or to the power adapter. ❍ You may cause picture interference. Mastering the Basics 15 Connect the power cord to ... the power adapter to the power adapter. 3. q 4. Turn the POWER switch to a TV, it from the adapter. ❍ Turn off the camcorder and disconnect the power adapter from a household power source using the supplied power adapter. Plug the power cord into a power r outlet. After use ....
OPTURA20 OPTURA10 Instruction Manual
Page 16
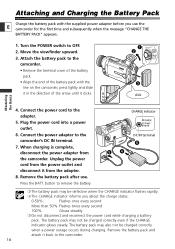
... indicator flashes rapidly. ❍ The CHARGE indicator informs you use . Unplug the power cord from the power outlet and disconnect it from the camcorder. CHARGE indicator DC IN terminal y tr ❍ The battery pack may not be charged correctly when a power outage occurs during charging. Turn... correctly even if the CHARGE indicator glows steady. Attaching and Charging the Battery Pack Charge the battery pack with the line on the camcorder, press lightly and slide it in the direction of the battery pack with the supplied power adapter before you about the charge status....
... indicator flashes rapidly. ❍ The CHARGE indicator informs you use . Unplug the power cord from the power outlet and disconnect it from the camcorder. CHARGE indicator DC IN terminal y tr ❍ The battery pack may not be charged correctly when a power outage occurs during charging. Turn... correctly even if the CHARGE indicator glows steady. Attaching and Charging the Battery Pack Charge the battery pack with the line on the camcorder, press lightly and slide it in the direction of the battery pack with the supplied power adapter before you about the charge status....
OPTURA20 OPTURA10 Instruction Manual
Page 17
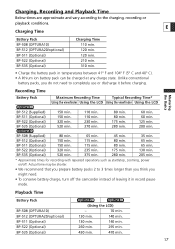
... (Optional) 520 min. 375 min. 280 min. 205 min. * Approximate times for recording with repeated operations such as start/stop, zooming, power on/off the camcorder instead of leaving it before charging.
... (Optional) 520 min. 375 min. 280 min. 205 min. * Approximate times for recording with repeated operations such as start/stop, zooming, power on/off the camcorder instead of leaving it before charging.
OPTURA20 OPTURA10 Instruction Manual
Page 18
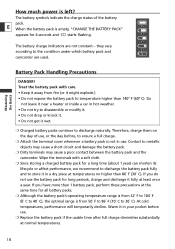
they vary according to the condition under which battery pack and camcorder are not constant - Do not leave it near a heater or inside a car in use. At cold temperatures, performance will temporarily decline. Therefore, charge them on ...; C to metallic objects may cause a short circuit and damage the battery pack. ❍ Dirty terminals may cause a poor contact between the battery pack and the camcorder.
they vary according to the condition under which battery pack and camcorder are not constant - Do not leave it near a heater or inside a car in use. At cold temperatures, performance will temporarily decline. Therefore, charge them on ...; C to metallic objects may cause a short circuit and damage the battery pack. ❍ Dirty terminals may cause a poor contact between the battery pack and the camcorder.
OPTURA20 OPTURA10 Instruction Manual
Page 19
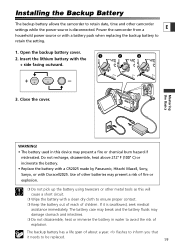
... the q w e + side facing outward. 3. Open the backup battery cover. 2. Use of other camcorder settings while the power source is swallowed, seek medical assistance immediately. Power the camcorder from a E household power source or with Duracell2025. If it needs to be replaced. 19 Mastering the Basics...the risk of about a year. j flashes to inform you that it is disconnected. Installing the Backup Battery The backup battery allows the camcorder to retain date, time and other batteries may present a risk of children. Do not recharge, disassemble, heat above 212° F...
... the q w e + side facing outward. 3. Open the backup battery cover. 2. Use of other camcorder settings while the power source is swallowed, seek medical assistance immediately. Power the camcorder from a E household power source or with Duracell2025. If it needs to be replaced. 19 Mastering the Basics...the risk of about a year. j flashes to inform you that it is disconnected. Installing the Backup Battery The backup battery allows the camcorder to retain date, time and other batteries may present a risk of children. Do not recharge, disassemble, heat above 212° F...
OPTURA20 OPTURA10 Instruction Manual
Page 20
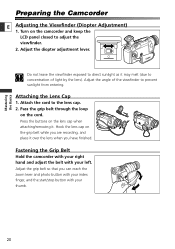
... (due to concentration of the viewfinder to prevent sunlight from entering. Attach the cord to adjust the viewfinder. 2. Fastening the Grip Belt Hold the camcorder with your right hand and adjust the belt with your left. Hook the lens cap on the lens cap when attaching/removing it over the...you can reach the zoom lever and photo button with your index finger, and the start/stop button with your thumb. 20 Pass the grip belt through the loop on the camcorder and keep the LCD panel closed to the lens cap. 2. Turn on the cord. Adjust the diopter adjustment lever. ...
... (due to concentration of the viewfinder to prevent sunlight from entering. Attach the cord to adjust the viewfinder. 2. Fastening the Grip Belt Hold the camcorder with your right hand and adjust the belt with your left. Hook the lens cap on the lens cap when attaching/removing it over the...you can reach the zoom lever and photo button with your index finger, and the start/stop button with your thumb. 20 Pass the grip belt through the loop on the camcorder and keep the LCD panel closed to the lens cap. 2. Turn on the cord. Adjust the diopter adjustment lever. ...
OPTURA20 OPTURA10 Instruction Manual
Page 21
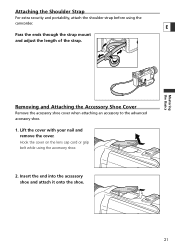
Lift the cover with your nail and remove the cover. Removing and Attaching the Accessory Shoe Cover Remove the accessory shoe cover when attaching an accessory to the advanced accessory shoe. 1. Hook the cover on the lens cap cord or grip belt while using the camcorder. Insert the end into the accessory shoe and attach it onto the shoe. 21 Mastering the Basics Attaching the Shoulder Strap For extra security and portability, attach the shoulder strap before using the accessory shoe. 2. E Pass the ends through the strap mount and adjust the length of the strap.
Lift the cover with your nail and remove the cover. Removing and Attaching the Accessory Shoe Cover Remove the accessory shoe cover when attaching an accessory to the advanced accessory shoe. 1. Hook the cover on the lens cap cord or grip belt while using the camcorder. Insert the end into the accessory shoe and attach it onto the shoe. 21 Mastering the Basics Attaching the Shoulder Strap For extra security and portability, attach the shoulder strap before using the accessory shoe. 2. E Pass the ends through the strap mount and adjust the length of the strap.
OPTURA20 OPTURA10 Instruction Manual
Page 22
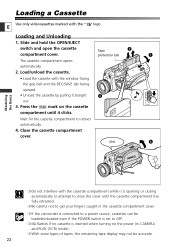
... cover until the cassette compartment has fully retracted. ❍ Be careful not to get your fingers caught in the cassette compartment cover. ❍ If the camcorder is connected to a power source, cassettes can be loaded/unloaded even if the POWER switch is set to retract automatically. 4. OPEN/EJECT • Unload the...
... cover until the cassette compartment has fully retracted. ❍ Be careful not to get your fingers caught in the cassette compartment cover. ❍ If the camcorder is connected to a power source, cassettes can be loaded/unloaded even if the POWER switch is set to retract automatically. 4. OPEN/EJECT • Unload the...
OPTURA20 OPTURA10 Instruction Manual
Page 23
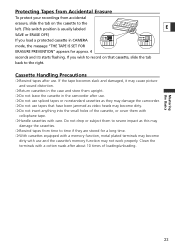
... recordings from time to the left. (This switch position is usually labeled E SAVE or ERASE OFF.) REC REC If you load a protected cassette in the camcorder after use. ❍ Do not use spliced tapes or nonstandard cassettes as they are stored for a long time. ❍ With cassettes equipped with a memory function... use and the cassette's memory function may not work properly. If you wish to record on the cassette to time if they may damage the camcorder. ❍ Do not use tapes that cassette, slide the tab back to the right.
... recordings from time to the left. (This switch position is usually labeled E SAVE or ERASE OFF.) REC REC If you load a protected cassette in the camcorder after use. ❍ Do not use spliced tapes or nonstandard cassettes as they are stored for a long time. ❍ With cassettes equipped with a memory function... use and the cassette's memory function may not work properly. If you wish to record on the cassette to time if they may damage the camcorder. ❍ Do not use tapes that cassette, slide the tab back to the right.
OPTURA20 OPTURA10 Instruction Manual
Page 24
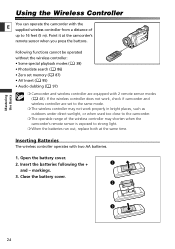
... cover. w e 24 Mastering the Basics Using the Wireless Controller You can operate the camcorder with the E supplied wireless controller from a distance of the wireless controller may shorten when the camcorder's remote sensor is exposed to 16 feet (5 m). If the wireless controller does not ... 87) • AV Insert ( 95) • Audio dubbing ( 97) ❍ Camcorder and wireless controller are set to the same mode. ❍ The wireless controller may not work , check if camcorder and wireless controller are equipped with two AA batteries. 1. Open the battery cover. 2. Inserting...
... cover. w e 24 Mastering the Basics Using the Wireless Controller You can operate the camcorder with the E supplied wireless controller from a distance of the wireless controller may shorten when the camcorder's remote sensor is exposed to 16 feet (5 m). If the wireless controller does not ... 87) • AV Insert ( 95) • Audio dubbing ( 97) ❍ Camcorder and wireless controller are set to the same mode. ❍ The wireless controller may not work , check if camcorder and wireless controller are equipped with two AA batteries. 1. Open the battery cover. 2. Inserting...
OPTURA20 OPTURA10 Instruction Manual
Page 25
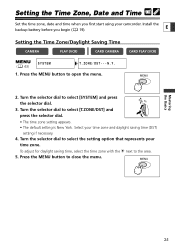
..., select the time zone with the U next to select [SYSTEM] and press the selector dial. 3. Install the backup battery before you first start using your camcorder. Turn the selector dial to the area. 5. Turn the selector dial to open the menu. 2. Turn the selector dial to close the menu. Setting the...
..., select the time zone with the U next to select [SYSTEM] and press the selector dial. 3. Install the backup battery before you first start using your camcorder. Turn the selector dial to the area. 5. Turn the selector dial to open the menu. 2. Turn the selector dial to close the menu. Setting the...
OPTURA20 OPTURA10 Instruction Manual
Page 26
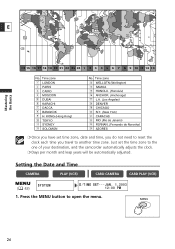
... 17 15 21 1 2 24 4 3 6 7 9 10 5 8 23 14 22 12 11 13 14 15 16 17 18 19 20 21 22 23 24 1 2 3 4 5 6 7 8 9 10 11 12 13 No. Time zone WELLGTN (Wellington) SAMOA HONOLU. (Honolulu) ANCHOR. (Anchorage) L.A. (Los Angeles) DENVER CHICAGO N.Y. (New York) CARACAS ...RIO (Rio de Janeiro) FERNAN. (Fernando de Noronha) AZORES ❍ Once you have set the time zone to the one of your destination, and the camcorder automatically adjusts the clock. ❍ Days per month and leap years will be automatically adjusted. Setting the Date and Time CAMERA PLAY (VCR) CARD CAMERA...
... 17 15 21 1 2 24 4 3 6 7 9 10 5 8 23 14 22 12 11 13 14 15 16 17 18 19 20 21 22 23 24 1 2 3 4 5 6 7 8 9 10 11 12 13 No. Time zone WELLGTN (Wellington) SAMOA HONOLU. (Honolulu) ANCHOR. (Anchorage) L.A. (Los Angeles) DENVER CHICAGO N.Y. (New York) CARACAS ...RIO (Rio de Janeiro) FERNAN. (Fernando de Noronha) AZORES ❍ Once you have set the time zone to the one of your destination, and the camcorder automatically adjusts the clock. ❍ Days per month and leap years will be automatically adjusted. Setting the Date and Time CAMERA PLAY (VCR) CARD CAMERA...


