
Quick Start Guide
Page 2
...names are registered trademarks of Microsoft Corporation in part, without notice. One Canon Plaza Lake Success, NY 11042 Canon i860 Desktop Photo Printer Quick Start Guide. As an ENERGY STAR partner, Canon U.S.A., Inc., has determined that it will be , representation or warranties...they are registered trademarks of their respective owners. Specifications are subject to your Canon i860 Desktop Photo Printer. Disclaimer Canon U.S.A., Inc. Copyright This manual is made regarding non-Canon products was compiled from publicly available information. Under the copyright laws, this ...
...names are registered trademarks of Microsoft Corporation in part, without notice. One Canon Plaza Lake Success, NY 11042 Canon i860 Desktop Photo Printer Quick Start Guide. As an ENERGY STAR partner, Canon U.S.A., Inc., has determined that it will be , representation or warranties...they are registered trademarks of their respective owners. Specifications are subject to your Canon i860 Desktop Photo Printer. Disclaimer Canon U.S.A., Inc. Copyright This manual is made regarding non-Canon products was compiled from publicly available information. Under the copyright laws, this ...

Quick Start Guide
Page 3
... Paper Tray 17 Accessing the Printer Driver 25 Adjusting the Print Quality for Photographs 26 Using the Printer Driver Options 35 Using the...Colors are Incorrect 50 Printing the Nozzle Check Pattern 51 Print Head Cleaning 55 Print Head Deep Cleaning 58 Aligning the Print Head 61 Troubleshooting Cannot Install the Printer... Driver 66 Print Quality is Poor or Contains Errors 67 Troubleshooting Printer Hardware 69 Paper Does ...Digital Camera 76 Appendix Installing the Printer Driver When Using Mac OS 9.x 79 User's Guide Table...
... Paper Tray 17 Accessing the Printer Driver 25 Adjusting the Print Quality for Photographs 26 Using the Printer Driver Options 35 Using the...Colors are Incorrect 50 Printing the Nozzle Check Pattern 51 Print Head Cleaning 55 Print Head Deep Cleaning 58 Aligning the Print Head 61 Troubleshooting Cannot Install the Printer... Driver 66 Print Quality is Poor or Contains Errors 67 Troubleshooting Printer Hardware 69 Paper Does ...Digital Camera 76 Appendix Installing the Printer Driver When Using Mac OS 9.x 79 User's Guide Table...

Quick Start Guide
Page 5
... User's Guide CD-ROM, or use the online help within your i860 printer and how to use them. Basic Printing Basic Printing Note This Quick Start Guide describes some of the features of your printer driver interface: While in the upper right corner. Turn Balloon Help on the... Printer 1 Press the POWER button. Turning on by selecting Help, then Show Balloon Help. Then click ...
... User's Guide CD-ROM, or use the online help within your i860 printer and how to use them. Basic Printing Basic Printing Note This Quick Start Guide describes some of the features of your printer driver interface: While in the upper right corner. Turn Balloon Help on the... Printer 1 Press the POWER button. Turning on by selecting Help, then Show Balloon Help. Then click ...

Quick Start Guide
Page 6
...• Excessively thin paper (less than 64 gsm or 17 lb) • Excessively thick paper* (more than 105 gsm or 28 lb) *non-Canon branded paper • Picture postcards • Postcards affixed with photos or stickers • Envelopes with double flaps • Sealed envelopes • Envelopes with...POWER lamp changes to orange and begins flashing, refer to the section "Handling Error Messages" on how to Avoid Do not use with its various printers, refer to the section "Using Specialty Media" on page 6. • Consult the User's Guide for detailed instructions on page 72. Loading Paper...
...• Excessively thin paper (less than 64 gsm or 17 lb) • Excessively thick paper* (more than 105 gsm or 28 lb) *non-Canon branded paper • Picture postcards • Postcards affixed with photos or stickers • Envelopes with double flaps • Sealed envelopes • Envelopes with...POWER lamp changes to orange and begins flashing, refer to the section "Handling Error Messages" on how to Avoid Do not use with its various printers, refer to the section "Using Specialty Media" on page 6. • Consult the User's Guide for detailed instructions on page 72. Loading Paper...

Quick Start Guide
Page 9
...-sized paper does not feed properly in the auto sheet feeder, fan the paper to 150 sheets (13 mm in the auto sheet feeder. „ Canon Specialty Media Media Type Paper Rest Load Limit Photo Paper Pro Photo Paper Pro Perforated Photo Paper Plus Glossy Matte Photo Paper Glossy Photo Paper... sheets Up to 10 sheets Letter: up to 10 sheets 4" x 6": up to 20 sheets Up to 80 sheets 1 sheet Up to 30 sheets Basic Printing Printer Driver Setting for Media Type Photo Paper Pro** Photo Paper Pro Photo Paper Plus Glossy Matte Photo Paper Glossy Photo Paper High Resolution Paper T-Shirt...
...-sized paper does not feed properly in the auto sheet feeder, fan the paper to 150 sheets (13 mm in the auto sheet feeder. „ Canon Specialty Media Media Type Paper Rest Load Limit Photo Paper Pro Photo Paper Pro Perforated Photo Paper Plus Glossy Matte Photo Paper Glossy Photo Paper... sheets Up to 10 sheets Letter: up to 10 sheets 4" x 6": up to 20 sheets Up to 80 sheets 1 sheet Up to 30 sheets Basic Printing Printer Driver Setting for Media Type Photo Paper Pro** Photo Paper Pro Photo Paper Plus Glossy Matte Photo Paper Glossy Photo Paper High Resolution Paper T-Shirt...
Quick Start Guide
Page 10
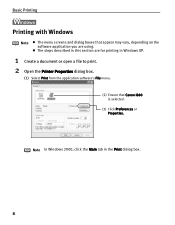
z The steps described in this section are using. Basic Printing Printing with Windows Note z The menu screens and dialog boxes that appear may vary, depending on the software application you are for printing in Windows XP. 1 Create a document or open a file to print. 2 Open the Printer Properties dialog box. (1) Select Print from the application software's File menu. (2) Ensure that Canon i860 is selected. (3) Click Preferences or Properties. Note In Windows 2000, click the Main tab in the Print dialog box. 8
z The steps described in this section are using. Basic Printing Printing with Windows Note z The menu screens and dialog boxes that appear may vary, depending on the software application you are for printing in Windows XP. 1 Create a document or open a file to print. 2 Open the Printer Properties dialog box. (1) Select Print from the application software's File menu. (2) Ensure that Canon i860 is selected. (3) Click Preferences or Properties. Note In Windows 2000, click the Main tab in the Print dialog box. 8

Quick Start Guide
Page 11
...selected printing effects and how your document will look when printed. z Select Preview before printing by clicking the check box. z For details about other printer driver functions, refer to select the desired type of paper in Media Type first. 9 z The print settings are recommended to the User's Guide or... Help. Some applications do not contain the function to select the type of paper loaded in the printer if Plain Paper has been selected in Media Type. (This function is not available with Windows NT 4.0.) To ensure high printing quality, you...
...selected printing effects and how your document will look when printed. z Select Preview before printing by clicking the check box. z For details about other printer driver functions, refer to select the desired type of paper in Media Type first. 9 z The print settings are recommended to the User's Guide or... Help. Some applications do not contain the function to select the type of paper loaded in the printer if Plain Paper has been selected in Media Type. (This function is not available with Windows NT 4.0.) To ensure high printing quality, you...
Quick Start Guide
Page 12
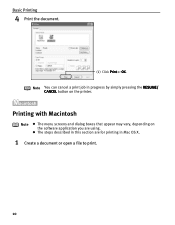
z The steps described in this section are using. Basic Printing 4 Print the document. (1) Click Print or OK. Printing with Macintosh Note z The menu screens and dialog boxes that appear may vary, depending on the software application you are for printing in progress by simply pressing the RESUME/ CANCEL button on the printer. Note You can cancel a print job in Mac OS X. 1 Create a document or open a file to print. 10
z The steps described in this section are using. Basic Printing 4 Print the document. (1) Click Print or OK. Printing with Macintosh Note z The menu screens and dialog boxes that appear may vary, depending on the software application you are for printing in progress by simply pressing the RESUME/ CANCEL button on the printer. Note You can cancel a print job in Mac OS X. 1 Create a document or open a file to print. 10

Quick Start Guide
Page 14
To temporarily stop a job in the list, click Stop Printing. 12 To cancel all the jobs in progress, click Pause. Note z For details about other printer driver functions, refer to confirm the status of the document from the pull-down menu. (5) Select the type of the print job(s). To cancel a job in the Printer list displays a dialog that prompts you to the User's Guide or Help. Basic Printing (4) Select Color Options from the Print Type pull-down menu. (6) Click Print. z Double-clicking the printer name in progress, select the desired document, then click Delete.
To temporarily stop a job in the list, click Stop Printing. 12 To cancel all the jobs in progress, click Pause. Note z For details about other printer driver functions, refer to confirm the status of the document from the pull-down menu. (5) Select the type of the print job(s). To cancel a job in the Printer list displays a dialog that prompts you to the User's Guide or Help. Basic Printing (4) Select Color Options from the Print Type pull-down menu. (6) Click Print. z Double-clicking the printer name in progress, select the desired document, then click Delete.
Quick Start Guide
Page 15
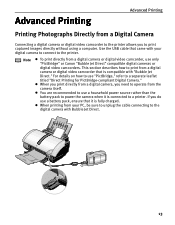
... a digital camera or digital video camcorder, use a household power source rather than the battery pack to use only "PictBridge" or Canon "Bubble Jet Direct" compatible digital cameras or digital video camcorders. z You are recommended to power the camera when it is compatible ...camera, you need to operate from a Digital Camera Connecting a digital camera or digital video camcorder to the printer allows you do use "PictBridge," refer to a printer. Advanced Printing Advanced Printing Printing Photographs Directly from the camera itself. Use the USB cable that it is connected...
... a digital camera or digital video camcorder, use a household power source rather than the battery pack to use only "PictBridge" or Canon "Bubble Jet Direct" compatible digital cameras or digital video camcorders. z You are recommended to power the camera when it is compatible ...camera, you need to operate from a Digital Camera Connecting a digital camera or digital video camcorder to the printer allows you do use "PictBridge," refer to a printer. Advanced Printing Advanced Printing Printing Photographs Directly from the camera itself. Use the USB cable that it is connected...
Quick Start Guide
Page 16
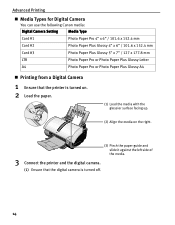
Advanced Printing „ Media Types for Digital Camera You can use the following Canon media: Digital Camera Setting Media Type Card #1 Photo Paper Pro 4" x 6" / 101.6 x 152.4 mm Card #2 Photo Paper Plus Glossy 4" x 6" / 101.6 x 152.4 mm Card #3 Photo Paper Plus ... Pro or Photo Paper Plus Glossy Letter A4 Photo Paper Pro or Photo Paper Plus Glossy A4 „ Printing from a Digital Camera 1 Ensure that the printer is turned on. 2 Load the paper. (1) Load the media with the glossier surface facing up. (2) Align the media on the right. (3) Pinch the paper guide...
Advanced Printing „ Media Types for Digital Camera You can use the following Canon media: Digital Camera Setting Media Type Card #1 Photo Paper Pro 4" x 6" / 101.6 x 152.4 mm Card #2 Photo Paper Plus Glossy 4" x 6" / 101.6 x 152.4 mm Card #3 Photo Paper Plus ... Pro or Photo Paper Plus Glossy Letter A4 Photo Paper Pro or Photo Paper Plus Glossy A4 „ Printing from a Digital Camera 1 Ensure that the printer is turned on. 2 Load the paper. (1) Load the media with the glossier surface facing up. (2) Align the media on the right. (3) Pinch the paper guide...

Quick Start Guide
Page 17
If not, turn on. If the camera will automatically turn it on the LCD display of the digital camera when the printer is correctly connected. (2) Press the SET button to display the Print menu. (3) Select Style and specify the paper size, Borderless or Bordered printing, and date ..., refer to your digital camera user's manual instructions for changing the camera to print in the Replay mode. Advanced Printing (2) Connect the digital camera and printer with the USB cable that came with the digital camera.
If not, turn on. If the camera will automatically turn it on the LCD display of the digital camera when the printer is correctly connected. (2) Press the SET button to display the Print menu. (3) Select Style and specify the paper size, Borderless or Bordered printing, and date ..., refer to your digital camera user's manual instructions for changing the camera to print in the Replay mode. Advanced Printing (2) Connect the digital camera and printer with the USB cable that came with the digital camera.

Quick Start Guide
Page 18
...set on the digital camera, the date the photograph was taken will be adjusted by its sides. 16 Disconnect the cable from the printer. 2. Turn off the digital camera. 3. The images taken with an Exif 2.2 compatible digital camera may not be printed (excluding the...following functions: - z The digital camera does not support the following prints: - z To disconnect the cable between the digital camera and the printer, follow the procedure below: 1. When disconnecting the cable, be aligned through the digital camera. Advanced Printing Note z For the digital camera ...
...set on the digital camera, the date the photograph was taken will be adjusted by its sides. 16 Disconnect the cable from the printer. 2. Turn off the digital camera. 3. The images taken with an Exif 2.2 compatible digital camera may not be printed (excluding the...following functions: - z The digital camera does not support the following prints: - z To disconnect the cable between the digital camera and the printer, follow the procedure below: 1. When disconnecting the cable, be aligned through the digital camera. Advanced Printing Note z For the digital camera ...
Quick Start Guide
Page 19
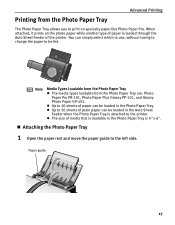
... is loadable in the Auto Sheet Feeder when the Photo Paper Tray is attached to print on the photo paper while another type of the printer. Note Media Types Loadable from the Photo Paper Tray z The media types loadable from the Photo Paper Tray The Photo Paper Tray allows you to...
... is loadable in the Auto Sheet Feeder when the Photo Paper Tray is attached to print on the photo paper while another type of the printer. Note Media Types Loadable from the Photo Paper Tray z The media types loadable from the Photo Paper Tray The Photo Paper Tray allows you to...
Quick Start Guide
Page 20
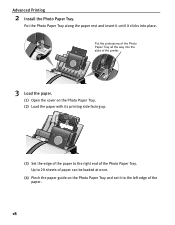
Advanced Printing 2 Install the Photo Paper Tray. Put the Photo Paper Tray along the paper rest and insert it until it to the right end of the paper. 18 Up to 20 sheets of paper can be loaded at once. (4) Pinch the paper guide on the Photo Paper Tray and set it clicks into the slots of the printer. 3 Load the paper. (1) Open the cover on the Photo Paper Tray. (2) Load the paper with its printing side facing up. (3) Set the edge of the paper to the left edge of the Photo Paper Tray. Put the protrusions of the Photo Paper Tray all the way into place.
Advanced Printing 2 Install the Photo Paper Tray. Put the Photo Paper Tray along the paper rest and insert it until it to the right end of the paper. 18 Up to 20 sheets of paper can be loaded at once. (4) Pinch the paper guide on the Photo Paper Tray and set it clicks into the slots of the printer. 3 Load the paper. (1) Open the cover on the Photo Paper Tray. (2) Load the paper with its printing side facing up. (3) Set the edge of the paper to the left edge of the Photo Paper Tray. Put the protrusions of the Photo Paper Tray all the way into place.

Quick Start Guide
Page 21
Turn the knob to feed paper from the Photo Paper Tray. 19 The tray is slided into the Auto Sheet Feeder, and the printer is now ready for feeding paper from the Photo Paper Tray. Paper guide Advanced Printing (5) Close the cover on the Photo Paper Tray. 4 Select to the left until it points at the arrow on the Photo Paper Tray.
Turn the knob to feed paper from the Photo Paper Tray. 19 The tray is slided into the Auto Sheet Feeder, and the printer is now ready for feeding paper from the Photo Paper Tray. Paper guide Advanced Printing (5) Close the cover on the Photo Paper Tray. 4 Select to the left until it points at the arrow on the Photo Paper Tray.
Quick Start Guide
Page 23
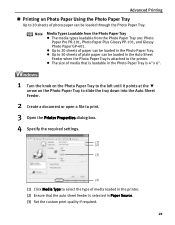
...Printing on the Photo Paper Tray to slide the tray down into the Auto Sheet Feeder. 2 Create a document or open a file to print. 3 Open the Printer Properties dialog box. 4 Specify the required settings. (1) (2) (3) (4) (1) Click Media Type to select the type of media loaded in the... printer. (2) Ensure that is loadable in the Photo Paper Tray is attached to the printer. z The size of media that the auto sheet feeder is selected in the Auto Sheet Feeder when the Photo...
...Printing on the Photo Paper Tray to slide the tray down into the Auto Sheet Feeder. 2 Create a document or open a file to print. 3 Open the Printer Properties dialog box. 4 Specify the required settings. (1) (2) (3) (4) (1) Click Media Type to select the type of media loaded in the... printer. (2) Ensure that is loadable in the Photo Paper Tray is attached to the printer. z The size of media that the auto sheet feeder is selected in the Auto Sheet Feeder when the Photo...

Quick Start Guide
Page 25
Note The size of media loaded in the Photo Paper Tray is 4" x 6". 4 Specify the required settings. (1) Select Print from the application software's File menu. (2) (3) (4) (5) (6) (2) Select Quality & Media from Paper Size. (4) Click OK. Advanced Printing (1) Select Page Setup from the application software's File menu. (2) Select the printer from Format for. (3) Select the paper size from the pop-up menu. (3) Click Media Type to select the type of media that is loadable in the printer. 23
Note The size of media loaded in the Photo Paper Tray is 4" x 6". 4 Specify the required settings. (1) Select Print from the application software's File menu. (2) (3) (4) (5) (6) (2) Select Quality & Media from Paper Size. (4) Click OK. Advanced Printing (1) Select Page Setup from the application software's File menu. (2) Select the printer from Format for. (3) Select the paper size from the pop-up menu. (3) Click Media Type to select the type of media that is loadable in the printer. 23

Quick Start Guide
Page 27
...more information about these additional tabs, refer to print a document. For non-XP Windows, click Start, select Settings, and then Printers. 2 Select the Canon i860 icon. 3 Open the File menu and select Printing Preferences (or Properties). For more details, see the user's manual for...menu, additional tabs appear, including the Details tab. Advanced Printing Accessing the Printer Driver The Printer Properties dialog box can usually be opened by selecting Print from the File menu. 2 Ensure that Canon i860 is selected. z Depending on your application program, the command and menu...
...more information about these additional tabs, refer to print a document. For non-XP Windows, click Start, select Settings, and then Printers. 2 Select the Canon i860 icon. 3 Open the File menu and select Printing Preferences (or Properties). For more details, see the user's manual for...menu, additional tabs appear, including the Details tab. Advanced Printing Accessing the Printer Driver The Printer Properties dialog box can usually be opened by selecting Print from the File menu. 2 Ensure that Canon i860 is selected. z Depending on your application program, the command and menu...
Quick Start Guide
Page 28
... want to know more detailed information, see the i860 User's Guide on ). See the inside back cover for a list of Canon Specialty Papers and ink tanks for printing photographs can significantly improve the quality of your printouts. in either of the following ways depending... ? You can also customize the Print Quality settings if desired. 26 The i860 automatically adjusts printer settings to creatively enhance the colors and output of your photographs. Printer Driver Settings The printer driver has a variety of settings that affect the appearance and quality of your printed images can...
... want to know more detailed information, see the i860 User's Guide on ). See the inside back cover for a list of Canon Specialty Papers and ink tanks for printing photographs can significantly improve the quality of your printouts. in either of the following ways depending... ? You can also customize the Print Quality settings if desired. 26 The i860 automatically adjusts printer settings to creatively enhance the colors and output of your photographs. Printer Driver Settings The printer driver has a variety of settings that affect the appearance and quality of your printed images can...


