
User Manual
Page 4
... other procedures. Document Scanner Startup Manual Please read it in a safe place for future reference. Startup Manual Explains how to the Startup Manual regarding the handling of the scanner, such as installation of its many functions. INTRODUCTION Thank you for the Scanner The DR-5010C scanner has a Startup Manual (this unit. Manuals for purchasing the Canon DR-5010C scanner. The online help...
... other procedures. Document Scanner Startup Manual Please read it in a safe place for future reference. Startup Manual Explains how to the Startup Manual regarding the handling of the scanner, such as installation of its many functions. INTRODUCTION Thank you for the Scanner The DR-5010C scanner has a Startup Manual (this unit. Manuals for purchasing the Canon DR-5010C scanner. The online help...

User Manual
Page 6
...Scanner 2 Conventions ...3 Before Using the Scanner 5 Safe Operation ...5 Installation Location ...5 Power ...6 Moving the Scanner ...6 Normal Handling ...7 Disposal ...8 Features of the DR-5010C 9 Checking the Packing List 11 Removing the Protective Packing Matarials 12 Names and Functions of Parts 14 Installing the Scanner 16 Installation Requirements 16 Installation... Confirming Scanner Event 39 Using the Scanner 42 Documents ...42 Setting Up the Document Feed Tray and the Document Eject Tray 44 Document Eject Tray 45 Installing the Document Eject Guide 47 Placing a Document for ...
...Scanner 2 Conventions ...3 Before Using the Scanner 5 Safe Operation ...5 Installation Location ...5 Power ...6 Moving the Scanner ...6 Normal Handling ...7 Disposal ...8 Features of the DR-5010C 9 Checking the Packing List 11 Removing the Protective Packing Matarials 12 Names and Functions of Parts 14 Installing the Scanner 16 Installation Requirements 16 Installation... Confirming Scanner Event 39 Using the Scanner 42 Documents ...42 Setting Up the Document Feed Tray and the Document Eject Tray 44 Document Eject Tray 45 Installing the Document Eject Guide 47 Placing a Document for ...
User Manual
Page 7
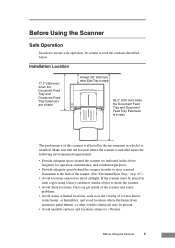
... ventilation purposes. • Provide adequate space behind the scanner in which it is installed. Before Using the Scanner 5 Make sure that the location where the scanner is affected by the environment in order to eject scanned documents to the back of a water faucet, water heater,... 29.5" (750 mm) when the Document Feed Tray and Document Feed Tray Extension are open The performance of this scanner is installed meets the following environmental requirements: • Provide adequate space around the scanner (as in the vicinity of the scanner. (See "Document Eject Tray," on p. 45. )...
... ventilation purposes. • Provide adequate space behind the scanner in which it is installed. Before Using the Scanner 5 Make sure that the location where the scanner is affected by the environment in order to eject scanned documents to the back of a water faucet, water heater,... 29.5" (750 mm) when the Document Feed Tray and Document Feed Tray Extension are open The performance of this scanner is installed meets the following environmental requirements: • Provide adequate space around the scanner (as in the vicinity of the scanner. (See "Document Eject Tray," on p. 45. )...

User Manual
Page 18
... cable to use the DR-5010C, your computer must satisfy the following system requirements: • A computer that supports the scanner (See "Interface Cards," on Windows NT. Monitor: Resolution of the following operating systems: Connecting via SCSI - Installing the Scanner Installation Requirements In order to use it with your scanner • One of ...2.0 interface does not operate normally sometimes, then use the recommended Hi-Speed USB 2.0 interface card. Contact your local authorized Canon dealer or service representative for more detailed information. 16 Installing the Scanner
... cable to use the DR-5010C, your computer must satisfy the following system requirements: • A computer that supports the scanner (See "Interface Cards," on Windows NT. Monitor: Resolution of the following operating systems: Connecting via SCSI - Installing the Scanner Installation Requirements In order to use it with your scanner • One of ...2.0 interface does not operate normally sometimes, then use the recommended Hi-Speed USB 2.0 interface card. Contact your local authorized Canon dealer or service representative for more detailed information. 16 Installing the Scanner

User Manual
Page 19
...Make sure that the device driver and application software that enough virtual memory is not necessarily compatible with the scanner is set on the scan settings. Contact your local authorized Canon dealer or service representative. For more detailed information. • If the CPU, memory, interface card,...time. • Even if the computer satisfies the recommended specifications, the scanning speed may not be able to the Windows system. Installing the Scanner 17 Note • Make sure that you will be slow depending on your PC, the system configuration, and the type of ...
...Make sure that the device driver and application software that enough virtual memory is not necessarily compatible with the scanner is set on the scan settings. Contact your local authorized Canon dealer or service representative. For more detailed information. • If the CPU, memory, interface card,...time. • Even if the computer satisfies the recommended specifications, the scanning speed may not be able to the Windows system. Installing the Scanner 17 Note • Make sure that you will be slow depending on your PC, the system configuration, and the type of ...
User Manual
Page 20
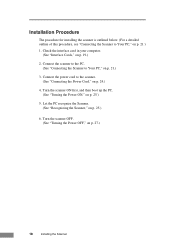
Let the PC recognize the Scanner. (See "Recognizing the Scanner," on p. 27.) 18 Installing the Scanner Turn the scanner OFF. (See "Turning the Power OFF," on p. 25.) 6. Installation Procedure The procedure for installing the scanner is outlined below. (For a detailed outline of this procedure, see "Connecting the Scanner to Your PC," on p. 21.) 3. Check the interface card in your computer...
Let the PC recognize the Scanner. (See "Recognizing the Scanner," on p. 27.) 18 Installing the Scanner Turn the scanner OFF. (See "Turning the Power OFF," on p. 25.) 6. Installation Procedure The procedure for installing the scanner is outlined below. (For a detailed outline of this procedure, see "Connecting the Scanner to Your PC," on p. 21.) 3. Check the interface card in your computer...

User Manual
Page 21
...connect 3100 (AUA-3100LP) USB 2 connect 5100 (AUA-5100) (for Card Bus) Manufacturer: Adaptec Models: USB 2 connect for Notebooks (AUA-1420) Installing the Scanner 19 USB 2.0 Interface Card When using the USB 2.0 interface card, verify that the USB 2.0 interface card you are using . For more information refer ...to install the SCSI card into your computer. • The maximum SCSI cable length that can be used is one recommended for use with the scanner. The recommended USB 2.0 interface cards are using is one of ...
...connect 3100 (AUA-3100LP) USB 2 connect 5100 (AUA-5100) (for Card Bus) Manufacturer: Adaptec Models: USB 2 connect for Notebooks (AUA-1420) Installing the Scanner 19 USB 2.0 Interface Card When using the USB 2.0 interface card, verify that the USB 2.0 interface card you are using . For more information refer ...to install the SCSI card into your computer. • The maximum SCSI cable length that can be used is one recommended for use with the scanner. The recommended USB 2.0 interface cards are using is one of ...
User Manual
Page 22
Note If the USB 2.0 interface is not compatible with Hi-Speed USB 2.0, scanning speed is reduced. 20 Installing the Scanner IMPORTANT • Follow the instructions in your computer's and the USB 2.0 interface card's manuals to install the USB 2.0 interface card into your computer. • Use the most recent version of the USB 2.0 driver provided by Microsoft.
Note If the USB 2.0 interface is not compatible with Hi-Speed USB 2.0, scanning speed is reduced. 20 Installing the Scanner IMPORTANT • Follow the instructions in your computer's and the USB 2.0 interface card's manuals to install the USB 2.0 interface card into your computer. • Use the most recent version of the USB 2.0 driver provided by Microsoft.

User Manual
Page 23
... connect both a SCSI cable and a USB cable concurrently. • Do not connect multiple DR-5010C scanners to one (1) computer. • After having changed the connection, be sure to turn the scanner and the PC ON once again. Check the shape of SCSI connectors on the Shape of connecting... the scanner to your computer, via SCSI Notes on your PC. Connecting the Scanner to Your PC There are using your computer and the scanner, and use a SCSI cable that has compatible connectors. DR-5010C Computer SCSI Cable 50-Pin Half-Pitch (Pin Type) Installing the Scanner 21 Connecting...
... connect both a SCSI cable and a USB cable concurrently. • Do not connect multiple DR-5010C scanners to one (1) computer. • After having changed the connection, be sure to turn the scanner and the PC ON once again. Check the shape of SCSI connectors on the Shape of connecting... the scanner to your computer, via SCSI Notes on your PC. Connecting the Scanner to Your PC There are using your computer and the scanner, and use a SCSI cable that has compatible connectors. DR-5010C Computer SCSI Cable 50-Pin Half-Pitch (Pin Type) Installing the Scanner 21 Connecting...

User Manual
Page 24
... OFF the power to the computer and the scanner before connecting the computer and setting the SCSI ID. • The scanner has a built-in terminator that the IDs for...devices connected or built-in the "ON" position. To connect the scanner with the Dip Switches on when they are down, and off the... when they are on the back of the daisy chain, and turn OFF the scanner and the computer and refer to the following table to set the SCSI ID....Switches are up. • To change the SCSI ID, be sure to position the scanner at the factory. • The SCSI ID is set with other SCSI devices. &#...
... OFF the power to the computer and the scanner before connecting the computer and setting the SCSI ID. • The scanner has a built-in terminator that the IDs for...devices connected or built-in the "ON" position. To connect the scanner with the Dip Switches on when they are down, and off the... when they are on the back of the daisy chain, and turn OFF the scanner and the computer and refer to the following table to set the SCSI ID....Switches are up. • To change the SCSI ID, be sure to position the scanner at the factory. • The SCSI ID is set with other SCSI devices. &#...

User Manual
Page 25
... Cable DR-5010C IMPORTANT • If the operating system you are using is Windows NT, the connection via SCSI. • When using a USB hub, be sure to use the scanner with a personal computer equipped with USB 2.0 as standard, the scanner may not always operate normally. • If the interface is not supported. Installing the Scanner 23...
... Cable DR-5010C IMPORTANT • If the operating system you are using is Windows NT, the connection via SCSI. • When using a USB hub, be sure to use the scanner with a personal computer equipped with USB 2.0 as standard, the scanner may not always operate normally. • If the interface is not supported. Installing the Scanner 23...
User Manual
Page 26
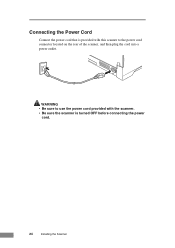
Connecting the Power Cord Connect the power cord that is provided with this scanner to use the power cord provided with the scanner. • Be sure the scanner is turned OFF before connecting the power cord. 24 Installing the Scanner WARNING • Be sure to the power cord connector located on the rear of the scanner, and then plug the cord into a power outlet.
Connecting the Power Cord Connect the power cord that is provided with this scanner to use the power cord provided with the scanner. • Be sure the scanner is turned OFF before connecting the power cord. 24 Installing the Scanner WARNING • Be sure to the power cord connector located on the rear of the scanner, and then plug the cord into a power outlet.

User Manual
Page 27
... screen prompting you to turn the scanner OFF and unplug the power cord. IMPORTANT If you turn ON your PC after connecting this scanner to your local authorized Canon dealer or service representative to proceed with administrator privileges. Installing the Scanner 25 The Power Switch is on... the screen to have the scanner serviced. 3. The power lamp lights green when the...
... screen prompting you to turn the scanner OFF and unplug the power cord. IMPORTANT If you turn ON your PC after connecting this scanner to your local authorized Canon dealer or service representative to proceed with administrator privileges. Installing the Scanner 25 The Power Switch is on... the screen to have the scanner serviced. 3. The power lamp lights green when the...

User Manual
Page 28
...the [Next] button. 5. Select [Search for a suitable driver for my device (recommended)], and then click the [Next] button to proceed to continue installation. 8. If the message "Digital Signature Not Found" appears, click [Yes] to the Locate Driver Files screen. 3. Insert the setup disc into the.... 6. Click the [Next] button to proceed to the Found New Hardware Wizard screen, select [Install from a list or specific location (Advanced)], and then click the [Next] button. 26 Installing the Scanner Insert the setup disc into the computer's CD-ROM drive. 2. Click the [Finish] button. ...
...the [Next] button. 5. Select [Search for a suitable driver for my device (recommended)], and then click the [Next] button to proceed to continue installation. 8. If the message "Digital Signature Not Found" appears, click [Yes] to the Locate Driver Files screen. 3. Insert the setup disc into the.... 6. Click the [Next] button to proceed to the Found New Hardware Wizard screen, select [Install from a list or specific location (Advanced)], and then click the [Next] button. 26 Installing the Scanner Insert the setup disc into the computer's CD-ROM drive. 2. Click the [Finish] button. ...

User Manual
Page 29
... for safety's sake. 1. 3. Although a message appears indicating that "D" is registered as "CANON DR-5010C SCSI" or "CANON DR-5010C USB" in the [Hardware Installation] dialog box. 5. IMPORTANT • The DR-5010C is the letter assigned to let the PC recognize the scanner once again. OFF Note • When connecting the DR-5010C via USB. The Power Switch is OFF. Turn OFF the...
... for safety's sake. 1. 3. Although a message appears indicating that "D" is registered as "CANON DR-5010C SCSI" or "CANON DR-5010C USB" in the [Hardware Installation] dialog box. 5. IMPORTANT • The DR-5010C is the letter assigned to let the PC recognize the scanner once again. OFF Note • When connecting the DR-5010C via USB. The Power Switch is OFF. Turn OFF the...
User Manual
Page 30
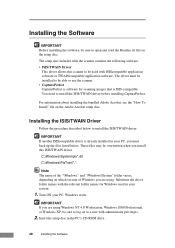
...names for scanning images that is already installed in the PC's CD-ROM drive. 28 Installing the Software IMPORTANT If you are using Windows NT 4.0 Workstation, Windows 2000 Professional, or Windows XP, be overwritten when you install this scanner to be used in your PC. ...be sure to open and read the Readme.txt file on the Adobe Acrobat setup disc. Installing the Software IMPORTANT Before installing the software, be able to use the scanner. • CapturePerfect CapturePerfect is software for Windows used with ISIScompatible application software or TWAINcompatible application ...
...names for scanning images that is already installed in the PC's CD-ROM drive. 28 Installing the Software IMPORTANT If you are using Windows NT 4.0 Workstation, Windows 2000 Professional, or Windows XP, be overwritten when you install this scanner to be used in your PC. ...be sure to open and read the Readme.txt file on the Adobe Acrobat setup disc. Installing the Software IMPORTANT Before installing the software, be able to use the scanner. • CapturePerfect CapturePerfect is software for Windows used with ISIScompatible application software or TWAINcompatible application ...

User Manual
Page 31
The Installer starts. 5. Restart Windows when you have completed the installation. Note Installing the ISIS/TWAIN driver creates the following shortcuts in the Start menu: Installing the Software 29 The [Run] dialog box appears. 4. In the Open box, enter "D:\Driver\Setup.exe" (assuming that "D" is the letter assigned to your CD-ROM drive), and then click the [OK] button. Click the [Start] button, and then select [Run]. 3. Follow the instructions on the screen and complete the installation. 6.
The Installer starts. 5. Restart Windows when you have completed the installation. Note Installing the ISIS/TWAIN driver creates the following shortcuts in the Start menu: Installing the Software 29 The [Run] dialog box appears. 4. In the Open box, enter "D:\Driver\Setup.exe" (assuming that "D" is the letter assigned to your CD-ROM drive), and then click the [OK] button. Click the [Start] button, and then select [Run]. 3. Follow the instructions on the screen and complete the installation. 6.

User Manual
Page 32
Canon DR-5010C Help Online help for ISIS/TWAIN driver. (See "Using the ISIS/TWAIN Driver," on p. 35.) PATCH x(xx) (Patch Code Sample Sheet) These sheets are used to automatically separate batches of documents when the scanner recognizes the patch code pattern. (See "Using Patch Code Sheets," on p. 55.) To use the patch code sheets, you need to install CapturePerfect, which is provided with the scanner, or an application that can handle PDF format files. 30 Installing the Software
Canon DR-5010C Help Online help for ISIS/TWAIN driver. (See "Using the ISIS/TWAIN Driver," on p. 35.) PATCH x(xx) (Patch Code Sample Sheet) These sheets are used to automatically separate batches of documents when the scanner recognizes the patch code pattern. (See "Using Patch Code Sheets," on p. 55.) To use the patch code sheets, you need to install CapturePerfect, which is provided with the scanner, or an application that can handle PDF format files. 30 Installing the Software

User Manual
Page 33
... the OK button. In the Open box, enter "D:\CapturePerfect\Setup.exe" (assuming that "D" is the letter assigned to log on the screen and complete the installation process. Insert the setup disc in the PC's CD-ROM drive. 3. Click the [Start] button, and then select [Run]. IMPORTANT If you are using Windows... NT 4.0 Workstation, Windows 2000 Professional, or Windows XP, be sure to your PC. Follow the instructions on as a user with administrator privileges. 2. Windows starts. Installing CapturePerfect Follow the procedure described below to...
... the OK button. In the Open box, enter "D:\CapturePerfect\Setup.exe" (assuming that "D" is the letter assigned to log on the screen and complete the installation process. Insert the setup disc in the PC's CD-ROM drive. 3. Click the [Start] button, and then select [Run]. IMPORTANT If you are using Windows... NT 4.0 Workstation, Windows 2000 Professional, or Windows XP, be sure to your PC. Follow the instructions on as a user with administrator privileges. 2. Windows starts. Installing CapturePerfect Follow the procedure described below to...
User Manual
Page 34
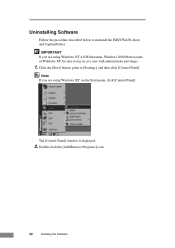
Click the [Start] button, point to uninstall the ISIS/TWAIN driver and CapturePerfect. The [Control Panel] window is displayed. 2. Uninstalling Software Follow the procedure described below to [Settings], and then click [Control Panel]. Double-click the [Add/Remove Programs] icon. 32 Installing the Software IMPORTANT If you are using Windows XP, on as a user with administrator privileges. 1. Note If you are using Windows NT 4.0 Workstation, Windows 2000 Professional, or Windows XP, be sure to log on the Start menu, click [Control Panel].
Click the [Start] button, point to uninstall the ISIS/TWAIN driver and CapturePerfect. The [Control Panel] window is displayed. 2. Uninstalling Software Follow the procedure described below to [Settings], and then click [Control Panel]. Double-click the [Add/Remove Programs] icon. 32 Installing the Software IMPORTANT If you are using Windows XP, on as a user with administrator privileges. 1. Note If you are using Windows NT 4.0 Workstation, Windows 2000 Professional, or Windows XP, be sure to log on the Start menu, click [Control Panel].


