User Manual
Page 2
...modifications should be made to provide reasonable protection against harmful interference when the equipment is operated in any form or by CANON ELECTRONICS INC. NOTICE q Copyright 2004 by any changes or modifications to radio communications. All rights reserved. RADIO INTERFERENCE ... manual. It is a United States registered mark. ● Microsoft WindowsR and Microsoft Windows NTR are subject to Part 15 of the Industry Canada. However, Canon Electronics Inc. Do not make any means, electronic, mechanical, magnetic, optical, chemical, manual, or otherwise, without...
...modifications should be made to provide reasonable protection against harmful interference when the equipment is operated in any form or by CANON ELECTRONICS INC. NOTICE q Copyright 2004 by any changes or modifications to radio communications. All rights reserved. RADIO INTERFERENCE ... manual. It is a United States registered mark. ● Microsoft WindowsR and Microsoft Windows NTR are subject to Part 15 of the Industry Canada. However, Canon Electronics Inc. Do not make any means, electronic, mechanical, magnetic, optical, chemical, manual, or otherwise, without...
User Manual
Page 6
... Precautions 5 Safe Operation 5 Installation Location 7 Power Supply 8 Operating and Closing the Feeder 8 Carrying ...9 Chapter 1 Getting Ready 1.1 Features of the DR-7080C 12 1.2 Before Getting Started 14 Unpacking 14 Removing the Transportation Screw 15 1.3 Part Names 16 Feeder ...16 Flatbed ...17 Rear ...18 Operation Panel 19 1.4 Job Function 20 1.5 Optional Products 21 Stamp Unit...
... Precautions 5 Safe Operation 5 Installation Location 7 Power Supply 8 Operating and Closing the Feeder 8 Carrying ...9 Chapter 1 Getting Ready 1.1 Features of the DR-7080C 12 1.2 Before Getting Started 14 Unpacking 14 Removing the Transportation Screw 15 1.3 Part Names 16 Feeder ...16 Flatbed ...17 Rear ...18 Operation Panel 19 1.4 Job Function 20 1.5 Optional Products 21 Stamp Unit...

User Manual
Page 10
... a malfunction or personal injury. ■ Close the feeder carefully and slowly, taking care to avoid letting it by pulling on the scanner connector with moving parts, especially the rollers that feed the scanner. Failure to do so might damage the glass and create the risk of a malfunction or personal injury. ■...
... a malfunction or personal injury. ■ Close the feeder carefully and slowly, taking care to avoid letting it by pulling on the scanner connector with moving parts, especially the rollers that feed the scanner. Failure to do so might damage the glass and create the risk of a malfunction or personal injury. ■...
User Manual
Page 15
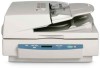
Chapter 1 Getting Ready This chapter describes the features of the scanner, what's in the box, and the names and functions of parts on the scanner. 1.1 Features of the DR-7080C 12 1.2 Before Getting Started 14 Unpacking 14 Removing the Transportation Screw ....... 15 1.3 Part Names 16 Feeder 16 Flatbed 17 Rear 18 Operation Panel 19 1.4 Job Function 20 1.5 Optional Products 21 Stamp Unit 21
Chapter 1 Getting Ready This chapter describes the features of the scanner, what's in the box, and the names and functions of parts on the scanner. 1.1 Features of the DR-7080C 12 1.2 Before Getting Started 14 Unpacking 14 Removing the Transportation Screw ....... 15 1.3 Part Names 16 Feeder 16 Flatbed 17 Rear 18 Operation Panel 19 1.4 Job Function 20 1.5 Optional Products 21 Stamp Unit 21

User Manual
Page 20
...this cover to remove ejected documents. (See p. 50.) u Operation Panel (See p. 19.) 16 Chapter 1 Getting Ready Part Names This section describes the names and functions of each part. Raise the document feeder tray to clear document jams and clean the rollers. (See pp. 77, 90.) w Opening...size label that indicates the applicable document size. (See p. 48.) t Document Feeder Tray Load documents to familiarize yourself with the main parts. Before you connect the DR-7080C, take a few minutes to be scanned here. (See p. 49.) y Document Eject Tray Scanned documents are ejected here. e Document...
...this cover to remove ejected documents. (See p. 50.) u Operation Panel (See p. 19.) 16 Chapter 1 Getting Ready Part Names This section describes the names and functions of each part. Raise the document feeder tray to clear document jams and clean the rollers. (See pp. 77, 90.) w Opening...size label that indicates the applicable document size. (See p. 48.) t Document Feeder Tray Load documents to familiarize yourself with the main parts. Before you connect the DR-7080C, take a few minutes to be scanned here. (See p. 49.) y Document Eject Tray Scanned documents are ejected here. e Document...

User Manual
Page 21
Flatbed 1.3 Part Names 1 i Pressure Board This board presses the document page against the glass during scanning. (See p. 89.) o Flatbed (Platen Glass) When placing the document onto the platen glass, align it with the arrow in the upper left corner of the glass. (See p. 51.) !0 Opening Sensor This sensor detects whether the feeder is open or closed. (See p. 51.) !1 Power Switch (See p. 30.) !2 Air Vents 17
Flatbed 1.3 Part Names 1 i Pressure Board This board presses the document page against the glass during scanning. (See p. 89.) o Flatbed (Platen Glass) When placing the document onto the platen glass, align it with the arrow in the upper left corner of the glass. (See p. 51.) !0 Opening Sensor This sensor detects whether the feeder is open or closed. (See p. 51.) !1 Power Switch (See p. 30.) !2 Air Vents 17

User Manual
Page 23
... when pressed or in a different file or folder than the previously scanned document. This key is active for applications that support batch separation. Operation Panel 1.3 Part Names 1 q Menu Key Press this key to cycle the display through 99) on the display panel. (See "Job Function," on p. 68.) w Set Keys Use these...
... when pressed or in a different file or folder than the previously scanned document. This key is active for applications that support batch separation. Operation Panel 1.3 Part Names 1 q Menu Key Press this key to cycle the display through 99) on the display panel. (See "Job Function," on p. 68.) w Set Keys Use these...

User Manual
Page 36
... ● If you will not be registered as "CANON DR-7080C SCSI" or "CANON DR-7080C USB" in the search], enter "D:\INF" (assuming that the SCSI connection device name is not a problem. ● The DR-7080C will have to the end. 32 Important If you cancel device driver installation part way through, you are using Windows XP, the [Found...
... ● If you will not be registered as "CANON DR-7080C SCSI" or "CANON DR-7080C USB" in the search], enter "D:\INF" (assuming that the SCSI connection device name is not a problem. ● The DR-7080C will have to the end. 32 Important If you cancel device driver installation part way through, you are using Windows XP, the [Found...
User Manual
Page 58
..., you start and stop the scanner. ■ Check the stack and remove all clips, staples, pins, or any other type of document pages with moving parts, especially the rollers that could damage the document, cause document jams, or damage the scanner. This could become entangled, immediately disconnect the power plug from...
..., you start and stop the scanner. ■ Check the stack and remove all clips, staples, pins, or any other type of document pages with moving parts, especially the rollers that could damage the document, cause document jams, or damage the scanner. This could become entangled, immediately disconnect the power plug from...
User Manual
Page 108
... 55 Stand-by Mode 70 Start key 19 Stop key 19 - Panel feeding 56 Paper jams 77 -Clearing a paper jam 77 -Paper jam causes 81 Part names 16 Patch code patterns 65 Patch code sheets 64 -How to set the user modes .......... 72 104 S - Safe operation 5 Scan procedure 54 -Automatic feeding...
... 55 Stand-by Mode 70 Start key 19 Stop key 19 - Panel feeding 56 Paper jams 77 -Clearing a paper jam 77 -Paper jam causes 81 Part names 16 Patch code patterns 65 Patch code sheets 64 -How to set the user modes .......... 72 104 S - Safe operation 5 Scan procedure 54 -Automatic feeding...


