
User Manual
Page 8
... 7-2 Options 7-3 Consumables 7-3 External Dimensions 7-4 2. Option Specifications 7-5 Barcode Specifications 7-5 Imprinter Specifications 7-6 3. Uninstalling the Software 6-9 Uninstalling the ISIS/TWAIN Driver 6-9 Chapter 7 Appendix 1. Messages 6-2 Status Display 6-2 Error Messages 6-3 2. 3. Troubleshooting 6-5 Trouble Categories 6-5 Problem and Solution 6-5 3. Index 7-7 iii Hardware Imprinter Ink Cartridge Replacement and Cleaning 5-13 About the Imprinter 5-13 Replacing Ink Cartridges 5-13 Specifying the Printing Position...
... 7-2 Options 7-3 Consumables 7-3 External Dimensions 7-4 2. Option Specifications 7-5 Barcode Specifications 7-5 Imprinter Specifications 7-6 3. Uninstalling the Software 6-9 Uninstalling the ISIS/TWAIN Driver 6-9 Chapter 7 Appendix 1. Messages 6-2 Status Display 6-2 Error Messages 6-3 2. 3. Troubleshooting 6-5 Trouble Categories 6-5 Problem and Solution 6-5 3. Index 7-7 iii Hardware Imprinter Ink Cartridge Replacement and Cleaning 5-13 About the Imprinter 5-13 Replacing Ink Cartridges 5-13 Specifying the Printing Position...

User Manual
Page 17
... ● Imprinter (Option) As an option, printing can be made on scanned documents. ● Barcode Detection (Option) Barcodes on documents can be detected by installing the optional barcode module. ● Patchcode Support (Option) By installing the optional patchcode decoder, patch code sheets inserted between document pages can ... feeding to stop, scanning pauses to allow you to correct the cause of the misfeed, after which scanning continues from the document page on which the abnormality was detected. (See "Clearing a Paper Jam or Double Feed Error" on p. 3-20.) Chapter 1 Before...
... ● Imprinter (Option) As an option, printing can be made on scanned documents. ● Barcode Detection (Option) Barcodes on documents can be detected by installing the optional barcode module. ● Patchcode Support (Option) By installing the optional patchcode decoder, patch code sheets inserted between document pages can ... feeding to stop, scanning pauses to allow you to correct the cause of the misfeed, after which scanning continues from the document page on which the abnormality was detected. (See "Clearing a Paper Jam or Double Feed Error" on p. 3-20.) Chapter 1 Before...

User Manual
Page 18
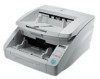
... 1 Before You Start Using the Scanner 3. Document Feeder Tray Extension / Extension Wire Extend as needed to fit the length of documents. (See p. 3-8 and p. 3-9.) + Document Guide Lock Lever Locks the Document Guides. (See p. 3-9.) , Document Feed Tray Load documents to fit the width of the documents. (See p. 3-7.) CAUTION Do not open the imprinter cover if the optional imprinter is not installed. 1-10...
... 1 Before You Start Using the Scanner 3. Document Feeder Tray Extension / Extension Wire Extend as needed to fit the length of documents. (See p. 3-8 and p. 3-9.) + Document Guide Lock Lever Locks the Document Guides. (See p. 3-9.) , Document Feed Tray Load documents to fit the width of the documents. (See p. 3-7.) CAUTION Do not open the imprinter cover if the optional imprinter is not installed. 1-10...

User Manual
Page 57
...11 4-2 Other Functions and Settings The following DR-6050C/7550C/9050C functions are grouped together as Other Functions. Chapter 4 Other Functions 1. SCSI Speed USB Short Packet Imprinter (Optional) Imprinter Test Counter (Total Counter) Count (Roller ...Counter) Count-Only Mode Display Contrast Key Repeat Skew-Detection (Always On) Deskew Double-Feed Detection Double-Feed Detection (Count-Only Mode) Staple Detection Staple Detection (Count-Only Mode) Staple Detection Level Setting Stand-by Mode Long-Document...
...11 4-2 Other Functions and Settings The following DR-6050C/7550C/9050C functions are grouped together as Other Functions. Chapter 4 Other Functions 1. SCSI Speed USB Short Packet Imprinter (Optional) Imprinter Test Counter (Total Counter) Count (Roller ...Counter) Count-Only Mode Display Contrast Key Repeat Skew-Detection (Always On) Deskew Double-Feed Detection Double-Feed Detection (Count-Only Mode) Staple Detection Staple Detection (Count-Only Mode) Staple Detection Level Setting Stand-by Mode Long-Document...

User Manual
Page 62
...imprinter that prints on the right side. • The scan image of the front side becomes the left half of the reconstructed image. • The maximum document size for Folio Scan is 22" × 34"/A1. • 22" × 34"/A1 document pages should be folded lengthwise and scanned with the following settings: Scanner...: Long Document Mode [ON1] Page Size: Auto-Detection •...
...imprinter that prints on the right side. • The scan image of the front side becomes the left half of the reconstructed image. • The maximum document size for Folio Scan is 22" × 34"/A1. • 22" × 34"/A1 document pages should be folded lengthwise and scanned with the following settings: Scanner...: Long Document Mode [ON1] Page Size: Auto-Detection •...

User Manual
Page 67
..., and retard rollers). OFF: The panel display scrolls each of the functions in the User Mode ■ Total Counter Displays the lifetime total number of document pages fed by the scanner. ■ Roller Counter Displays the number of the imprinter. (See "Performing an Imprinter Test" on p. 5-17.) 4-12 Chapter 4 Other Functions
..., and retard rollers). OFF: The panel display scrolls each of the functions in the User Mode ■ Total Counter Displays the lifetime total number of document pages fed by the scanner. ■ Roller Counter Displays the number of the imprinter. (See "Performing an Imprinter Test" on p. 5-17.) 4-12 Chapter 4 Other Functions

User Manual
Page 68
Imprinter Ink Cartridge Replacement and Cleaning 5-13 About the Imprinter 5-13 Replacing Ink Cartridges 5-13 Specifying the Printing Position 5-15 Cleaning the Imprinter 5-16 Imprinter Testing 5-17 Regular Maintenance 5-2 Cleaning the Scanner 5-2 Cleaning the Sensors 5-2 Cleaning the Scanning Glass and Rollers 5-3 Power Outlet 5-4 2. Replacing the Transport Rollers 5-5 Roller Replacement Cycle 5-5 Checking and Resetting the Page Counter...........5-5 Removing and Reinstalling the Rollers 5-7 3. Chapter 5 Maintenance 1.
Imprinter Ink Cartridge Replacement and Cleaning 5-13 About the Imprinter 5-13 Replacing Ink Cartridges 5-13 Specifying the Printing Position 5-15 Cleaning the Imprinter 5-16 Imprinter Testing 5-17 Regular Maintenance 5-2 Cleaning the Scanner 5-2 Cleaning the Sensors 5-2 Cleaning the Scanning Glass and Rollers 5-3 Power Outlet 5-4 2. Replacing the Transport Rollers 5-5 Roller Replacement Cycle 5-5 Checking and Resetting the Page Counter...........5-5 Removing and Reinstalling the Rollers 5-7 3. Chapter 5 Maintenance 1.

User Manual
Page 80
..., blue or green HP ink cartridges. With your local authorized Canon dealer or service representative. About the Imprinter The ink cartridge for the imprinter that prints on scanned documents is recommended to the left and right. 2. Imprinter Ink Cartridge Replacement and Cleaning When the optional imprinter is used, printing will become faint or nonexistent when the...
..., blue or green HP ink cartridges. With your local authorized Canon dealer or service representative. About the Imprinter The ink cartridge for the imprinter that prints on scanned documents is recommended to the left and right. 2. Imprinter Ink Cartridge Replacement and Cleaning When the optional imprinter is used, printing will become faint or nonexistent when the...

User Manual
Page 81
Open the imprinter cover until it immediately. Chapter 5 Maintenance 6. CAUTION Peel off the seal covering the nozzles of a new ink cartridge. Hint Perform the steps that follow with ... touching the metal contacts or nozzles of a cartridge only if you are going to release the ink cartridge lock (b). Install the new cartridge with the imprinter cover fully open. 4. Remove the ink cartridge. 7. Peel off the seal covering the nozzles of the ink cartridge. 5. 3.
Open the imprinter cover until it immediately. Chapter 5 Maintenance 6. CAUTION Peel off the seal covering the nozzles of a new ink cartridge. Hint Perform the steps that follow with ... touching the metal contacts or nozzles of a cartridge only if you are going to release the ink cartridge lock (b). Install the new cartridge with the imprinter cover fully open. 4. Remove the ink cartridge. 7. Peel off the seal covering the nozzles of the ink cartridge. 5. 3.

User Manual
Page 82
...in the area of the carriage. An error message appears on p. 5-15.) Positioning Holes (15 Locations) Hint The imprinter cover will not close , check the position of the imprinter cover shown by the arrow until it clicks into place. Specifying the Printing Position Manually specify the printing position in ...ink cartridge as indicated by the arrow to a position where it . 9. To do not feel it with one of the document. With your finger, push in . Close the imprinter cover. Hint If you can feel it will not open . Always move the carriage left or right, then make sure that...
...in the area of the carriage. An error message appears on p. 5-15.) Positioning Holes (15 Locations) Hint The imprinter cover will not close , check the position of the imprinter cover shown by the arrow until it clicks into place. Specifying the Printing Position Manually specify the printing position in ...ink cartridge as indicated by the arrow to a position where it . 9. To do not feel it with one of the document. With your finger, push in . Close the imprinter cover. Hint If you can feel it will not open . Always move the carriage left or right, then make sure that...

User Manual
Page 83
... then make sure you do not feel it clicks in . Always move the carriage to a position where it click in . • The imprinter cover will not close unless the carriage is not aligned correctly with a dry cloth. To prevent this, periodically remove the ink cartridge and clean ... become streaked or spotty. Positioning Holes (15 Locations) ■ Cleaning the Ink Cartridges If the imprinter print head nozzles are dirty, printing may stain the documents when they are scanned. Hint • If you can feel it will not close , check the position of the lock lever ...
... then make sure you do not feel it clicks in . Always move the carriage to a position where it click in . • The imprinter cover will not close unless the carriage is not aligned correctly with a dry cloth. To prevent this, periodically remove the ink cartridge and clean ... become streaked or spotty. Positioning Holes (15 Locations) ■ Cleaning the Ink Cartridges If the imprinter print head nozzles are dirty, printing may stain the documents when they are scanned. Hint • If you can feel it will not close , check the position of the lock lever ...

User Manual
Page 84
...the ink cartridge. Load a sheet of paper into the Document Feed Tray for test printing. Chapter 5 Maintenance 2. Enter Key 5-17 Press [Enter]. Press the [ ] key once to confirm proper printing. Menu Key Imprinter Testing After replacing an ink cartridge or cleaning the print ...Doing so may cause poor connections, resulting in poor print quality. IMPORTANT Before performing an Imprinter Test, load a sheet of paper into the Document Feed Tray. ■ Performing an Imprinter Test Use the following procedure to execute the Imprinter Test. 1. Test printing is activated. 3.
...the ink cartridge. Load a sheet of paper into the Document Feed Tray for test printing. Chapter 5 Maintenance 2. Enter Key 5-17 Press [Enter]. Press the [ ] key once to confirm proper printing. Menu Key Imprinter Testing After replacing an ink cartridge or cleaning the print ...Doing so may cause poor connections, resulting in poor print quality. IMPORTANT Before performing an Imprinter Test, load a sheet of paper into the Document Feed Tray. ■ Performing an Imprinter Test Use the following procedure to execute the Imprinter Test. 1. Test printing is activated. 3.

User Manual
Page 85
Press the [Stop] key to select [OK], and press [Enter]. The test print is loaded for test printing, the imprinter test finishes without printing. 6. Chapter 5 Maintenance 5-18 IMPORTANT If no paper is executed. The Imprinter Test is enabled. 5. Press the [ ] key to exit the User Mode.
Press the [Stop] key to select [OK], and press [Enter]. The test print is loaded for test printing, the imprinter test finishes without printing. 6. Chapter 5 Maintenance 5-18 IMPORTANT If no paper is executed. The Imprinter Test is enabled. 5. Press the [ ] key to exit the User Mode.

User Manual
Page 88
... code, and contact your Canon service representative. ■ Skew Detected Error Code: J018 Problem: A skewed document page contacted the wall of the document not feeding correctly. ■ Call for Service Error Code: Exxx Problem: Internal scanner error. Solution: Install an...document is jammed inside the scanner. • P006, P007: The document is open. Solution: Turn the power OFF, and restart the scanner. Solution: Remove and reposition the document page. Solution: Close (lower) the upper unit. (See p. 5-4.) Error Code: C009 Problem: The imprinter cover is installed in the scanner...
... code, and contact your Canon service representative. ■ Skew Detected Error Code: J018 Problem: A skewed document page contacted the wall of the document not feeding correctly. ■ Call for Service Error Code: Exxx Problem: Internal scanner error. Solution: Install an...document is jammed inside the scanner. • P006, P007: The document is open. Solution: Turn the power OFF, and restart the scanner. Solution: Remove and reposition the document page. Solution: Close (lower) the upper unit. (See p. 5-4.) Error Code: C009 Problem: The imprinter cover is installed in the scanner...

User Manual
Page 98
... For information about the roller replacement kit, contact your local authorized Canon dealer or service representative. Ink Cartridge: Blue (Product Code: 3693A002) This blue ink cartridge is used by the imprinter. Ink Cartridge: Green (Product Code: 3693A004) This green ink ...imprinter. (See "Replacing Ink Cartridges" on p. 5-5.) IMPORTANT • Rollers are subject to occur. External Dimensions 18.90" (W) × 20.91" (D) × 12.24" (H) 480 mm (W) × 531 mm (D) × 311 mm (H) Maximum External Dimensions (with Document Feeder Tray Extension / Extension Wire, and Document...
... For information about the roller replacement kit, contact your local authorized Canon dealer or service representative. Ink Cartridge: Blue (Product Code: 3693A002) This blue ink cartridge is used by the imprinter. Ink Cartridge: Green (Product Code: 3693A004) This green ink ...imprinter. (See "Replacing Ink Cartridges" on p. 5-5.) IMPORTANT • Rollers are subject to occur. External Dimensions 18.90" (W) × 20.91" (D) × 12.24" (H) 480 mm (W) × 531 mm (D) × 311 mm (H) Maximum External Dimensions (with Document Feeder Tray Extension / Extension Wire, and Document...

User Manual
Page 100
...Digits Checksum EAN Codabar Code 39 ITF Code 128 UPC-A UPC-E 8 or 13 Modulus 10, Weight 3 3 to 32 (including Modulus 16, 7 DR Start/Stop characters) 3 to 32 (including Modulus 43 Start/Stop characters) (Standard ASCII or Full ASCII) 2 to "Using Patchcode Sheets (Option)" ...(p. 3-20) for the separately sold Barcode Module (p. 7-3) and imprinters. Barcode Specifications The following barcodes can be detected by installing the optional barcode module. ■ Barcode Types Code No. Option Specifications This ...
...Digits Checksum EAN Codabar Code 39 ITF Code 128 UPC-A UPC-E 8 or 13 Modulus 10, Weight 3 3 to 32 (including Modulus 16, 7 DR Start/Stop characters) 3 to 32 (including Modulus 43 Start/Stop characters) (Standard ASCII or Full ASCII) 2 to "Using Patchcode Sheets (Option)" ...(p. 3-20) for the separately sold Barcode Module (p. 7-3) and imprinters. Barcode Specifications The following barcodes can be detected by installing the optional barcode module. ■ Barcode Types Code No. Option Specifications This ...

User Manual
Page 101
... Feeding the edge of the page Direction Quantity Up to four per page Spacing At least 0.197" (5 mm) Conditions No background or overlapping barcodes Imprinter Specifications Printing Side Front Position Set in the ISIS/TWAIN driver (See p. 8-26) One of 15 positions Printing Content Set in the ISIS/TWAIN ...driver Imprinter Font Sizes (Dots) 12 × 12 (with no added space between characters) 12 × 8 (with no added space between characters) 12 × 12 (...
... Feeding the edge of the page Direction Quantity Up to four per page Spacing At least 0.197" (5 mm) Conditions No background or overlapping barcodes Imprinter Specifications Printing Side Front Position Set in the ISIS/TWAIN driver (See p. 8-26) One of 15 positions Printing Content Set in the ISIS/TWAIN ...driver Imprinter Font Sizes (Dots) 12 × 12 (with no added space between characters) 12 × 8 (with no added space between characters) 12 × 12 (...

User Manual
Page 105
... Sizes 10-4 Specifying the Scanning Area 10-5 Configuring Scanner Settings According to the Purpose 10-6 Registering Your Settings 10-11 ii Software ISIS/TWAIN Driver Settings Dialog Box ...........8-4 [Basic] Tab Sheet 8-6 [Brightness] Tab Sheet 8-14 [Image processing] Tab Sheet 8-16 [Others] Tab Sheet 8-18 [Imprinter/Addon] Tab Sheet 8-25 Chapter 9 Job Registration...
... Sizes 10-4 Specifying the Scanning Area 10-5 Configuring Scanner Settings According to the Purpose 10-6 Registering Your Settings 10-11 ii Software ISIS/TWAIN Driver Settings Dialog Box ...........8-4 [Basic] Tab Sheet 8-6 [Brightness] Tab Sheet 8-14 [Image processing] Tab Sheet 8-16 [Others] Tab Sheet 8-18 [Imprinter/Addon] Tab Sheet 8-25 Chapter 9 Job Registration...

User Manual
Page 106
Before You Start Using the Scanner 8-2 2. Chapter 8 ISIS/TWAIN Driver Settings 1. ISIS/TWAIN Driver Settings Dialog Box .......... 8-4 [Basic] Tab Sheet 8-6 [Brightness] Tab Sheet 8-14 [Image processing] Tab Sheet 8-16 [Others] Tab Sheet 8-18 [Imprinter/Addon] Tab Sheet 8-25
Before You Start Using the Scanner 8-2 2. Chapter 8 ISIS/TWAIN Driver Settings 1. ISIS/TWAIN Driver Settings Dialog Box .......... 8-4 [Basic] Tab Sheet 8-6 [Brightness] Tab Sheet 8-14 [Image processing] Tab Sheet 8-16 [Others] Tab Sheet 8-18 [Imprinter/Addon] Tab Sheet 8-25

User Manual
Page 109
... description of the standard tab sheets [Basic], [Brightness], [Image processing], [Others], and [Imprinter/Addon]. ISIS Driver Settings Dialog Box TWAIN Driver Settings Dialog Box 8-4 ISIS/TWAIN Driver Settings Dialog Box If menus or buttons are selected to configure the scanner settings from the scanning application. The ISIS/TWAIN Driver Settings dialog box...
... description of the standard tab sheets [Basic], [Brightness], [Image processing], [Others], and [Imprinter/Addon]. ISIS Driver Settings Dialog Box TWAIN Driver Settings Dialog Box 8-4 ISIS/TWAIN Driver Settings Dialog Box If menus or buttons are selected to configure the scanner settings from the scanning application. The ISIS/TWAIN Driver Settings dialog box...