
User Manual
Page 1
DR-9050C/DR-7550C User Manual DR-6050C Please read this manual, keep it in a safe place for future reference. After you finish reading this manual before using the scanner.
DR-9050C/DR-7550C User Manual DR-6050C Please read this manual, keep it in a safe place for future reference. After you finish reading this manual before using the scanner.
User Manual
Page 2
... equipment unless otherwise specified in accordance with the instructions, may cause undesired operation. DR-9050C: Model M11068 This device complies with the limits for a Class B digital device... of FCC Rules. Increase the separation between the equipment and receiver. - One Canon Plaza, Lake Success NY 11042, U.S.A. RÈGLEMENT SUR LE BROUILLAGE RADIOÉ...120 V model) Document Scanner: - DR-7550C: Model M11069 - This equipment generates, uses, and can participate voluntarily. Connect the equipment into an outlet on , the user is connected. - DR-6050C: Model M11070 ...
... equipment unless otherwise specified in accordance with the instructions, may cause undesired operation. DR-9050C: Model M11068 This device complies with the limits for a Class B digital device... of FCC Rules. Increase the separation between the equipment and receiver. - One Canon Plaza, Lake Success NY 11042, U.S.A. RÈGLEMENT SUR LE BROUILLAGE RADIOÉ...120 V model) Document Scanner: - DR-7550C: Model M11069 - This equipment generates, uses, and can participate voluntarily. Connect the equipment into an outlet on , the user is connected. - DR-6050C: Model M11070 ...

User Manual
Page 3
...Other product and company names herein are registered trademarks of the Document Scanner. For more information about where you buy a new similar ...WARRANTIES AS TO MARKETABILITY, MERCHANTABILITY, FITNESS FOR A PARTICULAR PURPOSE OF USE OR NONINFRINGEMENT. GPSGV "Maschinenlärminformations-Verordnung 3. ii No part...CANON ELECTRONICS INC. All rights reserved. DR-6050C: Model M11070 DR-7550C: Model M11069 DR-9050C: Model M11068 Trademarks • Canon and the Canon logo are , or may be trademarks or registered trademarks in other countries. • imageFORMULA is a trademark of Canon...
...Other product and company names herein are registered trademarks of the Document Scanner. For more information about where you buy a new similar ...WARRANTIES AS TO MARKETABILITY, MERCHANTABILITY, FITNESS FOR A PARTICULAR PURPOSE OF USE OR NONINFRINGEMENT. GPSGV "Maschinenlärminformations-Verordnung 3. ii No part...CANON ELECTRONICS INC. All rights reserved. DR-6050C: Model M11070 DR-7550C: Model M11069 DR-9050C: Model M11068 Trademarks • Canon and the Canon logo are , or may be trademarks or registered trademarks in other countries. • imageFORMULA is a trademark of Canon...

User Manual
Page 4
... become acquainted with its many functions. Preface Thank you for use the ISIS/ TWAIN driver with the scanner), the User Manual (this and the following locations during software installation. The Software section describes how to set up the scanner for purchasing the Canon imageFORMULA DR-6050C/DR-7550C/DR-9050C Document Scanner. Please read this manual), and the CapturePerfect3.0 Operation Guide...
... become acquainted with its many functions. Preface Thank you for use the ISIS/ TWAIN driver with the scanner), the User Manual (this and the following locations during software installation. The Software section describes how to set up the scanner for purchasing the Canon imageFORMULA DR-6050C/DR-7550C/DR-9050C Document Scanner. Please read this manual), and the CapturePerfect3.0 Operation Guide...

User Manual
Page 5
...precautions, and instructions that may lead to death or injury to property if not performed correctly. To use the scanner safely, always pay attention to the scanner. IMPORTANT Indicates operational requirements and restrictions. Reading these warnings. WARNING Indicates a warning concerning operations that ...you read these cautions. To use the scanner safely, always pay attention to these items carefully to operate the scanner correctly, and avoid damage to these notes is Organized This manual consists of an...
...precautions, and instructions that may lead to death or injury to property if not performed correctly. To use the scanner safely, always pay attention to the scanner. IMPORTANT Indicates operational requirements and restrictions. Reading these warnings. WARNING Indicates a warning concerning operations that ...you read these cautions. To use the scanner safely, always pay attention to these items carefully to operate the scanner correctly, and avoid damage to these notes is Organized This manual consists of an...

User Manual
Page 6
User Manual Hardware Please read this manual, keep it in a safe place for future reference. After you finish reading this manual before using the scanner.
User Manual Hardware Please read this manual, keep it in a safe place for future reference. After you finish reading this manual before using the scanner.

User Manual
Page 7
... the Computer 2-6 5. User Mode 4-8 User Mode Operating Procedure 4-8 4. Installation Requirements 2-3 3. Connecting the Scanner to the Computer ........2-6 Interface Connector Locations 2-6 Connecting the Scanner to Use Patchcode Sheets 3-21 7. Document Feed and Eject Trays 3-6 Preparing the Document Feed Tray 3-6 Adjusting the Document Guides 3-8 Preparing the Document Eject Tray 3-10 4. User Mode Functions 4-10 Chapter 5 Maintenance 1. Important Safety Instructions 1-2 Installation...
... the Computer 2-6 5. User Mode 4-8 User Mode Operating Procedure 4-8 4. Installation Requirements 2-3 3. Connecting the Scanner to the Computer ........2-6 Interface Connector Locations 2-6 Connecting the Scanner to Use Patchcode Sheets 3-21 7. Document Feed and Eject Trays 3-6 Preparing the Document Feed Tray 3-6 Adjusting the Document Guides 3-8 Preparing the Document Eject Tray 3-10 4. User Mode Functions 4-10 Chapter 5 Maintenance 1. Important Safety Instructions 1-2 Installation...

User Manual
Page 9
Features 1-6 3. Names and Functions of Parts 1-10 Front View, Feeder Inlet, and Eject Outlet ..........1-10 Rear View 1-11 Control Panel 1-12 Important Safety Instructions 1-2 Installation Location 1-2 Power 1-2 Moving the Scanner 1-3 Handling 1-3 Disposal 1-5 2. Chapter 1 Before You Start Using the Scanner 1.
Features 1-6 3. Names and Functions of Parts 1-10 Front View, Feeder Inlet, and Eject Outlet ..........1-10 Rear View 1-11 Control Panel 1-12 Important Safety Instructions 1-2 Installation Location 1-2 Power 1-2 Moving the Scanner 1-3 Handling 1-3 Disposal 1-5 2. Chapter 1 Before You Start Using the Scanner 1.

User Manual
Page 10
...rated for the specified voltage. If this is unavoidable, use the scanner with a power supply that the extension cord is installed. Power ● Connect only to rapid changes in direct sunlight. Also, when using an extension cord, make sure that is often stepped ...scanning quality. This may become damaged if it . Chapter 1 Before You Start Using the Scanner 1. Installation Location The performance of this scanner is connected. Important Safety Instructions To ensure the safe operation of this scanner, be present. speakers, televisions, or radios). 24.84" (631 mm) or...
...rated for the specified voltage. If this is unavoidable, use the scanner with a power supply that the extension cord is installed. Power ● Connect only to rapid changes in direct sunlight. Also, when using an extension cord, make sure that is often stepped ...scanning quality. This may become damaged if it . Chapter 1 Before You Start Using the Scanner 1. Installation Location The performance of this scanner is connected. Important Safety Instructions To ensure the safe operation of this scanner, be present. speakers, televisions, or radios). 24.84" (631 mm) or...

User Manual
Page 11
...plugs and connectors may result in a fire or electric shock. ■ Never use alcohol, benzene, paint thinner, aerosol sprays, or any questions regarding the power supply, contact your local authorized Canon dealer or service representative for further information. Do not place heavy objects on the ... plug is coiled. ● Do not pull directly on each side. Moving the Scanner ● The scanner weights about 50 lbs (22.5 kg). Handling WARNING Note the following precautions whenever using the scanner. When connecting the power cord, make sure that the power cord can be disconnected...
...plugs and connectors may result in a fire or electric shock. ■ Never use alcohol, benzene, paint thinner, aerosol sprays, or any questions regarding the power supply, contact your local authorized Canon dealer or service representative for further information. Do not place heavy objects on the ... plug is coiled. ● Do not pull directly on each side. Moving the Scanner ● The scanner weights about 50 lbs (22.5 kg). Handling WARNING Note the following precautions whenever using the scanner. When connecting the power cord, make sure that the power cord can be disconnected...

User Manual
Page 12
... it in a fire or electric shock. ■ Leave sufficient space around the power plug, you use the scanner, immediately turn the power switch OFF, and disconnect the power plug from the power outlet. Then, contact your local authorized Canon dealer or service representative to have the unit serviced. ■ Do not locate the...
... it in a fire or electric shock. ■ Leave sufficient space around the power plug, you use the scanner, immediately turn the power switch OFF, and disconnect the power plug from the power outlet. Then, contact your local authorized Canon dealer or service representative to have the unit serviced. ■ Do not locate the...

User Manual
Page 13
... hair. Be extra careful of paper. Chapter 1 Before You Start Using the Scanner 1-5 This may get caught in the scanner while you the scanner. Disposal ● When disposing of this scanner, make sure to stop the scanner. ■ Be careful when placing paper in the scanner and when removing jammed paper. ■ Do not wear loose clothing...
... hair. Be extra careful of paper. Chapter 1 Before You Start Using the Scanner 1-5 This may get caught in the scanner while you the scanner. Disposal ● When disposing of this scanner, make sure to stop the scanner. ■ Be careful when placing paper in the scanner and when removing jammed paper. ■ Do not wear loose clothing...

User Manual
Page 14
...Freely Adjustable Document Guides The left and right document guides can be adjusted so that documents can scan using only control panel key operations. (See "About the Job Function" on p. 4-10.) 1-6 Chapter 1 Before You Start Using the Scanner 2. Scanner Features ● Variety of Scanning Modes The scanner is ...scanner as a stand-alone device, this mode counts the number of loaded document sheets. (See "Count-Only Mode" on p. 4-4.) ● Adjustable Document Feed Tray The position of the document feed tray can be adjusted up or down according to the number of the DR-6050C/7550C/9050C...
...Freely Adjustable Document Guides The left and right document guides can be adjusted so that documents can scan using only control panel key operations. (See "About the Job Function" on p. 4-10.) 1-6 Chapter 1 Before You Start Using the Scanner 2. Scanner Features ● Variety of Scanning Modes The scanner is ...scanner as a stand-alone device, this mode counts the number of loaded document sheets. (See "Count-Only Mode" on p. 4-4.) ● Adjustable Document Feed Tray The position of the document feed tray can be adjusted up or down according to the number of the DR-6050C/7550C/9050C...

User Manual
Page 15
... detection in areas such as those containing adhesive labels. ● Double-Feed Detection by Document Length The scanner stops feeding when a double feed is detected by comparing document lengths. (See "Double-Feed Detection" on p. 4-5.) * Using the length of the first document page as necessary for normalization. Feeding Direction The text orientation is detected and the...
... detection in areas such as those containing adhesive labels. ● Double-Feed Detection by Document Length The scanner stops feeding when a double feed is detected by comparing document lengths. (See "Double-Feed Detection" on p. 4-5.) * Using the length of the first document page as necessary for normalization. Feeding Direction The text orientation is detected and the...

User Manual
Page 16
... to be folded and scanned on both sides of a document and skips saving the image of Output Image 1-8 Skewed Image Deskewed Image ● Dropout and Color Enhancement The scanner is only available when using CapturePerfect 3.0 (supplied with Red Drop-Out set (red ...side it recognizes from a single scan pass. Document to A1-size (23.4" × 33.1" (594 × 841 mm)) documents when used together with the Long Document Mode. ● MultiStream The scanner supports MultiStream, which, depending on the original document. However, this function is equipped with different ...
... to be folded and scanned on both sides of a document and skips saving the image of Output Image 1-8 Skewed Image Deskewed Image ● Dropout and Color Enhancement The scanner is only available when using CapturePerfect 3.0 (supplied with Red Drop-Out set (red ...side it recognizes from a single scan pass. Document to A1-size (23.4" × 33.1" (594 × 841 mm)) documents when used together with the Long Document Mode. ● MultiStream The scanner supports MultiStream, which, depending on the original document. However, this function is equipped with different ...

User Manual
Page 17
...Double Feed Error" on p. 3-20.) Chapter 1 Before You Start Using the Scanner 1-9 Options ● Imprinter (Option) As an option, printing can be made on scanned documents. ● Barcode Detection (Option) Barcodes on documents can be detected by installing the optional barcode module. ● Patchcode ...Support (Option) By installing the optional patchcode decoder, patch code sheets inserted between document pages can be detected for batch separation. (See "Using Patchcode Sheets (Option)" on p. 3-23.) * The Rapid Recovery System is activated and a sensor ...
...Double Feed Error" on p. 3-20.) Chapter 1 Before You Start Using the Scanner 1-9 Options ● Imprinter (Option) As an option, printing can be made on scanned documents. ● Barcode Detection (Option) Barcodes on documents can be detected by installing the optional barcode module. ● Patchcode ...Support (Option) By installing the optional patchcode decoder, patch code sheets inserted between document pages can be detected for batch separation. (See "Using Patchcode Sheets (Option)" on p. 3-23.) * The Rapid Recovery System is activated and a sensor ...

User Manual
Page 18
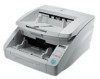
...Using the Scanner 3. Front View, Feeder Inlet, and Eject Outlet a Upper Unit Open when cleaning the rollers or paper jams. (See p. 3-23.) b Imprinter Cover Open when replacing the ink cartridge in the optional imprinter or when cleaning the imprinter. (See p. 5-13.) c Document Eject Tray Scanned documents... e Power Switch Turns the scanner ON and OFF. (See p. 3-2.) f Document Eject Tray Extension Open the Document Eject Tray Extension when documents look like they are shown below. Names and Functions of Parts The names and functions of the DR-6050C/7550C/9050C parts are going to fall ...
...Using the Scanner 3. Front View, Feeder Inlet, and Eject Outlet a Upper Unit Open when cleaning the rollers or paper jams. (See p. 3-23.) b Imprinter Cover Open when replacing the ink cartridge in the optional imprinter or when cleaning the imprinter. (See p. 5-13.) c Document Eject Tray Scanned documents... e Power Switch Turns the scanner ON and OFF. (See p. 3-2.) f Document Eject Tray Extension Open the Document Eject Tray Extension when documents look like they are shown below. Names and Functions of Parts The names and functions of the DR-6050C/7550C/9050C parts are going to fall ...

User Manual
Page 19
Doing so could cause the scanner to overheat, creating a fire hazard. 1-11 Rear View Chapter 1 Before You Start Using the Scanner a Ventilation Holes (Exhaust Fan) Exhausts heat from inside the scanner. b Power Connector Connect the supplied power cord here. (See p. 2-7.) c USB Connector (Type B) Connect the supplied USB cable here. (See p. 2-6.) d SCSI Connector (50-pin half-pitch D-sub receptacle) Connect the SCSI cable here. (See p. 2-7.) e DIP Switches (SCSI ID) Selects the scanner's SCSI ID. (See p. 2-8.) CAUTION Do not block the ventilation holes.
Doing so could cause the scanner to overheat, creating a fire hazard. 1-11 Rear View Chapter 1 Before You Start Using the Scanner a Ventilation Holes (Exhaust Fan) Exhausts heat from inside the scanner. b Power Connector Connect the supplied power cord here. (See p. 2-7.) c USB Connector (Type B) Connect the supplied USB cable here. (See p. 2-6.) d SCSI Connector (50-pin half-pitch D-sub receptacle) Connect the SCSI cable here. (See p. 2-7.) e DIP Switches (SCSI ID) Selects the scanner's SCSI ID. (See p. 2-8.) CAUTION Do not block the ventilation holes.

User Manual
Page 20
c Enter Key Selects the user mode, and accepts settings. Control Panel Chapter 1 Before You Start Using the Scanner a Display Panel Displays the user mode, job info, messages, and counter. d Keys Selects the user mode and job. e Menu Key Displays ...the user mode. (See p. 4-8.) f Job Key Selects jobs. (See p. 3-14.) g Count Only Key Feeds and counts the number of document pages. (See p. 4-4.) h Separation Off Key Raises the Document...
c Enter Key Selects the user mode, and accepts settings. Control Panel Chapter 1 Before You Start Using the Scanner a Display Panel Displays the user mode, job info, messages, and counter. d Keys Selects the user mode and job. e Menu Key Displays ...the user mode. (See p. 4-8.) f Job Key Selects jobs. (See p. 3-14.) g Count Only Key Feeds and counts the number of document pages. (See p. 4-4.) h Separation Off Key Raises the Document...

User Manual
Page 22
... requirements. (See p. 2-3) Step 2: Install the Software. (See p. 2-4) Step 3: Connect the scanner to the computer. (See p. 2-6) Step 4: Turn the power ON (Scanner recognition). (See p. 2-9) IMPORTANT • Make sure that you install the software before installing the ...scanner ON. In this case, click [Cancel] to the computer before connecting the scanner to the computer. • If you turn the scanner OFF. • Windows 2000 • Windows XP • Windows Vista Chapter 2 Setup 2-2 Setup Procedures Perform the following setup procedures to prepare the scanner for use...
... requirements. (See p. 2-3) Step 2: Install the Software. (See p. 2-4) Step 3: Connect the scanner to the computer. (See p. 2-6) Step 4: Turn the power ON (Scanner recognition). (See p. 2-9) IMPORTANT • Make sure that you install the software before installing the ...scanner ON. In this case, click [Cancel] to the computer before connecting the scanner to the computer. • If you turn the scanner OFF. • Windows 2000 • Windows XP • Windows Vista Chapter 2 Setup 2-2 Setup Procedures Perform the following setup procedures to prepare the scanner for use...


