

User Manual
Page 9
... subject. If necessary, the built-in flash will be raised. 8 Take the picture (p.44). Press the shutter button completely to take the picture. 9 Review the picture. The captured image will be displayed for approx. 2 sec.
... subject. If necessary, the built-in flash will be raised. 8 Take the picture (p.44). Press the shutter button completely to take the picture. 9 Review the picture. The captured image will be displayed for approx. 2 sec.
User Manual
Page 12
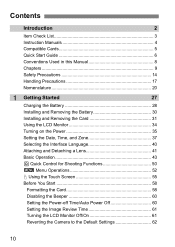
... 55 Before You Start 58 Formatting the Card 58 Disabling the Beeper 60 Setting the Power-off Time/Auto Power Off 60 Setting the Image Review Time 61 Turning the LCD Monitor Off/On 61 Reverting the Camera to the Default Settings 62 10
... 55 Before You Start 58 Formatting the Card 58 Disabling the Beeper 60 Setting the Power-off Time/Auto Power Off 60 Setting the Image Review Time 61 Turning the LCD Monitor Off/On 61 Reverting the Camera to the Default Settings 62 10
User Manual
Page 63
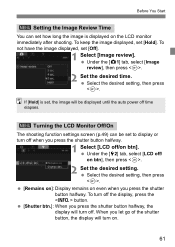
... on . 61 When you press the shutter button halfway. To turn on the LCD monitor immediately after shooting. Before You Start 3 Setting the Image Review Time You can set how long the image is set, the image will be displayed until the auto power off time elapses. 3 Turning the LCD.... [Shutter btn.]: When you press the shutter button halfway, the display will turn off . To keep the image displayed, set [Off]. 1 Select [Image review]. Under the [z1] tab, select [Image review], then press . 2 Set the desired time. Select the desired setting, then press .
... on . 61 When you press the shutter button halfway. To turn on the LCD monitor immediately after shooting. Before You Start 3 Setting the Image Review Time You can set how long the image is set, the image will be displayed until the auto power off time elapses. 3 Turning the LCD.... [Shutter btn.]: When you press the shutter button halfway, the display will turn off . To keep the image displayed, set [Off]. 1 Select [Image review]. Under the [z1] tab, select [Image review], then press . 2 Set the desired time. Select the desired setting, then press .
User Manual
Page 65
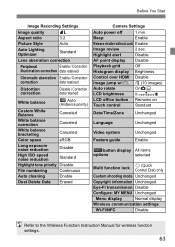
Beep Enable Release shutter without card Enable Image review 2 sec. Highlight alert Disable AF point display Disable Playback grid Off Histogram display Brightness Control over HDMI Disable Image jump w/6 e (10 images) Auto rotate OnzD ...
Beep Enable Release shutter without card Enable Image review 2 sec. Highlight alert Disable AF point display Disable Playback grid Off Histogram display Brightness Control over HDMI Disable Image jump w/6 e (10 images) Auto rotate OnzD ...

User Manual
Page 225
... View You can magnify a captured image by approx. 1.5x to 10x on the LCD monitor. 1 Magnify the image. Press the button during the image review immediately after the image is taken. A movie cannot be reduced to the single-image display. Magnified area position 2 Scroll around the image. Use...
... View You can magnify a captured image by approx. 1.5x to 10x on the LCD monitor. 1 Magnify the image. Press the button during the image review immediately after the image is taken. A movie cannot be reduced to the single-image display. Magnified area position 2 Scroll around the image. Use...
User Manual
Page 244
...) movies......... 208 High ISO speed noise reduction ... 143 Highlight tone priority 147 High-speed continuous shooting ... 128 Hot shoe 20 I Illumination (LCD panel 49 Image review time 61 Image-recording quality........ 132, 207 Images Erasing 229 Index display 222 Magnification 223 Playback 215...
...) movies......... 208 High ISO speed noise reduction ... 143 Highlight tone priority 147 High-speed continuous shooting ... 128 Hot shoe 20 I Illumination (LCD panel 49 Image review time 61 Image-recording quality........ 132, 207 Images Erasing 229 Index display 222 Magnification 223 Playback 215...
User Manual
Page 280
Reconnecting 4 Operate the target device. Activate the smartphone's Wi-Fi function, then start Camera Connect. If the smartphone's connection destination has been changed, restore the setting to connect to the camera or the same access point as the camera. If you do not know the SSID of the destination when reconnecting, select [Review/change settings] 9 [Confirm set.] in the screen for step 3 to check it. With NFC connection or when connecting by selecting [Easy connection], "_Canon0A" is displayed at the end of the SSID. W-32
Reconnecting 4 Operate the target device. Activate the smartphone's Wi-Fi function, then start Camera Connect. If the smartphone's connection destination has been changed, restore the setting to connect to the camera or the same access point as the camera. If you do not know the SSID of the destination when reconnecting, select [Review/change settings] 9 [Confirm set.] in the screen for step 3 to check it. With NFC connection or when connecting by selecting [Easy connection], "_Canon0A" is displayed at the end of the SSID. W-32
